

All Activity
- Past hour
-
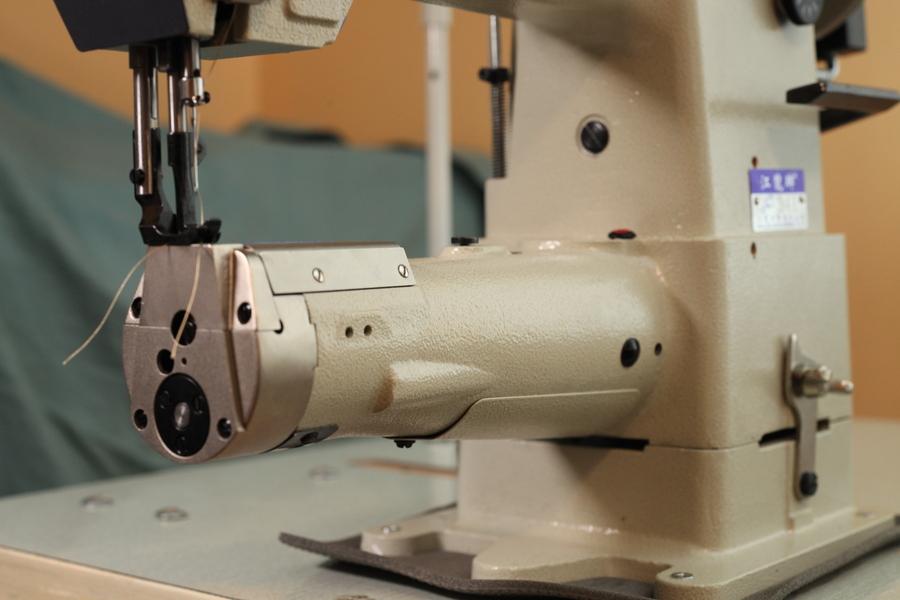
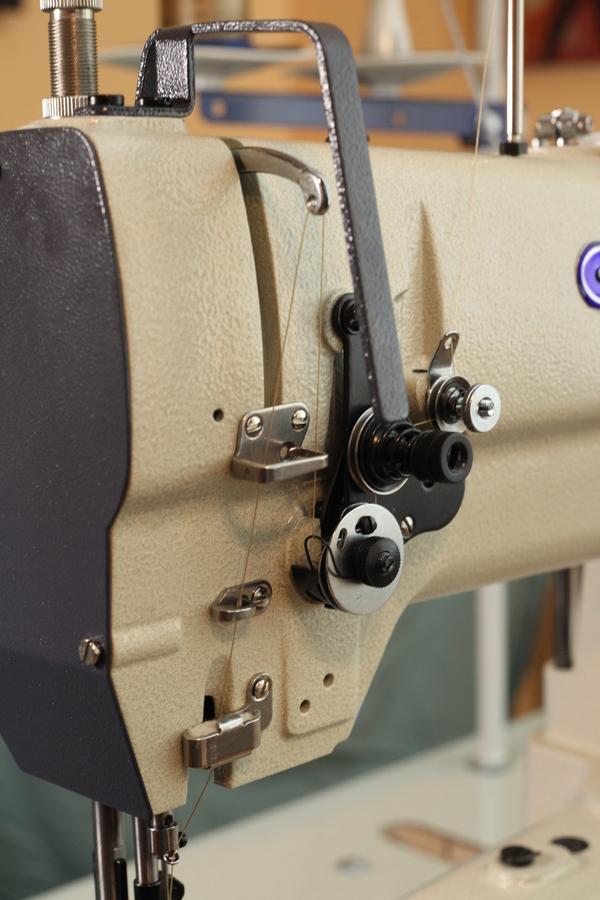
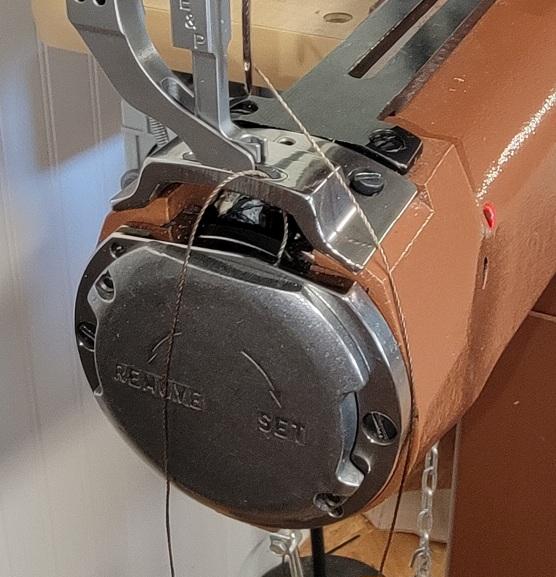
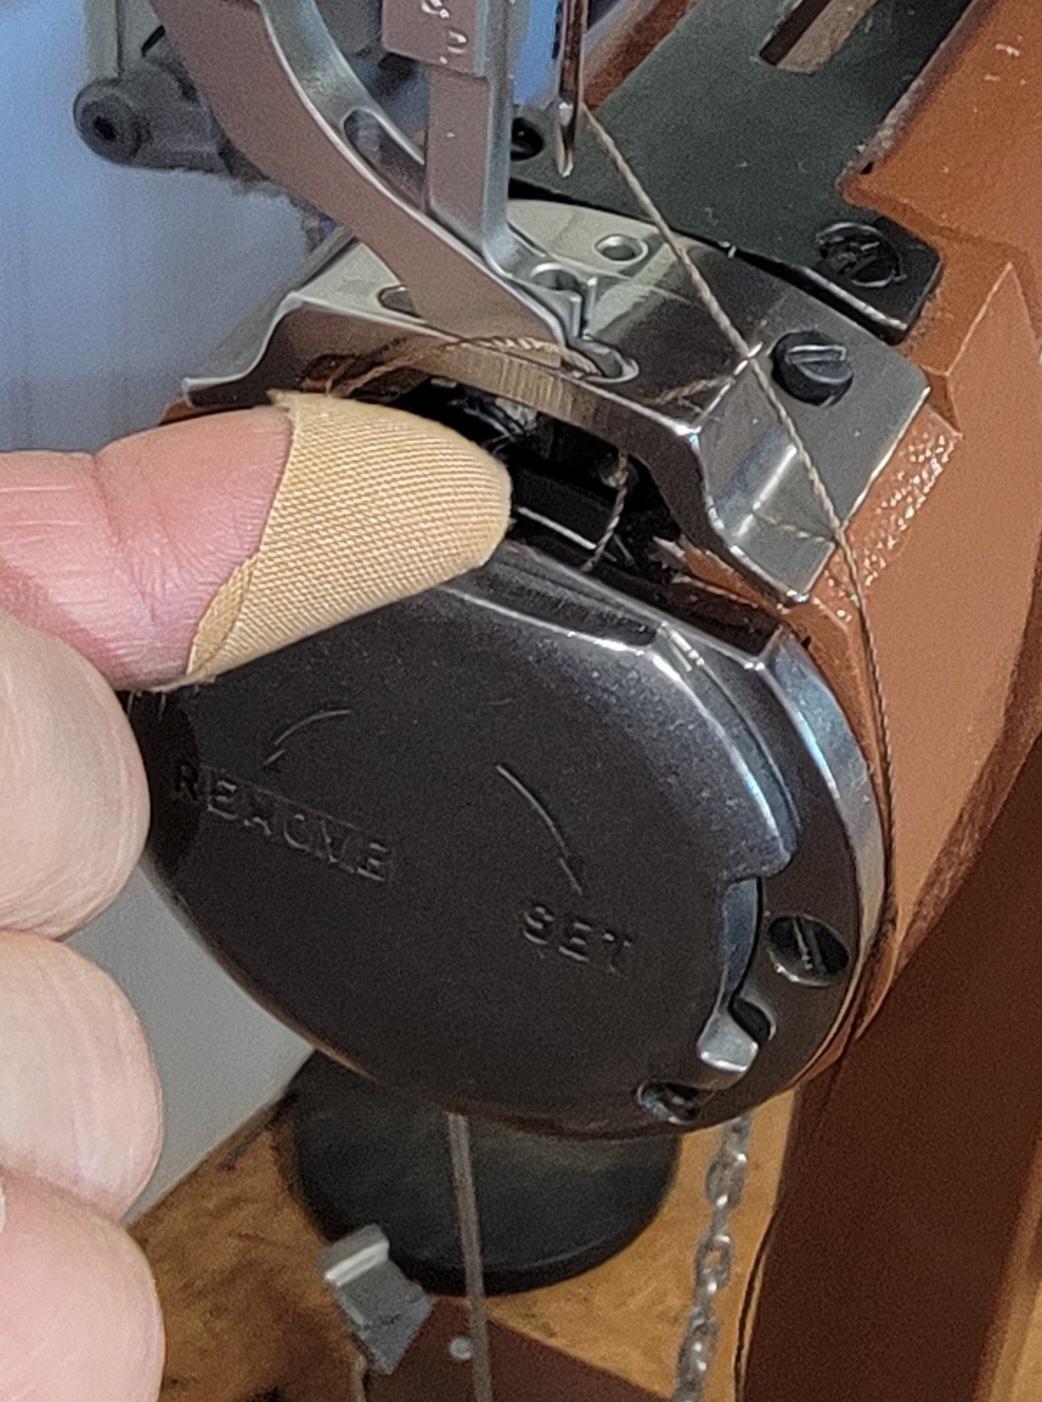
Hello everyone, I am cleaning an Adler 5-27 and I was wondering if it is possible to remove the jump foot? I have removed all the screws, but I can't get it to move a mm. 😅 My guess is that the pin that is visible in the second picture is stuck through the rod. As I don't own the manual I was hoping somebody here is able to help me! Kind regards, IMK


-
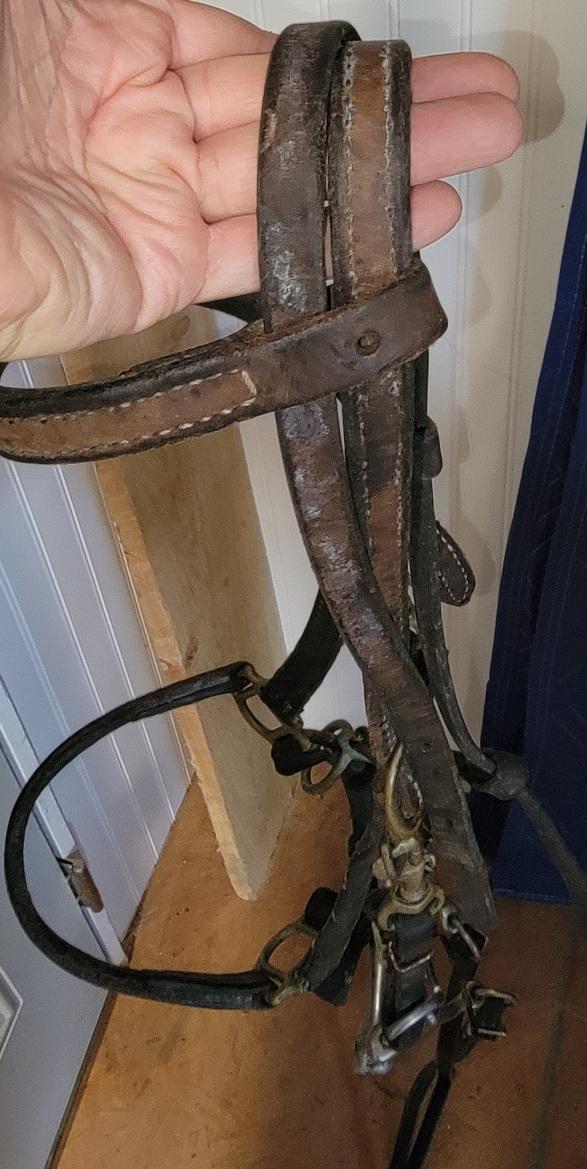
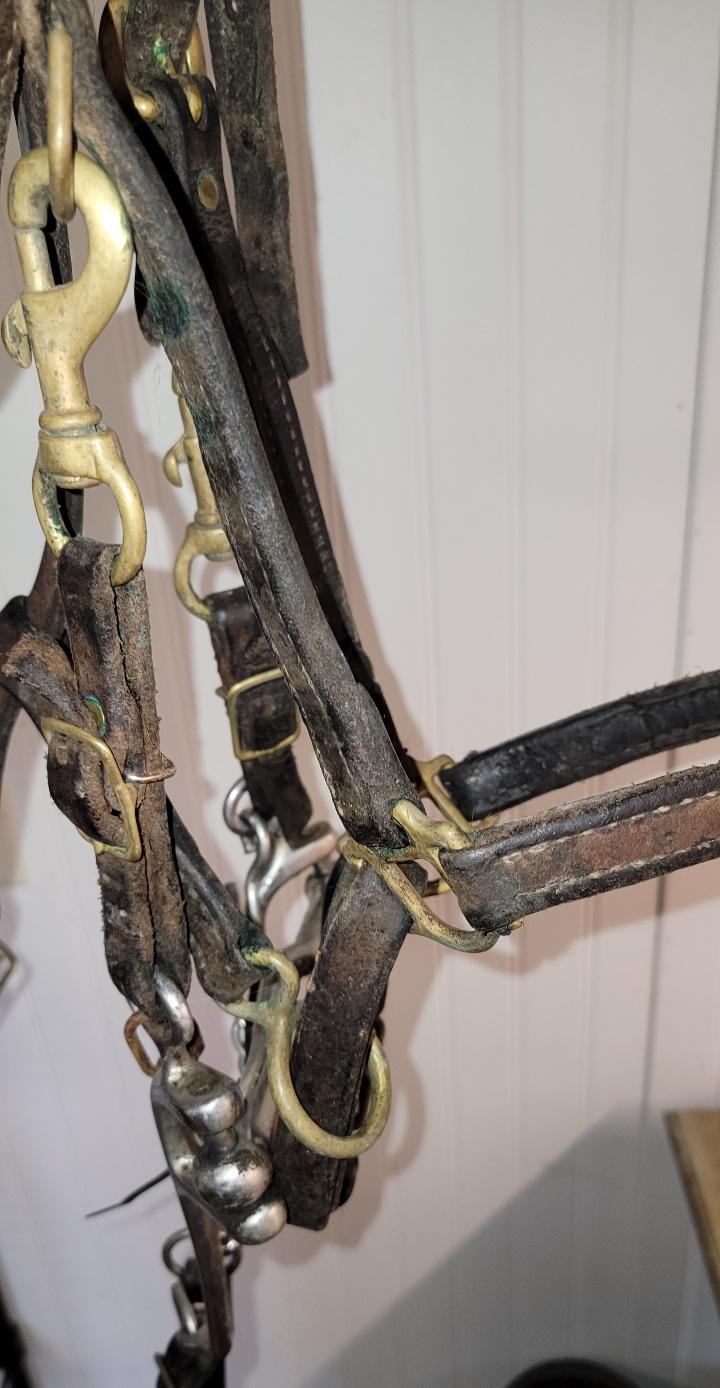
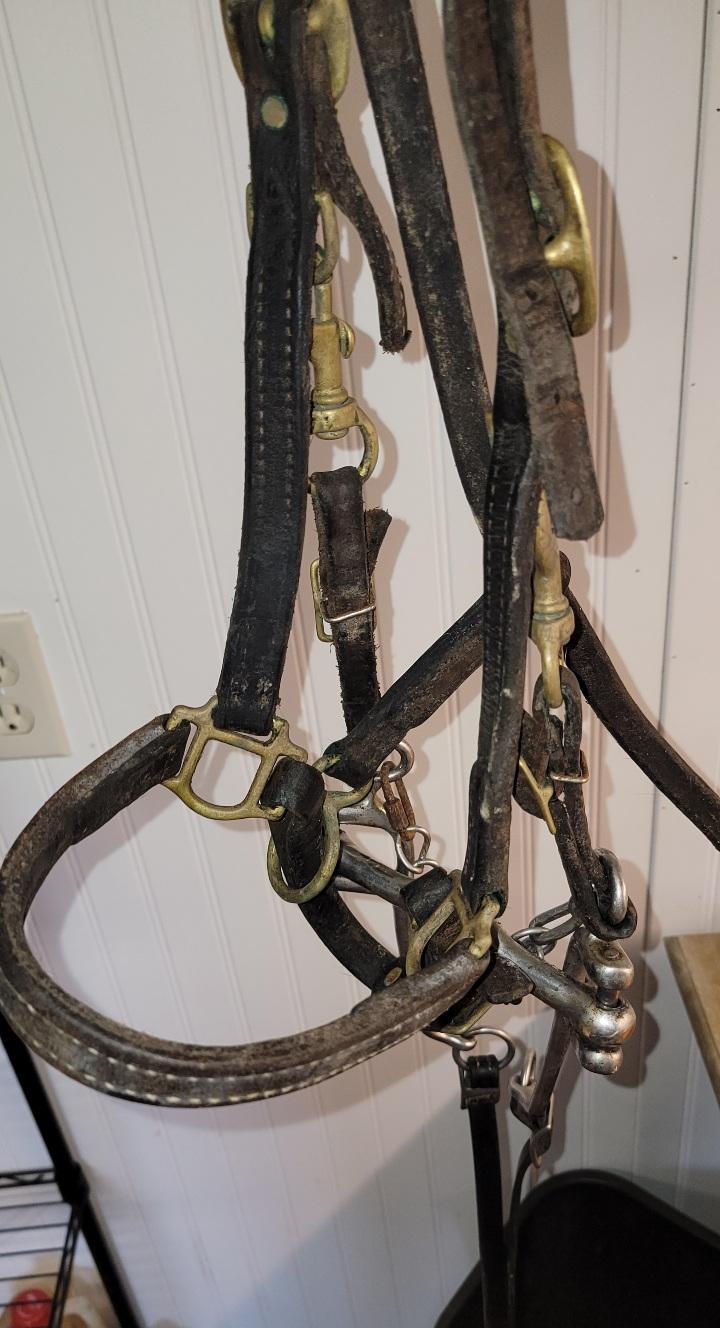
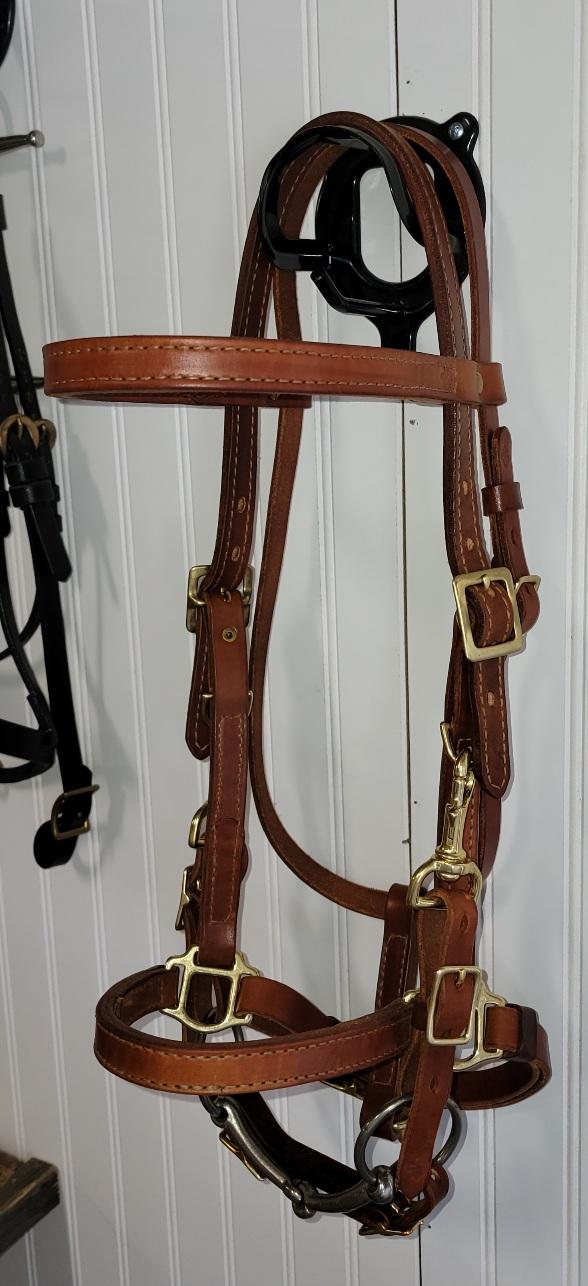
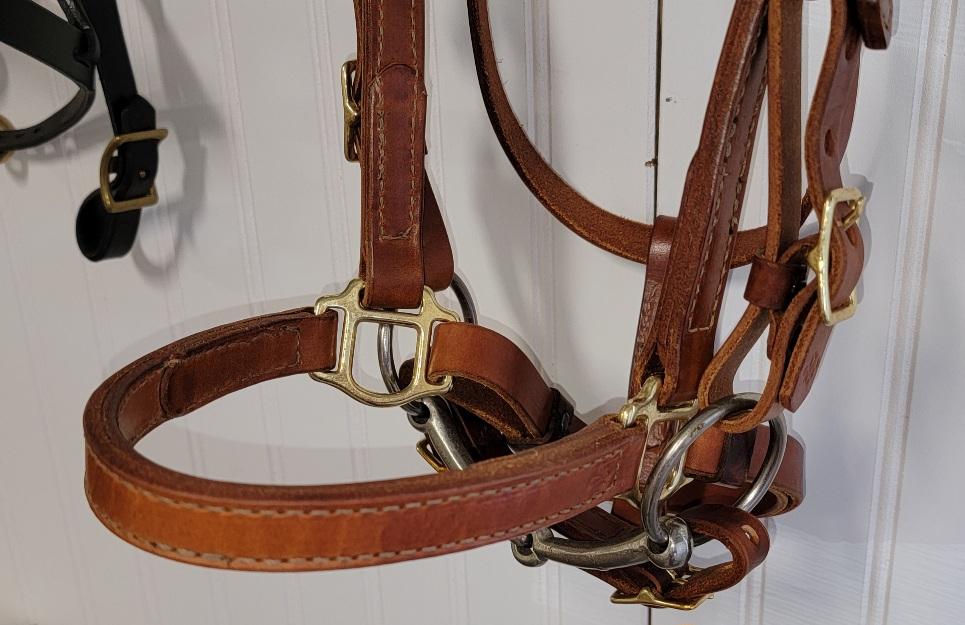
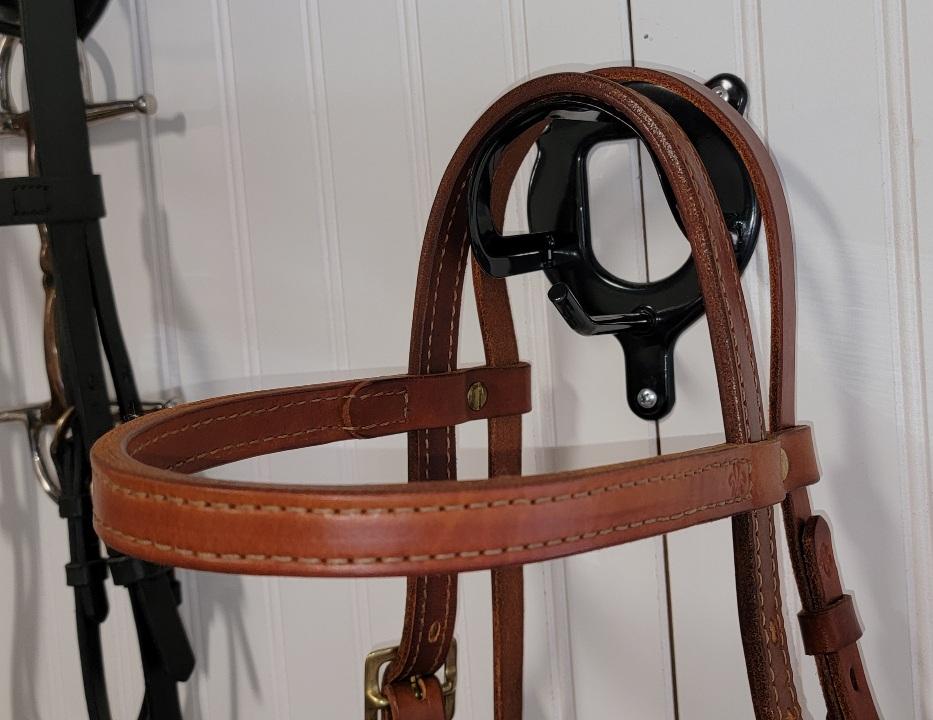
A friend of mine had an old saddle and halter/bridle she wanted cleaned. The saddle hadn't been cleaned and had quite a bit of mud, grime, and dust. I cleaned it up and replaced a couple pieces. The halter/bridle didn't have mud on it but it was grimy, swollen, and is starting to disintegrate. It felt like it had been drowned in wax and weighs a lot. I has a curb chain but it had a rusty quick link holding it on. She wanted it cleaned but I advised her that it was on it's way out and it should be completely replaced. The new halter/bridle is made with 10oz vegtan. The crown, brow band, nose band, and cheek pieces are double layered.
-
Is that the Hennigan holster plate with a feed dog? How is that working for you, compared to the Cobra holster plate?
-
I used a piece of hard plastic and some electrical tape for the time being. I was working on a bridle, had my finger curled under and didn't realize my finger fit in there.
-
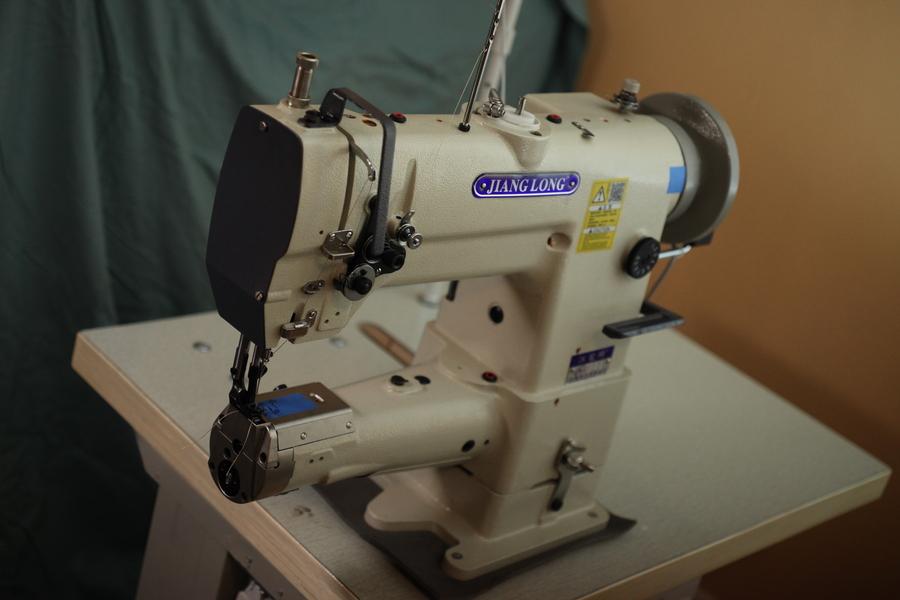
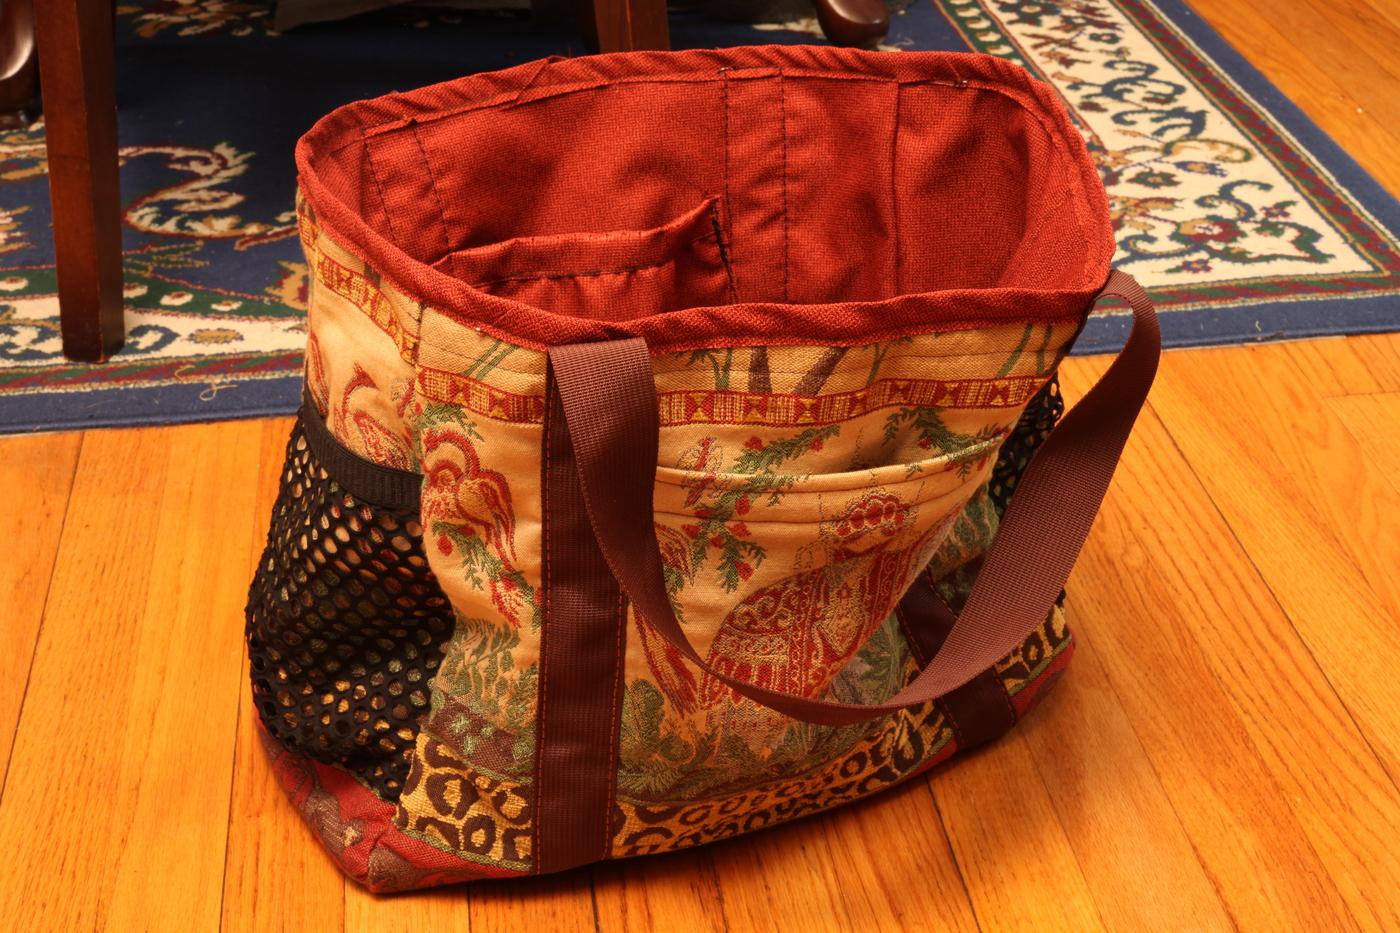
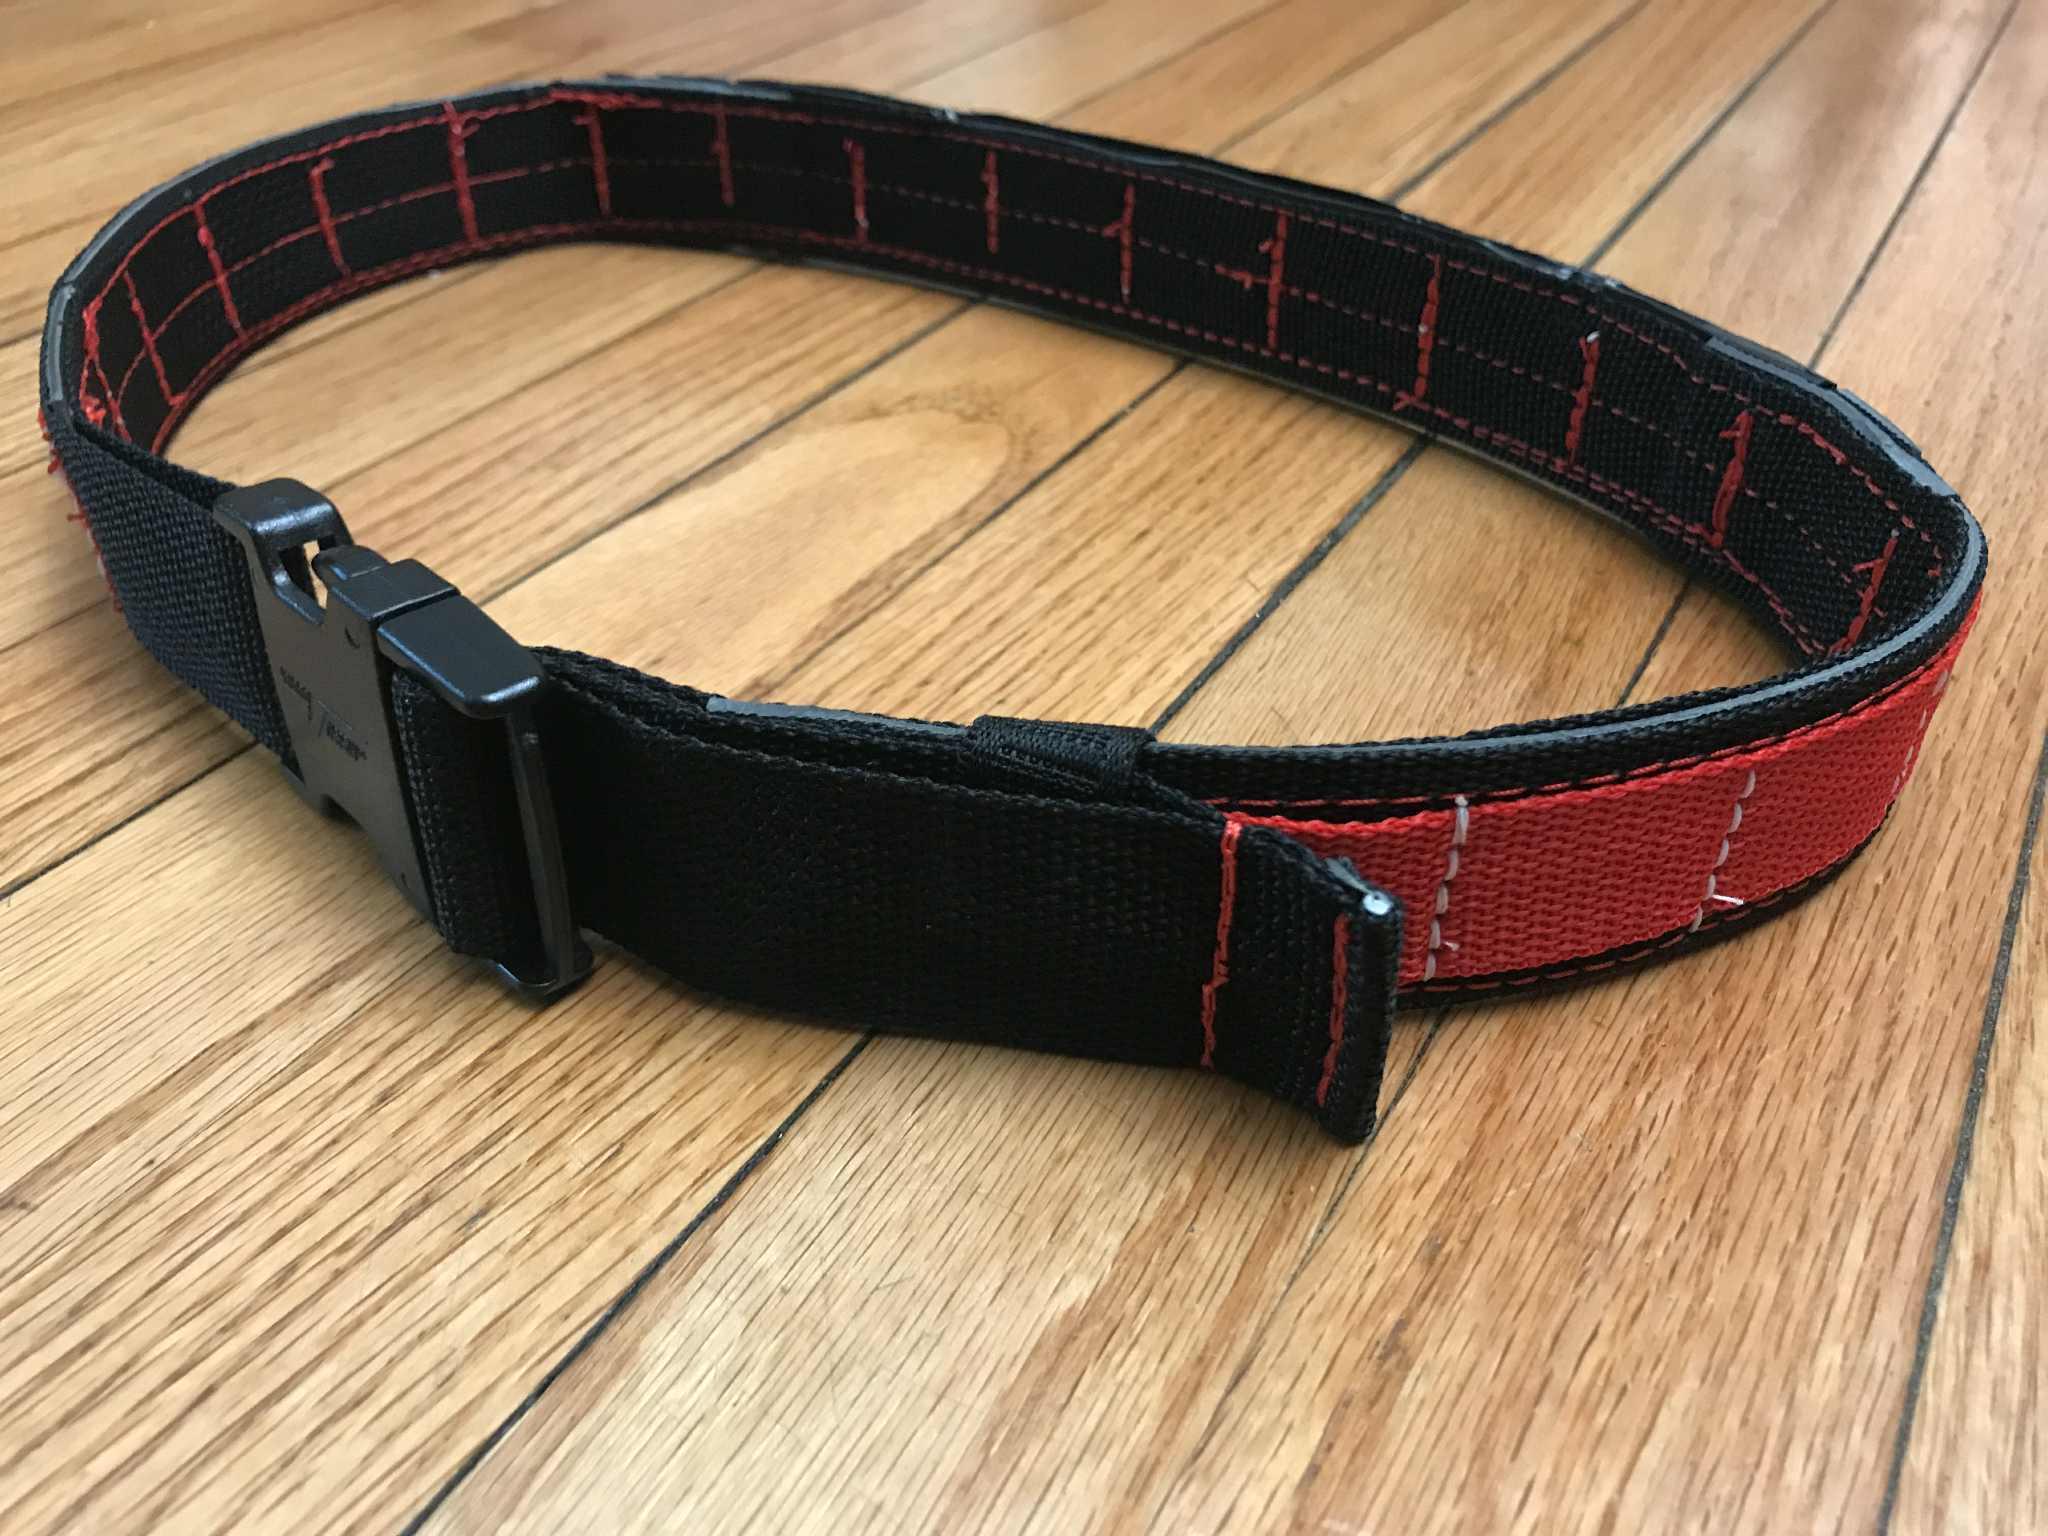
Review of Jianglong 341 purchased March 2025 I am quite happy with my Jianglong 341. It only took two months to get it, cost me a total of $1115 with a table, knee lift, foot lift, flatbed table attachment, servo motor, needle positioner, and a couple of binding attachments. It’s been quite versatile. I’ve been able to stitch a stack of vinyl 12mm high using TEX 270 thread. I’ve also been able to repair my watchband with TEX 70 thread. Not that I expect it to be exactly as good as an original Juki 341, but in areas where it is a little less polished, I have been able to adapt. First Impressions On arrival it sewed well. It stitched slightly longer stitches in reverse than in forward. I would say it was not perfectly in adjustment, but I had no complaints about it at the time. Here is my “first impressions” forum post: https://leatherworker.net/forum/topic/125619-jianglong-341-first-impressions/ Representative Work Here are some photos representative of things that I stitch. On the left is a tote with liner and heavy interfacing in the base. In the middle is a backpack compartment that uses plastic corrugated signboard for two of its interior walls. On the right is a heavy belt made of webbing on the outside and a plastic core for stiffness. Thread Size Supposedly this machine is rated up to TEX 207. I’ve used TEX 30 on up to UNbonded TEX 270. Mind you, I’m mostly sewing textiles so I can’t vouch for its abilities with large thread going through thick stacks of leather. Major Quibbles after Four Months of Use Here are the main things that I hope Jianglong will correct in the future. 1. No Hook Safety Mechanism The juki 341 manual shows a hook safety mechanism, but the Jianglong 341 has none. (You can run low belt tension to help keep you from damaging) 2. Advertised Stitch Length The factory advertises 9.5mm stitch length. This is only achievable if you optimize for forward stitch length, leaving your reverse stitches about 3mm long. If you balance the stitch length, you can get 8mm forward and reverse. 3. Banana Slide The arm that connects to the banana slide is too long in my opinion. What this means is that when you adjust the height of the walking feet, you must also adjust the timing of the walking feet. (Ideally this would only require a single adjustment, not two) Forum post: https://leatherworker.net/forum/topic/125832-juki-341-lift-height-adjustment/ 4. Reverse Spring The reverse spring is so stiff that it was hurting my arm to use it. Ultimately, I disconnected the spring where it hooks under the frame and used a number 64 rubber band to hold the lever in the “up” position. 5. Cylinder Bed End caps The upper end cap on the cylinder bed is not solidly located. That is, there is a range of fore-aft positions you can position it at before tightening the screws. This presents a challenge, because if you inadvertently tighten it down in a different position than last time, then your bobbin latch opener will open a different amount than before. Somewhat related forum post: https://leatherworker.net/forum/topic/126148-hook-off-the-shoulder/ 6. Hook Shoulder When stitching medium or long stitches in reverse, the thread does not ride in the hook shoulder. I suspect this machine would do better with a larger diameter hook, which would give less side-to-side deviation between the needle and the hook when the needle moves front to back. Forum post: https://leatherworker.net/forum/topic/126148-hook-off-the-shoulder/ Minor Quibbles Here are some minor annoyances 7. bobbin winder if you move the handwheel in reverse, the bobbin winder goes in reverse. (May be a problem if you need to raise the needle to remove material) The height of the exit on the bobbin winder tensioner is incorrect. to get a bobbin to wind evenly, I bent a piece of wire to hold the thread higher for an even wind. 8. Hook timing cover plate The hook timing cover plate has a hole in it so that you can supposedly loosen/tighten the set screws in the hook gear without removing the cover plate. But the hole is in the wrong position, so you have to remove the cover plate anyway. 9. Check Spring limited adjustment The check spring has limited adjustment (won’t let it has as much slack as it possibly could). This is because the check spring does not match the casting well. To fix, one could bend the check spring to match, OR one could grind on the casting to make a path for the check spring. I bent the spring to match the contour of the body,, and now I have full range of motion. Basically when you slide the limmiter out of the way to let the check spring drop down farther, the casting is in the way and it’s as though you didn’t slide it at all. 10. Stitch Length Dial On the stitch length dial, the number at the top of the dial is not what it’s actually set at. If you were to draw a line to indicate what length you are at, the line would be at more like the 11:15 position. 11. Oil hole in End Cap The oil hole in the center of the lower cylinder bed end cap is in an awkward position. I’m not convinced that there is any reliable way of oiling through that hole and having the oil arrive to the feed dog cam. 12. Screw Holes for Edge Guide The screw holes for attaching the swing down edge guide are filled with paint. The screws that come with edge guide do fit fine after installing/reinstalling a couple times to squash the paint down. But at first I thought it might be the wrong screws. 13. Missing Screws for Foot Lift The foot lift bar (extension of the knee lift bar) attaches with two screws. Mine came without the screws. I ended up using some smaller screws and putting nuts on the back. 14. Needle Threading Path I like that some of the paths downstream of the tension discs have side entry. But the loop at the bottom of the needle bar has no side entry…you must thread that manually. 15. No slots in cover plates The cover plate on the back and left end have standard holes for the retaining screws. It would be more convenient if some of these hole had a slot running out to the side so you could rotate the cover plate without completely removing any of the screws. 15. Thread Post The post that the thread goes through before descending toward the tension disks, the one that has four holes in it at 90 degree angles. This post is quite long. It could be quite a bit shorter IMO. It gets in the way when tilting the machine head back. 16. Feed Dog Eccentric 16.1 There are no markings on the main shaft indicating optimal position of the feed dog eccentric. The first time I adjusted this eccentric, I actually adjusted it 180 degrees out, such that it stitched in reverse when the feed lever was in the forward position, and vice versa. 16.2 With the handwheel in the needle bottom dead center position, neither of the set screws for the feed dog eccentric are visible through the rear cover. It takes a little extra work to rotate the handwheel to needle bottom dead center, check the adjustment of the feed dog eccentric, then rotate the handwheel to a position where the set screws can be reached to adjust to a new position. 17. Squeak Sound At low speed (80-90 stitches per minute) it makes a sing-song sound when the inner toe moves upward or downward. The sound goes away at higher speeds. Notes on Ordering Accessories https://www.youtube.com/shorts/uaZYioWcaXI They sell several accessories to go with it, if you ask. Ask for a speed reducer Ask for a knee lift Ask for a foot lift Ask for any binding attachments that interest you Ask for a flat top table attachment Ask for a motor if you want theirs Ask for a needle position sensor if you want one Ask for a table if you want one. (Not sure how much this inflates the shipping cost) Verification Video https://leatherworker.net/forum/topic/112102-new-machine/page/2/#findComment-733498 After they get your machine ready, they will provide a video of it running. You can ask for additional videos that demonstrate the machine doing certain things. I didn’t know what to ask for then, but now I realize this is prime time to ask for verification that the machine is adjusted properly. (This will save you time dialing it in yourself) I would ask for these things: Ask to see your machine stitching synchronized holes (forward/reverse same length) Ask them to measure the distance between the holes (they may be less than their advertised “maximum stitch length”) Ask for a video showing the feed dog moving with no fabric to show that the min clearance at the front of the feed dog matches the min clearance at the rear of the feed dog Ask to see the hook to needle distance. Ask for it to touch the needle. Ask to see close-up photo of needle in throat plate. (should be exactly centered. Mine is not) (see this post where a jianglong 441 was out of alignment: https://leatherworker.net/forum/topic/109373-441-clone/ ) Ask to see close-up video of hook in slow motion (crank handwheel) in REVERSE at MAX stitch length (make sure it clears the notch gracefully) (make sure the thread rides in the hook shoulder, and not off the side of the shoulder) Ask to see stitching using your maximum intended thread size (or larger) Ask to see forward and reverse stitching that goes into the same holes at your chosen stitch length. If you want it without the jianglong logo, ask to not include. (My demo video had no jianglong logo in it, so I was hopeful it would come without one but no) Ask to see the screws that hold the foot lift extension bar (mine came without those) Note when they demo your machine, they will use their own table and motor but your head unit. Where to Order From Here is the link I ordered from: https://www.alibaba.com/product-detail/341-Single-Needle-Heavy-Duty-Bag_60453082240.html But it seems to take a lot of chatting to get all the extras you want.

- Today
-
Zowie. Maybe epoxy a small guard plate over it.
-
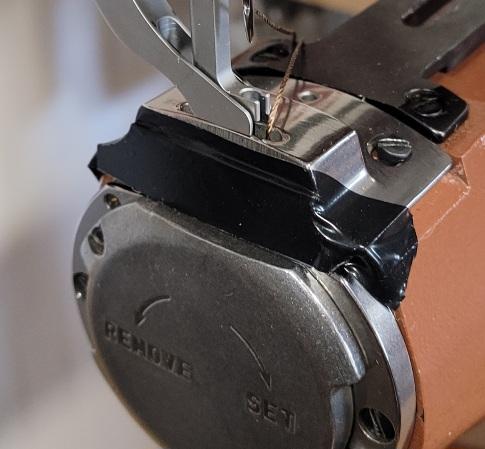
I learned something new yesterday. I don't use the holster plate very often but I've come to the realization there is enough room between the plate and the arm to easily fit a finger. Don't ask how I learned this. I'm thankful I was moving the wheel by hand at the time.
-

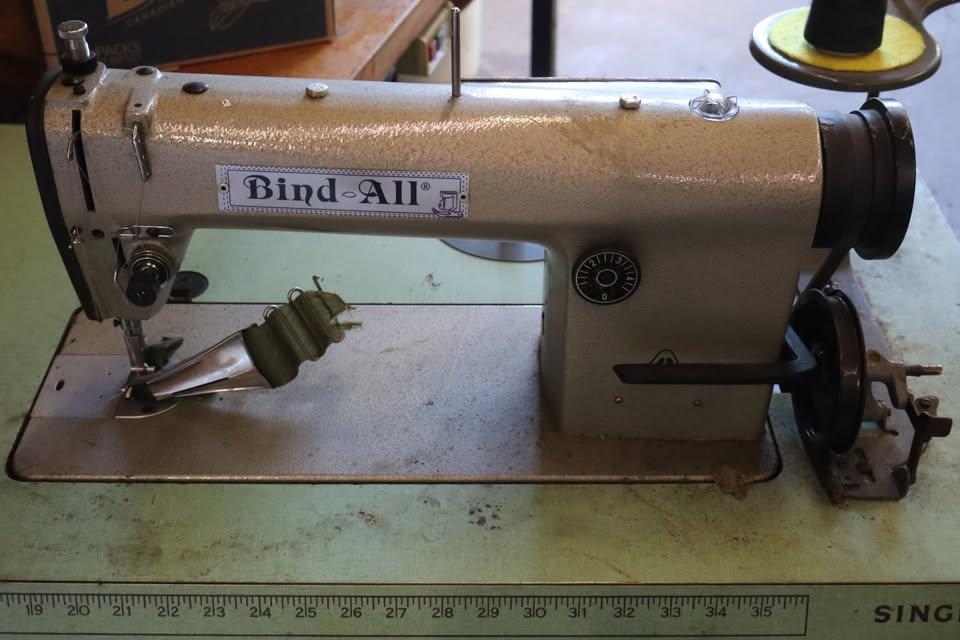
Anyone Heard of a "Bind-All" binding machine?
nejcek74 replied to hemiyota's topic in Leather Sewing Machines
To me there are a lot of visual similarities with Pfaff 461 (or 463, 467, or 483 etc) or something from that era and source. But they were all fast straight stitch sewing machines for light to medium fabric.
-
I found one for sale, at a good price, but can't find any info on them.
-
I usually just use leather worker. People know what it means and I really don't have to explain it to much. Now if I'm at a fair I may use leather crafter or leather artisan/craftsmen. To me crafter sounds like you may sell cheaper small goods like key fobs, lanyards, wallets. Artisan/craftsmen sounds like you sell more expensive things even though they are the same item.
-

Is Laser Engraving Hard to Learn?
chuck123wapati replied to Fonlandlaser's topic in 3D Printers and Lasers
With just a few hours of practice, a monkey can do it!! You will be so proud of yourself. Just think you can steal everyone else's hard work and artistic abilities off the internet and not even use one brain cell doing it or even attempting to further your own skillsets. -
I have used copper rivets for swivels. solder a cap/concho of your choice on and use a larger washer on the back side.
-

Stitchman Servo Motor (The Missing Manual)
Paulin631 replied to friquant's topic in Leather Sewing Machines
Thank you for the post. I just ordered my 341! I hope your happy with yours. -
1. leather crafter, someone who can make key fobs, basic wallets, sheathes, and such from premade kits or pattern packs,you will find them and their supplies at Hobby Lobby. They have a limited skillset and usually have no inclination to further their knowledge of the craft. 2. Leather craftsman, someone who can make their crafts from scratch using only the basic supplies, they can design, determine the correct leather and supplies needed for the project, and finish it without help or supervision and it will look professionally made when done. 3. Leather workers, the poor slobs who do this for a living lol, Tanners, production workers in shoe factories, piece workers etc. Working with leather because it's the job you found at the time.
-
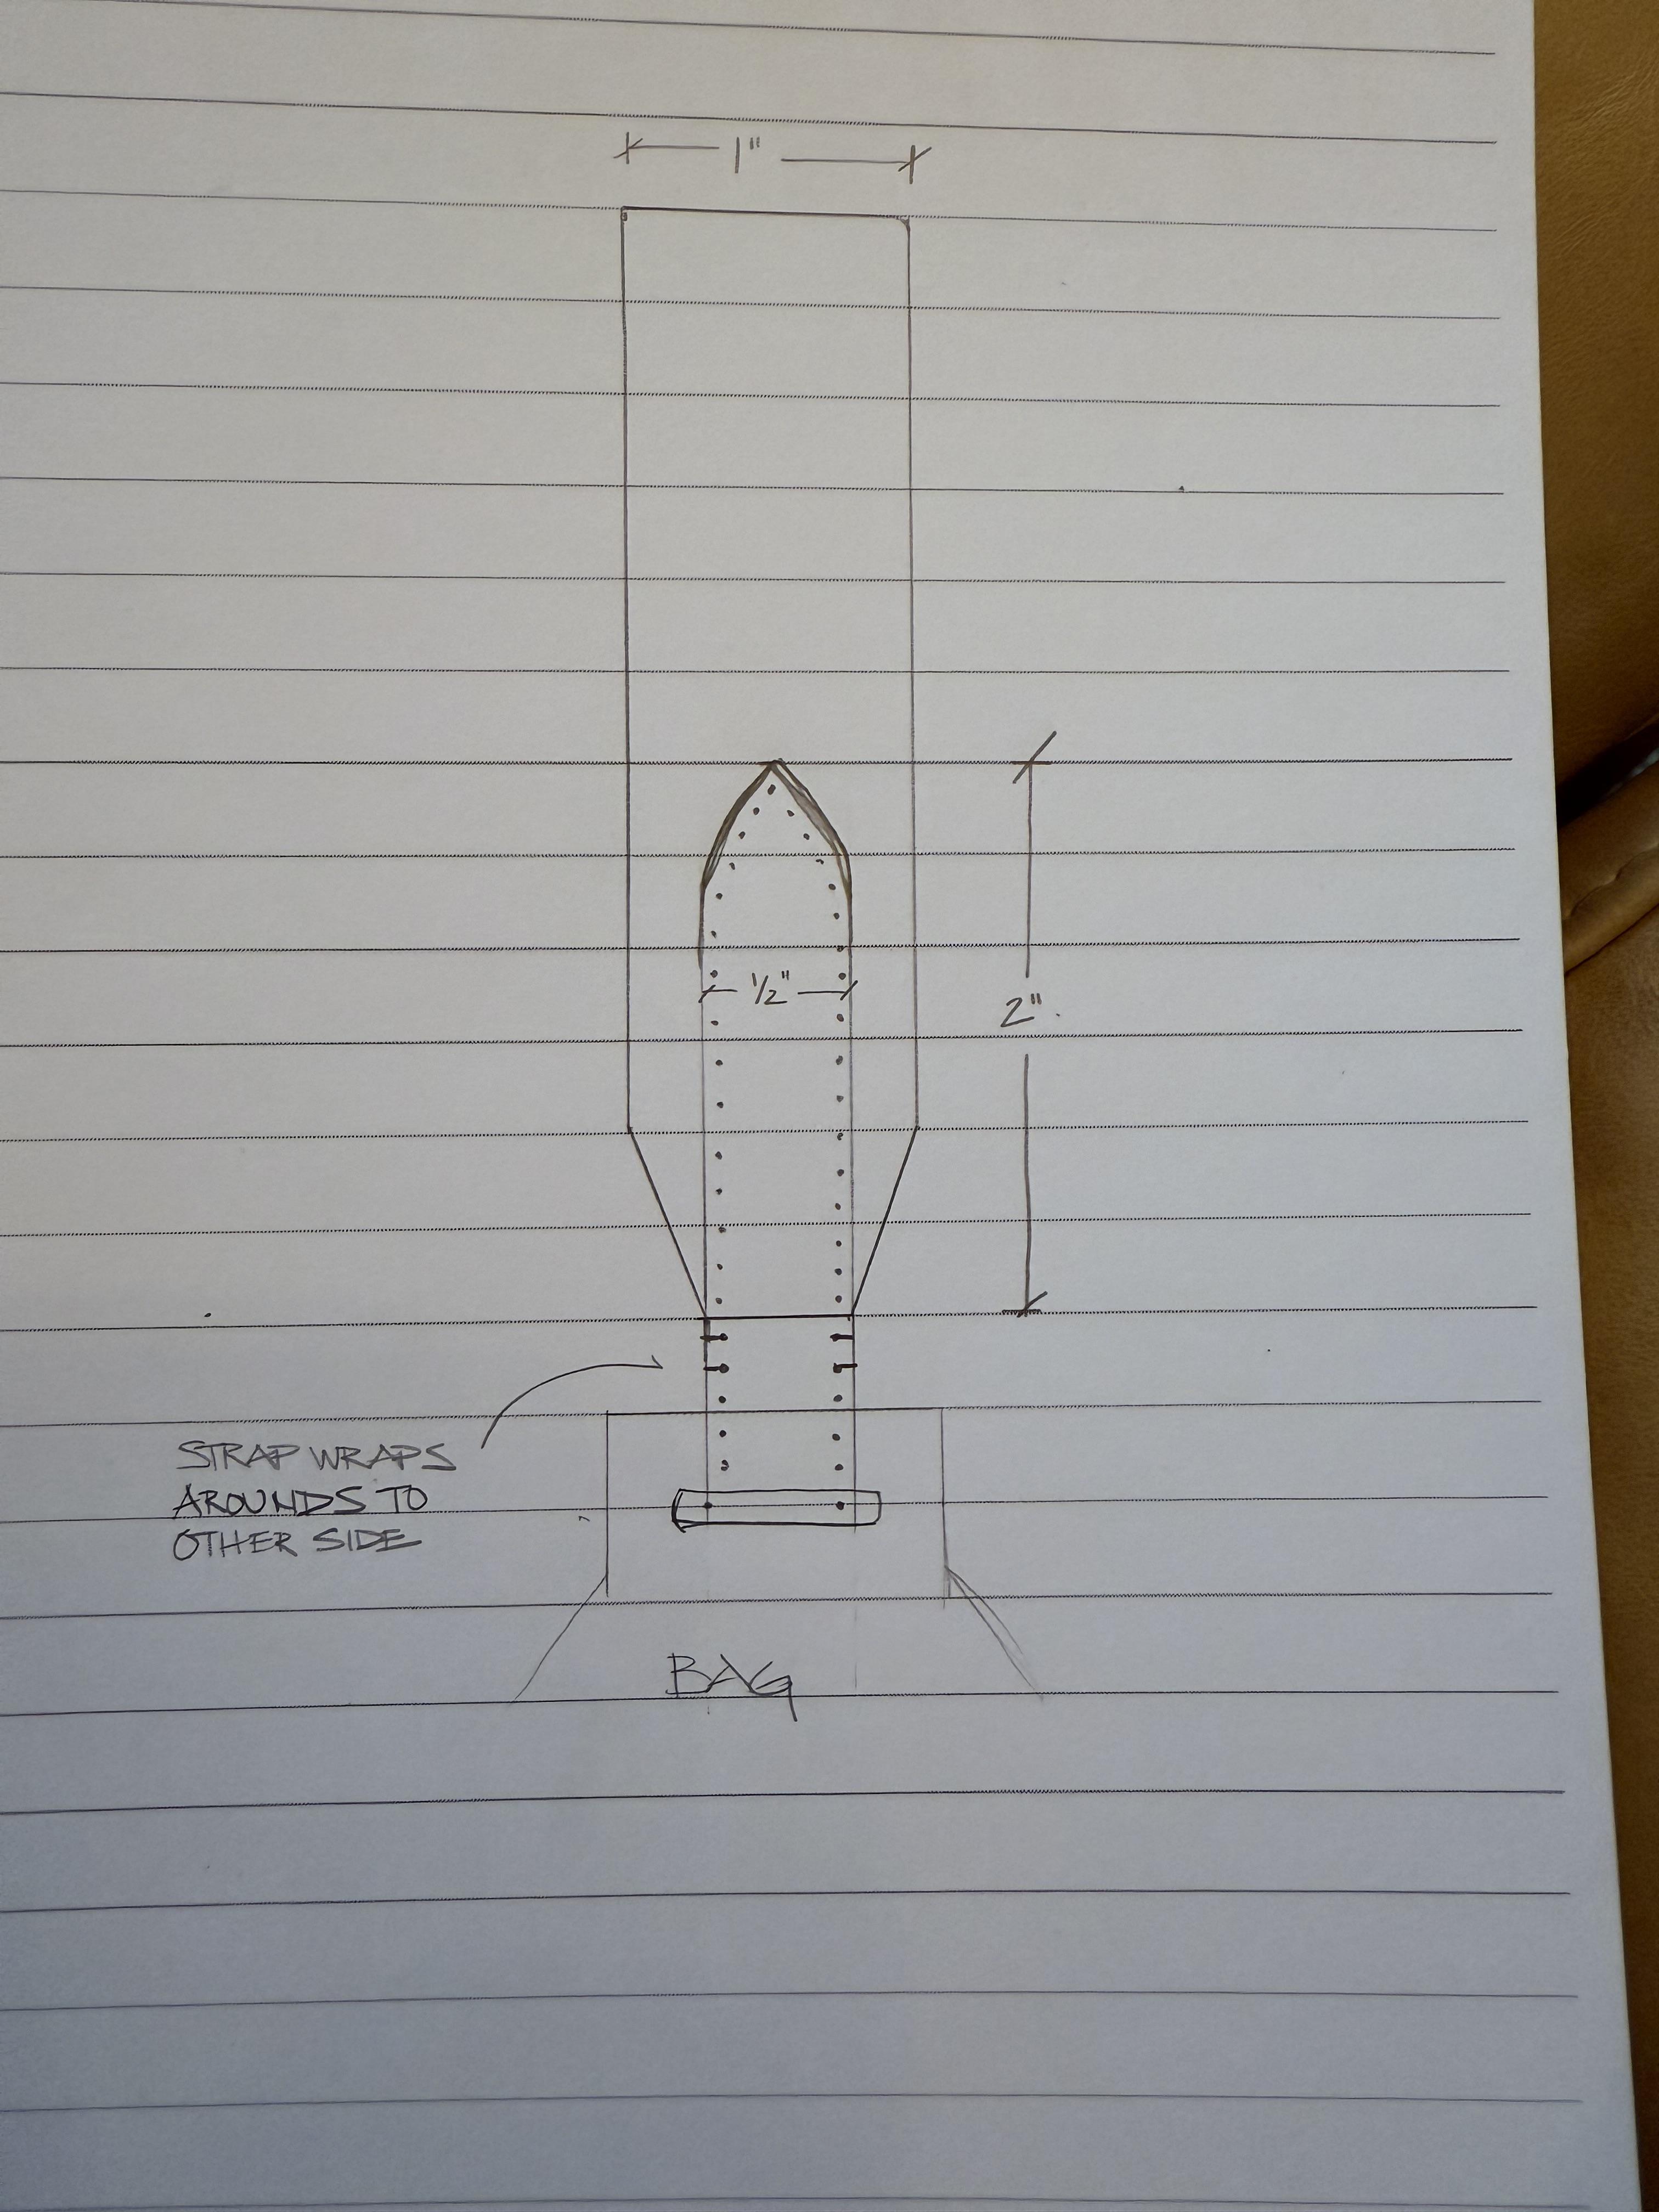
I'm hoping someone has ideas on how to construct this strap so the stitches look clean on both sides. The strap ends will go through the bag and wrap on both sides which will be visible from both sides. My initial thought was to double up the strap ends (without the strap attached) and punch holes, hand stitch the middle section (where it goes through bag), attach strap ends through the bag, double stick tape (or glue) strap ends to strap, and then hand stitch with awl. Am I on the right track or does someone else have an easier way or thought on a different process. Thank you in advance for any advice.
-
spring flowers and good food
chuck123wapati replied to chuck123wapati's topic in All About Us and Off Topic
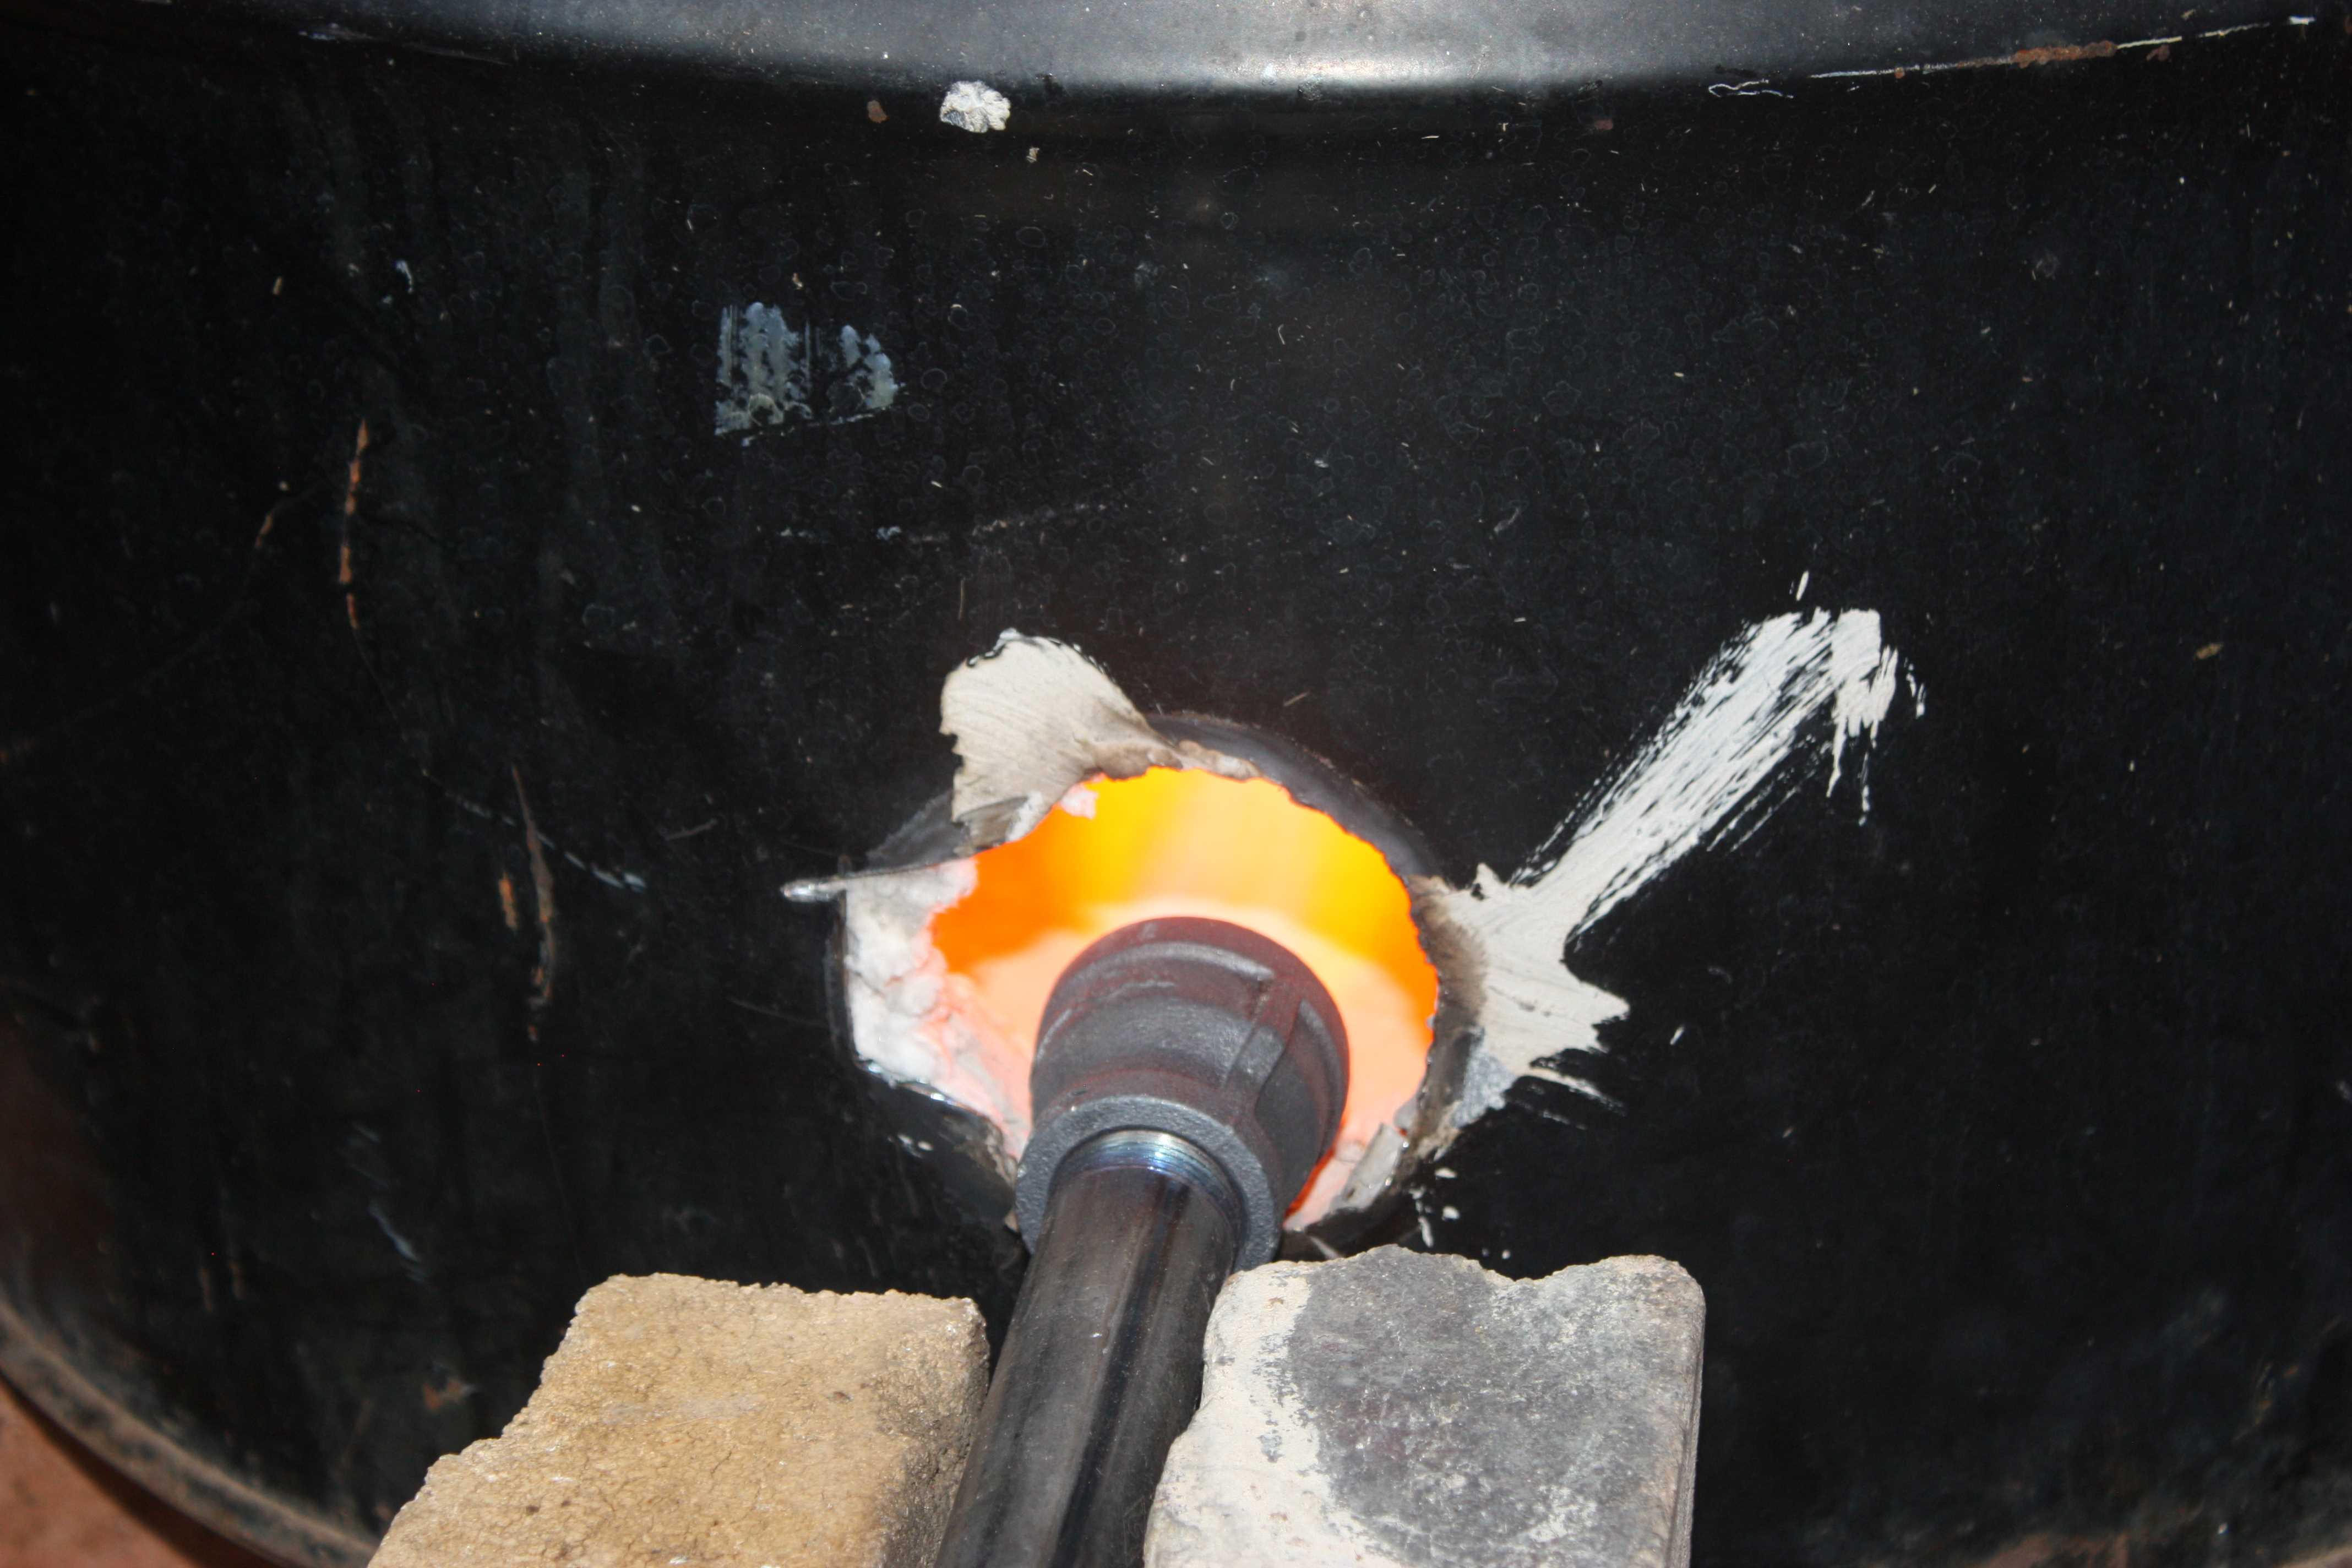
My new burner!!! works well the first pic is at 1 psi the third is at 10 How hot is yellow hot? really hot about 2000 F. I could only go about 12 psi before the flue wasnt large enough. i can get it hotter lol And yea the welding sucks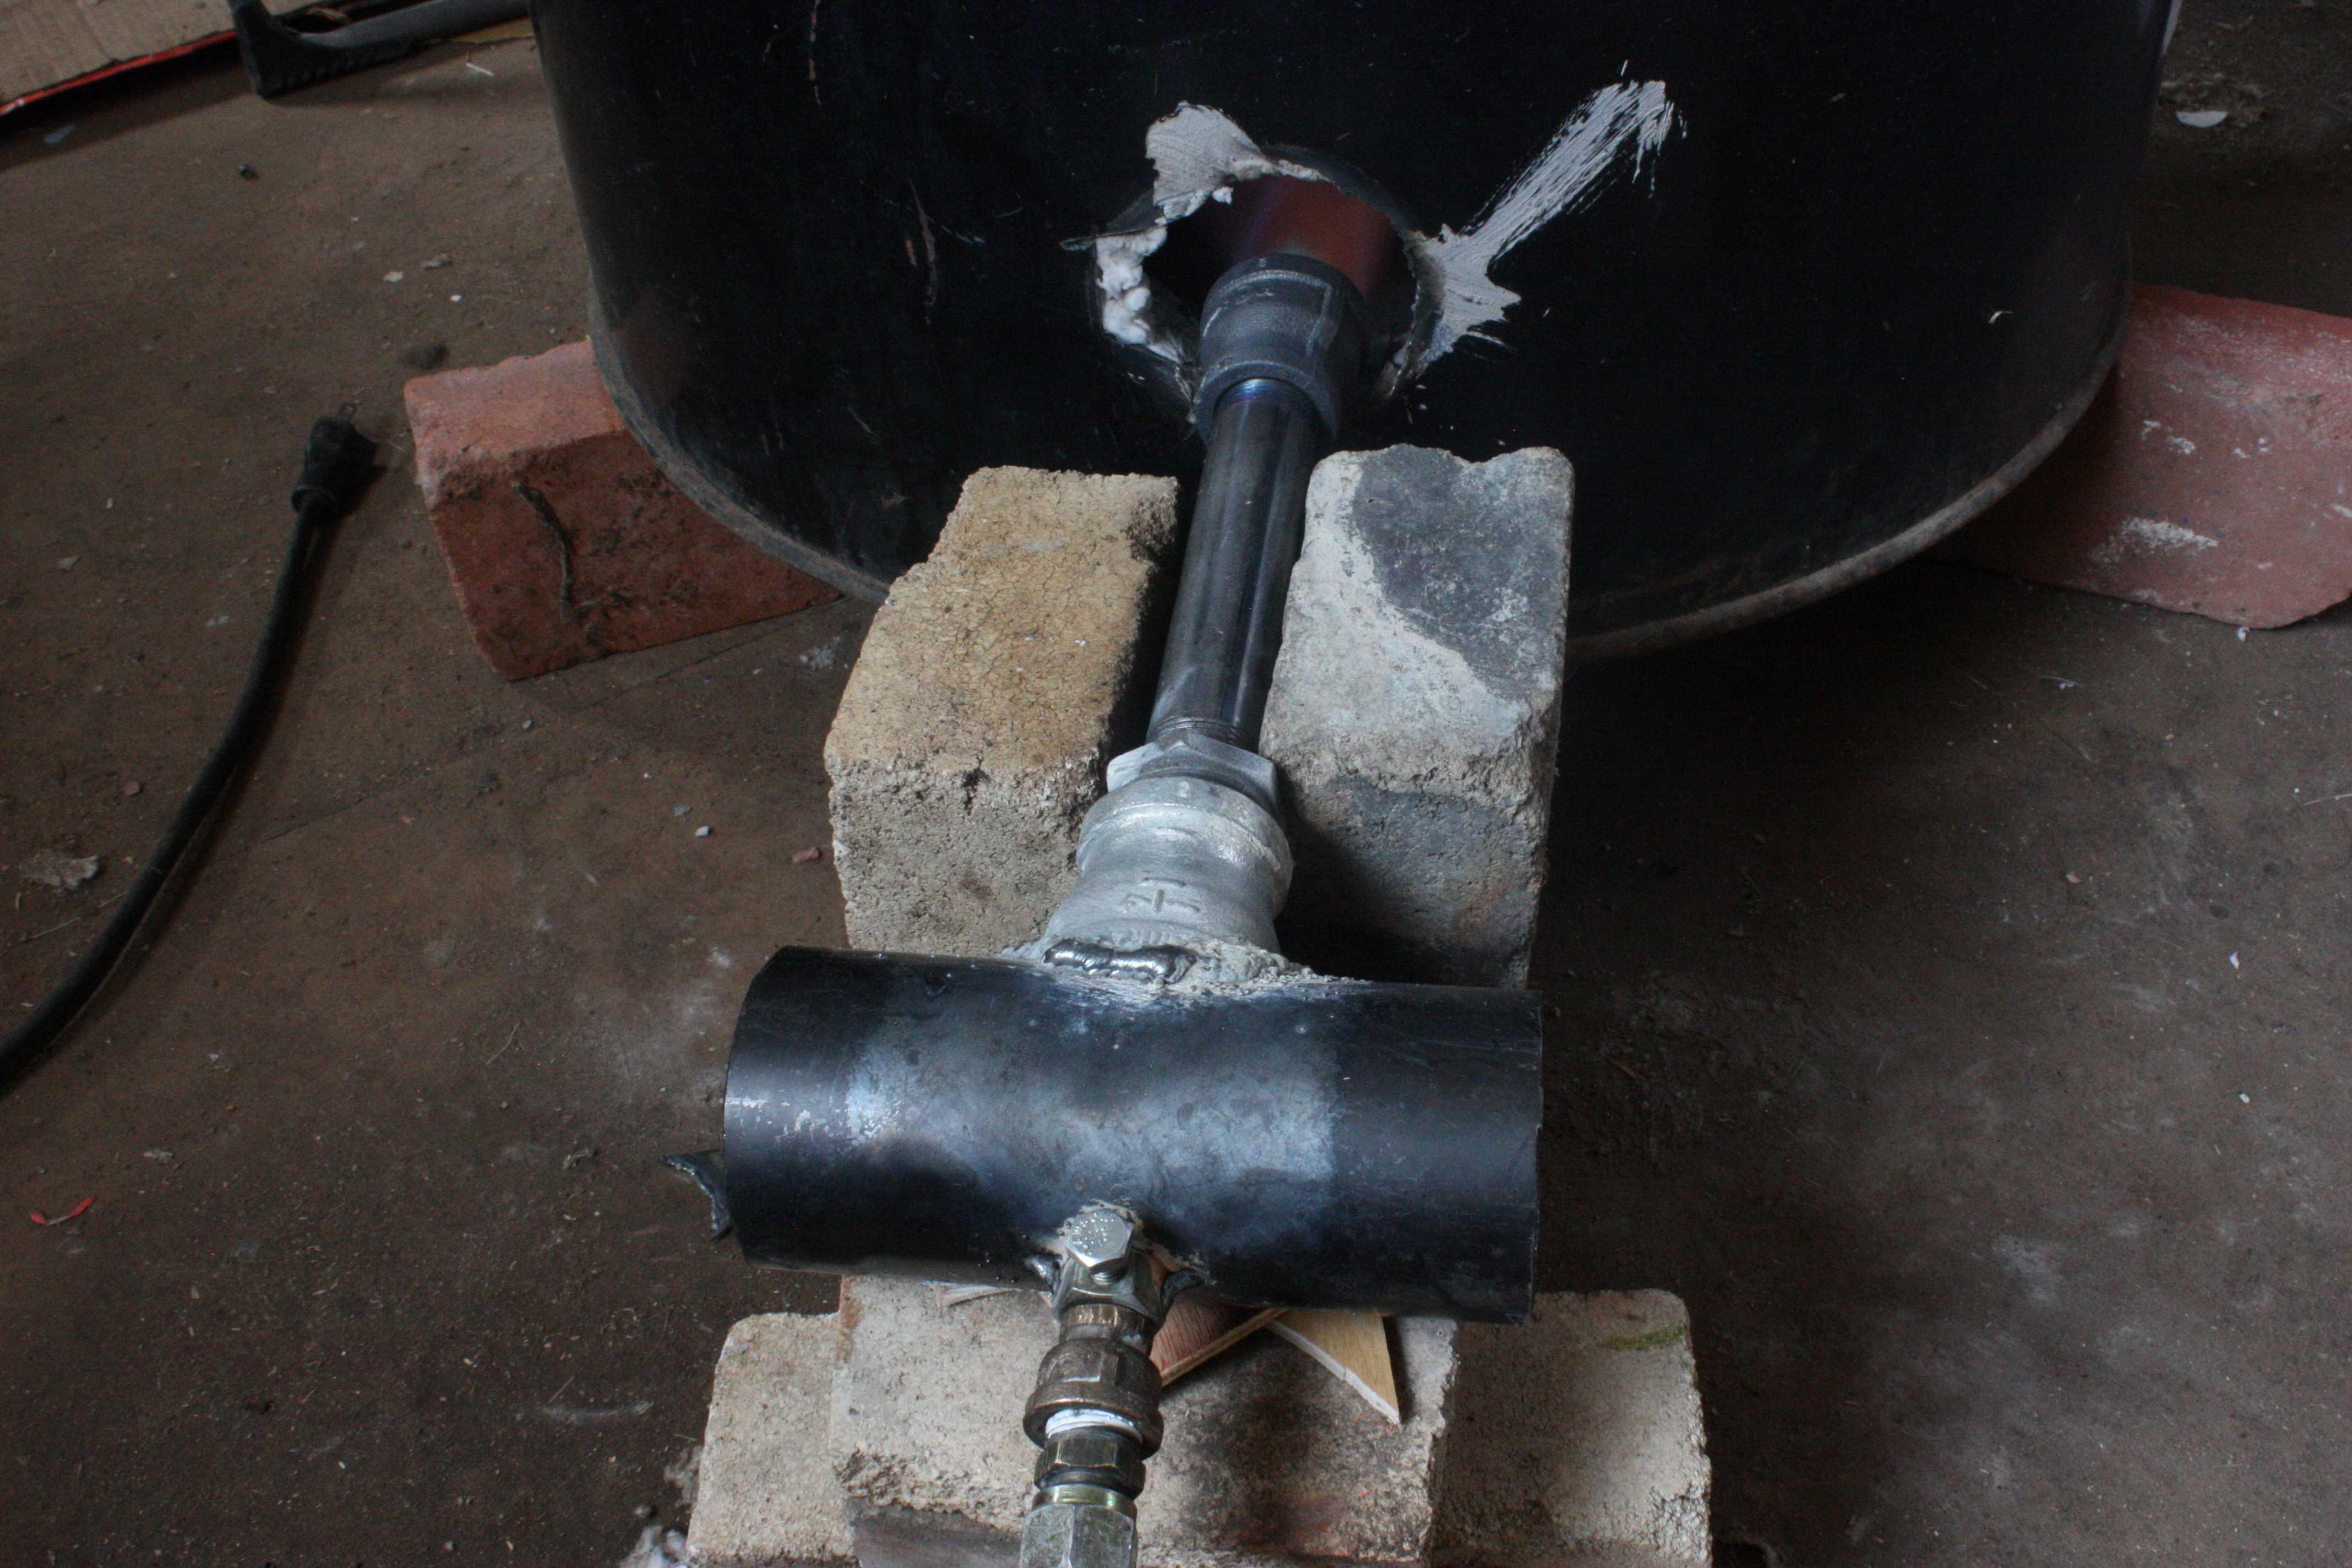

-
Leather work helps me to avoid all my bad thoughts in my head(
-
I normally say that I work with leather, it is also the term that I would use in Danish. To me leatherworker means that it is your "line of work" I mean what you do for a living. Leathercrafter (to me) sounds more like a hobbyist. But I guess it all depends on where you live in the world 🙂
-
According to Google... Factor Leatherworker Leathercrafter General view This is a broad term for anyone who works with leather professionally. It encompasses specialists like saddle-makers, cobblers, and artisans for fashion companies. In some contexts, particularly in the US, "crafter" can imply a hobbyist who works for enjoyment rather than profit. However, "craftsman" is widely recognized as indicating a high level of skill or artistry. Business vs. hobby The term "leatherworker" is often associated with the business or professional aspects of the trade, where profit is a key driver. The term "leathercrafter" can suggest an individual who is creating items for personal enjoyment. Scope of work A leatherworker might specialize in a single area, such as repairing shoes, or assemble pre-cut leather into finished products. A leathercrafter is more often associated with the process of making a product from scratch—including cutting, patterning, and finishing the leather. Level of artistry While many leatherworkers are highly skilled artisans, the term itself does not always carry the same emphasis on artistry as "craftsman" or "crafter". Many associate the term "craft" with the skill and artistry required to create a unique item. A person with this mindset may use "crafter" or the more formal "craftsman" to emphasize their dedication and skill.
-
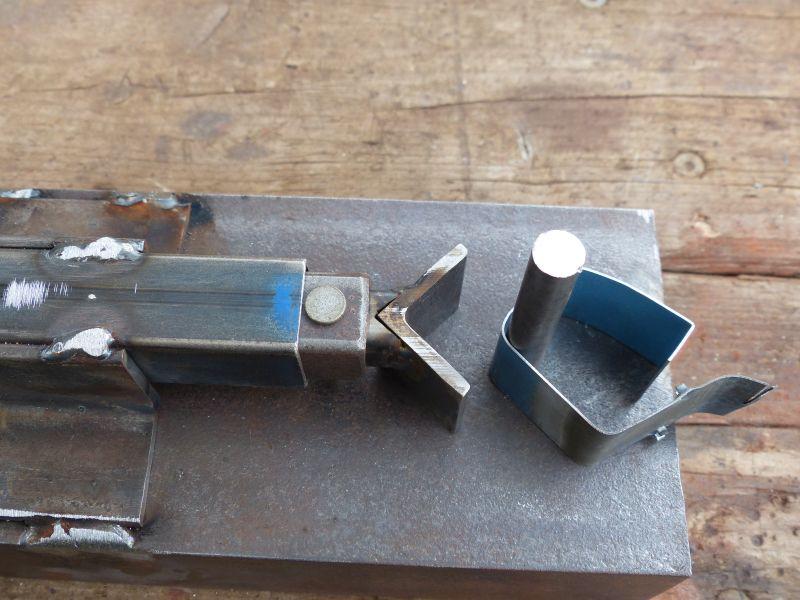
If I can make a suggestion mate, you'll find it easier if you turn things around and find a way to slot in the various shapes at the end of the ram. On the receiving end, say you want a right angle you could weld two bits of sharp stuff so the internal angle is around say 85 degrees (guessing) to allow for spring back. I'll try to do a short vid.
-
The non-medical variant is simply called a (foldable) workshop crane. It comes in various configurations but it usually has two wheeled legs that go under or to the sides of the load and an arm (sometimes telescopic) that can be moved up or down hydrolically, pneumatically or with a screw drive. Max carrying weight goes up to two or three metric tons, depending on the model. My mechanic has one in his garage to lift engines out of cars.
-
.thumb.jpg.df03483a8f149b5c3635266f3ce9bbac.jpg) These leather WWII aviation patches are really impressive. The craftsmanship and attention to detail make each patch feel authentic and full of character. I especially love how the stitching and design capture the historical look of the squadrons. It’s amazing how a small leather patch can add so much personality to a collection or display.
These leather WWII aviation patches are really impressive. The craftsmanship and attention to detail make each patch feel authentic and full of character. I especially love how the stitching and design capture the historical look of the squadrons. It’s amazing how a small leather patch can add so much personality to a collection or display. -
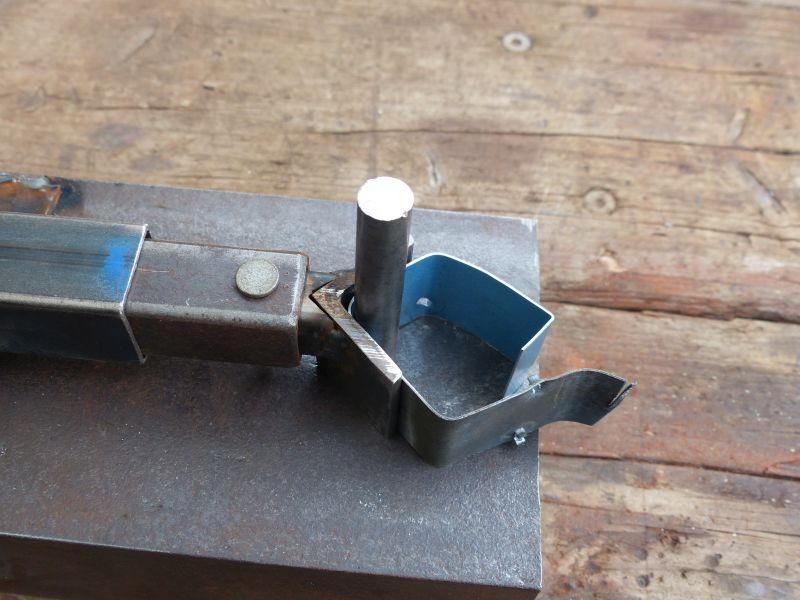
First bending bit, this was whipped up to see if I could actually bend anything in this contraption. As you can see it sort of works. Being angle iron the inside is radiused so I cant get a right angle bend, I'll have to file it to square up the inside. I also need to reinforce the underside where the 1/2" rod goes through to make sure it stays upright against the pushing force. Now to make more jig/tools of various shapes, I need one that is like a knife edge so I can get sharp bends, this may need to be made from something that can be hardened. One problem, which I half expected, is that pushing down on the handle causes the other end to rise so the whole thing needs to be clamped down
-
Leatherwork (verb) is the process through which one creates leathercraft (noun).
-
Thanks Wiz. I’ll read up on the p-1206rb


