All Activity
- Past hour
-

Singer 16-188 timing vs take up spring issue
friquant replied to peterstarch's topic in Leather Sewing Machines
That's great! As timing adjustments go, setting the needle bar height is the easiest. So if you do end up swapping to other needles... The most convenient way to set the needle bar height is to put a black mark on the needle in the middle of the scarf. Then adjust the needle bar height so the hook crosses at the black mark. -

Singer 16-188 timing vs take up spring issue
peterstarch replied to peterstarch's topic in Leather Sewing Machines
@friquant Thank you for the response! I imagine I will have to fiddle with my check spring regardless but I believe I have solved the skipped stitching issue. I bought 16x63 needles (what the manual instructs) thinking the previous owner never re-timed this machine, but I believe he actually did re-time it to take 135x17 needles. Both a blessing and a curse, because the 135x17 are much more common and offer a lot of variety, but now I have to get new needles because I don't think its worth the effort to readjust it to use an almost obsolete needle type. Thank you for your help!!!! -
Singer 16-188 timing vs take up spring issue
friquant replied to peterstarch's topic in Leather Sewing Machines
You are correct, scarf goes on the hook side. The long (longitudinal?) groove is on the other side. (Wishing for better names here haha) I'm not familiar with the check spring on that model. But in general, there are two or three adjustments that can be made on the thread check spring. (I expect neither of them will have as profound an effect as getting your needle bar height correct.) Here are the two adjustments that I understand about check springs: Adjust the preload. This is usually done by loosening a screw that is down lower on the body so that the whole check spring cylinder can rotate freely. Then you put a screwdriver in the big slot on the front in between the threads of the thumb nut...use the screwdriver to gently rotate the whole check spring cylinder left (for less preload) or right (for more preload). Adjust the amount of travel. Typically there is a secondary lever in a banana-shaped slide with a screw holding it in place. Loosen the screw, slide the adjuster, tighten the screw. I'm not familiar with yours in particular, so I can't say for sure which screws do what on your model. But a little experimentation (and looking for additional screws under the mechanism) may unlock the mystery for you. -
No offence taken...difference of opinion welcome.... Roger
-
.thumb.jpg.6e903dd66163ad5672f00f144058c571.jpg)
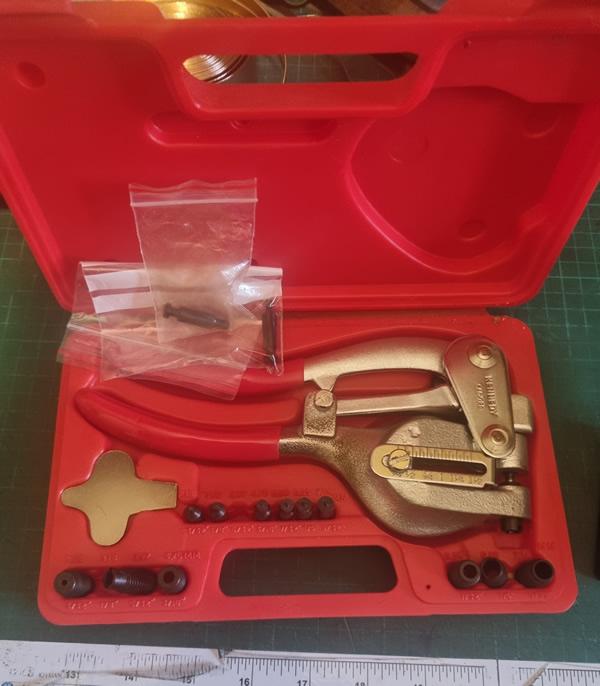
Clicker dies, no clicker press?
Northmount replied to ThisIsMyFirstRodeo's topic in How Do I Do That?
Split off posts about Making Your Own Dies to https://leatherworker.net/forum/topic/131702-making-your-own-dies/ -
Split this batch of posts off of Clicker Dies, No Clicker Press? as these posts are about making dies.
-
LOL, it's like the little skinny guy in the wide-brimmed fedora or the giant guy in the very narrow-brimmed fedora, it's just opinion LOL. I once picked up some folks from Indiana at Logan International. As we approached the Sumner Tunnel, the traffic bottlenecked, they said, Is the traffic always this bad I said No, this isn't bad, BUT WHEN IT GETS TO BE 5 O'clock, FORGET ABOUT IT They both started laughing. I had no idea what was so funny. After a while of prodding them, they said we would never use that expression in Indiana. I said What expression? "Forget about it", no one would ever say that in Indiana. LOL I took them to Regina Pizza in the North End of Boston for lunch, then to Caffe Vittoria, for coffee, now that was funny! LOL.
- Today
-
Singer 16-188 timing vs take up spring issue
peterstarch replied to peterstarch's topic in Leather Sewing Machines
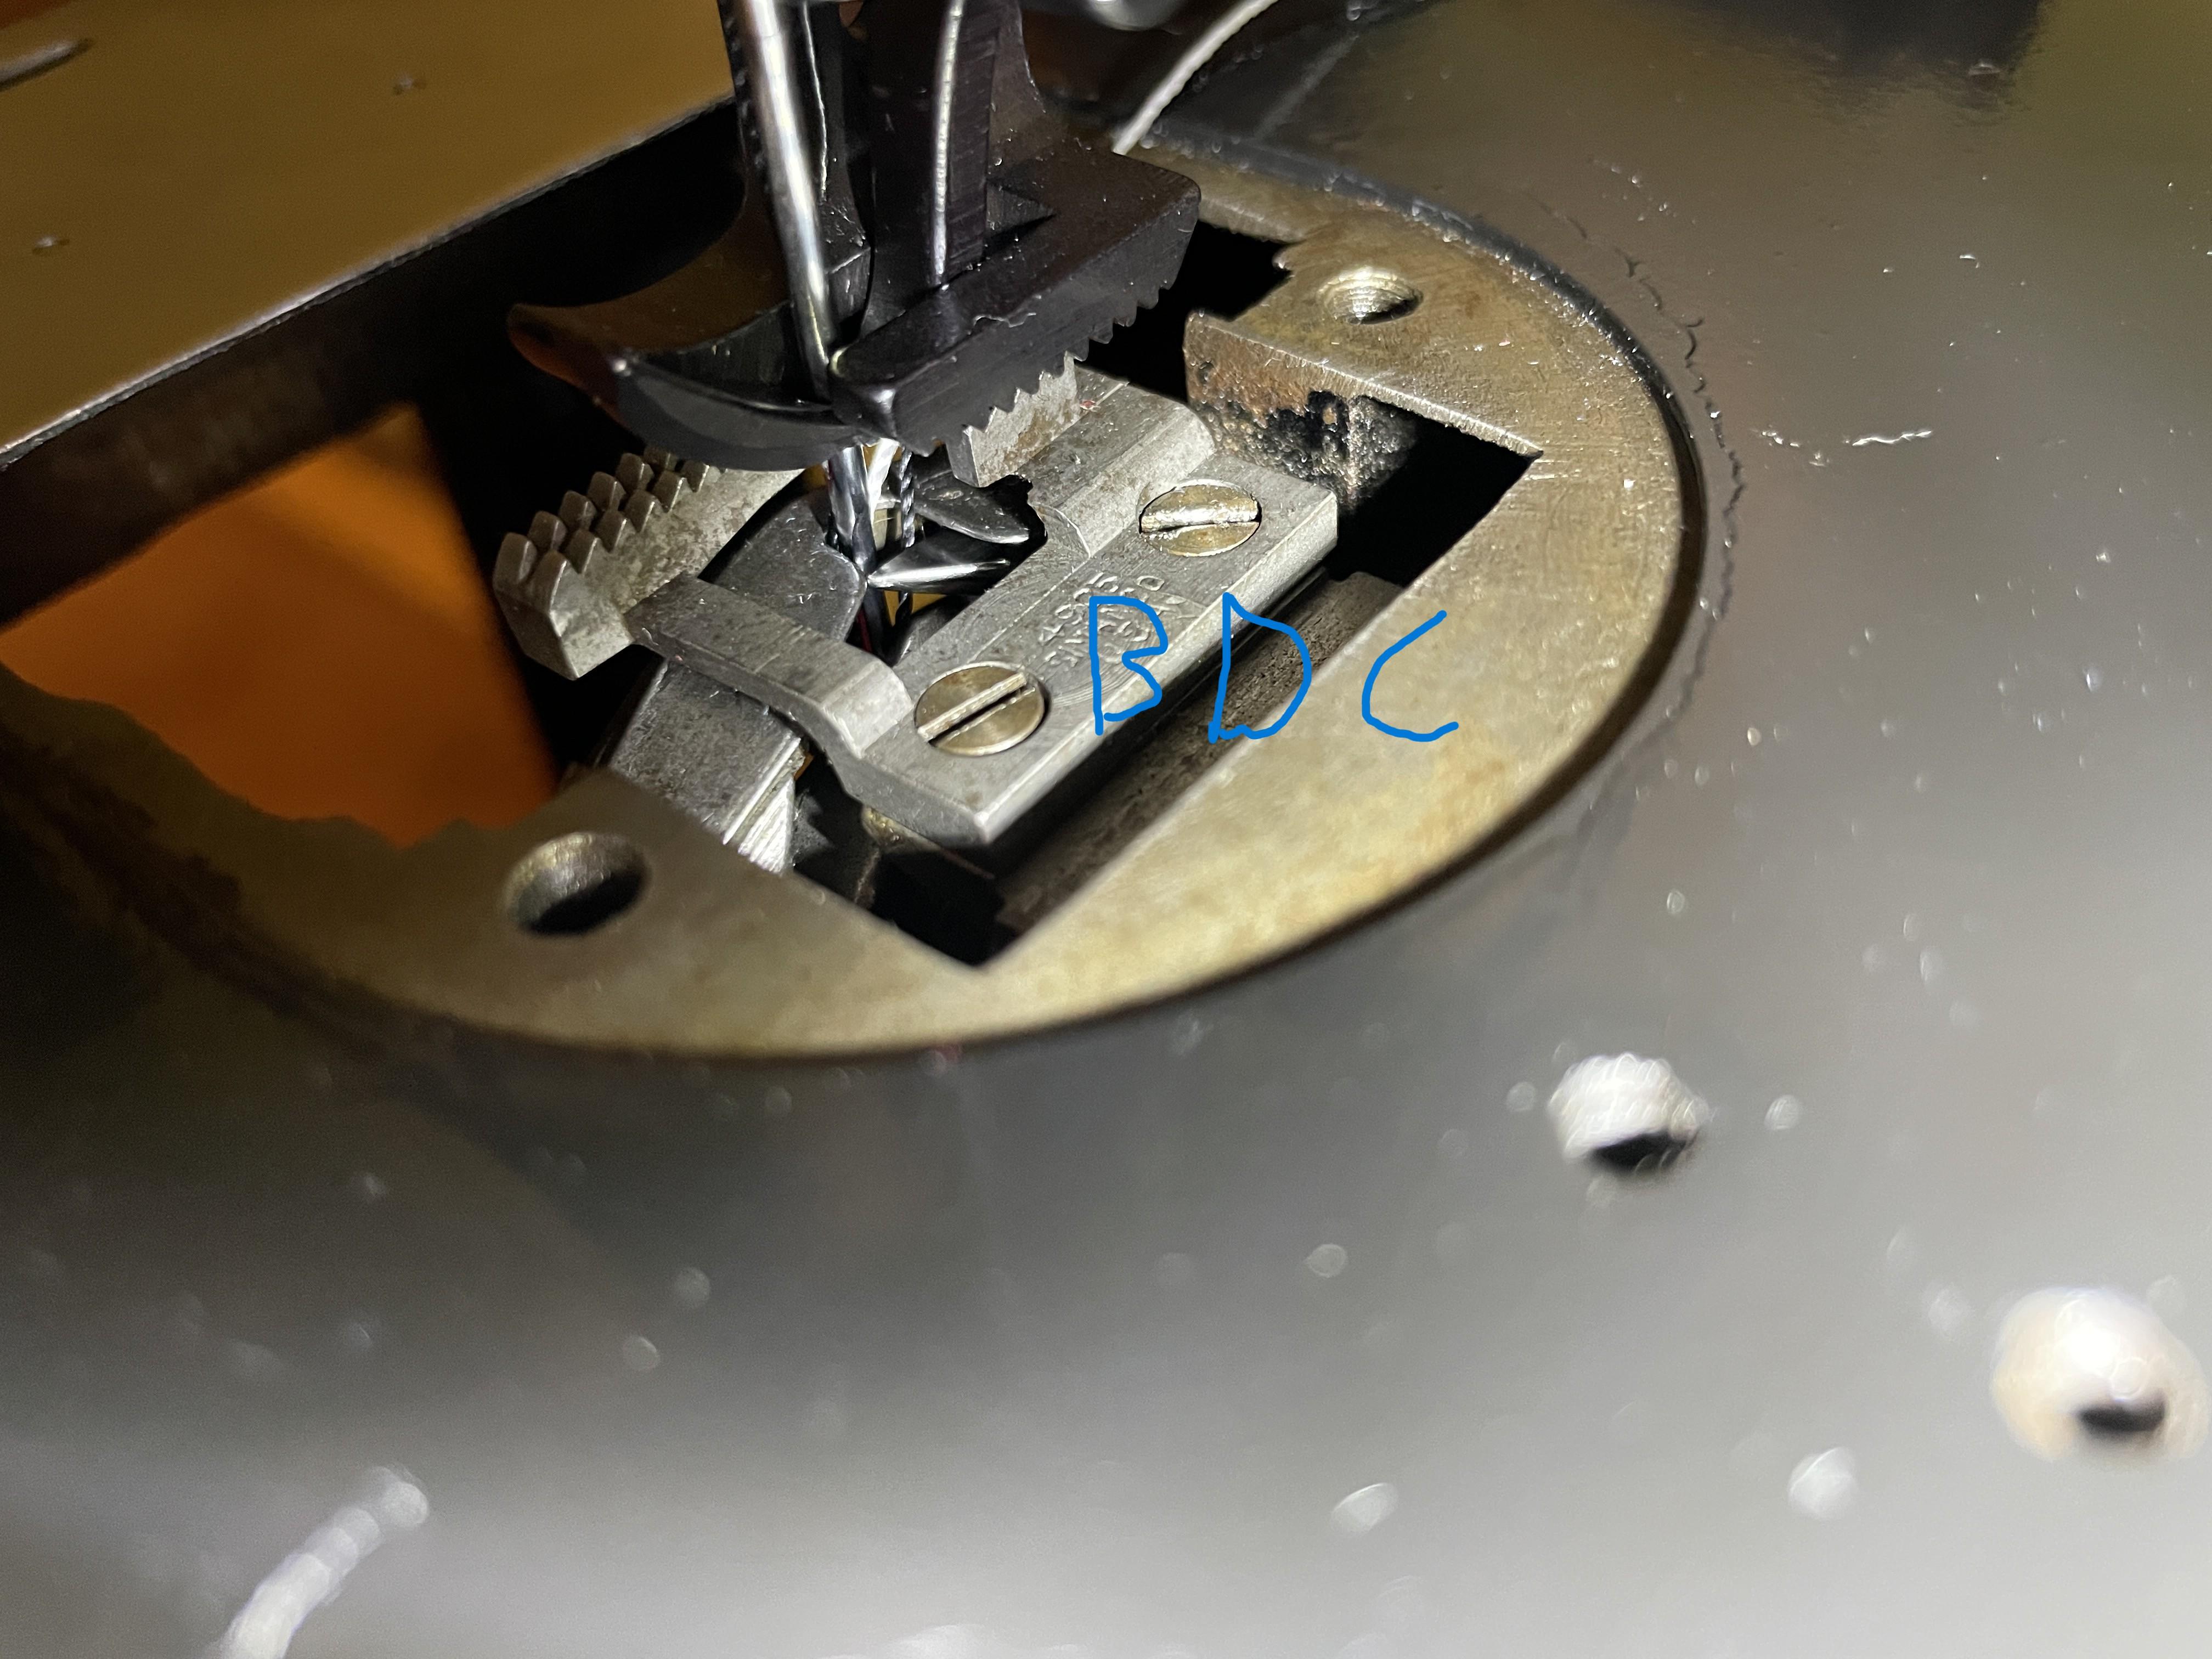
Yea, it actually tells you in the regular users manual, which is pretty cool. The long groove as in the scarf? It was my belief that you want the scarf facing the hook which would be right in this case. Do you know if the screw of the adjustment for the check spring is actually supposed to catch it? I figure it may be bent a bit since it seems like adjusting the plate that the screw holds under it does not seems to do anything, the spring is always stopped by the screw that holds it. Anyway thanks for your response, I do appreciate it a lot. + -

spring flowers and good food
Handstitched replied to chuck123wapati's topic in All About Us and Off Topic
I think I have spoken about this before, but I have 2 lumps of rump in the freezer that's been there for 5 -6 years or more, freezer burnt to buggery , they were part of a huge slab of 'cheap ' meat that i cut up, I'm thinking of cooking one up this weekend..........very very slowly , or I could get lazy and not bother 🤔, we'll see . Every time I open the freezer, they're looking at me and I think, " I must do something with those", hate wasting food. HS -
Sorry, friend, it was not my intention to insult you, for me it was just a "Style question" and also just "my opinion on style, not on execution". A German Luger would not look good in that holster either, IMHO. All that said, very nice holster, friend. What's most important is that you like it.
-
It's a 1911 what do you think holsters looked like in 1911 lol I see em all the time around here. yours look great!
-
I'm glad the you got it freed up. As far as I'm concerned there's nothing better then good old fashion Diesel. It works better then any of the "penetrating oils" just smells a bit. I would now flush/soak the area with synthetic transmission fluid. That will soak in and flush out the old garbage while lubing. Sorry, can't help with the amount of movement you should have. kgg
-
 themoonsola02 joined the community
 -
Very nice Will, for competition use the trigger has to be covered and must cover up to the ejection port on the slide. Roger
-

Free watch strap templates (A4 + Letter size)
Faraz replied to Danne's topic in Patterns and Templates
Im new to leather crafts, and this looks so clean. Thanks -
Singer 16-188 timing vs take up spring issue
friquant replied to peterstarch's topic in Leather Sewing Machines
Welcome to the forum! At bottom dead center, the eye of the needle must be below the point of the hook. Do you have a manual for setting the needle bar height? Hard to tell from the photo, but make sure the long groove in the needle is pointing left The thread check spring has a lot more motion than it probably needs. Generally it only needs to maintain tension until the needle hits the goods. -
Hello all, I have very recently acquired a singer 16-188 and I have managed to mess up either the timing or the take up spring (the loop forms just before the hook has time to pick it up), I am not exactly sure which. I am using a size #138 thread with a size 23 needle (16x63) I was just wondering if anyone could tell by just looking at a picture of the BDC position of the needle to tell whether it is timed correctly or not. I believe the eye of the needle is about 1/16" too far below the hook. I wanted to ask so if in the case it is the fault of the take up spring I can save myself the trouble of removing the whole faceplate (is that what its called?) to access the needle bar. Thank you everyone! And this forum is truly a wealth of information. I do not sew with leather all that much, but even the machine information here is probably one of the best resources on the internet I have found. hand crank.MOV
-
I don't see it being the wrong holster for the 1911. In fact, I made one along a similar vein.
(copy).JPG.0d8090104f272e1ad13144e46ba01140.JPG)
-
Same, I use a small brass brush followed by metal polish
-
Flat bed attachment for my Consew 287-RB
friquant replied to AmyRF's topic in Leather Sewing Machines
Is your machine the same as this 287-RB-2? https://consew.com/products/consew-model-287rb-2 The RB-2 looks a lot like a Juki 341. If it's a 341 clone, then flatbed attachments for any of the 341 clones may fit. Some folks on the forum have made their own. -
Don't use any mallet directly on the die. Thats a sure way of ruining the mallet and possibly damaging the die. I lay the die on a hard surface with the blade upwards. Find my leather and press it into place with my thumbs. That sort of 'locks' it in place then I use piece of off-cut wood or a piece of round nylon I have and hit that with my mallet. About a minute later I have the cut out. Pop it out of the die are start again. In about 10 minutes I have a dozen or so pieces to make key fobs If you cut 2 key fob pieces, glue a magnet on each end and sew the leather fob pieces together you have made a magnetic book mark! Two of these sewn together with a magnet at each end Make one book mark They are mildly popular at the moment
-
I use a small brass brush on mine.
-
Ughhhh. I had the temp up too dang high and didn't catch it. How do I clean this?
- Yesterday
-
peterstarch joined the community
-
Another factor with postage is they come in 1 meter lengths. Shame you weren't nearer I would've sorted you out a few lengths. I've even got an almost full pack of 3 point somewhere that my cheapo bending gear won't handle. If that banding gear is a bit springy you might have trouble with straight lines. (unless you're putting it around a wooden block and then fixing it might be a problem cos you have to leave enough sticking out to cut the leather.) Toxo, that is very thoughtful of you. I just went for a drive and bought some steel banding. It's 0.7mm thick by 30mm wide and the rolls are between 20 - 30 metres long. They are leftovers from the manufacturing process, they get huge rolls of the stuff, approx. 1 metre wide, and slit it to 30mm and these are the bits left after coiling it to measured lengths. The stuff is used for building steel-framed houses, is very good quality and is high-tensile. It's going to be interesting to see what I can do with it. I'll probably try making wooden shapes to attach it to, but the first thing is to build some sort of jig for bending it. That sounds like it's gonna work. Rule steel is only 0.7 also but likely to be harder. If you go with a precise wooden core and a softish board I'd say you have a good chance. This is very handy for the holes if you go with wood. I've seen them cheaper than I paid. When I started it was with a large vice, 2 six inch nails and a hammer. Worked well for simple shapes. This is a mini rolling mill that was really cheap, very heavy and won't do very small circles but good for circular handbag styles. Can't remember where I got it.
-
Frozen Stitch Length on Singer 144W103
friquant replied to friquant's topic in Leather Sewing Machines
A few hours sitting with a few drops of diesel made a difference! I'm gonna throw away my penetrating oil 😜 I've got 2.5 turns each way now. How many turns should I expect when it's fully loosened up? -
Even that is proving problematic, Australia is a strange market......I'll try the banding steel, it may not have enough carbon in it to get a hardened edge but should still hold an edge adequate for cutting leather. It's cheap enough ($5 a roll) to experiment with.