

All Activity
- Past hour
-

Finishing Coat
Dwight replied to Cactusman's topic in Dyes, Antiques, Stains, Glues, Waxes, Finishes and Conditioners.
If you were in the military . . . Resolene and dress shoes would be a gift from heaven. Super polish them guys . . . about 6 or 8 coats or resolene . . . you have a pair of inspection shoes that need only to be put back in their protective white socks . . . to await the next inspection. Didn't have it when I was in the Navy . . . had to do it the hard way. And I would probably bring the holster back to you within about a week. Neutral or any other shoe polish has no ability at all to protect the leather item. Rubbing up against a wall . . . gate . . . laying on the ground . . . the leather will look like it was found on the beach at Normandy. May God bless, Dwight -
neatsfoot oil - how much is too much?
Dwight replied to el_pipou's topic in Leatherwork Conversation
Neatsfoot oil is meant to replace the oil that was latent in the original hide. It is very easy to get too much in there . . . kids usually do that with their baseball gloves . . . thinking sloppy and floppy will catch a ball better It don't. My oiling is done with a cheap 1 inch pig hair paint brush from Harbor freight. I put it on quickly . . . just enough to see it is wet . . . and quit. The "wet" stage disappears very quickly . . . My item will be just barely noticeably darker the next day. Usually only determined by putting a piece of the original leather up to the oiled one . . . squinting a bit . . . to find a difference . May God bless, Dwight -
This guy says subtract an inch from your measurement for gusset length. Some day I'll test this using my heap of leftovers from bridle sides but I currently have no experience with bag making.
- Today
-
Do it however you want . . . but if my project requires a gusset . . . I lay down the item . . . trace the outside for the length of the gusset I want . . . then cut the outside of the gusset piece out of a hunk of leather. I then decide how wide a gusset I want . . . use a pair of dividers and mark that all around the inside of the piece I cut out I then cut out the gussett . . . glue it in place . . . sew / lace / stitch / as necessary. May God bless, Dwight
-
Your video showed as much, but you beat me to it 🏅
-
Ok - fixed it. I also just farted around with it and found that I had forgotten to tighten the screws behind the connecting rod. Seems to have fixed it 😳
-
Link is not loading for me..
-
Hi all - found this Adler 67 at the goodwill bins and thought I’d try to save her! Am I mistaken that this is a walking foot machine? If it is - can anyone see why these feet aren’t moving up and down? I’m sure I broke something but don’t know where to start. Thanks!
-
I'll try those out. Needle is a 20....t90 thread. NOW...I was taking a video of the bobbin, sewing slow and then by hand....no problems. Then I started sewing regularly and now it's sewing fine....for now. When it starts acting up again, I'll take another video. Thanks for the tips.
-
Trying here too… I posted this question in How To but no one’s stepping up. I’m making a bag 9”x5-3/4” of 2mm thickness leather. I’m stitching by hand and have layed out and punched the holes about 3/16” from the edge. The 4 corners have 1” radius. My search here came up blank so I’m asking…do I add all sides together and subtract the circumference of the 2” diameter or work from the dimensions of the sewing line? I tried the old string around the outside all the way around and the string layer over the sewing line. Outside strings 1-1/8” longer. I’d like to learn how to get it right the first time and not trim it to fit or piece it together. Thanks! Dano PS I’m laying the outside panel on top of the gusset.
-
Its very hard to judge the right amount That is definitely too much. Too much can surely ruin a pair of boots To limit how much NFO I'm putting on I have a NFO/bees wax/carnauba wax mix that I apply all over. I let that sit a while then I buff the waxes to a semi-glossy shine. I've never had anything so dry that it needs more than one NFO/wax application. Perhaps in your case, another coating in a weeks time, then another after another week should see it getting enough feed
-
Have you complained to the seller / vendor as they may not be aware of the rancid problem??? kgg
- Yesterday
-
 Noah Beckman joined the community
 -
 Rob hodgson joined the community
 -
Hi, I have owned a couple pairs of cowboy boots for about a year and have been conditioning them with only neatsfoot oil. The boots I got have usually been offered to someone a few years ago, this person then wore them a couple times and let them sit in a shoebox for years. So technically they're almost unworn, but rather dry (not to the point of getting cracks however) (if you wonder why I choose that kind of boots its because I get them for about 30 bucks whereas Id have to pay hundreds otherwise wich I cant afford) winter is coming, and I dont want my boots to get dry because of wet-dry cycles, or to rot... they dont seem to ever get enough oil, whenever I apply some, they drink it up in seconds if not instantly. wich to me would seem to indicate that they are way too dry and need more oil. however im a newbie and im afraid of ruining a perfectly fine pair of boots because of my ignorance. how to know when there is enough oil? should I keep oiling until the oil stays on the surface for a few minutes? what happens if I over-use oil? ps: how the leather feels to the touch ; definitely not dry, but firm.
-
The blade is blunt. A good sharp blade will skive off a very thin amount By edge; I mean the surface, to thin an edge for sewing of gluing The second one takes the same blades as the first. A sharp blade will take of a very small amount. Change blades every time you start a new project. It makes life easier and blades are fairly cheap
-
 I have never made a purse but just thinking about it, I think I would use neutral shoe polish. I use neutral shoe polish on my holsters. It's something that the end user could easily replenish and without damaging anything. I wouldn't use Resolene on dress shoes.
 -
Love the sound! Looks like you're having trouble getting the machine to let go of your thread when you have finished a seam. Here is what I recommend: Before you start your seam, turn the handwheel so that the takeup lever is at its highest point. Otherwise, the takeup lever may try to snatch the thread out of your fingers. (You can do the opposite---takeup lever at lowest point---if you want to experience the snatch firsthand!) At the end of your seam, before you pull the material out from under the presser, turn the handwheel so the takeup lever is again at its highest point. This does two things. First, it locks your final stitch. Second, the top thread will not be wrapped around the bobbin when you go to take the material out. Since you ended your seam with the takeup lever at its highest point, it's already in position to start the next seam 😊
-
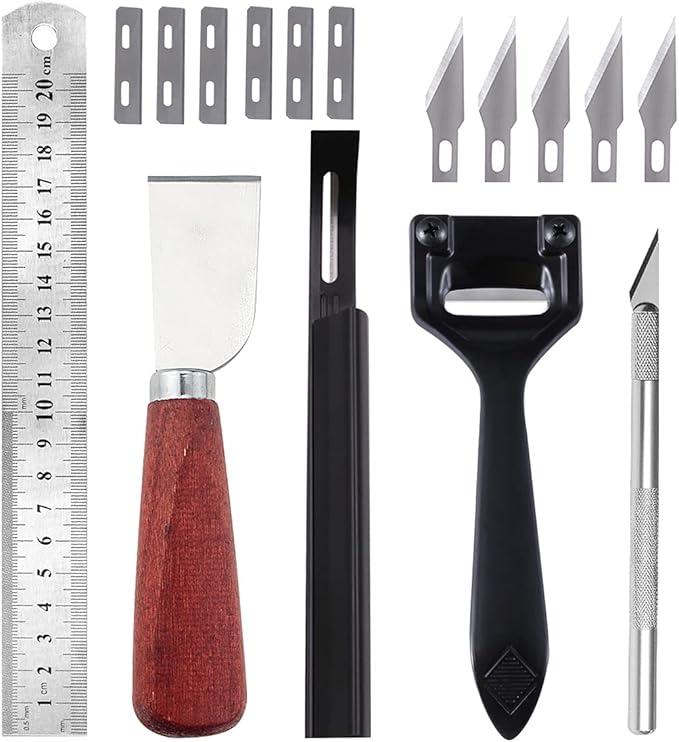
I have the first one and haven't had good results...it scraps instead of cutting. I assume the blade was sharp when I bought it. I have replacement blades. I have something that looks a lot like the second one, but it is different. Maybe I have a bad knock off of a better design? The third one is considered a French skiver? I thought that type was for thinning out the surfaces of leather...I didn't know if was for edges. My whole life I've lived by pushing blades away from me, so the French design might be better for me. The two razor blade models in the picture are pulling toward me which is awkward. It seems like my trouble with skiving is holding be back from doing the types of projects I'd like to work on. Maybe I'll break down and buy a machine and have no more excuses... So far, I've had my best luck with the wood handled knife that came in this value pack, but it's such an uncomfortable, unpleasant experience:
-
 Scooter Hooden joined the community
 -
This?
-
It looks like the metal straps are what carry the weight. You could just construct a new basket out of whatever material you wished. I like it because it'll block light. The down side is it'll make it harder to rack it off, if you use a plastic siphon hose. I like conical fermenters for small scale stuff.
-
 Ion Retro joined the community
 -
Definitely avoid the last one, it looks like it should work but doesn't!!!
-
Thanks to you all for your anwsers! I bought some other cans from another brand and im back genuine neatsfoot oil. I think the p.paulin maker puts lots of inferior products like lard and such wich go rancid and make for a product that isnt neatsfoot oil at all anymore. while it does nourish leather very very well it is barely liquid at room temperature, cloudy, and the smell does stay onto any piece of leather you put it on. it can only be found in france though so you wont have to worry about it
-
I sow a picture online for the Order of the Arrow arrow head impression in some leather but i can not find the stamp anywhere it looked really well and i want to try to make it. also looking for any BSA/CUBSCOUT stamps where is a good place to source them? I wish i could find the picture again but i cant
-
 Scriptkrewe joined the community
 -
here is what works for me. I take a regular 5-gallon food-grade plastic bucket with a tight lid. Drill a hole to fit 1/4" tubing tight, then get a pint mason jar with a lid, drill a hole in that lid to fit the other end of the tubing into push it to the bottom of the jar fill the half full of water and you have your air lock and airtight fermenting barrel. you do your fermenting in this until it's complete. Then when its done press your mash and put the wine into the carboy with your clarifier. You're basically done now except for time. When it's clear, re-bottle it into your smaller vessels and enjoy it. you want your barrel and carboy as full as possible so there is little to no air, A hydrometer is what you needed for your water issue. You create your chosen alcohol content by the amount of sugar in your mash, if you want less alcohol more water type thing. You can add sugar to make stronger wine also. You do this at the start of your mash. And yes fix it!!!!
-
I watched your video and here is my two cents worth. i) When you started you did not hold the thread properly to prevent thread movement (Top and Bobbin) like you did at the 5:54 mark. ii) At the 3.10 mark you can see the top thread (black thread) gets pulled in slightly which is causing a slack in the top thread and causing a jam at the 3:20 mark. iii) You did not back stitch after three stitches to lock the thread before starting your seam. iv) When you finish the seam you are not back stitching to lock the thread. v) With a thin piece of material like what you are using in the video there is almost not space to bury the bobbin thread knot in the material particularly with thicker thread and vinyl is a sticky material as far as the thread is concerned and will want to catch on the sides of the hole the needle makes. Keep in mind for every hole of each stitch you have the thickness of three threads (top thread and the two halves of the bobbin loop). vi) When finishing the seam and after back stitching try hand wheeling the needle up to the point where the tension disc release before removing the material. What size of needle are you using???? What size of thread??? kgg
-

Finishing Coat
fredk replied to Cactusman's topic in Dyes, Antiques, Stains, Glues, Waxes, Finishes and Conditioners.
I just retired* a 20 year old belt. Thinner than Dwight's, about 3.5mm. Not used every day but often. The resolene finish coat was still alright * retired cos I wanted a change in pattern on the belt imo, leather items should show some wear and change in colouring over time. Its what makes leather so unique


