OdinUK
-
Posts
656 -
Joined
-
Last visited
Content Type
Profiles
Forums
Events
Blogs
Gallery
Store
Everything posted by OdinUK
-
Welcome to the Forum, Have you any pictures of things that youve made?
-
Welcome to the forum! I'll take a look at your website. I plan on making my first sheath soon for a pair of butterfly swords/knives.
-
Fantastic work. I'd love to learn to make one of those.
-
Welcome to the forum. Hope the move goes well. There is a Chinese proverb that goes a little like : Ask a question and be ignorant for a moment, or don't ask and be ignorant for life.... Ive asked many questions here and everyone has been so helpful. Enjoy.
-
Welcome to the forum. Nice leather pictures and masks.
-
Welcome to the forum Abbyanna! There are various ways to minimize the noise when tooling or stamping leather. I'm currently learning to airbrush with the intention to use it with my leatherwork. Im sure you will learn lots on here, I did
-
Looking For Tutorial For Photo Album Or Notebook Cover?
OdinUK replied to OdinUK's topic in Books, Journals and Photo Albums
@Beaverslayer, thanks for that, thats exactly what I'm looking for. When making covers, is thick card or some kind of then board used to reinforce them? -
How is the bible secured to the cover, are there pockets on the inside? Fantastic work, I dont recall seeing edges done so well!
-
Leather Photo Frame/ Photo Protection
OdinUK replied to 2palominos1bay's topic in Books, Journals and Photo Albums
I'd say use thin perspex. -
I have been looking for a tutorial or patterns for photo album covers or note book covers but cant seem to find one with the search funcion. Does anybody have any patterns or constructions notes for these. For photo albums, do you butcher standard ones to get the picture inserts, or can they be bought seperately to be attached to your own cover. I'd be very grateful for any advice. Thank you.
-
Unbelievable!!! WOW!
-
Round Leather Box
OdinUK replied to Dangerous Beans's topic in Purses, Wallets, Belts and Miscellaneous Pocket Items
Very nice work! It looks great. Did you have your circular cutter custom made, or is it a standard size? -
You're all welcome, I hope you find it useful.
-
That looks great!
-
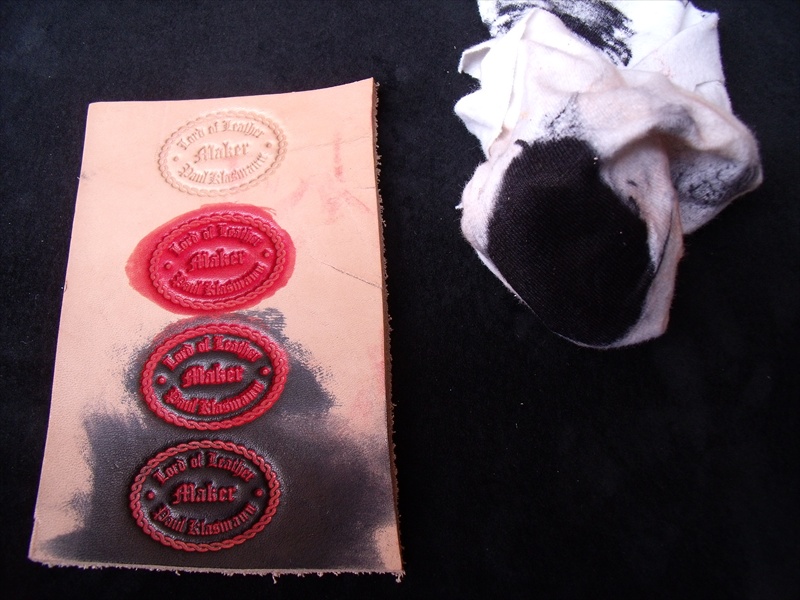
Some of you have asked how I get the two tone colors on my makers stamp like I used on the last belt I made. Referring to the picture, after the stamp is applied, I dye the whole stamp in Fiebings red, making sure I cover the whole area. Then I get an fine weave cloth or a part of an old t-shirt and put either cotton wool or a folded paper towel into it and make it into a tight ball. Apply the black dye to it and begin to gently dab the black dye on to the raised areas on the stamp (third stamp down). Finally, if necessary, press down harder to make sure that all raised areas of the lettering are dyed black. The red wont show through the black but if using other colours try on a scrap first. Thats it! Hope thats useful to those interested. Paul
-
 That gives me the creeps! But a very nice wallet
 -
Thanks for posting the picture. I like the idea of the sheeps skin shaved down. I like the fork protectors with your logo:)
-
 Very nice work! What did you use for the white?
 -
Very Nice
-
Mines a white plastic called Delrin. It's been great!
-
Very nice:) What is the stamp made from?
-
My First Sheath - And First Inlay.
OdinUK replied to Cyberthrasher's topic in Gun Holsters, Rifle Slings and Knife Sheathes
Good Job! I like the laced edge and the insets. -
Thats great, certainly unique.
-
Thanks for all that info Jace, its much appreciated. I was planning, when I have the tank cover, to fit a microfibre cloth to its lower side so that it doesnt scratch the paint. I was considering to attatch the cloth with velcro so that I could periodically change it to get rid of dust or dirt. I dont know Parrie Tan, Ill look it up.
-
Thatrs nice, what did you use to finish the leather? Are the covers for the lights a tight fit so they dont come off? I still want to make a leather tank cover but havent decided how to go about it.