OdinUK
-
Posts
656 -
Joined
-
Last visited
Content Type
Profiles
Forums
Events
Blogs
Gallery
Store
Everything posted by OdinUK
-
Thanks for sharing that. I look forward to trying more figure carving in the new year after I finish my current project.
-
You're portraits are fantastic. Where did you get the original image from? Did you trace it yourself? I have the figure carving finesse book but not tried a portrait yet.
-
Hmm I'll give it a try, so cutting past the eyeball with a slight undercut. Thanks for the tip, I'll see what happens.
-
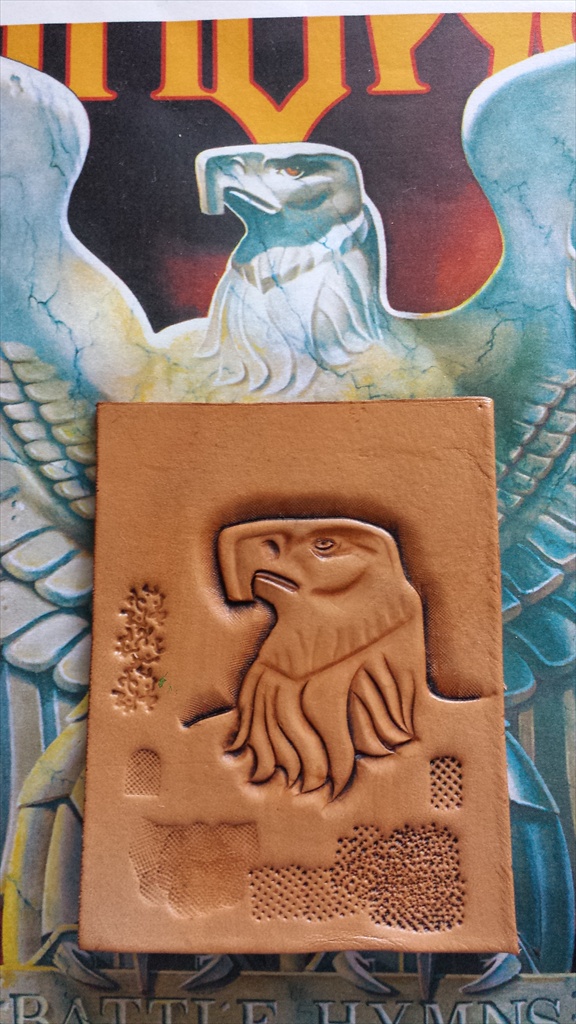
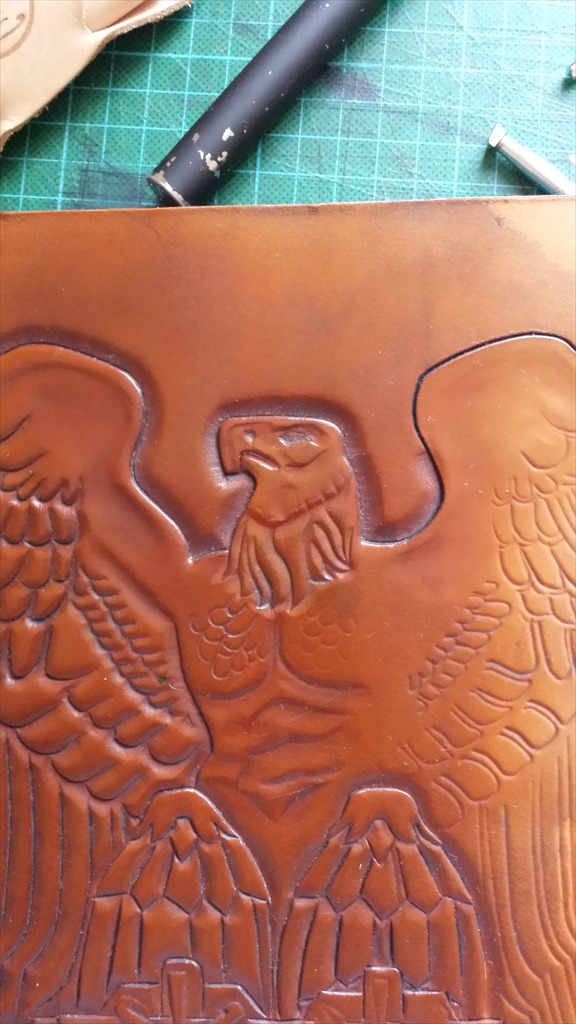
Im trying to tool this eagle onto the leather to make a backpatch. Im ok with most of it but due to its size I can't seem to get the correct expression of the eagle. The eye and brow are the main areas that I just cant seem to get right. Im trying to get that authoritive condident look. The brow needs to be deep, it seems, but then I loose any detail of the eye. I may go for a two tone colour scheme by blocking and then antiquing the eagle. I'll use a background texture tool for the background around the eagle. Does anybody have any advice or tips on how to do it? Im trying to use various size figure carving bevelers along with a modeling spoon.
-
Does anybody know if Clear Laq or WyoSheen is available in the UK? I checked on google and can't find anywhere. Thank you.
-
Celtic Weave Wallet Back Plate
OdinUK replied to Studio-N's topic in Purses, Wallets, Belts and Miscellaneous Pocket Items
Looks good. May I ask what sort of press you use? -
Sunburst Color Belt
OdinUK replied to Allan1972's topic in Purses, Wallets, Belts and Miscellaneous Pocket Items
Very nicely done and oozes quality. What finish did you use inside and out? -
Thank you for the explaination. I hope to have a go at this sometime.
-
They look great! What do you use as a core?
-
The stamping looks good. Perhaps you can bevel along the stamped edge and then use another tool for more decoration, something like a camo tool? This will make it look more 'finished'. Ive not had much practice at scrolls and flowers but if its your first or early attempts just keep practicing. I suggest keeping your early attempts to monitor your progress.
-
Thank you for the tutorial. Hopefully I'll get to try it out soon.
-
Thanks for that, Ill have to look for such a mask. Congratulations for winning best costume, its better when you've made it yourself!
-
Thats fantastic! Whats the former made from, ive been looking for something suitable to use as a former but cant find anything sturdy enough. I was thinking about making one with plaster or Herculite but can only find molds with expressions. The black and gold looks great for contrast.
-
Thanks for that, its a great resource and Id like to give it a try sometime. The rivets have given me an idea, I'd like to make a tankard with just revets instead of the usual sewing. Many thanks for that link to your site.
-
Thanks for sharing those pictures. Im interested in leather bottles and pictures like this are great to see how they're made. How do you cast your own rivets, do you make a mold into which you pour the moten copper?
-
From the album: Misc Projects
-
From the album: Misc Projects
-
From the album: Misc Projects
-
From the album: Misc Projects
-
New Watchband
OdinUK replied to tatehunt's topic in Purses, Wallets, Belts and Miscellaneous Pocket Items
Very nice and solid looking. -
What a great idea. I like it a lot. I also agree with Michael's comment about dying the insides. Fantastic project!
-
They look great and very durable. My only comment is with regards to the third picture. I noticed you stitched across the leather handle straps. I would not have done that because it creates a perfourated line in the strap which could be a possible point of weakness if the straps are flexed over time. The vertical and lower stitching, and the rivet looks very sturdy and would be more than adequate. Just my opinion.
-
That's going to last a lifetime if not longer! Excellent work!
-
2001 Harley-Davidson Heritage Softail Tank & Fender Bib
OdinUK replied to Spinner's topic in Motorcycles and Biker Gear
Wow! Those are stunning! May I ask what paints you use and the finish? I love the painting on such fine detail. I bet that's one proud owner Ah, ignore my questions, I just saw your other post! -
Thank you. The original picture had black lines on the sides to show the depth, I tried that on a rough practice piece but it looked a mess although I could have used a fine tip marker. I opted to leave the lines as just an impression since they are still obvious but subtle and give a similar effect. The pink is much brighter in 'real life' but being flourescent, it doesn't show on the pictures. The colour on the shaded sides were made by mixing blue with black, then by airbrushing I was able to control the intensity. It took some practice to get it right.