ClayB
-
Posts
2,063 -
Joined
-
Last visited
Content Type
Profiles
Forums
Events
Blogs
Gallery
Store
Everything posted by ClayB
-

Pictures from the Jim Linnell Workshop
ClayB replied to Froghunter's topic in Special Events, Contests and Classes
Thanks for sharing the pictures from the class with Jim. It looks like everyone was having fun and it looks like a neat project to carve. -
Hi Alex, I understand the frustration a messy work area can cause. I recently messed up a couple pieces of leather because I dont have a sepreate place to do my coloring. Tipped the piece of leather over on my marble and when I turned it back over, it had red dye spots on it. I cut a new piece out and after casing, but them both in the same plastic bag until I was ready to use them. When I took them out, the second piece had gotten red spots off the first piece. Yeah it's frustrating, and could have been avoided, but it'll probably happen again sometime. I think some of us are just a little messy by nature (at least that's the excuse I'm using)
-
I'm just glad I'm not the only one that ISN'T a neat freak. I could blame my mess on not having enough space (and I don't) but I think I'd still be messy. I dont mind the mess as long as I know where everything is. When it gets to the point I cant find something, then I'll clean it up, but it doesn't seem to last very long. I'd rather spend time carving than cleaning.
-
if it's the needles with the big long eyes, I HATE them. I used to break them all the time. Go to a needle with a lot smaller eye and it will work a lot better
-
You did a really nice job of that! I also had to ask Hammerhead if it was ok to use his ideas. He posted a pattern in the adult section of the forum a while back that I have been working on carving and embossing (of course). I found carving the faces like that to be the biggest challenge and need to work on them. Yours looks better than mine. I like the muscling, like on the right arm. You also did a nice job on the small details like the feathers. This is a really nice strap! I'm not sure you are going to get what it's worth off Ebay either.
-
yeah it did
-
Hey Shirley, That looks pretty nice black......... um.... I didn't say that out loud did I? When you're good, you can make anything look nice! Clay
-
I want to say "thank you" to everyone who has made a donation to help pay the expenses for running this site. Johanna says that there is enough money in the kitty to keeps things running for several months now. Your contributions are REALLY appreciated!!!!!!!!!!! Earlier today in the chat room we held a drawing. Johanna, Lindatt, and Crystal witnessed as my daughter drew a name out of a hat (come on, use your imagination here) And the winner of the drawing was................... Randy Scott. I'll try and get the picture in the mail sometime this week. Thanks again everyone for helping to keep this great site running!!!! Clay
-
WOW!! your roses are amazing!!!! They look so real, right down to the imperfections in the petals, the tears and bug bites. What is the most impressive is ripples in the petals, they look so thin and delicate. I'd sure like to hang out in your shop for a while, I'd love to learn how you do that!
-
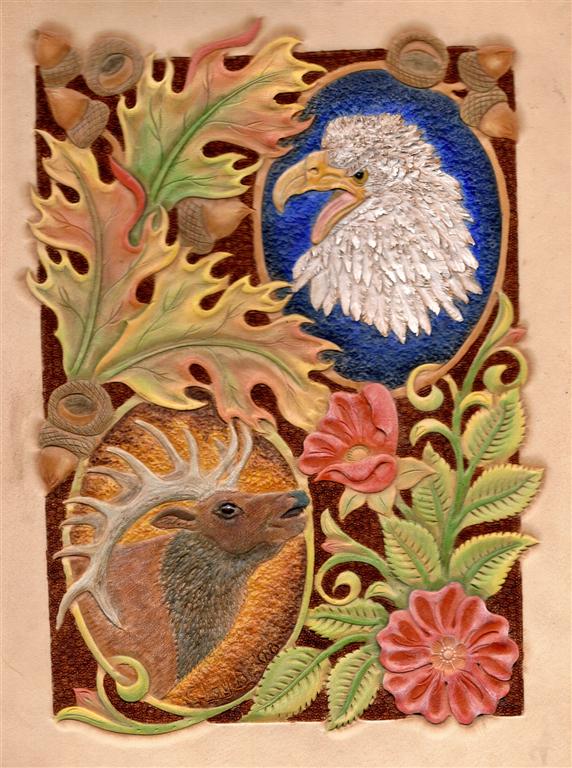
Thanks all of you. I appreciate all your comments, and welcome any tips, hints, whacks on the side of the head etc. that will help me out. Especially with the coloring. It was fun to try some of these different things and some of them I was pretty happy with. The elk could use some help, but it's the first one I was brave enough to try coloring. Coloring oak leaves with the eco flow dyes is really easy. I start out by putting about 6 drops of yellow and green in one of those plastic paint trays with 6 cups to hold paint. Then add about 10 drops of water to each color. For the red, I use the same amount of water as dye. For orange, I use about 3 drops of red, 5 drops of yellow, and then about 10 drops fo water. I also mix some stronger green, about half dye, half water. I start coloring with the more diluted green, going down the center vien, and coloring the bottom portion of the leaf, staying in the areas I pear shaded and away from the tips. As the brush runs out of dye, work it higher on the leaf into areas that will be the next color. Next color on this was yellow. Fill the brush with yellow and go right over all the green, on the tips, and farther up the leaf. Seems like yellow blends everything together. You can even do the whole rest of the leaf with the yellow at this point if you want. Then go on to orange. Usually with the orange, I like to start at the tips of some leaves and work back down to blend into the other colors. Put it on heavier at the tips and scallops and as you start to run out of dye, work it down into the other colors. When the brush is almost dry, I will scrub it into the yellow and even over some of the green. You can barely see it, but it helps to blend the colors together. I use the red very sparingly, usually only of a turn back part of a leaf, or maybe a couple of the scallops between the tips. It's pretty easy to over do it, so I try to make sure there isn't too much on the brush when I start. With the stronger green, I'll go back up the center vein, and a little ways out from that, but dont cover all the original green, giving it another shade. Then when all the colors are on, I go back over everything with yellow again. It just seems to blend it all together, and doesn't seem to take anything away from the other colors. Simple, right???? So come on all of you, give it a try!!!! Tina, I'm not sure if they are really opaque. The aren't really transparent, but they dont cover up the leather like acrylics do, so you can really tell it's leather yet. They remind me of water colors. I think you'd have fun experimenting with them. Again, thanks for all your comments, and if you want to see it in person, you're gonna have to come visit me. Or you can stop at Bert's place, he has the original one, but I only colored the top half of it.
-
I decided to go ahead and finsih up the demo piece I started in Rapid City. I played around with some different dyes and paints. The oaks are done with Eco Flow dyes, the eagle and background with Liquitex acrylic paints. The wild roses are Eco Flow dyes with acrylic white for hightlights. They actually look a bit different than the picture. I just put this in the scanner to see how if it would work. Finally, the elk is a combination of Eco Flows and acrylics. The background behind the floral is spirit dye, med brown. I am fairly happy with how it turned out, kinda wish I would have done it on something usable, like a note book cover. It's been my experience that if you want something to turn out nice, do it on scrap.
-
So that's why I am still a construction worker!! I'm not so sure that holds true across the country. A lot of people out west have beards especially in the winter, and even more have moustaches all year long. Some of the jobs in the oil field require you to be clean shaven in case you have to use a gas mask and need it to seal on your face. But there are bankers and lawyers around here that have beards. I have a brother that runs several companies and they used to even have contests to see who could grow the best beard in a set amount of time with cash prizes.
-
Hi Tom, Those bracers turned out really nice, just what we have all come to expect from you Just yesterday my wife and I were checking out the in progress photos of these on your blog. Cool blog and webiste, by the way! I need to figure out how to do that someday. Anyway, on the close up of the coloring, it looks to me like that is a scar on the leather, probably a healed up wound of some kind on the cow. Those things just wont take color like the rest of the leather sometimes. It's a natural thing to leather, and I dont consider them flaws, just the way it is. You did a good job of hiding it, what's left is just a reminder that it's REAL leather. Your experimentation with coloring is fun to watch and I have been learning a lot from what you are doing and sharing. Thanks!! Clay
-
Happy Birthday Tina!! It's always fun to get new leather tools for your birthday. Hope someone tells you how to use it. I'd try, but I dont know anything about it Hope there is a BIG party and lots of cake! If you weren't so far away, I'd bring doughnuts
-
Fire Dancer Leather Bracers
ClayB replied to ElVaqueroMuerto's topic in Collars, Cuffs, Leashes and Leads
VM, You do a really great job on you coloring and I just wanted to thank you for sharing some of your tips. I know there are lots of us here that are always wanting to learn more about different coloring techniques that work on leather and this post has some interesting things to try. Thanks! -
Hi Tina, It's great to see you back to working on projects. Nice job on your first holsters. I dont know much about the functionality of holsters either, but they sure are pretty. Something about the second pattern I really like, but not sure what it is. I also like the added touches, like the border on the second one and I REALLY like the lacing on the back. Even the way you signed them is neat. Hmmmm, Freak has a fan club, maybe you need one too.
-
Did ya'll see the latest Leather Crafters and Saddlers Journal? On the cover is a is a really nice Sheridan pattern carved by Clay Miller and inside is an article explaining how he carved it. And did you know that he took top honors in the leather carving division at the Central States Fair last week in Rapid City? Congrats Clay!!! Then on the page following Clay's article, Kathy Flanagan (aka Yak killer......oops... Yaklady) has an article on how to do the Mexican round braid on a flat surface. Bet you didn't know she was that talented, I sure didn't! Kathy spent some time demo'ing at the state fair in Colorado last week too. I don't know if she had anything entered in competition there or not, but if she did, she probably took home some ribbons too. Back to the journal, to go along with the August monthly challenge theme, Al Gould has a couple examples of his finger carving in there. And finally, there is an article by Jan Schoonover on extreme embossing an arabian horse. Jan's the guy that taught me most of what I know about extreme embossing. All in all, this turned out to be a pretty interesting issue. Check it out if you get a chance.
-
Here is a PDF page that was written by Verlane Desgrange that has some good info about awls. Verlane believed in hand sewing the way she was taught by the old masters, and she was very good at it. Verlane_awl_pdf_small_size.pdf Verlane_awl_pdf_small_size.pdf
-
ClayB. to share lost secrets of ancient leatherwork
ClayB replied to Clay's topic in Special Events, Contests and Classes
I want to thank Bert for letting me hang out in his store for a couple days. It was a great break from normal life and I really enjoyed it. Things didn't really go as planned, but that was ok. I did carve most of the pattern that I had planned to carve on the first day. Didn't get around to coloring it the second day. Instead, I talked several people that came in into trying to carve an elk head. A couple of these people had very limited or no carving experience at all. Russ said he had never done any figure carving, but from the picture, you can see he did a nice job. All of them did a nice job of carving thier elk. It was fun to be able to work with these people and hopefully they got a little confidence in their ability to do this and will try some more. Bert let me stay at his house while I was there and I had a chance to meet his parents and some the kids. The triplets made me feel right at home. They also had a lot of fun taking turns wearing the mask that Leatheroo sent to me. Too bad both Bert and I had left our cameras at the store. Freak, I'm not sure if the hat will improve your carving, but it's nice to hide behind when someone wont put that dang camera down! Looking at the pictures Bert posted, I kinda felt like Wilson from Tool Time. Oh, and there were doughnuts at the store!!!! I didn't bring them, so there wasn't any dog slobber on them, but for some reason people were still a little reluctant to try them. I'd love to do this again sometime so hopefully Bert will let me come back again, but it's sure weird to have 2 Clays in the same place. -
If you go to Herman Oak's website and click on the "distributors" button on the left side of the page, it will give you a list of the places you can buy thier leather one side at a time.
-
ClayB. to share lost secrets of ancient leatherwork
ClayB replied to Clay's topic in Special Events, Contests and Classes
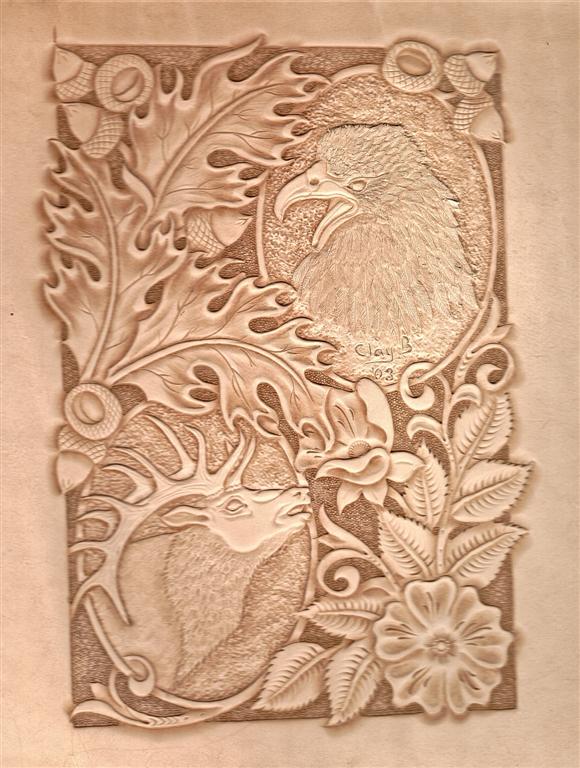
Thank you for the suggestions you all gave. I tried to come up with a pattern that included a few of them. Sorry Freak, no skulls this time. If I can get through all the carving, I'll try and do some coloring on it too. I started on this one, eco flow dyes on the leaves and acrylics on the eagle, but just didn't have the time or energy to finish it up. I'll be heading down to Rapid early tomorrow morning, hoping to be there when the store opens. It's would be great to see some of you there.
-
Here is what I would do. There might be easier ways. I'd dye the background a medium to dark brown with a small brush. On the side by the basketweave, I'd dye it dark close to the floral, then start diluting the dye maybe 1/3, go a little farther away from the floral, then maybe 2/3 diluted and go out a little farther. Start with a full brush of dye close to the floral and the brush runs out of dye, work farther away towards the basket weave. Less dye in the brush should give you a somewhat lighter color. Practice on scrap first until you figure out how your dye is going to act. Some dyes will spread towards a cut line and then stop. Some will go places you dont want them to. Some dye will also get lighter or maybe even darker as it dries too, so trying it on scrap first will save you some frustration. Hopefully you'll get some more ideas from a few other people.
-
1. x ray film seems to be pretty hard to get a hold of. I got some from a friend that said "dont tell anyone where you got this". I have tried using it to back carving projects, but I dont really like it. It's really hard for me to get it to stay on the leather. About half way through a project, it starts coming loose. I just use the cardboard off of cereal boxes. It's easy to get, sticks well with rubber cement, and comes of easily when I want it to come off (make sure you put the cement on the outside part of the box). 2. Rubber Cement is usually for a temporary bond, contact cement for a permanent bond 3. Good question
-
Elton, Sure couldn't tell from looking that it's only your second one. I really like your tooling, that's a neat flower. I dont consider myself a "real" saddle maker so I'll be interested in seeing what they have to say. I like pretty and yours fits that. One thing I can say. On a cantle like that, I like the hidden stitch on the back. I can't keep my stitches very straight on the back side so hiding them was a good option for me.
-
Hi Clay, Looks like that turned out really nice. I cant imaging trying to do that before and after work. Do you get to display it for a few days? I'd like to get a chance to see it before it goes to it's new owner. When I was learning, Rex told me he likes to put the welts off to the front because they are a little out of the way and less likely to get rubbed and scuffed there. Not sure if that's the only reason for it or not, but that's how I have done mine too. The other Clay