


Bobby hdflame
-
Posts
283 -
Joined
-
Last visited
Content Type
Profiles
Forums
Events
Blogs
Gallery
Store
Everything posted by Bobby hdflame
-
Fantastic Leather Edge Burnisher
Bobby hdflame replied to Bobby hdflame's topic in Hardware and Accessories
Looking at that, I don't see why you couldn't just take a bolt, cut a stack of canvas or felt with a round die cutter, stack them together between two nuts and flat washers, and tighten. Then cut off the bolt head, add collette for the motor shaft or just chuck up in the drill press. Then all you'd need is your favorite edge dressing. I think I may try making one. -
I really like the lace! What did you use for the colors on the initials, and what did you use to protect with your top coat? Bobby
-
I love the round braid, and a very unique design. Looks good! Bobby
-
Solo Seat....a Work In Progress
Bobby hdflame replied to leatheroo's topic in Motorcycles and Biker Gear
Like Dave, I like them both, but......I'm leaning a bit towards the darker one myself. But it turned out great either way, and I assume the one paying is probably more than satisfied! Great job! What was the final finish/protectant that you used? Bobby -
Joker, Thanks so much for the quick reply and picture! That helps a lot. Actually seeing how something is put together really helps me understand it much better. It looks like you drill and tap the pistons for attaching the leather? I guess you could use rivets too. I've never used the copper or brass, (not sure which) rivets, but I bet they'd look good on it. I've seen them used on other projects on this site. Would they be easier or cheaper, or is there a reason you use screws? Very nice work! Thanks again, Bobby
-
New Mini Dragon Notebook
Bobby hdflame replied to anester05's topic in Books, Journals and Photo Albums
Hey, looks great! I'm starting a cover for my cheap little pocket appointment book that I picked up from Office Max. Just bought the one with the cheap plastic cover because I knew I wanted to make one from leather. I'm not going that fancy, but I hope mine turns out half that good! -
I really like your piston bags! Could you show some pictures of how they're opened and closed? I'd like to see the inside.
-
It looks great. I like the font and background stamping around them. Lot's of detail in the pictures, but they are a bit big to view without scrolling the page. I like the writing along the edge, nice touch. Bobby
-
Key Fobs
Bobby hdflame replied to dscott's topic in Purses, Wallets, Belts and Miscellaneous Pocket Items
dscott, Nice job on the key fobs. I'll keep those in mind when I've got small pieces laying around! Looks like I wasn't the only one thinking about key fobs for Christmas presents. Bobby -
Loren, I was thinking of making my wife and daughter a knock around bag out of some old jeans, but they sure wouldn't have been that fancy! Where do you find patterns for purses? I can tell that you put a lot of thought into the design. I would have a hard time trying to figure out which piece gets sewn first. The wrong order and you'd be screwed! Your dual needle machine made some fine looking French seams, BTW. You need to post these pictures in the GREEN room on the upholstery forum. Now, if you could just make a removable purse you can sit on for motorcycle chicks. Bobby
-
Loren, I see you found the leatherworker.net site. Man, I am impressed with those handbags! Did you take one apart to get your pattern, or did you make the design yourself? That has to be very time consuming, how many hours in one? I know your daughters and girlfriend were excited to get those on christmas. Great job, Bobby
-
Crocodile Biker Wallet
Bobby hdflame replied to Big Papa Leather's topic in Motorcycles and Biker Gear
Very nice wallet! Just a couple of questions. Do the card slots have the leather go full length for each card? I was wondering how to minimize bulk. The wallet doesn't look very thick so I wondered how you accomplished it. Love the colors. I really like the croc leather. I haven't got the nerve to buy any to cut up yet! Also wondered where you find the liner material? Is there a place that specializes in wallet supplies? Bobby -
Christmas Collars And Leads
Bobby hdflame replied to xaman's topic in Collars, Cuffs, Leashes and Leads
I will go ahead and apologize now, I like the two toned Brown/Black one so much, I'm going to make one for my daughter's dog! Nice job on all. I do have to agree on cutting the ends. Bobby -
I just started the Leatherworking University videos at www.smartflix.com Pretty good so far. Here's a link to check out: http://smartflix.com/store/video/6304/Leatherworking-University Hope this helps. Bobby
-
I was just looking at your colors and I think they look great! I want to get colors like that on the firefighter shields I'm working on. You said you were using eco-flo products. Can you tell me what brushes you're using or any other tricks you could recommend for me to get bright opaque colors? The dyes I've used don't give me the coverage you have. Could I also use acrylic paints like I could get at a craft store? Your detail to the painting is very good.
-
John, Thanks for the suggestions and comments. Actually, I sewed it exactly like you said. I used my compass to scribe a line around the edges, then used a stitch wheel because I wasn't sure if I would actually stitch it or not. I've seen them done by painting the stitches from the stitch wheel. Then I set my stitch length on the machine to match the wheel marks. I also hand turned the wheel stitch by stitch, each time lifting the foot to line up the needle to go into the same hole. I think the reason the stitches aren't perfectly straight looking may have to do with the needle and thread. I used a #22 leather needle with #138 poly thread. I have a feeling that the needle was punching a hole just a little too big for the thread. I'm going to switch to maybe a #18 needle next time. The #22 was the only size leather needle I had. I may also try going to a bigger thread, but then #138 is the biggest thread I have! I was looking at my presser foot and I'm thinking about using my Dremel to cut off part of the foot so I can see better without having to lift the foot each time. I think by cutting back the center foot, it will still sew OK, but I want to order an extra foot to have on hand before cutting the one I have, course I do have a zipper foot and cording foot I could use if I had to. Thanks again for the suggestions, Bobby
-
Thanks for the comments. You're exactly right about learning from mistakes. I've also been teaching myself upholstery work over the last year and it's amazing how far I've come and how much more confident my sewing has become. The stitching was done with my walking foot upholstery machine and there is two layers. I used some weldwood contact cement to glue them together before I stitched them so the stitching is visible from the back. I think next time I will do the stitching for looks and then glue the back on. I will just have to make sure that the two are glued really good on the edges. Thanks again, Bobby
-
Miniature Firefighter Helmet Shields Key FOB
Images added to a gallery album owned by Bobby hdflame in Our Leatherwork Galleries
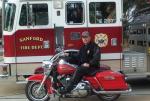
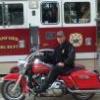
Here's some pictures of one of my first projects I'm working on for the guys at my fire station. I'm making them for Christmas presents. -
-
Miniature Firefighter Helmet Shield Key FOB
Bobby hdflame posted a gallery image in Our Leatherwork Galleries
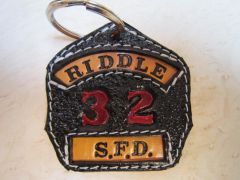
From the album: Miniature Firefighter Helmet Shields Key FOB
© © leatherworker.net
-
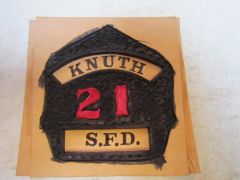
From the album: Miniature Firefighter Helmet Shields Key FOB
© © leatherworker.net
-
Practice Key FOBS
Bobby hdflame commented on Bobby hdflame's gallery image in Our Leatherwork Galleries
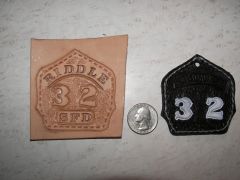 These are not the finished key fobs. For some reason I can't get the other pictures to upload. Maybe the files are too big??
 -
From the album: Miniature Firefighter Helmet Shields Key FOB
I tried several different things before my final key fob.© © leatherworker.net
-
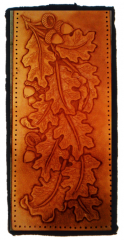 That's nice. I'm thinking of making a cover for my pocket calendar and use some oak leaves. Good job! Bobby
 -
Ace of Spades Solo Seat
Bobby hdflame commented on leatheroo's gallery image in Our Leatherwork Galleries
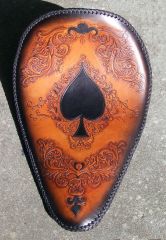 Dude, excellent seat!! Everything just goes together! Nice work. Bobby