JLSleather
-
Posts
7,385 -
Joined
Content Type
Profiles
Forums
Events
Blogs
Gallery
Store
Everything posted by JLSleather
-
theyzz DEFINITELY glue under muh needles In leather, yer fixina find a WHIOOLE BUNCH o' fellas determined ta tell ya they got the "real" way ta do it. This was the reason for my "fade" video... they was fellas makin' HOUR LONG videos about that same thing, many of them claimin' they 'invented' that look. ALL of that was RIDICULOUS, so I showed how that kin be done in about 3 minutes once you got yer stuff ready. Tell a story while yer doin it, STILL only take 3 mins to paint the holster and mag carrier. Some fellas gonna tell ya ya gotta stand on yer left foot facin' east to sew leather, er whatever they makin' up this week I suppose you could - theoretically - get some glue on yer needle if you CAKED IT ON THICK, but I have no idea how a guycould git glue up in the machine
-
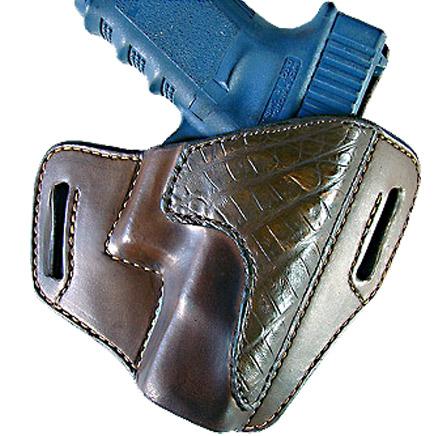
not sure i'm gittin yer question here.if it's under the exotic, it's glued completely. done differently one project to the next sometimes. In these examples, the pocket holster lizard panel was glued to the flesh side of a cowhide, and then together glued and sewn to the main body. That the question or somethin' else? I haven't had any issues with it at all. The small size of the scales lets it bend a pretty tight curve. It's machine sewn, so maybe that makes a difference? I do not like hole punches - too much chance for them to walk on you, or angle the wrong way coming out the back, or tear the leather on the way out (all of which I have had happen in the past). So, either machine stitch, or I have been known to put a machine needle in a drill press and "poke" the holes. SOME exotics you can get away with marking with an overstitch wheel and then using an awl, but not too many (exotics) work that well like that. But teju isn't armadillo so it aint too bad. It doesn't "burnish" in the condition shown, so I taper it to almost feather edges on the back side before gluing.
-
looks good , tho you could have just turned the zipper gusset other way and not added that piece I like to burnish and dye the edge near the zipper before sewing on the zipper.
-
these folk may have what you want https://bunkhousetools.com/product-category/holster-molds/
-
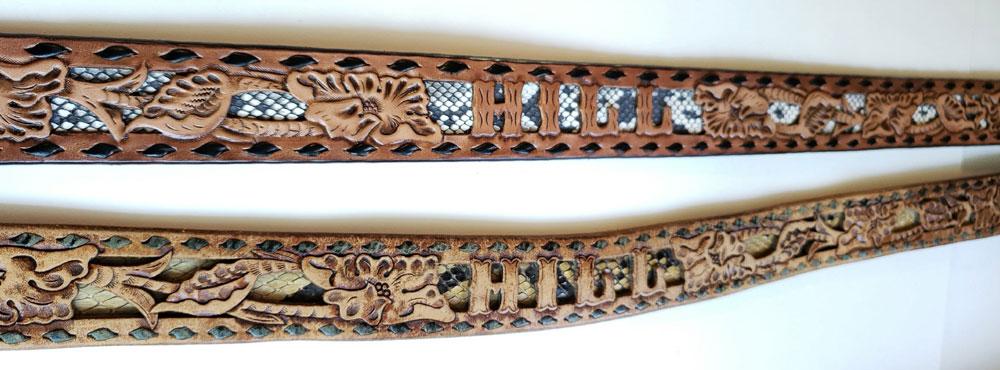
I generally like to "mix em up" with various exotic ACCENTS. I have made full snakeskin belts, but prefer to recess it or inlay it so the scales don't flake. Just one example of some issues that can arise with exotics. Somewhere along the line "prints' became widely used, but I aint really a fan there. Gona use fake gator, might as well use fake cow. IN the gallery some pics of various 'stuff' got added time to time, like such as ... Python Teju lizard Ostrich leg
-
I like to turn the zipper gussets the other way ,so they're flush with the outside of the case and get burnished together.. but that looks purdy good
-

whats a good leather and thickness to wet mold?
JLSleather replied to ToddW's topic in Leatherwork Conversation
for a phone? A case, or a belt holster? One I'd use like a 4/5, the other perhaps a 6/7. -
I tried em in the 80's, but didn't care for 'em. Coulda been I just got bad ones, who knows - never tried em again. They were advertised as basically indestructable, stay sharp forever. Those I bought weren't that sharp when I got 'em, and I don't like having to FIX a tool BEFORE I use it.
-
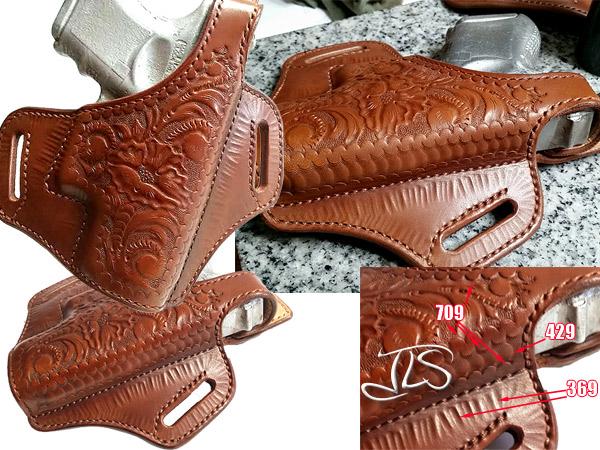
uh... okay. Any interest in tooling designs or instruction? Guessing if I upload a bit different style of holster I'll have to also change the directions a tad . That would take considerably longer, so ... This one shows a G27, tooled, monochrome colored, with safety thumb break strap and full lining. Tools used were added to the pic for a conversation round here somewhere a while back.
-
isn't that eco-flow stuff more of a stain? ah - no mattter. you'll get a jillion different comments, some more logical than others. For a baseline startig poing, if you git that fella tellin' ya ta dye only when facin' east and standin' with weight on the left foot... run away the #1 way to ensure good results with dye is to start with good leather.
-
well, that seems extreme but I maybe should get some these "NOT 5050" patterns digitalatized ...
-
yup. the tighter you bend it, the tighter you bind it. Seem like somebody around here once posted some pdf's about howta makeyer own, in different ways, including comparing '5050' and "flat back" pattern makin'. Dummy even gav it away free...
-
yup - the etsy shop is 5050. Look like this if you use brown dye and brown caiman hide those have been BIG for years. Personally prefer the "curved pancake" style myself. Those 5050 builds are simple to make, and you could cut front and back from the same cutting die, so they're popular as all. Issue was, as a rule the tighter you cinch the belt, the more friction on the pistol - which I don't like. Folks talk about "breakin em in", but they just mean stretchin' em, mostly. At some point, the holster no longer retains the pistol when you take it off, and the holster gets replaced (maybe thats why holster makers like em?). You can make a 5050 KYDEX holster without that issue, cept it's gonna protrude more and be less likely to conceal. And forming the front over the gun on a table or bench, allowing to dry, then sewing, DOES work, and works WELL. But the TIME involved in that doesn't lend itself to getting the numbers out, unless maybe you have thousands of square feet of bench. Robert, while he was with us, did this well as ANYBODY, and made some genuinely beautiful pocket holsters in teh process (Sig Sauer sent him their logo stamp to use on the holsters they ordered). I should find that picture of what I think is probably the BEST looking leather holster I've ever seen - designed and made by Robert, who taught me a good bit. BACK to the point.... These "curved panel" holsters have the same retention in your hand as they do on your belt. Tightening the belt doesn't tighten the holster (well, I suppose if you sucked the belly in and HAULED on your belt, maybe a little?).
-
I like makin' that one in exotic stuff too. Haven't done it in dog yet, but I got one askin' fer it This some mottled grey elephant and black shark hide.

-
SOME FOLK (not me) say it should be DOUBLE 8/9 oz, and though I don't care for that, there IS the advantage of being able to use it to pull your truck out the snow if you git stuck Mine are generally a 'standard' belt is about 12 oz leather - 7/8 lined with 3/4. And 1 1/2" wide. We usedta make 'em 1 3/4" wide, but most jeans makers started making pants loops smaller so that wouldnt' fit most. In teh end, "standard" is what you decide to make 'em. Most my holster patterns assume a 1 1/2" wide 12 oz belt. Biggest one I ever did was a 2" wide belt, about 13/14 oz, for this BIG fella with a 54" waist who wanted to carry TWO Ruger revolvers with 10" barrels. Oh, yeah- and I like to use an OVAL punch for the adjustment holes, and I leave 6" past the middle hole to the tip, and I fold the buckle end over and leave 3 1/2" of fold (skived to just under half thickness at the end).
-
that's what I was thinkin' too. as a rule, i cut strips 10" longer than the waist size. And by waist size, I mean what they actuall measure, not what they SAY they are. Even at 52", that's a 42 belt, which is a LOT of us.
-
Two more points here - http://www.usacuttingdie.com/ folks make a decent die, always arrives sharp and ready to use (sadly, not everybody can say that). Having said that, no matter where you have dies made, adding holes (or slots, or whatever) is going to increase the cost exponentially.
-
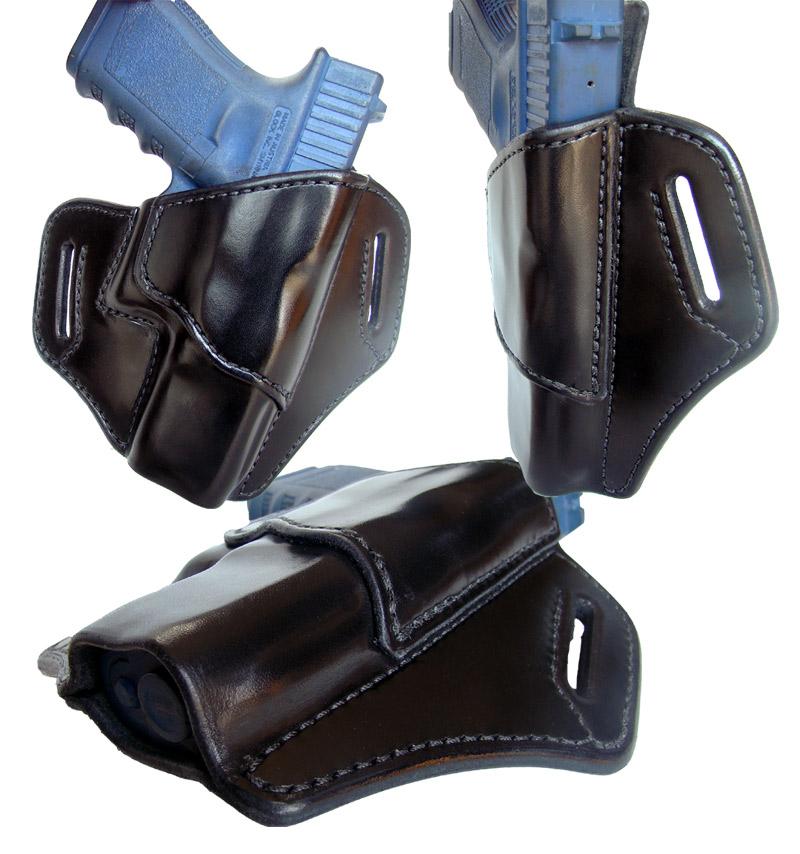
Yup, formed in a vaccuum bag with a "blue" gun. That works also. I prefer to do it the other way so I can cut like 4 er 6 er 10, glue and sew, form 'em as they are ordered. Just saves time, and ensures that when a customer comes back for another, or his buddy sees it and wants one, the next one is just like that one (though not identical). The purpose of that video was actually that "fade" thing SO MANY were on about for YEARS. LEather workers will take turns claiming the invented it, but Gibson Guitars made that big decades ago, calling it "sunburst". Guys were taking turns making HOUR LONG videos about it, so I thought somebody might benefit from seeing it done in 3 minutes That said, I can't find the pic of THAT holster... can't keep em ALL. But this is a G19 done the SAME WAY, but with a reinforcement panel. From this you kin prolly tell that it's not "flat", its actually curved BEYOND flat to a natural curve. This is assembled and sewn before forming.

-
I would get a stronger press. Harbor freight sells em cheap, and they're solid. I got one round here is.. I think 6 ton (?)... small enuogh to put on a bench. Big enough to cut your wallets. Mine used mostly for small holsters, mag pouch parts, drink coasters.... I'd have to look up the "sae" formula for press tonnage, but it would involve the cut length... so a 4" x 4" drink coaster would have a 16" cut length. You're talking about more than twice that. I'd do it WITHOUT the stitching "holes", becuase I do not like stitching HOLES. YEars ago, Tandy sold those little "kits" (which I HAVE used on occasion) with holes - and it sucked Doesn't look right with thread OR lace, and weakens the project too much. But yeah - you can emboss with a press as well. I use it for my "maker stamp" and also for small dies pressed into drink coasters.
-
Well, no. Actually those holsters are made from patterns, much like other patterns. But the front piece is wider than the back panel, so if you glue it where ya should, then stick it together on the outside edges lined up, the curve forms in naturally. You can kinda see this in an old video I made forever ago... using a "curved panel" holster and a "pancake" mag carrier for the same gun, kinda two birds with one rock type instruction (actually was about something else, but I still think it's worth the 4 minutes ).
-
I DO NOT LIKE that "ant-streak" junk. Its nothing you did, I just hate that JUNK. Always looks to me like what's left behind when the puddles dry up after a rain. I've tried half a dozen variations of it, and they all suck Occasionally, I get somebody who specifically ASKS for that stuff, I think because somebody else talked about it. So I have some on the shelf, but I apply it only with a finger tip, exactly where I want it, and more than once I've thrown it out because it got old before it got used up. With the design you have there, I would completely eliminate that border at the top of your pic - all three of those straight lines, just don't include them at all.
-
Stamp_Maker.pdf This comes up time to time, so I put together this list - probably been a couple years ago? I had mine done by am, and I see the link changed a bit since, now https://am-leathercraft.com/collections/custom-leather-stamps-usable-hot-and-cold Great quality, great pricing, ...

-
that was gonna be my question ... ifya hadda nuf room ta grip onit. otherwise, I'm gonna say that's not a terrible "first" at all
-
I like the rigs ,but I didnt' realize they were closed. Only thing this needs is the slots dyed.
-
might could be the pic is a bit too small. that's not half INCH, that's HALF OF THE THICKNESS OF THE FRAME & LEATHER. So, assuming your frame was 1/2" thick, and your leather was 1/8" thick (exactly 8 oz), that's 5/8", and half of that would put your stitch line 5/16" away from the gun drawing. Keep in mind, this is a "starting point" - I have been known to alter the design like 4 times before i'm happy with the fit and land on a pattern. Not to sidetrack too much, worth mentioning here that this is the importance of the leather thickness. If you're molding the leather over the form (or gun, or whatever you're using), you can use whatever weight leather you want, then trim when it's formed. When cuttnig from a pattern, you need to use close to the weight of leather that the pattern was made with, or adjust the pattern to suit different leather thickness. As in... If the pattern says use 7/8 oz leather (mine usually do), I sometimes use 4/5 lined wit 3/4 without altering anything about the pattern (4.5 + 3.5 = 8 oz). If somebody asked for that same rig but in 10 oz leather, I know I'm only moving the stitch line HALF THE DIFFERENCE, so (2 more oz = 1/32", and half that distance is only 1/64"... so I just mark down the outside of the SAME LINE and It'll be fine). Start talking bigger thickness changes than that, you'd want to start kicking teh lines outward on th pattern. Im'a send you a sketch of the shield .. maybe save you some time. Use it, or pitch it, or whatever -- up to you.