


JLSleather
-
Posts
7,384 -
Joined
Content Type
Profiles
Forums
Events
Blogs
Gallery
Store
Everything posted by JLSleather
-

Fudging stitch length @ a border/corner: Cobra class 4
JLSleather replied to DieselTech's topic in Leather Sewing Machines
you'll want to spread the difference over 3 er 4 stitches, so you don' t have 1 or 2 real short, very obvious ones. It's worse at a corner. Generally, for soemthing like what you have in the pic, I would mark with an overstitch wheel starting from the point working backwards, so that the TURN comes out correct. You can "fudge' a few stitches before getting to the corner, and you'l be fine. -
Holster making literature
JLSleather replied to JLopez38's topic in Gun Holsters, Rifle Slings and Knife Sheathes
You CAN, but the spring makes it nicer to use. Gives the thing something firm to push on. A guy could use an additional piece of cowhide in the shape of the metal too. And put on the outside, wouldnt' really need to be lined. I LIKE 'em lined, because i can recess the snap into the lining, helping it clear the pistol better. -
I generally and usually and normally and routinely and consistently (and prolly some other ly's) advise NOT to use ant-streak on leather. But on "figure carving" I DEFINITELY WARN against it. Just don't belong on 'figures' at all. That said, I think you could benefit greatly from seeing Stohlman's book on figure carving, specifically look at 'matting" and double beveling. Still, your knife cuts look good n smooth Maybe this helps? Figures here also from "craftaid" templates.


-
yeah, prolly work there, long as the land is wide enough. Mostly on chrome-tanned bags, I would think. Assuming we're talking about the same type of bag, a 90° on a veg-tanned edge would likely cause a "booger" (wrinkle) I would find unacceptable. Still, it may be of use for like gussets on notebooks/binders?
-
One is a six, the other seem more like half a dozen. I've had customers ask, and I tell 'em by the time either wears out, send it back and I'll replace the stitchin' in it - you just pay the shippin'. They DO sew a bit different, barely, if I'm tellin' the story. EITHER is fine - but you might notice when switching from one to the other you might adjust the tension just a tad, even with the same weight of thread. Again, I have and use both, so ... Originally, I used nylon for no other reason than that's what I had on hand. I "tried" poly thread because it was available in a color I wanted and the nylon was not, at least with my regular supply stores. The difference in use is minimal... almost none .. and I dont know there's much difference in the wear of it either. Somebody said that somebody said poly might be a bit more UV-resistant... but that same 'they' also tell you that tooled leather needs ant-streak and theyz WMD in Iraq ...
-
I didn't find I use the "holster" or "stirrup" plates nearly as much as I thought I would. With just a little thought, the standard plate does prett much all of that. I suppose if you were trying to sew next to a metal clip....
-
Correct. I've got a few decent pieces from there, but they were the exception. I would call and complain, they would apologize for the "mistake", send me a different piece. But I was spending SO much time on the phone with them, it just became not worth it. They didn't seem to understand that I KNOW what H.O. A and B grade looks like - usually that's what I would order and use SLC for the ocassional odd weight. Like as in I don't use a lot of 5/6, so instead of buying multiple sides from H.O., I would order 7/8 at H.O. and use SLC for the ocassional 5/6 or 4/5. I got one side of 5/6 I could stretch a 1.5" wide strap by hand. ANYWAY.... Wickett/Craig has good leather, I've made a lot of holsters from their skirting leathers. That in mind, I have had a few issues with W/C as well, though not nearly as often. More than once I called to remind them that I don't mind PAYING premium as long as I'm GETTING premium. If you want to go with H.O. but don't want to buy minimum 10 sides, I always recommend Goliger Leather. It's a bit higher cost than some places, but they have ALWAYS sent me great leather. NEVER ONCE a piece I wasn't happy with. http://www.goligerleather.us/
-
Are Basket-Weave Stampers Negligent!?!
JLSleather replied to RVM45's topic in Gun Holsters, Rifle Slings and Knife Sheathes
back to the original point, I dont do a LOT of basket stamp, but when I do, I leave the back side of the holster (wearer side) SMOOTH, UNSTAMPED. Nothing to do with lazy - I want a smooth surface to glue down the belt loop to. -
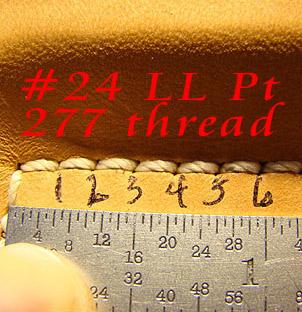
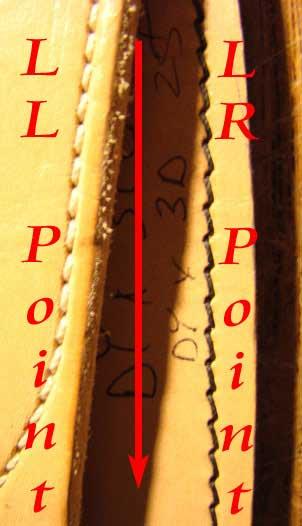
yup. LL is a diamond hole. I don't much like the "D" of "S" needles, as they make a hole I think is not as strong in teh direction of sewing, and I don't like the way it leaves "space" between stitches. EDIT TO ADD: I like a #24 needle, 277 thread on the "top" and 207 on the bottom MOST of the time (I have been known to sew 207/207). The pics above were #24 needles. yes, you certainly are. I found the service at LMC more hype than reality. I remember a post about it disappearing, prompting me to ask if advertisers here can get that done for them. Meh - perhaps it's better now, it's been a good while since I dealt with them.
-
exactly what i use - LL point, #24 pics show close up of the difference in a couple styles. the LL and LR points are the SAME needle size, same thread size, and same stitch length. The LR is kinda lacy and girlie, doesn't pull as deep, and makes the stitch LOOK longer (it isnt) teh LL pulls in deep, results in a very straight and tight stitch, with a hole geometry unlikey to tear.
-
Holster making literature
JLSleather replied to JLopez38's topic in Gun Holsters, Rifle Slings and Knife Sheathes
Easy enough to put the spring steel between the outer leather and the liner - since this was all black it didnt' really matter one way or other, so this is done to show the construction. -
Holster making literature
JLSleather replied to JLopez38's topic in Gun Holsters, Rifle Slings and Knife Sheathes
Yes, and yes. USUALLY, a 'regular' line 24 snap, a piece of spring steel and a rivet, give the thing some substance to push on. This one on the back of a 686 / Python holster. Busy again, but stil meaning to get back to this conversation. PM sent...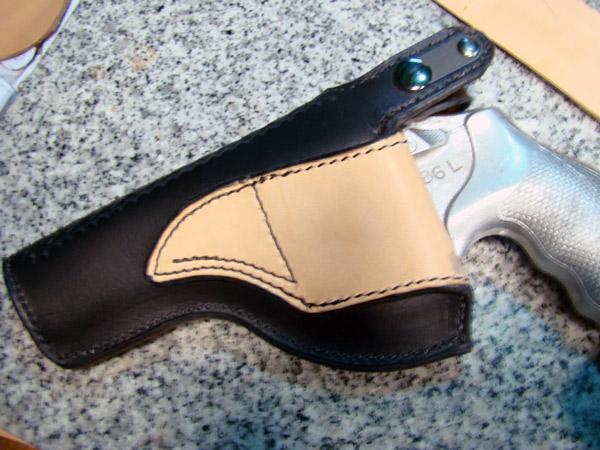
-
I wouldn't antique a basket stamped leather anything. But then, I don't antique anything (save about twice where somebody threatened me with money if I would do that to the project, against my recommendation). If the moisture content of the leather is right, the burnish of the leather negates the need for ant-streak That said, IF a guy was insistent on that goop, considering that type of holster, I would then grudgingly recommend ... Cut out leather Stamp Line (if used) Sew Wet form Allow to dry completely. Oil if desired Ant-streak, using a fingertip TanKote or other top finish (I use resolene sometimes, sparingly)
-
I like the thread from Superior. Big color selection (including hot pink). That said, i also like the 'cowboy' brand I bought from Bob K / Toledo Ind Sewing.
-
Holster making literature
JLSleather replied to JLopez38's topic in Gun Holsters, Rifle Slings and Knife Sheathes
It actually looks like we need to get you a good piece of cowhide. Using sub leather to learn the craft is like a guitar player trying to tune his ear with something off the walmart shelf How thick is that? I 'might' have a piece around here somewhere. Off to somewhere right now, but I'll check back. -
dude - it's the SAME MACHINE. If you're already dealing with Bob K / Toledo Ind Sewing, I highly recommend you stay with him.
-
Tha's a LOT of work! Lookin' good
-
Holster making literature
JLSleather replied to JLopez38's topic in Gun Holsters, Rifle Slings and Knife Sheathes
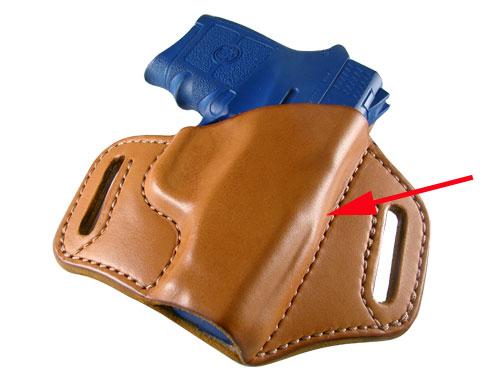
Oh, I DO use a "site channel", but generally not the full length of the holster. About the back of the port is bout as far as ya need most cases. Maybe this show it a bit better? Channel ends at red arrow.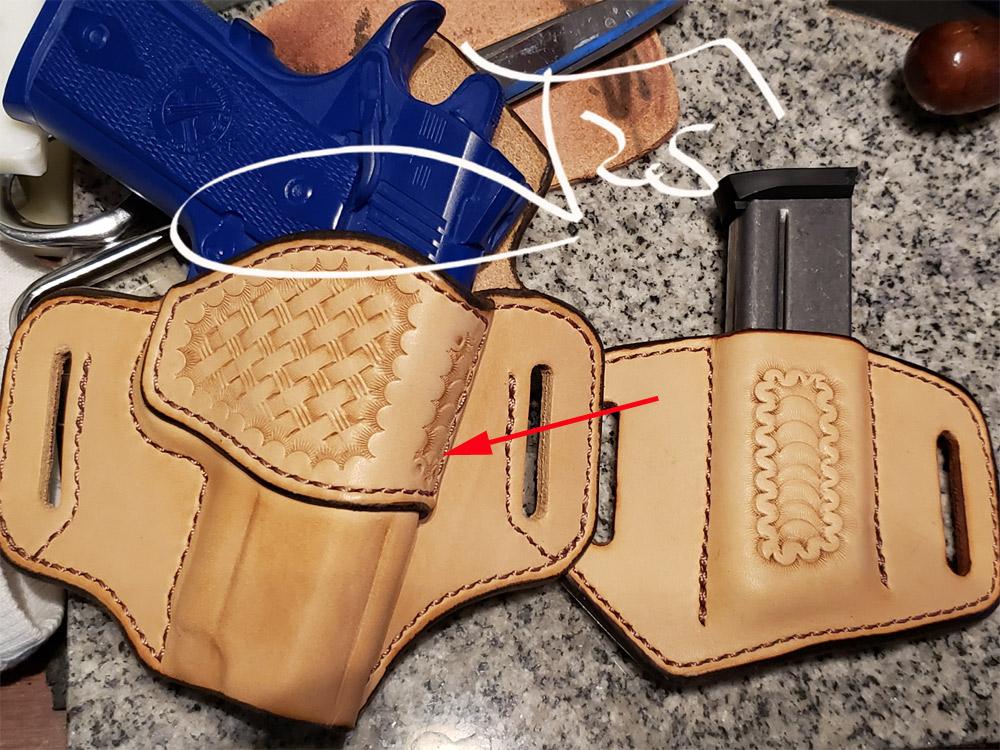
-
Holster making literature
JLSleather replied to JLopez38's topic in Gun Holsters, Rifle Slings and Knife Sheathes
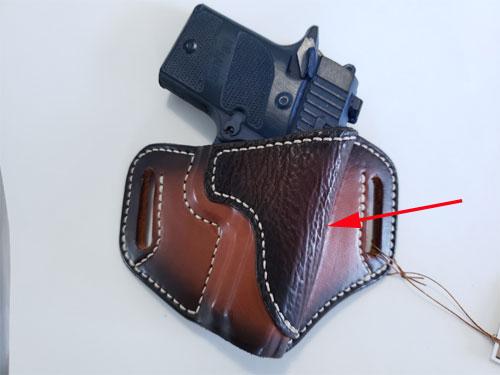
uh... I'm gonna guess at maybe I understood that. Starting with.. 80/20 is a number I threw out there a few years back... it's not actually "calculated" to those numbers - just "about" that. Varies with the gun model, at least for me. And yeah - the leading edge stitch line will often be RIGHT AT the edge of the pistol (probably most obvious with Glocks and other "square" pistols). The trailing stitch line varies a bit depending on thickness of the gun, whether there are accessories mounted on it, etc. This is the same Glock holster shown above ,you can see about how much break is in it. It's not "flat" in the back, it actually curves beyond just flat to contour to the hip. Little harder to see since the pic was taken with a metal "dummy" that messed with the camera a bit. This little Sig P238 right hand (green dummy gun) might show the difference with these smaller pistols, and the pic of the other is a P320 Compact (blue dummy) just to show that they are not all done "just" the same.

-
Holster making literature
JLSleather replied to JLopez38's topic in Gun Holsters, Rifle Slings and Knife Sheathes
i didnt' really follow this bit not sure i'm addressing your issue here, either, but I'll say this. I've seen SO many holsters where not much attention was given to the stitching placement, obviously. Then they seemed to rely on "boning" to create the tension they wanted. This will fairly quickly relax in and you end up with far less retention than desired. ONLY time I have a stitch line not meticulously placed is either 1) Im' making a traditional 'western' holster and want to keep the look, or 2) I'm using tension screws w/ grommets. In all other cases, I want that stitch EXACTLY where it belongs. This was another issue I had with adams' patterns - stitch lines weren't particularly thought out. When I attempted - more than once - to discuss that with the guy who made them, I was met with an excessively defensive response. Meh. I dont care WHO lays it out - I don't want holsters with a stitch line 1/4" or more from the weapon. This one went to CA a long time ago, but I use the pics for discussion. This was for a Glock 27 (or was it a 26... I'd have to check records). The customer asked for TOOLED, MONCHROME, THUMB SAFETY STRAP, and that '80/20' design style. These pics show the 80/20 shape, but also the tooling shows i knew exactly where the stitching would land before making it. Note the liner was NOT dyed. The bottom corner shows "craftool" numbers - somewher along the line somebody wanted to know which tools I used on this. AND THERE is a bit of the issue with making these other patterns available. What to put out, and in what way, and for how much? Include the tooling pattern, or no? A guy could get SO detailed as to come with a formula - or 'recipe" - for that shade of brown and the thread used to match WHO was it recently... asked about a P320 mag pattern off cutesy. Apparently I laid that one out to go with the 80/20 holster, so I din't realize that folks might want the 50/50 version of that. I do like to make the more stout mag carriers on a curve... like this P320, many of the Glocks, .. whereas a flatter mag like most 1911's isn't necessary.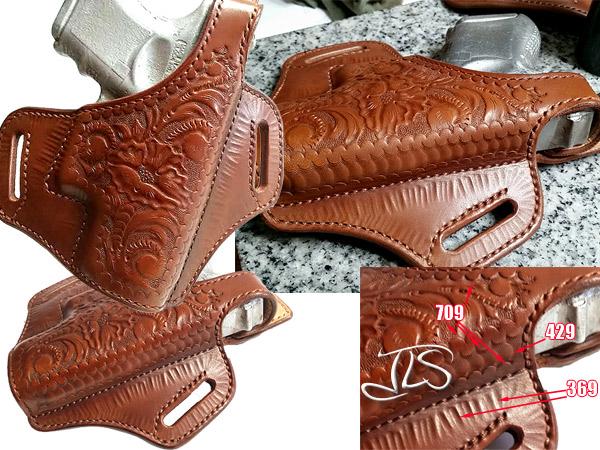
-
Holster making literature
JLSleather replied to JLopez38's topic in Gun Holsters, Rifle Slings and Knife Sheathes
okay as are many of mine I do make them NOT that and have had multiple requests to offer them. SOME of them are in PDF form now, still working ... MY point in them was the value of the user learning to design their OWN, and these "50/50" models do that very well (did I invent that term? maybe...). WHERE IS them pdf's.... Oh, here we go.. might help with the original question. I do need to get these files all combined into one... so theyz tgether and in order.... For now, I recommend the order here for understanableness... Holster_Theory.pdf PancakeLayout.pdf IWBa.pdf AvengerLayout.pdf Theory Pancake IWB Avenger -
Holster making literature
JLSleather replied to JLopez38's topic in Gun Holsters, Rifle Slings and Knife Sheathes
I disagree. This guy is gabby, and the intent of the video seems aimed more at keeping you on the site than actually discussing holsters. Take forever to "explain" the most basic act, appears to intentionally drag out the simplest idea. Gabby. The STohlman book is VERY good. Even if you're not making teh holsters shown, the PRINCIPLES are still valid. ANd check out the "tutorial" on holsters in the holster section - PDF by Jim Simmons ... good stuff in there as well. And SOMEWHERE around here are some PDF's I wrote a while back about LAYING OUT your own holster, and why it works. They're free, so if somebody beats me to it and provides them that's fine. which one? -
Holster making literature
JLSleather replied to JLopez38's topic in Gun Holsters, Rifle Slings and Knife Sheathes
what type of holster? Utube Sam Andrews - he's got some very informative videos on making leather holsters. Might be one or two others, but Andrews skips the hours and hours of droning on and on and just shows how its done well. -
I guess you mean "deglazed". And yeah - that would be required. If it were possible, it would be difficult.
-
theyzz DEFINITELY glue under muh needles In leather, yer fixina find a WHIOOLE BUNCH o' fellas determined ta tell ya they got the "real" way ta do it. This was the reason for my "fade" video... they was fellas makin' HOUR LONG videos about that same thing, many of them claimin' they 'invented' that look. ALL of that was RIDICULOUS, so I showed how that kin be done in about 3 minutes once you got yer stuff ready. Tell a story while yer doin it, STILL only take 3 mins to paint the holster and mag carrier. Some fellas gonna tell ya ya gotta stand on yer left foot facin' east to sew leather, er whatever they makin' up this week I suppose you could - theoretically - get some glue on yer needle if you CAKED IT ON THICK, but I have no idea how a guycould git glue up in the machine