-
Posts
7,386 -
Joined
Content Type
Profiles
Forums
Events
Blogs
Gallery
Store
Everything posted by JLSleather
-
AutoCad? So that would be a revolved surface then?
-
Already there - though not in teh same place (sold that one, too). Now I can jump in the car and be bothering my nieces in about 15 minutes
-

Inkscape and Pattern making, 1911 holster TUTORIAL!
JLSleather replied to Stetson912's topic in How Do I Do That?
Yeah, uh.. I don't see anything like that, at least in teh free version. But I'm not tlaking about individual buttons, either. I mean I have two "draw" menus, and two "modify" and two "snap" ...- 15 replies
-
- tutorial
- vector imaging
-
(and 2 more)
Tagged with:
-
Don't know the "cutting speed", but I've seen ppl on this forum going on about a 2" diameter burnisher running at 3600 rpm, which I have always thought was WAY too fast. I get very nice edges running a stick less than 1"diameter (effective dia. down in the groove closer to 1/2" / 13mm) in a drill press at about 500 rpm. Honestly, I think some people just like to have more tools, necessary or not. If you understand "cutting speed", you likely don't have any trouble making your own "blueprint".
-
Too many Democrats Oh, and the methamphetamine runners and shootings could be a consideration. Not so much in Sartell, but it wasn't far enough away from Minneapolis, where apparently calling police to report a crime can get you shot. By the police you called. https://www.nbcnews.com/news/us-news/minnesota-officer-involved-justine-damond-s-death-can-t-handle-n907036
-
Just a thought out loud here .... you guys know that you can buy 1 1/4 - 1 3/8" diameter oak dowels for a few bucks, right? Building materials stores (menards, lowes, etc) call them closet rods.
-

Inkscape and Pattern making, 1911 holster TUTORIAL!
JLSleather replied to Stetson912's topic in How Do I Do That?
I downloaded the 'trial' version of this - and I WAS able to make a pattern with it. Since I'm familiar with several CAD programs and I already had the measurements of the gun, it didn't take very long to "transfer" it to this software. Except for some reason I have double menus (?#@!), it seems to work pretty well. Don't see any way to eliminate ONE set of the duplicate command buttons (TWO "draw line", TWO "draw ellipse" , etc.)- 15 replies
-
- tutorial
- vector imaging
-
(and 2 more)
Tagged with:
-
-
Blueprint only necessary if you are mass-producing something. Stick a piece of wood in a drill chuck, and make some grooves with a gouge or file, sand it right in place. Obviously, for mounting on a bench or pedestal grinder, you'll need an internal thread to suit the arbor.
-

P320 Carry and P320 Compact
JLSleather replied to JLSleather's topic in Gun Holsters, Rifle Slings and Knife Sheathes
HEY thanks, Bruce. But neither of them looks like much compared to this one of YOURS! Great color there. -
It would depend on what shape you are trying to wet form. Most wouldn't require any "extra" (though if you have an inside and outside forms, an entry radius would be nice)
-

Anyone Read Don Gonzales's Floral Design eBook?
JLSleather replied to GatoGordo's topic in Resources
Maybe I should have bought Don's e-book? I just watched tolerated 16 minutes of some 35 minute video about using Illustrator to lay out patterns . At that point, I really couldn't take any more. PUH LEEZE . it's a 6x4 card holder, and you have a $600 software program, add a silly accent, and a voice that sounds like you're apologizing endlessly for something -- to draw 3 rectangles (two identical pockets, so maybe that's actually TWO rectangles). I think I just failed (yet another) idiot test -

Anyone Read Don Gonzales's Floral Design eBook?
JLSleather replied to GatoGordo's topic in Resources
Agreed.. lots of poo out there with a pretty story attached to it As for holster patterns, anybody not satisfied with the cost + shipping on those free designs is entitled to a full refund, plus 5% for your trouble. -

Anyone Read Don Gonzales's Floral Design eBook?
JLSleather replied to GatoGordo's topic in Resources
Talking about that $20 thing on his web site? $20 doesn't seem like a life-altering investment. I did watch parts of a couple of his videos. Seems like a decent fella, but the videos were a bit long-winded. In fairness, that could be just an honest desire to make his point clear to his viewers. Again, only way to really know would be to spend the $20 -- since it's instant download, fella would know soon enough. https://dgsaddlery.com/product/introduction-leather-floral-design/ -
My fancy-smancy method of trimming involves a utility knife with a new (or close) blade dragged along the edge with the belt in the air... rather like cuttin a piece of jerky, or peelin' taters. Maybe I should make a video? Don't know any fairies I can get to be in it tho ... so there's that to consider
-
Lazy -- I cut teh liner 1/4" or so too wide, stick it n trim it. Bevel edges, burnish, dun.
-

Inkscape and Pattern making, 1911 holster TUTORIAL!
JLSleather replied to Stetson912's topic in How Do I Do That?
I tried draftsight a while back, found it to be quirky. I see they have a newer version, maybe it's fine now.- 15 replies
-
- tutorial
- vector imaging
-
(and 2 more)
Tagged with:
-

Inkscape and Pattern making, 1911 holster TUTORIAL!
JLSleather replied to Stetson912's topic in How Do I Do That?
Im a bit intimidated by the symbols in AutoCad. Like this one: $$- 15 replies
-
- tutorial
- vector imaging
-
(and 2 more)
Tagged with:
-

Help with Avenger style holster
JLSleather replied to Hildebrand's topic in Gun Holsters, Rifle Slings and Knife Sheathes
4" shouldn't be a problem "leaning" the angle a bit. Longer guns become a pain -- more it's angled, the more likely that it "sticks out" and is less concealable. As a rule: dropping the slots lower causes the rig to ride higher. To maintain the angle you have, would require dropping BOTH slots down. You have the opposite issue -- you want it to ride LOWER. Which would be done with a lower belt, or an angled belt, or a drop loop on the holster. -

Inkscape and Pattern making, 1911 holster TUTORIAL!
JLSleather replied to Stetson912's topic in How Do I Do That?
PM me an email, and I'll send you a file I use as a 'start point' -- and we'll know if it's useful in inkscape or no.- 15 replies
-
- tutorial
- vector imaging
-
(and 2 more)
Tagged with:
-

Inkscape and Pattern making, 1911 holster TUTORIAL!
JLSleather replied to Stetson912's topic in How Do I Do That?
I like PrimoPDF for making the pdf files. It's very similar to Acrobat Pro (do they still call it that?) -- makes files quickly and reliably, and free. There is a paid 'version', but i haven't needed it.- 15 replies
-
- tutorial
- vector imaging
-
(and 2 more)
Tagged with:
-

Custom Book Cover
JLSleather replied to JBryan's topic in Purses, Wallets, Belts and Miscellaneous Pocket Items
I think you got a right fine start! -

Inkscape and Pattern making, 1911 holster TUTORIAL!
JLSleather replied to Stetson912's topic in How Do I Do That?
Quick 'google' shows that Inkscape WILL work with .ai files, though don't know just how well. I miss those days when I had teh space to have 3 computers - one just to install and test software I wasn't familiar with. And drives imaged so WHEN (not if) I booger it up it can put itself back while I have lunch- 15 replies
-
- tutorial
- vector imaging
-
(and 2 more)
Tagged with:
-

Inkscape and Pattern making, 1911 holster TUTORIAL!
JLSleather replied to Stetson912's topic in How Do I Do That?
HEY I like it! Very much the same type of thing I'm doing, only the buttons look different in that software. I'm gonna hafta read it again, even though what you're doing is very similar to what I'm doing. It's a bit embarrassing that it never occurred to me to use the guide lines for that (I do use them for other things, so can't say I didn't know they were there!). Just for pointing that out I'm gonna whine about something really petty --- you threw me off when you said "flesh out" ... my brain auto went to flipping the leather, turning the "flesh (side) out", AND you misspelled "alternatively". So there. Now I'm better That software looks more recognizable than I thought it would. Though, I'm not familiar with "outset" (I do get "offset"). Bruce G told me other day that Adobe suite is just over $600/year, translating to about $1.75 per day. So I guess I need to decide if I re-up the Adobe stuff or scratch my head for a while. I'm at least as cheap as you, but I don't like it even when the "copy" button gets moved from 3rd down to 5th down! For those who haven't already committed to learning PS or IL, Inkscape looks like a clear choice. Does it open and work with PSD and/or AI files? Hate to see it not use the files I already created! Is there a "stroke" command, or something comparable? I sometimes use that to portray the leather thickness (just for me - it doesn't come out in the patterns to keep them clear). Have to go over it again after the first coffee is down, but I do like the way you photo-ed and scaled the firearm for your "original" layer. I never did it that way (I'll try it now, though) but I like that better than the old (and not very reliable) "trace it with a pencil" routine (which ends up with some built-in "offset" due to teh thickness of the pencil, operator error and parallax. 'Preciatecha puttin' the time in here -- I'll pop in to check (and perhaps comment) as others chime in. OH-- what did you make the pdf with? Wondering why it wouldn't reduce to a Pdf (the "P" is for "portable" - )- 15 replies
-
- tutorial
- vector imaging
-
(and 2 more)
Tagged with:
-
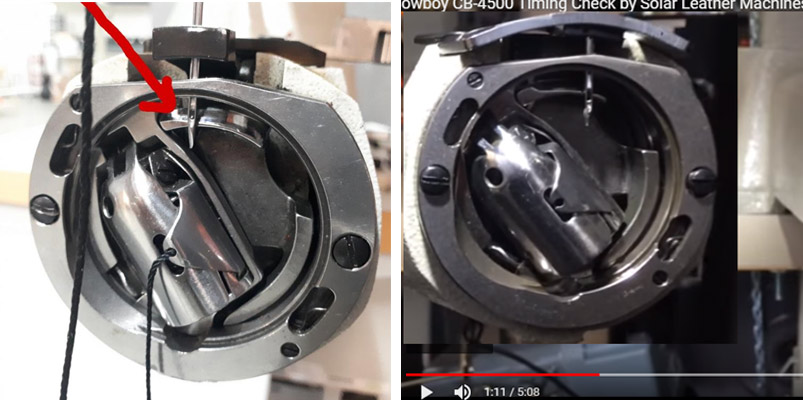
See, that's what I was thinking, but he said he "did" the timing. In this video, the position of the bobbin / shuttle is clearly not the same as the OP's pic. Compare position of the shuttle ...


