


JLSleather
-
Posts
7,378 -
Joined
Content Type
Profiles
Forums
Events
Blogs
Gallery
Everything posted by JLSleather
-
Wasn't so big on the P320? Maybe you more of a 226 guy?
-

Need advice on my new to me cobra4
JLSleather replied to chasman52's topic in Leather Sewing Machines
You can replace that bobbin assembly -- think its about $80. Pop in / Pop out = done. -
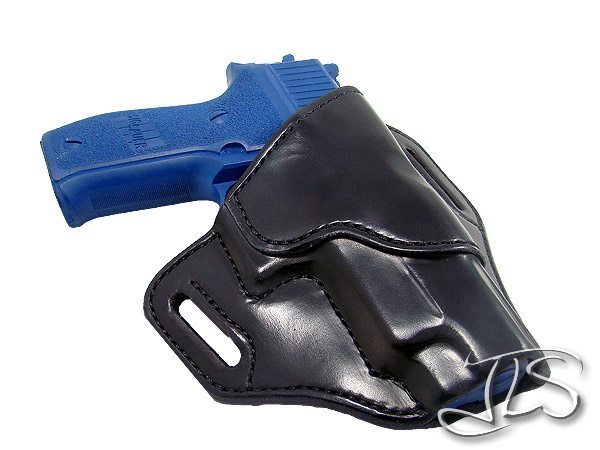
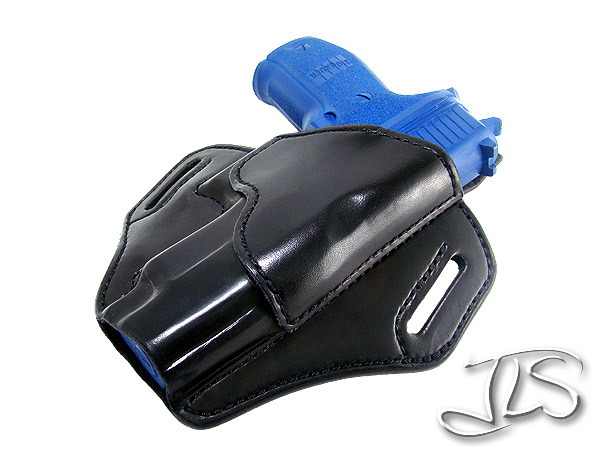
P320 Carry and P320 Compact
JLSleather replied to JLSleather's topic in Gun Holsters, Rifle Slings and Knife Sheathes
The stamped one is Fiebings Pro Dye. The smooth finish is W/C DRUM DYED skirting (comes already black). -
No point lookin' down the end .. there are NO peas in there
-
Didja check the "fancy smancy" video, or just mine?@! Next time I'm at the market, I'm fixina buy me a couple cans of peas.... however many it takes to make my videos "1080 peas" - so they'll be nicer, more valuable videos https://www.youtube.com/watch?v=OMVHrTPf1AQ
-
Don't forget inspiration. We all know that "A squared + B squared= C squared. And we can all read it and "know"it. And we can work with it for a while, and "get" it. But what level of GENIUS does that require to be sitting under a shade tree, with someone playing the flute over there, and it "occurs" to you that "the square of the hypotenuse of a right angle is equal to the sum of the squares of the other two sides" ?@! I'm with Sam Andrews -- I can show you leatherwork in a short time, the rest is PRACTICE. I'm pretty good at it, but I didn't INVENT any of it.
-
First Holster...
JLSleather replied to ewayne53's topic in Gun Holsters, Rifle Slings and Knife Sheathes
Point taken Worth repeating. -
First Holster...
JLSleather replied to ewayne53's topic in Gun Holsters, Rifle Slings and Knife Sheathes
OH NO NO NO -- that just won't do! The holster looks pretty good (who doesn't like tight, consistent stitches?@!) but we can't have a leather worker running around in a WEB BELT -
What's happened to Hermann Oak?
JLSleather replied to buzzardbait's topic in Leatherwork Conversation
Think about that -- is it Hermann Oak, or is it these retailers? I have purchased leather from quite a few different places., sometimes left to wonder how they even stay in business - I suspect it has something to do with selling to the inexperienced and those not properly warned. . But direct from Hermann Oak is the ONLY place that has never sent me a hide I didn't like. I absolutely recommend ordering direct from the tannery. $8 per foot for fantastic leather. Direct from HO, a side of top notch, "A" leather is about $200. IF a retailer marks it up a bit and lets you avoid buying 10+ sides, fair enough. Think about it - say you only want one side. Those people charging $300 are out of control - let's just skip those. leather, marked up, should look and carve just like if I would have got it direct from HO - and any deviation is unacceptable. You don't get to sell me lower grade leather AND mark up the price. AND, I have had retailers (they are often called "suppliers", but that's not actually true) sell me something substandard - then offer to "fix it" by sending me a different batch or refunding my money. But that's not a leather purchase - that's a 0% interest LOAN to them -
If you're tooling, you'll need vegetable tanned leather. The best leathers are from Hermann Oak and WIckett&Craig tanneries. You can get these leathers from retailers, but expect the price to be jacked up. If you're using small pieces, maybe it's worth the mark up for the convenience of the smaller cuts. Start with what you want to make. That will determine the thickness you want.
-
Yup - video makes it look gold... probably camera settings and lighting. Machines like aluminininim, but look like brass or bronze in the show. Maintenance in a former life, I've tore up a chunk of 6061 a time er two...
-
So in down under, "aluminium" is the word they use for free machining bronze?
-
There is no "dilemma", there is no "rule". It's YOURS - so you charge what you choose. I don't recommend what OTHER people should charge for their work, but I'll mention a couple things about what I do. If you have people asking to buy your stuff, that's good, right? Here's a clip from a discussion about this type of thing. On a long drive, I stopped in a convenience store to fuel and stand up for a bit. While in line at the counter, I took a bite out of the donut I was getting. When I was next in line, I joked with the girl at the counter; “How much for these damaged donuts?” She looked at the bite taken out and said ‘Damaged ones are free. But that one’s not damaged, that’s custom – and it costs extra”. We both laughed, I paid and left. More of the story at http://www.jlsleather.com/hand-made-well-made/ and http://www.jlsleather.com/compare-items/
-
Okay.
-
Never any trouble with the cardboard. But I get CLEAN stuff.. nothing that has actually BEEN used on a pallet. If you move, those big moving boxes work great, cut a corner so it lays flat.
-
Caught me replying, so I'll continue, but let me put this in at teh top of what I started. I don't pay for "lessons" or "classes", but it makes no difference to me if the NEXT guy does. Not my business or my concern. Now, here's what I had started to reply... ______________ Hmmm... musta read it wrong But if "carving and content go hand in hand", then everybody who used the craftaid would all look the same, right? No matter. Regardless of where I "got" it, I got it. Here's one that is colored ONLY -- not carved at all. It IS from a "craftaid", if I remember right. For those wanting to carve it, simply hit it deeper where the color is richer, and there ya go (lightly double bevel down the center of the leaves). SHOOT..... shoulda maybe added that if'n a guy wanted to , could reverse engineer that rose... go from the rose to the drawing .. just as easy ..

-
I like big cardboard - like ya might see on a pallet. Smooth surface wont scratch the leather, light weight, easy to place and remove, and the cardboard will tend to absorb some of the moisture in teh air (to a point) if it's humid. Only down side... sometimes seems like the hide you need is the one on the bottom
-
NO HEAT index. My little girl irritated she can't swim cuz the water TOO COLD. Meanwhile.. you southern boys must sit in the shade on day like this comin' up with some new "sayin's" ...
-
I saw the applicators in THIS thread. Didn't catch the "edge solution" thingie, but no matter --
-
'Bout ONE MORE rain, and you can bring your equipment up here and PUSH WATER.
-
You seem defensive -- did you take that as some kind of attack?@! Weird. I have no idea what "they teach nothing about how to interpret complex data and then manipulate or apply it" means. You seem to miss my point. The point of doing those "templates" is not so you can do the template... it's to get the experience with the leather. Even the ones which were "fail" in carving, I still used for practice coloring - even though I knew I was going to pitch it when I was done. The idea was always learn the principles needed to carve leather. But if there were "paint by numbers" instructions for those, I have never seen them Kathy's horse thing was well discussed and well carved -- I've recommended it to several people. I could do that, but I don't have that "small man complex" that causes some to duplicate another's material for the attention (or pay, or whatever). I've never met her, and wasn't looking to date her - I just recognize that she did that little discussion very well. Horses are hardly "original" in leather, though THOSE horses may be her original art. You posted a number of pics.. is one of them Kathy? She may be a "swell" gal -- but I wouldn't pay somebody to show me that ... just show me the finished picture and I'll figure it out "Many people find a piece of art that looks awesome" ... This doesn't sound particularly "original" either. And in fairness, those USCG notebooks I made a couple of were not a "jeff original" (though I carved and colored them) nor was your "iron maiden" thing.. really not different that a stohlman scene or "figure".. just a different one. And no "paint by numbers" tutorial for either The pics are gone, but I was quite proud of one I did of a Santa Fe train locomotive coming down out of the mountains passing a sign (like you'd see for the name of the town you're approaching) with the guy's name on it. Guy retired from 35 years with the RR and his son asked me for that. BEAUTIFULLY done, painstakingly colored. Yet, neither the mountains or the locomotive were "original" (making it look like something EXISTING was the POINT). You know, and I know, - but for those who don't know.. there's a reason a "shader" is called a "shader".. bop it where the "shade" is, and you got 'er. Tooling is simple enough.. I can teach a monkey long as he aint TOO drunk.
-
That horse carving discussion IS amazing - but don't thank me, thank HER.
-
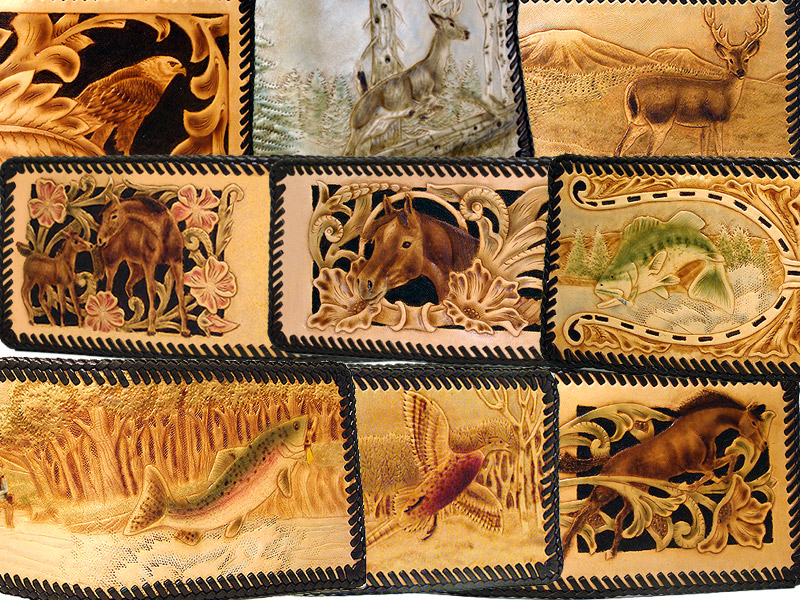
I just like it... never really thought much about the 'why'. Long time ago, when I started out - I sucked at it. At some point, I decided to improve the skills, so I used those 'craftaid' templates so I could spend the time learning the CARVING technique, not spend the time tracing / drawing / designing. Get the carving down, then I could worry about content. And at some point, I decided to do a BUNCH of those templates - idea being that if 10 people all do the same design, then it should be easy to compare the skill level of those 10, side by side. So if a person wanted one of those, I could clearly do it, but - more important -- if they wanted something ELSE, then here's a guy who can carve (well) those birds, and horses, and fish, and deer, and .... so on .... Here's a couple of small pics from some of those templates. Every so often, though, you find someone who is skilled at both the carving AND the ability (and tendency) to teach it to the next guy. If you haven't already, I absolutely recommend checking out Yaklady's horse carving on this site:
-
Always be able to find somebody to re-invent the wheel, and charge you for doing it. I've tried a few types of edge "coatings" over the years - still don't care for em. I do use a little wax on occasion, on the stubborn ones, melted over leather dye (usually Fiebings Pro Dyes). These have been around for years - and work great. Available in wide and fine point.. and available in a zillion places. Since some of you already shop SLC, here's a link to theirs ... http://springfieldleather.com/search?keywords=angelus marker On belts and holsters, and other such "broad" items, I dye edges with a standard wool dauber (like the one that comes with the small bottle of dye).
-
Tool questions: good, better & really good
JLSleather replied to Railrider1920's topic in Getting Started
I often recommend these guys. https://www.ebay.com/str/proleathercarvers The Craftool stamps they sell are the older "vintage' ones -- built far better than the stuff tandy has over the counter these days. They also sometimes carry more expensive models, but I don't see a benefit from the higher price tag. The exception would be the geometric and basket stamps... some of those by Beard and Linnell are more CRISP impressions - which is desirable from a "pattern" design. But for floral, figure, scenic carving, crisp is not necessary and some would say undesirable. Each his own - all the projects shown on the site - and about a bazillon more - were tooled with the older Craftool brand stamps. http://www.jlsleather.com/gallery/