


JLSleather
-
Posts
7,378 -
Joined
Content Type
Profiles
Forums
Events
Blogs
Gallery
Everything posted by JLSleather
-
Fixd er! Occasionally, there are so many downloads of those patterns going on that it "boogers" the bandwidth -- which i could fix by bumping up my hosting plan, but I'm not sure that's required.
-
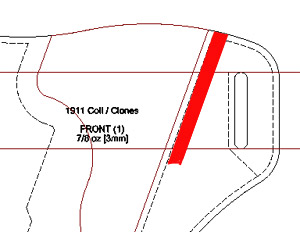
Been scratching my head a bit here lately about how to describe this concisely. At least in my mind, this is closely related to why people so routinely get the belt size wrong, so I think it's easier to tackle both of those together. Coming soon ... For now, I'll say that the PROBLEM with those '50/50' things is not the STRETCHING of the FRONT, but rather the COLLAPSING of the BACK. To fit, the INSIDE of teh holster would be the same as the OUTSIDE of teh pistol. And the gun doesn't change depending on the style of holster. Say it's 6" around the gun (just a number - whatever yours is). To wrap it in 2 piece holster, you can go around from center to center with each piece (50/50), or you can leave one side flat, and use the other piece to go around the rest (thickness of the top, plus height of gun, plus thickness of back of pistol), or 70/30 (or whatever your gun is). BUT IT"S STILL 6" "AROUND" the gun. This BEGINS to explain that, and I'll continue that before long. http://www.jlsleather.com/holster-design-upgrade/ Like anything else, leather has a tensile strength - and a point at which it weakens and fails. I don't like to STRETCH the leather for the fit. I want a holster that FITS the rig it was made for. A customer should not have to STRETCH the rig to use it. Holster makers often use the term "break in" to avoid saying they botched it. Here's a bit of simple thought, clearly stated: If the holster fits the gun when you make it, then STRETCHING it would make it NOT FIT. A holster should not have to rely on pressure from the belt to hold the pistol. So, obvious question is WHY, then, would I make those '50/50' rigs? And I don't as a rule. But I DO make the design that way, since from that "center line" size, I can quickly make small alterations to turn it into a "curved back" version, or an IWB, or an "avenger" holster .. etc. The same STITCH LINE PLACEMENT will still work if you cut teh "wings" off and add a clip, or a leather loop, etc. If you cut the "wings" off a "pancake" holster and add a belt clip, and the holster is now LOOSE, then your fit wasn't right to begin with - you are relying on teh BELT to retain the firearm. This looks like I'm answering two questions, but it's really just one question. KEEP IN MIND that you asked about making these "using numbers/measurements ". You could also wet the leather, form it over the pistol, let it dry, then assemble. A LOT of holsters are made without using any pattern at all. I don't do it that way, because it makes it difficult to machine sew close to the formed edge, and I don't want a stitch line AWAY FROM the pistol (you CAN easily do it hand stitching, though). I want to see it WHERE IT GOES, like ...
-

Switching to W&C Harness Leather - Stamping?
JLSleather replied to RecoveringA55hole's topic in How Do I Do That?
Well, yeah - that question was for him actually -
Switching to W&C Harness Leather - Stamping?
JLSleather replied to RecoveringA55hole's topic in How Do I Do That?
That from somebody who certainly uses more harness than me, and likely more bridle than me -- I'd go with that. But what is an a55 hole? -
Nobody knows, or I'd be using one. A 2-d program will likely do everything you need, and cost a LOT less.
-
Looks like she peeled purdy good. Still in teh works, more to come? (WHY does that 'h' stick like that ?@!)
-
Yikes -- did I let the get away for another YEAR?@! Marking ...
-
HEY ... WHO'S the dummy now?@! (hint: it's me). Found this post, right on this site, from a few years ago. The wrap reinforcement is done a bit different, but he's got some pics that would have made my entire conversation.. you know.. basically useless.
-
Well, I don't want to be found bragging about my less stellar moments, for fear I might WIN, and I just can't bring myself to fall for that AGAIN~ Enough to say that no, you are not alone.
-
Well, thanks - but that may sound a bit more noble than it really is. COULD be that some guy bashed his leg so bad he needed knee surgery... and now gets to spend part of the day SITTING and part of the day IN THE GYM firming up a knee. I mean, just guessin' here ... and if some think he aint chargin' enough, probably just write it off to disorientation due to blood loss. But I wouden know. OH, I think Boss Lindsey is going to be selling these for a few bucks here 'n' there as he gets the chance to upload 'em. Look this kid up if'n ya need somethin' like that.
-
That actually HELPED somebody?@! Well, okay - cool! Sew the leading edges together ahead of teh front stitch line. Where the pieces come together at the top of the front stitch seam, some folks sew the butt joint first before adding the reinf panel. Scuff the area where the panel will go, apply glue, stick and sew the panel to both front and back panels. Close back end of holster, sew back stitch lines as "usual". Honestly, I tried to 'get away' on this one with a quick, down 'n' dirty pdf on the site. Now that it's been brought to the front here, I'll get some time to actually DO one with pics -- likely be more helpful.
-
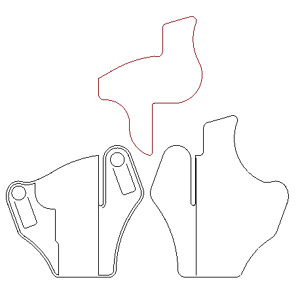
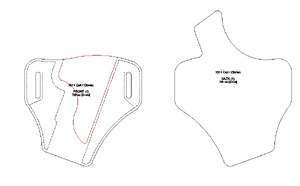
Leaving you with front panel, back panel, and wrap. It should be easy to see how the panel spans the front and back through the 'slot'.
-
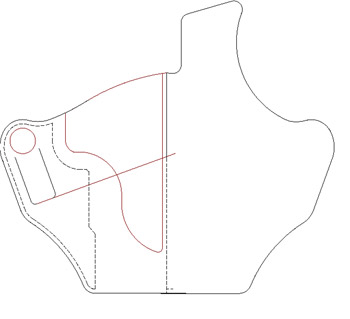
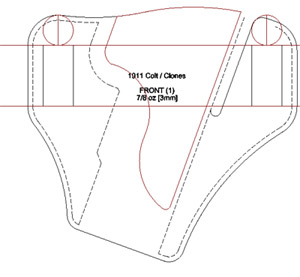
Adding a horizontal line where the belt line crosses the center line ... and penciling in the contour of the sweat guard is just copying teh back panel sweat guard at this point. Make this line higher if you prefer, depending on how much you want to reinforce. Sketch a contour to the line from some point on teh sweat shield, as you see fit... And round the bottom portion of the panel into the wrap around section. Keep in mind this is the THEORY, and your actual panel will likely need to be about 1/4" wider than this. Easiest way to get your pattern is put the front and back together, then wrap a piece of leather around the assembly, mark, and trim (make a paper pattern from that before stitching it on).
-
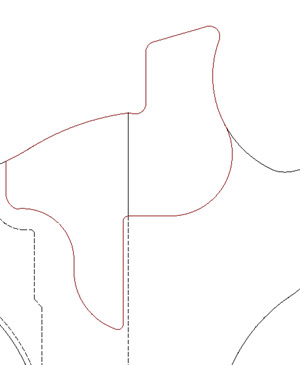
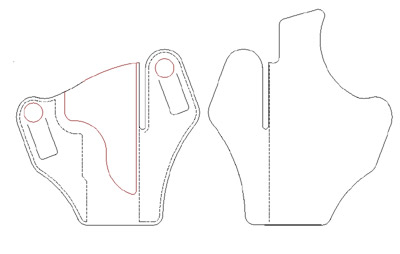
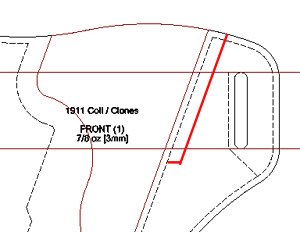
For illustration, I added the stitch line to the back panel, and twisted the parts around so the leading stitch line is vertical. Once you have the idea down, no reason to do this consistently. This is done to show the idea behind making your reinforcement "wrap around" panel (what, you thought I forgot what we started out to cover?@!). The front 'wings" will get glued together up to the front stitch line, leaving the rest separated. If you glue these sections, you end up with something looking like the back portions of front and back panels, with that "shark fin' sticking up in the middle. Something like this ... (note I put the bottom belt line back in for now)
-
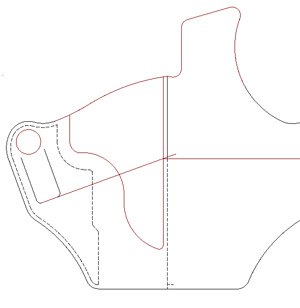
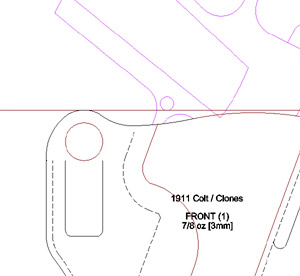
You may have noticed that with this particular pattern, if you go UP that 1" from the belt line in the leading edge, that would put you in the cutout area. To 'fix' this, we'll move the entire front wing out 3/8" - the distance of the slot width - and then come up to our new line. This gives your base IWB pattern (I didn't cover the loops here, but that will get included in the pdf version) And of course, these changes would need to be made also in teh back panel. This shows the 'theory' of it, but in actual practice, it's much faster and easier to glue the pieces, then cut out both front and back together - eliminate tedious lining up edges.
-
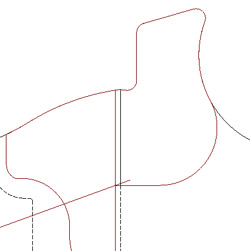
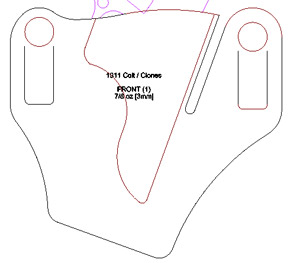
Here the slot has been removed (but not the stitch line), and I have replaced the belt SLOTS with belt LOOPS. Also added line 24 snaps where they would fall if you let the pistol ride at the same height and angle we had before. You can see, this does not leave enough room above the snap to assemble the holster. You could drop the loops lower, long as you understand that will raise the rig and make the pistol ride higher. Instead, let's adjust the pattern so that we have the same height and angle. I want 3/8" ABOVE the snaps, so I if you have one of those 12" tandy squares, you can just lay it on the top belt line, and mark the other edge of the square, giving you a parallel line 1" above the belt, which is about what we want here. Pencil in the change to your contour pattern, keeping in mind proper space to properly grip the weapon.
-
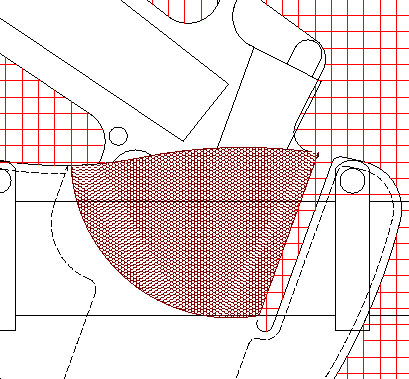
Okay ... in a rough sense.... just to maybe answer your question without making one of these right now .... You have your "pancake" pattern ... BEFORE cutting out parts, decide what type of connection you'll use for the loops (you could just sew them, if you don't mind threading the belt through them to take on and off - but that's not done very often). Let's assume you're using snaps - line 24 snap is about 5/8" diameter, and I like to see a good 3/8" outside the snap (I don't mind 5/8", but NOT less than 1/4"). So, make sure you have 1" of material above where the slots are on your pattern to allow for the snap and the 3/8" [NOTE: you could just lower the loop, but that will change the angle of your holster] Now decide if you want to go with the same shape front panel - entirely optional either way. For this discussion, I'm leaving it the way it shows - and we'll need to alter it a bit to let it wrap around. This is done AT THE STITCH LINE (incidentally, this is the point of those 50/50 rigs). We want it to wrap around, and since I'm using a sweat shield on the holster, I want to include that in teh wrap around, to stiffen the sweat guard. The finished shape will depend on the cutout, and for this one let's cut out to below the belt line. Mark parallel line about 3/8" from stitch line, and another at least 1/4" under the belt line. and cut out this area in front of the front stitch line. Easiest way, punch a round hole for the bottom of the slot and cut up the sides.
-
Switching to W&C Harness Leather - Stamping?
JLSleather replied to RecoveringA55hole's topic in How Do I Do That?
Yes, you can use a 'mark' on it. But harness is pretty "waxey' -- you might want to consider perhaps a bridle leather, or even drum dyed skirting, which is the same veg-tanned leather but already colored. http://wickett-craig.com/leathers/skirting/ -
There ya go -- this is just as simple. WHILE ATTEMPTING TO ANSWER THIS, I DID CHECK WHY-THE-HECK-TUBE AND FOUND BASICALLY NOTHING BUT STANDARD MARKETING CRAP. SINCE I HAVE LITTLE TO NO PATIENCE FOR PEOPLE WHO HAVE INFO FREELY HANDED TO THEM, THEN CHARGE THE NEXT GUY FOR THAT SAME INFO, I WILL BE DOING THIS STEP-BY-STEP SOON, FREE OF CHARGE. I personally find it incomprehensible that with 10,000 members, nobody can provide this very simple information. Cut the front seam as shown in my pdf and the picture above - cut it out or use an oblong punch to remove that piece. (NOTE: you might leave a little extra material ABOVE THE SNAPS, depending on teh size of snap/connector you're using. I don't like to see less than 3/8" of leather, just personal preference- plan for your own hardware.) Once you have the shape you want, and the "hole" removed, mark your glue lines on it the same way you did before. Install your t-nut if you want it between the leather layers. Glue the front end and stick. So far, this is EXACTLY what you did when you made your "pancake" version. Then "open up" the holster on the table so the grain side is up on both pieces (like turning a book over so you dont lose your page). Be careful not to wrinkle the grain side of the holster. This will result in a "shark fin" sticking up, two layers thick, where it's glued. But the part with the material removed will lay flat and "come together" in a butt joint. Some folks sew this butt joint shut, but not necessary. You can use seam tape to hold it temporarily, but also NOT necessary. Take your "stiffener" piece (which may include sweat guard since it's IWB) , glue in place, and sew. Once the reinforcement piece is glued down and sewn to the back and front of the holster, the butt joint is locked in place. Close the holster normally and glue the trailing end (you may need to dampen the reinforcement piece). Sew teh back as with your pancake version. I'm late for something already, but I'll get this in pics later.
-
FB_IMG_1525338745399.jpg
JLSleather commented on LeHoang's gallery image in Gallery- Our Leatherwork
 HEY _ THANKS for reminding me how it's SUPPOSED TO LOOK!
 -
Basically the SAME as a "pancake" holster. Just cut out the leading edge and sew the "butt joint" together, then wrap a piece for "stiffener" (some folks add a strip of steel reinforcing between teh layers). Loops can be attached any number of ways, I think t-nuts between leather layers and a screw through the snap is most usual (and some like a leather or rubber "washer" behind the straps to shim the loops out a bit). http://www.jlsleather.com/wp-content/uploads/2017/03/IWBa-1.pdf
-
I can carve But I know SQUAT about building a saddle. Correction: HALF of SQUAT.
-
First Pancake Holster
JLSleather replied to Hildebrand's topic in Gun Holsters, Rifle Slings and Knife Sheathes
I admire you "boss" boys -- determination! -
I don't separate "artistic" from functional. I ONLY make functional items -- if it doesn't DO something, its useless (perhaps them "sensitive' guys want it?). But I think I have some skill at making functional items include artistics (which is a word I just now coined.. like artsy cosmetics). I have made leather "pictures" - -I recreated Stohlman's "pictorial carving" front cover just cuz i can (12x18 leather), and I did a 18:x24" (if I remember right) of a steam ship going up the river to be hung on a wall (all those guide wires SUCKED) because that lady was pretty determined to find out how big a check she would have to write. Honestly, the internet is changing the designs I use. It makes me a bit lazy knowing that I likely can google up 5 images quickly for anything I want to tool, and when I do something unique and new, I often don't post it because I know others will google and get me! TOOLING really is a bit mechanical - and not difficult. I always say I can teach a MONKEY to tool leather, long as he aint TOO drunk. Painting/coloring leather is almost as simple once you learn some basic ideas, and how the dye / paint of your choice reacts to the leather. BRAIDING leather -- now THERE'S an ART ...
-
American Leather Direct or other sources for American leather
JLSleather replied to CraftyNick's topic in All About Leather
I tried ALD. I would not do it again.