


JLSleather
-
Posts
7,378 -
Joined
Content Type
Profiles
Forums
Events
Blogs
Gallery
Everything posted by JLSleather
-
I'm glad to see BSS reply to this issue. I was thinking the same thing, but chose to defer to superior knowledge
-
I think that may apply more to fabrics and synthetics... likely far less useful on leather, where firmness, thickness, dryness, and tanning will all affect the material condition and thus also affect the required tensions. Probably great for manufactured materials which are quality controlled for consistency.
-
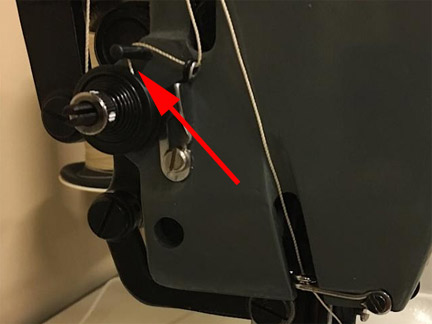
Isn't the thread supposed to wrap around this disc all the way, THEN go up over the pin?@
-
I think that's the same ones hold the boat tarp down - should be sturdy enough!
-
Just oil it. Excess will run off and won't hurt anything, assuming it isn't in the middle of the living room carpet. Too much better than not enough. Put a scrap of cow under the presser foot - it will catch and absorb any that drains
-

can old thread cause problems and just what
JLSleather replied to OLDNSLOW's topic in Leather Sewing Machines
Yep, definitely has a shelf life, but I think more likely that your thread is drying out. Wrapping it when not in use DOES help. I've a had a few spools go "off" -- the heavier threads (277 and up)I set off for when I have a project needing hand sewn, the lighter weights get offered to someone or pitched out ... nature of the game. At $10-12 (for the smaller weights) ... I figure by the time it's out the door it's paid for itself a bunch. I don't have a "lube pot" on mine, but I suspect that would at least ease the problem, but not likely eliminate it. -
That seems extreme just to get a snap. Kinda like startin' a cattle ranch so's a fella kin tool leather
-
Both good ideas. And, have we asked the instagram user that posted them what they are?
-
Better? Idunno I much prefer the look of the belly cut, particularly on snake with bold markings like the diamondback or python. Cutting the belly preserves teh "pattern" of the skin. I'd LIKE to say that it's more "durable" as well, but can't really claim that. Truth is, snake isn't very tough -- even when solidly glued, "stroking the fur the wrong way " can unseat scales (the few belts I've made with snake, I like to lace the edges.. protects the edge and helps kick the belt loop up off the scales so you aren't "grating" the snake when you back the belt out.
-
Welcome - glad I could help. MUCH of leather work is quite easy ... don't believe them "fancy' folks who spend their time trying to tell you they are somehow "special" and doing something you can't do. Folks with a physical limitation is valid -- arthritis, limited mobility, etc - but the rest of us can just have at 'er
-
could be any number of breeds. whip snake is common, and that size would be about right. This looks a bit different than some because it's back-cut, leaving the belly scales prominent down the middle.
-
And it aint even April Fool's yet ...
JLSleather replied to JLSleather's topic in Marketing and Advertising
Oh, yeah - that counts. I saw a thing - maybe best word to use for it -- where a guy took a pattern from an old publication, offered it for sale, then wrote a paragraph in the sales pitch that it violates copyright law to copy, sell, give, distribute "his" pattern. -
And it aint even April Fool's yet ...
JLSleather replied to JLSleather's topic in Marketing and Advertising
Well, we were talking about holster patterns. As for that other stuff, I just meant things that a man would do. -
You can operate the machine with the end cap off - just keep the fingers out. Stitch a few holding the thread like usual, then you can watch the end without watching the top. As for the pressure spring, keep in mind that a new spring will be "stiffer" than one broken in.
-
Needle is not too small. I use a #24 needle with 277 thread up and 207 thread down --- never an issue. Depending on the thread (not all thread is equal) I have been known to step up to #25 when sewing with 277 top 'n' bottom.
-
Oh, yea -- definitely looks like it's fraying at the "loop"
-
Shims, Bob. Shims.
-
Gun Belt
JLSleather replied to IngleGunLeather's topic in Gun Holsters, Rifle Slings and Knife Sheathes
W/C mahogany skirting? Color looks good - in fact whole belt looks good. I don't care for 'em that heavy, so only bulk 'em like that when specifically requested. Looks like your leather is cracking when you punch the holes. Usually result of a punch getting dull, or your backing material (what you punch on) is too soft. -
I never double stitch a holster. Aint needed at all, and the more holes ya put in sumthin', the weaker it is. Some a@@ will be along in a minute to swear that aint true, but ... consider a diving board. You feel safe walking out on the end, that's what it's made for. Now drill holes across the board, a couple feet from the end, and THEN walk out and stand there. Not so fun now, eh? BUT some holes (double row) running DOWN the board along the edges (like a fella might see on the edges of a belt) don't significantly damage the board in the direction of the downward force. Still fine to walk on out. I think Stohlman said it like "don't stitch across a strap" or something like that, right?
-
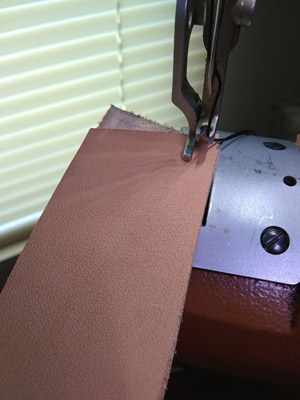
Yup - still makes the mark, but the mark is in the SCRAP piece With just a little practice, you can get where the scrap doesn't move with the work, so you can run clean down a belt without stopping. Just a footnote - when making a double row of stitchin', I use the left foot shown here for the outside row, then switch to the right foot for the inside row. Spaced about 1/8" apart, the right foot "tamps" down teh row of stitchin' made in the first pass (comes out the machine already "tapped down").
-
Maybe it helps to see the direction? footpad.mp4
-
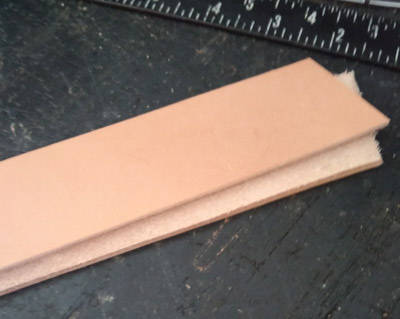
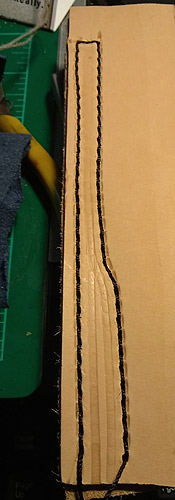
Piece o' scrap, 4-6" long. This is about 4 oz - not critical but I wouldn't use skirting leather. Couple pieces strap leather .. much like I would be making a belt. Again, just scrap - this time about 8 oz each. Stick 'em back to back, as if making a belt. Following in a minute... I actually wet the leather to make the result a bit more obvious. Bottom shows marks left by outside presser foot without the pad. Top shows stitching with "pad" under the presser foot (but not under needle or center foot). You can clearly see the DENT left by the center foot above teh dark stitching. Ordinarily, I wouldn't let this happen, but this is to illustrate the difference between where the pad is and where it isn't. Really just a matter of psi ... spread the pressure of the foot out over larger area, less marks. If the leather isn't wet, there will be NO TRACE of a mark at all.
-
Gluing layers for a gun belt
JLSleather replied to Hildebrand's topic in Gun Holsters, Rifle Slings and Knife Sheathes
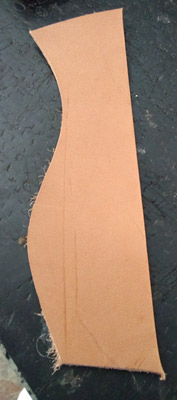
If you're making "plain" belts, solid color especially, you "could" line them up 'close' and then trim or sand to fit (keep in mind it should fit the buckle without excess room). If on the other hand your belt is carved, then it may be more important to keep the width accurate - not trimmed. I cut the front the size it needs to be, then cut the back (liner) about 1/4" wider SOLELY so I don't have to go nuts trying to line it up. Trim and finish edges. If you want to try to "save" that 1/4" of leather, you can glue both pieces, then separate them with wax paper, which will prevent the layers from sticking before you are ready. Works a bit like the backing on a postage stamp or address label, and is commonly available in your neighbor's kitchen -
Oh, I did put a pic from teh buyer with his Glock in it ..
-
Every mark you don't put in the leather is one you don't have to take out. Hey- that's good stuff, I'm gonna use that sometime! Lemme say that again -- EVERY MARK YOU DON'T PUT IN THE LEATHER IS ONE YOU DON'T HAVE TO TAKE OUT. Got a piece of scrap leather, fairly thin? I found a small piece of 3/4 oz - about inch wide and 6" long, put a straight cut on one side (you could get all 'fancy', but you really just need one side straight). Stick it under the presser foot, and sew. No marks in the leather. None.