TomG
-
Posts
1,025 -
Joined
-
Last visited
Content Type
Profiles
Forums
Events
Blogs
Gallery
Store
Everything posted by TomG
-
 Cut them 10 to 50% with Alcohol. They are almost always too dark out of the bottle. Plus, they will lighten up quite a bit as they dry.
 -
Dwight, I have been using a folded rag and then even dab the rag on a paper before applying to the leather. I'm trying to avoid putting it on too thick. But maybe I'm putting it on too thin? Does the brush hold a lot like it would with paint?
-
I use Resolene. 2 coats. 3 is better. Dry 24 hours. Apply dye quickly. Don't "scrub" the dye into the resist or it will get blOtchy. Results will vary. Or, if you have a steady hand, use the latex mask stuff. Do a search for it here. Tom
-
The mod will not slow it down lower than its lowest speed. It does make the control of that speed smoother and easier to sew slowly. As others said, 2" or smaller pulley and speed reducer, combined with the mod you found, is the way to go.
-
Do a search here or on YouTube. There are a number of threads on how to do this. You didn't say what make and model of servo motor, what size pullet you have now. Usually anything beyond using the smallest pulley involves making a modified interrupter paddle for the optical control.
-
I think the white is only good for touchup on things like white nurses shoes and such. I sure does stink though!
-
Dip Dye Method
TomG replied to TomG's topic in Dyes, Antiques, Stains, Glues, Waxes, Finishes and Conditioners.
Just saw my post created 2 entries.. Weird. Just dyed 2 more straps and they still look blotchy. My dye tubs are in the garage and cold. Hmm.. I wonder how temp affects the dye. Cold dye - warm leather?? -
I love the results of using Mink Oil Paste on the back of my collars, leashes and bracelets. Makes them extremely soft and pliable. But I have been "chastised" for using that instead of NFO. I prefer the Kiwi CampDry over the Fiebings. It seems to work better. I'll try the resist method and see how it works. Thanks for the tip.
-
Dip Dye Method
TomG replied to TomG's topic in Dyes, Antiques, Stains, Glues, Waxes, Finishes and Conditioners.
Hi Dwight. Yup. I learned early on not to hang a wet strap. You drag procedure sounds identical, except I have begun pulling through in about 2 seconds of submersion and then back the other way for 2 seconds....Then wipe off the excess as quickly as I can. I haven't done the belt flip. Will have to try that. I have coiled it loosely and gotten the one-way fade. what I have been doing now is using an 8 foot piece of wood moulding/trim left over from a remodel job. The back side has a shallow flat channel that holds up to a 1" or so wide strap perfectly flat. I have some Rubbermaid 1 quart rectangular tubs I found at Walmart that I use. I like them because they actually seal air-tight, so I can leave the dye in them all the time. I'll try a slower drag and see how that works. -
I have been dip dyeing my collars, belts and leashes for a while now. But I sometimes have erratic results. I am using a "drag" technique because soaking seems to over-color the straps. But if I dilute the dye more, can I just do a short soak and a quick wipe down as I pull it out and get more even and consistent results. I guess the real questions are - How do you do it AND... will the leather reach a saturation in a given dilution of dye and not get darker past a certain point? Say.. Will Saddle Tan become a brown if I leave it in say 3 minutes? Thanks
-
Rediculously Simple Question : Sharpening A Swivel Knife
TomG replied to lydian8's topic in How Do I Do That?
So, Bob and Electrathon. What makes the SK-3 better than others? What makes a knife bad, good or great? I have large hands and some arthritis setting in. I have been thinking of the newer Tandy Pro with the large barrel. -
You always dye first with either method. I dye, buff, balm/wax, burnish edges, paint, outline then resolene. You always dye first with either method. I dye, buff, balm/wax, burnish edges, paint, outline then resolene.
-
Wow. Almost 24 hours and no responses??? I'm sure there are may ways to do this. I've done it 2 ways. First, I use Leather Balm with Atom wax on the leather. 2 coats buffed between coats and dried.. First method is to use a thin brush and acrylic white paint to fill the outlines. I keep a damp rag in my hand and if I hav an "oops", I quickly wipe it off. You can get away with a couple of oops in the same spot before you possibly blemish the finish a bit. I can usually get it in 1 coat with this.. The new way I've gone to is to use a white Sharpie. I use the Extra Fine Point, Oil-Based Paint model. It fits the outline almost perfectly. I usually have to do at least 2 coats as the leather seems to absorb it more then the acrylic paint. You will want to practice both methods. The pen has a spring-loaded tip to release the ink and you can push too much and flood the letter grooves. The couple of times it happened to me, I was lucky and it stayed in the grooves. I was able to spread it out to the rest of the outline. But it could have easily overflowed and I don't the damp rag would have fixed it. Just go slow and careful.
-
I've been looking for a set of the old log letter sets if you have any of those. Tom
-
Much better <g>
-
This is not about your problem, but... Your "Interests" and Interested In.." sections in your profile are bleeding into your message. You might want to remove those "/" between the words, and use commas and spaces instead "Tooling/Dye/Stain/..." to Tooling, Dye, Stain...
-
Peter Main has an excellent and definitive book on coloring leather using dyes. I believe you can order directly from him. If I'm wrong, he can advise you on where to buy a copy. I'd start there and use it as your main guide.
-
What Howie said... You're only chance that I can see is if you put a copper rivet in and solder to the rivet. But you're going to have fumes out the wazoo probably. Solder melts at something like 750 degrees F. What are you trying to do?
-
Would You Help Me Sort Through This Hardware?
TomG replied to Calvus's topic in Leatherwork Conversation
There is a YouTube out there about setting the Segmas. One key trick is to snap them together and then give them a tap or 2 with the mallet to seat them. I also found that if I use them on thinner leather, I may have to use a larger domed setter to LIGHTLY expand them for a good fit. They do take some practice to get right.. at least in my case... And the other rivets... yes.. try to match cap sizes and make sure the post fits and use that concave setter. On those, you want about a 1/16" sticking up out of the leather. You can do a search here to find lots of suggestions for setting and fitting them. -
Would You Help Me Sort Through This Hardware?
TomG replied to Calvus's topic in Leatherwork Conversation
The first setter looks like a male Segma snap setter. Not sure of setter 2, 3 and 4 Setters 5 and 6 look like Segma snap female setters. Setter 7 is a cap setter for rapid rivets, double cap rivets, some conchos, etc. The snaps marked Glove Snaps are Segma snaps - male and female. The Brown What are the cap and post for the Segma snaps. The rest are an assortment of rapid rivets, double caps and so on. -
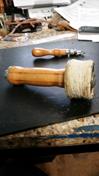
Hey oltoot, A number of years ago, I got the hots to make my own maul out of rawhide. I mentioned it either here or on one of the yahoo groups and one of the members had a fresh hide of rawhide he had just made. He graciously sent me a whole bag of rawhide disks he cut for me. The even precut the center hole just like you suggested. I did exactly what you said. Soaked them for a while, then I took a couple of squares of 2x6, drilled the same hole in the centers. I pushed my bolt through one and stacked all the rawhide on the bolt, topped it with the other 2x6 and tightened as hard as I could. Every few days, I'd go down and tighten some more. I seem to recall it took a week or 2 to dry thoroughly. I think it was Bearman who gave me instructions on how to do the assembly. I use it all the time for stamping and it's still holding up.

-
I do have a question though... What is the purpose/reasoning for both guns facing the left hand?
-
I like the shotgun shell "waistalier". Looks a lot more efficient than the over the shoulder bandolier. I am really into the one of a kind stuff. Don't like doing the same old stuff all the time, but those are ones that pay the bills, so to speak.
-
Had a real similar experience as Dwight. My "mentor" actually gave me a test measurement strap like yours. I had a lady friends of ours who wanted a belt so I handed it to her and told her to put it on and tell me what hole it was. My mistake was in not watching and asking if that was where she wore her BELTED pants. At the time, she was wearing sweat pants and the belt was for low-rider jeans. A 4" mistake.... Darn curvey women <g>