TomG
-
Posts
1,025 -
Joined
-
Last visited
Content Type
Profiles
Forums
Events
Blogs
Gallery
Store
Everything posted by TomG
-
2 that come to mind right away goldstartools.com standardrivet.com
-
I'm looking for some 2.5, 3.0 and 3.5 curb chain in SS and solid brass if you have a source for those and reasonable prices.
-

Show & Tell: Thumb Controller For Needle Positioning
TomG replied to Uwe's topic in Leather Sewing Machines
Fantastic. Did you do the design/programming yourself or find instructions elsewhere? Would it work on any of the servo motors like the Consew? -
Agree with Heavy. Call them before blasting them.. The link you gave shows the website listing. It clearly says these are a good quality leather but is a leftover from their belt production. So they have been handled and I would expect some nicks and blemishes on various pieces.
-
I am trying to learn to do bags and that is exactly the bag I have been looking for a pattern for. Can you tell me where you got the pattern? I need to get a copy. I've been researching bags and have seen any number of different materials used for linings. The one I liked to idea of best was one using a fusible vinyl. I think you iron it to the wrong side of the fabric of your choice and it creates a leak resistance lining. You can probably get it at a fabric store.
-
Yeah.. I can understand your frustration. I was just giving you a heads up that he was showing 8 weeks now. I agree that delays beyond what you've quoted should always be addressed with an email or phone call. Hope you get it resolved soon.
-
I use 2 products exclusively. 95% of the time, I use full strength acrylic floor wax - Mop 'n Glo. I apply 2 -3 coats, allowing at least 4-6 hours between.. usually closer to 8+ hours. I use Fiebings oil dye almost exclusively after the final dry. I use a sponge to apply quickly and evenly and a paper towel to dab up any excess on the resisted areas... mainly the grooves left from the stamps. Otherwise, if you have missed getting the resist down in the groove, the dye can leech under the resist. Now, this method does not block 100% of the dye penetrating, but gives a contrasting effect. Different colors seem to give different results. Now, for even better protection, you can use Woodlands Latex Rubber. Paint on 3 heavy coats, letting each dry totally. As with the wax, you must get down in the grooves, or you'll have ugly streaks and splotches. Once you dye, peel the rubber off and you;ll have pretty much bare leather underneath. A couple of points.... Apply your dye quickly and as lightly as possible. The heavier the sponge is loaded with dye, the more bleed through you'll have. You just need to practice to see the effects of different techniques. Next, you can not dip dye using thiese techniques. Finally, if you dye the back side, you have a much greater chance of the dye showing under the resist. I'll try to attach a photo or 2 here. Good luck


-
I don't know Ed, but have heard good things about his stuff. He does have a notice on his site that mauls are an 8-week item. And things happen to delay production at times - especially for those of us who do this as a second income. Hopefully he will contact you soon and get everything resolved. Luck
-
Ummm..You are not trying to turn the hand wheel backwards are you? That will jumble your thread in a hurry. To back stitch, either lift the pressor foot and pull it back 2 or 3 stitches, or when the needle goes down and then just starts back up, lift the pressor foot slightly, spin the leather 180 degress, drop the foot and sew the 2 or 3 stitches over the top of the originals. My only real compliant on the 155's
-
I have the same machine. I never did develop the "touch" with the clutch motor. I wound up buying a servo motor, modifying it to give better control and installing that. MUCH better. As for the bird's nests at startup, I pull some slight tension on the threads and it eliminated the problem. You may need to adjust the bobbin tension, but read up on how to do it before you start. And make SMALL adjustments.. like 1/8 of a turn on the tension screw. Yes, you can buy prewound bobbins. They come in plastic, cardboard sides, and sideless, which is what it sounds like you have. They also have ones with magnetic cores but I'm not sure those would work in the 155. It's a pretty light thread - mainly sized for machine embroidery and light fabric weight threads. But I use them exclusively for those jobs.I do have some 138 I think that are sideless. But I think they are "M" sized and don;t fit my machine. Someone gave them to me to use the thread to adjust the 155 when I was setting it up for leather. So a search through the sewing machine forums and you will find a virtual wealth of information on this machine and the servo motor issues. Good luck
-
Hobby stores sell small square tubing for model making. Not sure if it would be strong enough. You can also get solid square pins at some hardware stores, woodworking supply stores, machine tool supply stores, etc. You would have to machine it to make a cutting edge. Also, check the hobby or scrapbooking stores for small square punches used on paper hobbies. No problem with repurposing as along as it works <g>
-
Well, There should be about as many opinions as there are users . BUT.. I don;t use Super Sheen for anything any more. Super Sheen is water based and I found that almost anything "wet" washes it off. That's what you are probably experiencing.. I use Leather Balm with Atom Wax on top of my dye. Let it dry for an hour or so, buff thoroughly with a piece of fleece, then apply Fiebings antiquing gel. Let that sit for a few minutes and then use a folded stiff rag (like a flat pad) to wipe the surface gel off.
-
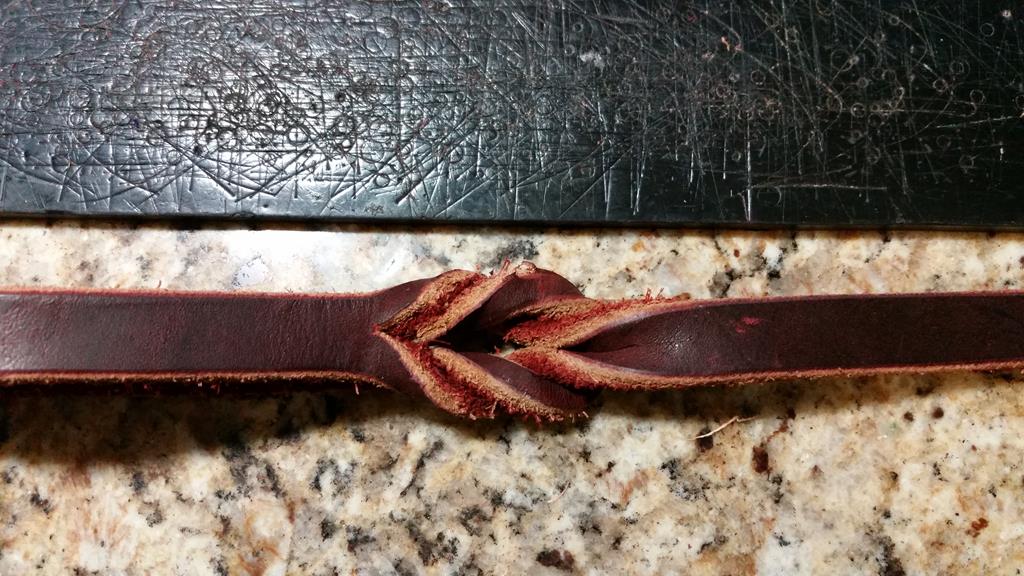
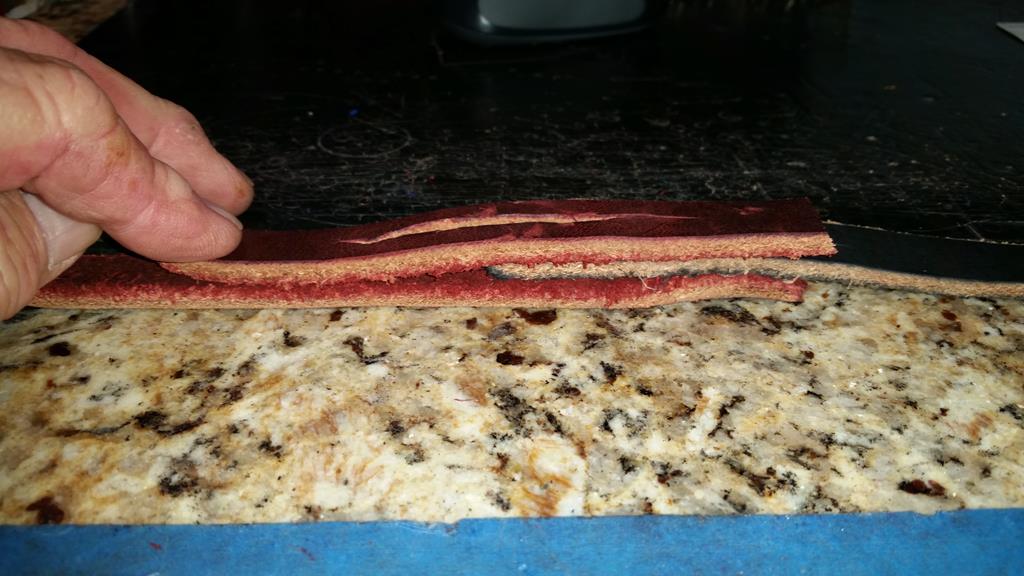
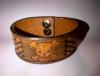
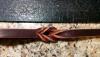
I make dog leashes with a twist braid on each end. I can't remember the name of the braid, but am attaching a picture. It's normally 1 strap of Latigo. I need to be able to make the handle a separate piece of leather so I can still make my 6 foot leashes, as the side I am cutting from gets shorter. (See 2nd photo.) I'm usually down to only being able to make 4 and 5 footers about halfway through the side. Does anyone have instructions on how to do this? Thanks

-
Bump. Still trying to figure it out. Should I move this to the Braiding section?
-
Thanks folks. That is perfect.
-
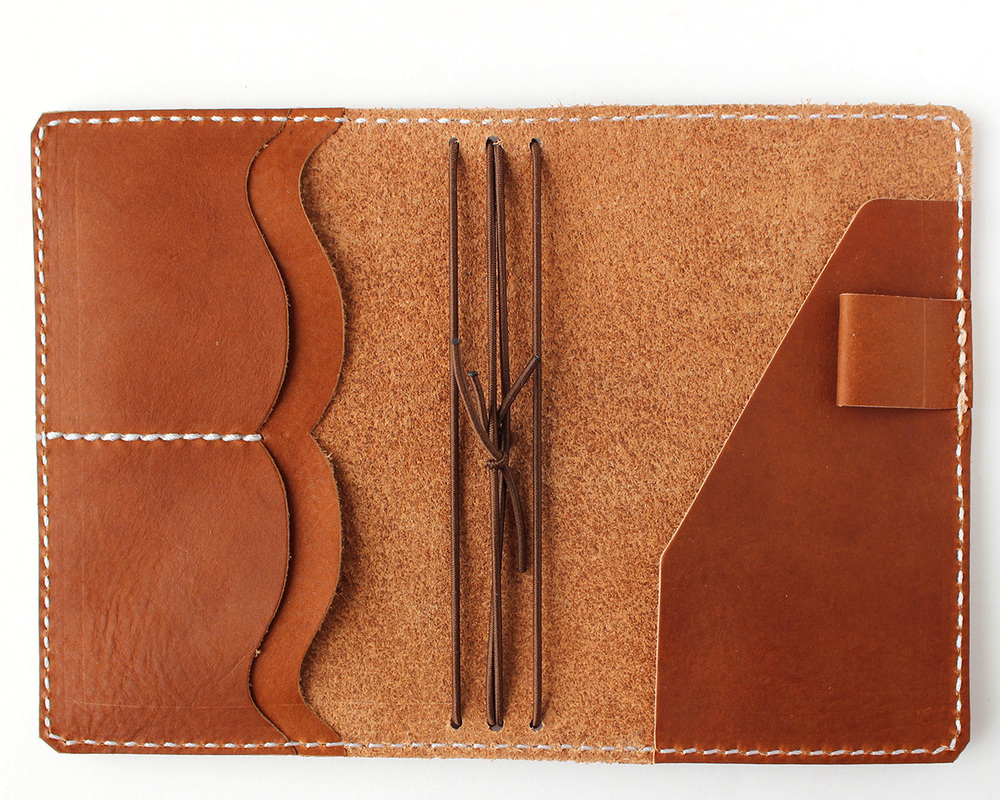
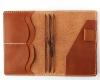
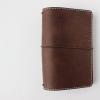
I have a friend who wants me to make her something similar to this. She calls it a travelers Journal. I've done some searching but can't find a pattern. I can probably make one once she decides on dimension for her pads, but I prefer not to reinvent the wheel <g>. Can anyone point me in the right direction? Thanks
-
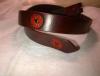
I make dog leashes with a twist braid on each end. I can't remember the name of the braid, but am attaching a picture. It's normally 1 strap. I need to be able to make the handle a separate piece of leather so I can still make my 6 foot leashes, as the side I am cutting from gets shorter. I'm usually down to only being able to make 4 and 5 footers about halfway through the side. Does anyone have instructions on how to do this? Thanks

-
Why Is Black Dye So Dirty After Drying?
TomG replied to bushpilotmexico's topic in How Do I Do That?
Black has an over-abundance of the dyestuffs that compose the color component of the dye. Black need to be opaque, whereas other colors can have a bit of translucency to them. The leather can't absorb all of them, so you get a crapload of loose particles. All you can do is keep buffing until it pretty much stops, and then seal it with several light coats of Resolene or some other sealer. And expect more to come off as you do that. It can loosen more particles. A power buffer can reduce the pain. You can also reduce this problem by going to the Fiebings oil dyes. I picked up some black from a lady who was getting rid of the last of her elderly father's shoe repair business stuff. I did a quick dip dye test a while back and had zero ruboff. I haven't had time to do more testing or confirmation of that, but just ran out of my black oil dye yesterday and will be messing with it tomorrow. Can't remember the name of it, but will post it when I go to the shop tomorrow. -
There are some YouTube videos and thread here that discuss sharpening punches, knives, etc. The weird thing is that I have purchased the expensive punches from Tandy and the cheapos. The cheapos are 10 times sharper than the expensive ones. But ALL have to be sharpened or at least stropped. But you do need a piece of marble or granite, a cutting board of some sort on top, and a solid (Not Metal) hammer/mallet/maul. If you have a Harbor Freight around you, go buy their big dead blow hammer. The plastic coating really doesn't bounce enough to hurt you on punches as long as you hold firm downward pressure as you hit it. But definately sharpen the punch first.
-
Leather Heresies #1: Does Neatsfoot Oil Go Rancid?
TomG replied to LeatherNerd's topic in Getting Started
I got a bottle of neatsfoot oil COMPOUND a long time ago , and it did turn rancid. It has other components in it and I think those were what went bad. I've had a can of pure NFO that was 20 years old and still good as new. -
I had a side of Chrome tan like that once. I had a horrible cold at the time, but when I got it home, my wife almost threw up it was so bad. Took it back to Tandy and they exchanged it. Got one of the same sides and it (and the others) didn;t have the smell. I always figured it just didn't get rinsed properly at the tannery.
-
Here's the bottom line, IMHO. Like every other vendor in the world, you can get good stuff and bad stuff. You can have a great Tandy store with terrific, knowlegable staff, or a dump where half the staff don't know which end of a skiver to use. I've bought some horrible leather from them and I've bought some beautiful sides and doubles. Their regular stamps are not the best in the world, but they will let a person who is new to the craft, to at experience a variety of designs without breaking the bank. And if you are careful and mark your tools to keep the same side forward as you stamp, you can actually do some nice stuff. Their new line of Pro tools is actually very nice. At least the ones I've tried. I would never hesitate recommending a new person buy from them. They can always return items they don't like or are not up to par. And when you sss that you are really going to get serious about the craft, you can upgrade your most used tools with better quality stuff.
-
Is Fiebings Snow Proof Bad For Leather?
TomG replied to thekid77's topic in Leatherwork Conversation
I've used it and never had a complaint. It's made by Fiebings and I doubt that they would make something to deliberately damage leather. The can says it waterproofs, protects and conditions the leather. -
Lots of folks dip dye. Personally, I don't soak, I dip it is and pull it out. On straps I use 1 hand to hold one end under and pull it through with the other in a smooth motion. The only issue I can see by doing what you describe, is lighter colors might be uneven, or darker than you wanted.
-
Antiquing Over Stamps
TomG replied to retiredff's topic in Dyes, Antiques, Stains, Glues, Waxes, Finishes and Conditioners.
Weird. I never got notices of your replies. But glad you found your answers. I use the 1.5mm for 1" letters and use the 1mm for smaller. Now, the Molotow 1mm tip has been called a SpecilTech or something like that. It clogs as badly as the Sharpies. But they have a new one called Crossover that is supposed to be shipped with the 127 EF model marker, which is what I use. You can soak the tips in water to help keep them clear. You can also take a little piece of sponge and put it in the cap to keep the tip open. Then you are using the pen in the grooves, don't push down hard. Prime your tip on a pad of paper, and if you have to push down to renew the flow, stop moving to do it and then continue. You'll get the hang of it. Let me know how it goes.