


TomG
-
Posts
1,025 -
Joined
-
Last visited
Content Type
Profiles
Forums
Events
Blogs
Gallery
Store
Everything posted by TomG
-
Wow! Great work. I wish I had that skill set
-
I have a screen printing conveyor dryer and I spilled some dye on it. It doesn't hurt it, but I'd like to get it off of the metal if possible. I tried Denatured Alcohol with no luck. Does anyone have a way that won't remove the paint from the dryer?
-
Nice Work!!
-
Hey Dustin. I meant to ask you how you did the playing card design. Is it painted on, some form of heat transfer, or whay?
-
What Mike said. Weldwood is every bit as good at Barge, from my experience, and half the cost. Apply to both edges, let set until tacky and then assemble. But, it is not easily repositionable, so make sure all edges line up and then tap the edges lightly with a mallet, or put pressure on them for a while, for best adhesion.
-
I believe that this user is saying that a small dab of glue under the tongue keeps it from moving. I agree. That would be the easiest and cleanest way to secure the hand size. You could also use a small strip of Velcro the make it adjustable without showing.
-
First, why would you use Pro resist as a top coat? It's meant as a dye blocker. My go to for years has been Fiebings Leather Balm with Atom Wax. Rub it in with a cotton tee scrap, front and back. Then flex the leather over something from the front an then the back. I make lots of strap goods and use the rounded edge of my desk or a piece of 1" PVC I have mounted as a rack. It will normally be as limber as spaghetti. The wrinkles on the back look like fatty deposits. Usually found when using leather near the belly. The cracks on top are dry leather. I'd suggest using the Olive Oil for cooking and switch to NFO. It's made primarily for leather. One neat trick that you can experiment with is add the dye to the oil and adjust for color. It is a technique posted on Fiebings website and worth a try. That way, you are adding the oil back into the leather at the same time as dying.
-

veg tanned leather Dyeing and top coat veg tanned leather
TomG replied to pgraca97's topic in How Do I Do That?
Where do I start?? 1) Did you let the molded leather dry thoroughly before dying? 2) The Molded leather looks like it has a lot of scratches on it, maybe from tools or fingernails. Wet leather is very suseptible to anything touching it. 3) Saddle Lac dries pretty fast. How did you apply it? Spray or brush? Both require good technique. I've never had luck with brushing. All of my toppings go on with a folded scrap of tee shirt, in a circular motion. 4) You MUST apply wet stuff in an area with minimal dust and such floating in the air. You may have put too much on at once and made it dry slower. This would add to the dust collection. Multiple light coats is better. 5) On the straps, that folding issue looks like fatty leather. Nature of the beast. it's less pronounced with non-fatty pieces. If you are trying to make a fold such as around a ring, look or Dee ring, try wetting it at the fold and letting it soak in for a few minutes before folding. It will soften the fat and avoid any cracking. 6) I never used the Ecoflo stuff. But, it looks like it was applied too heavily. I have been using Leather Balm with Atom Wax almost exclusively for years. Again, put it on with a scrap of Tee on both sides. Rub it it. Wait 4-5 minutes and buff to a shine. Leather becomes soft and limber. Never had a problem. 7) For a high shine, I use acrylic floor wax (same as Resolene), diluted 50/50 with water. Apply in THIN coats with 3-4 hours between coats, it I need more than 1. Buff when dry. 7) On the edges, get some liquid glycerin soap. Apply to the edges and them rub it in hard with a piece of canvas or other heavy cloth. 8) As for times, I dip dye most of my stuff, so I let it dry at least 8 hours or until the alcohol smell is gone. If I use a sponge or dauber, at least an hour or 2. Again, until the smell is gone.The Leather Balm, only about 5 minutes. Or, about an hour if I'm going to use the wax top coat. Take your time, use thin coats of stuff and try to work in a dust free area, as much as you can, for applying your top coats. Good Luck -
That was not it exactly, but it did point me in a direction that I was looking for. The exact post showed construction details. But, some of those photos looked familiar. Thanks!
-
Thanks. I'll check that out. I also need to go back and do some more searching. I still recall seeing someone who made a nice one for their machine and showed detailed photos of how they mointed it.
-
I have a Consew 227R2 and need a flatbed attachment for it. Does anyone have plans available to make one? I haven't seen any commercially, but would prefer to make it anyway... Thanks
-
I'm not sure if the Tandy machine will take the single shaft mount that the majority of machines these days use. Here is the machine I use. Notice the slot in the heat plate https://www.amazon.com/Digital-Embossing-Machine-Leather-YLZ/dp/B07PXT2MG7/ref=sr_1_4_sspa?crid=YWZ5WDPDTX14&dchild=1&keywords=hot+foil+stamping+machine&qid=1622125565&sprefix=hot+foil%2Caps%2C197&sr=8-4-spons&psc=1&smid=A2MO4N54PYK6Y&spLa=ZW5jcnlwdGVkUXVhbGlmaWVyPUE0MkVKT0w3UFBPWDcmZW5jcnlwdGVkSWQ9QTA4Mjg5MjJFWVdXNTNVQ1g5SVYmZW5jcnlwdGVkQWRJZD1BMDc1NzE3MDI0UlZSUjY5SDM0QjUmd2lkZ2V0TmFtZT1zcF9hdGYmYWN0aW9uPWNsaWNrUmVkaXJlY3QmZG9Ob3RMb2dDbGljaz10cnVl I've used the following place for a number of custom stamps. Great job and very reasonable. https://www.etsy.com/listing/682912920/custom-branding-iron-stamp-leather-wood
-
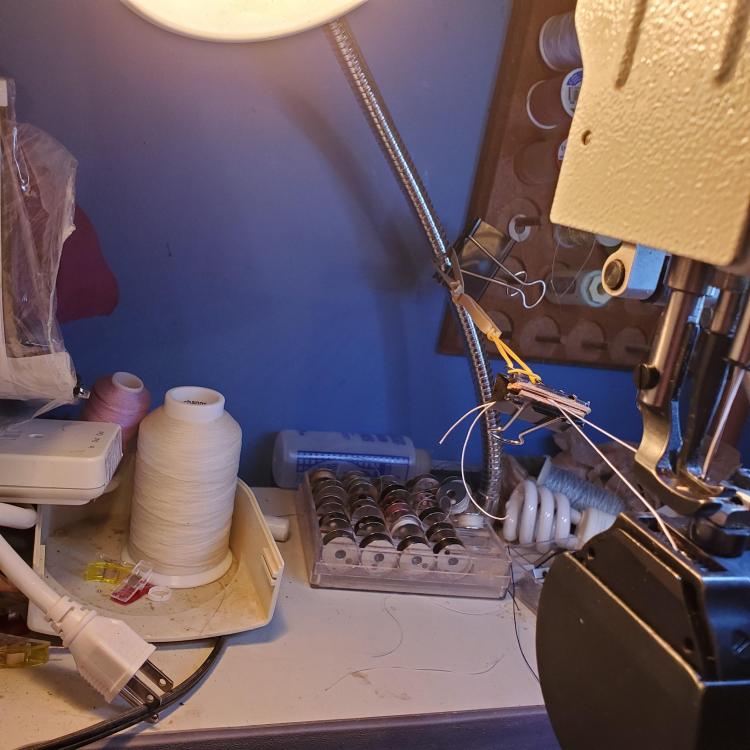
Consew 227R-2 Hi all. I know to hold the top and bottom thread for the first couple of stitches when sewing to avoid birds nests. I don't know why, but I've learned to do it anyway, LOL. My question is this. Is there a device or attachment that I can use to just loop those threads around quickly to free up my hands to guide the leather and worj the reverse lever at the same time? I currently use a large paper clip attached to the light pole with a couple of rubber bands. Maybe something that attaches to the back of the arm that we could just loop into it quickly? But, when I have 100+ straps to sew the edges on, it adds a considerable amount of time to the operation Thanks
-
Yes. I've only had a slight issue when I used some 12oz saddle skirting, but it worked fine. Just pull it out slower and let it uncool as you do so.
-
I've dip dyed 7 foot straps for years now. I use a Rubbermaid sealable tub that's about 10" long and 3-4" wide. I fill it with full strength black (1 tub for each color) and then coil the strap up and place it in the tank. I let it sit for 20-30 second or until the bubbles stop. I then wrap a rag or paper towel around one end and draw the strap through it, wiping the excess off and I go. I then hang it from a simple rack I made using a 1/2" thick x 1" wide piece of lathing strip that I've driven small nails halfway through. This way, I can hang up to 50 straps on 25 nails, one to each side. Now, for colors other than black, I do it differently. I hold one end of the strap in one hand and the rest up it wadded up in the other. I feed it down and through the dye, gathering the dyed end and releasing the undyed end as it passes through. I time it so each section of strap is only in the dye about 5 seconds. the key is to not stop the motion. It does take some practice. If you stop the motion for more than a second or so, you can get uneven coverage. Or, mix your dyes so that a soak of 1t5 - 30 seconds gives the final color that you like. It's more pronounced on lighter browns and such. Play with it and once you develop the techniques, you'll daub very few strraps again.
-
Do double caps fall into that category?
-
Yes, it is. Not enough though. I have had to skive the the piece of the strap that I fold into a handle, but the customer isn't happy with how 'thin' it makes it. Yeah, I checked Ali as well. This is a long-time, repeat customer. I have used Chicago screws since day one. He has had some of the screws strip out (threads) early on and wants to now use rivets, as he feels they will be stronger. I've always felt that the failed screws were a defective batch as they all happened in the same time frame. No failures in a few years. Plus, I think he likes the smaller head of the rivet. Chicago screws actually worked well, but were a PITA to install. I had to use 1/2" on some parts and 3/8" on others. Plus, 12 identical pieces might need the 1/2" or the 3/8" depending on the leather thickness. They have to be snug with no slop through the leather. Since the Chicago screws give me longer reach, the available sizes always worked. I am not familiar with saddlers rivets by that name. What are they ?
-
Fred and Latigo. I took a look. Unfortunately, they are both a tad too short. The 15mm would barely poke through the stack of leather. 16mm or 5/8" would be the absolute minimum to hold properly
-
Hahaha. Yeah, I learned metric a long time ago. I actually like it better as it's much easier to scale things.
-
I am looking for the below rivets without much success. I need double cap, solid brass that have posts longer 1/2". I have tried OTB, Buckle Guy, Beiler's, Tandy, CDW, McMaster-Carr, Hanson and a number of the sites that pop up on a Google search. Do any of you have a source that might have something? Oh, and no, I can't use copper rivets. Bummer. Thanks
-
I have an arbor and a press to do snaps. As others said, the arbor will likely need boring out. The snap press needs to have a hole that will fit the snap dies. I bought a press and dies for double caps, line 20 and line 24s, and they have dozens of other dies for $30. Check www.goldstartool.com
-
I've been using the Dollar store acrylic floor wax (50/50) for a long while now and had good results. However, it is no longer carried in the stores around us. The other big box stores do not carry any products labeled as acrylic floor wax. They have finishes (clear) and multisurface and so on. Does anyone have suggestions for another resolene replacement?
-
Dip dye your leather to avoid the blotches. Works like a champ
-
What sealers do you use?
-
I make lots of straps and found that Leather Balm with Atom Wax (Fiebings product) works well. I apply liberally with a piece of sheep's wool that I have trimmed about 1/2 height. Apply with a firm, circular motion. I apply the back and then the front. I then take it an roll the strap bent over a smooth edge of the bench or a round bar to work the fibers. It will usually go from stiff and dry to floppy and flacid!. I've also had similar results with MInk Oil Paste. This is done after tooling, dying etc. If the leather is super dry, I'll lightly oil it with some NFO first. Then the tooling, dying, etc.
