


TomG
-
Posts
1,024 -
Joined
-
Last visited
Content Type
Profiles
Forums
Events
Blogs
Gallery
Everything posted by TomG
-
Try the drill press or hand drill route
-
I used to make a spacing strap our of nylon webbing and brass grommets. I would chuck a standard punch into my drill press. Set to a medium speed and use it to bore through the webbing. The punch generated enough heat to melt as it cut and I had perfectly cut holes. I used both wood and plastic cutting boards as backers.
-
As Hildebrand said. This is normal. Let me see if I can remember how it was explained to me. Picture a doughnut. If you measure the diameter of the outside and of the inside, they are different, of course. Say that the outside is 3" across and the inside is 2" across. Using the formula for the circumference, c=pid, the outside circumference is 9.42" and the inside is 6.28". And, since the circumference is equivalent to the "length" around the circle, you see that there is a 3.13" difference in length. In practical matters, you'd have to figure the diameters based on the thickness of the leather - if I remember right, it's something like outside diameter - thickness x 2. As for mixed tannages, people glue Chrome to Veg all the time. BUT, regardless of tannages, measure and glue everything up flat, not curved.
-
Oh Lord, Dwight.. You are not doing that at all. That's basically what I've been doing. I sort of pull the bobbin thread intil it "feels" right. and adjust my top tension from there. I was just blabbering about a "wish" <g>... I thought that might have contributed. I haven't had a chance to play with it and do any fine tuning. Woke up sick this morning.
-
Thanks. I THOUGHT I had that happening on my test sews after the repair. I'm going to breakout some good scrap and go back through all of the tension setup steps. That being said. I just discovered that both of the presser foot tensions were very light. I never thought to check those. The way my hands fed the 2 different pieces was different and I was probably holding the test piece down a bit without thinking about it. The leash was mainly making sure it fed straight :-) I'll know for sure shortly.. I do wish there was a way to precisely adjust the bobbin tension. With our 12 needle embroidery machines, we take the bobbin carrier out and hang 4 quarter taped together to the thread and bounce it. We adjust the tension until a bounce drops the stack and then stops. Easy-Peasy
-
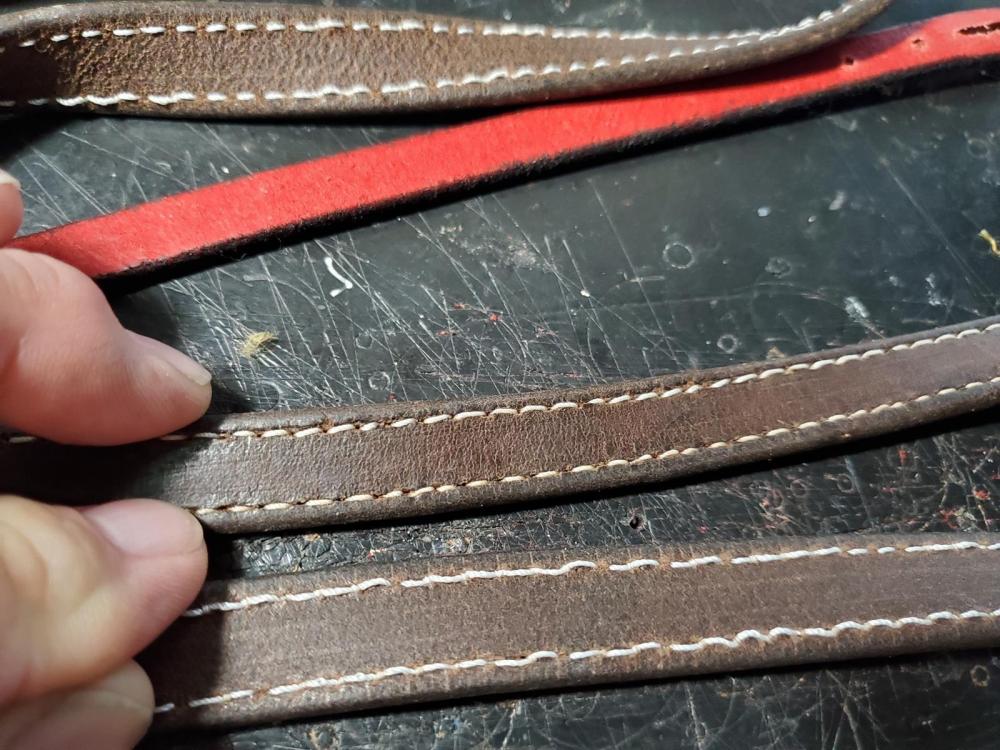
First, thanks for all the help earlier on my needle bar issue. I replaced it and checked timing and it looks OK, I think. But, I was sewing on a leash today for a repair and the stitching is for crap. I did not mess with bobbin tensions or top tensions during the repair. Sewing with 138 and 22 needle. Now, the leash is sort of soft, well-used VegTan. I adjusted the stitch length to use the old holes. My test piece was a lot better looking, but not 100% perfect. So, I guess the question is.. Can the quality and firmness of the leather affect the stitch quality in this way? Photo shows top side and bottom side.
-
Been there. done that on a few mechanical machines. Like I said.. unless I KNOW it's a press fit, I check with others who might know. I just finished installing the new bar and did OK. It took a little experimenting to figure out how to reassemble, since a couple of parts did not want to cooperate . The main issue was the very tight tolerances on one of the sliding bars behind the rocking arm. Had to take abreak and ease up on my back, but now going to check the hook timing. Later
-
I'm in the process of replacing it now, but kind of stuck. I have the feed dog removed, loosened the clamp screw on it and it drops dpwn just fine.. except it hits the edge of the bobbin assy. I need about 2mm of movement to allow it to completely drop out. I've removed the screws that I THINK should allow the needle rocker frame to slide a little but it's not budging. I'm not comfortable forcing anything until I know it needs to be forced. That part is the pivot pin that the rocker goes on. I put in a call to Bob and will probably hear from him sooner or later. If I find it's OK to pry that pin out a tad, I'll be golden.
-
Nothing you can do. they are made from stamped metal. Once they start to bend, they are toast. Don't worry about throwing away cheap trash. You probably paid around $10 or so. Say $15. If you had it for 3 years, that's $5 a year! Go invest in a good, solid punch. I have the one I bought from Tandy about 12 years ago (around $25 on sale at the time) and use it almost daily. I either polish.hone the tubes in a drill press when they get dull or I simply buy replacement tubes. Try to get one with a replaceable anvil and you will have a tool that will last you a lifetime. You'll never regret it.
-
I did notice that it appears that the needle rod won't just drop out of the bottom of the machine. Bob said something about removing a plate or something. I haven't looked at it in depth yet though. Any tips you'd care to share?
-
Exactly. I ordered it today and hopefully Bob was able to get it in today's mail for me.
-
I suppose I could, but I would either have to drill all the way through the original hole, or buy a bottoming tap in the small size I'd need. I'd still have to pull the bar to do this. It's just easier to replace with new and not have an oddball machine . But, I appreciate the idea.
-
Thanks, but it broke off too far into the hole. I did drill it out, but slipped and damaged the threads. So, Iml replacing the bar.
-
I just picked up 2. I got home and tried to remove the old screw and wound up buggering the hole. So, I am going to have to replace the needle bar. If the bar I buy comes with one already, I'll be glad to mail you the 2 extras. I'll let you know.
-
As an FYI, the Consew part number is B140553. I'm waiting to hear if my local dealer has any in stock. Fingers crossed.
-
Consew 227-R2
-
Not sure if I can pull the needle out as it is secure, but I'll try it when I get to the shop tomorrow. Do you know what size screw it takes?
-
Thanks. I'll check into that. Never heard of a left hand drill bit
-
I was tightening the screw that holds the needle in the bar and the head broke off. Inswear I wasn't cranking down on it. But the screw is now recessed in the hole. I am afraid that the screw is too small for standard extractors. Suggestions?
-
Is it mainly widening the gap? What does the hook need?
-
I think I've seen the answer to this somewhere her. but I've spent an hour looking with not success. I have a 111W155 and it sews fine with 138 thread. I would like to sew with 207 just for cosmetic reasons. Isn't there a way to modify the thread path so I can use 207 top and bottom? Tom
-
When you skive and glue together, do you sew the join as well? I've done this to make longer dog leashes and always have to sew a couple of lines at the edges Not sure if I'd have to for belts though
-

Suggestions needed for Back pack straps breaking
TomG replied to Sharon Mallory's topic in How Do I Do That?
2 things to try, if you haven't already. 1) Burn the ends of the nylon strap after you cut them. 2) Use a fairly long stitch.. 6-8 SPI or so. Make a couple of rows or better a square box with a "X" from corner to corner on. Tom -
Suggestions needed for Back pack straps breaking
TomG replied to Sharon Mallory's topic in How Do I Do That?
Some photos of what you are doing exactly would help Tom -
Making an oil based dye
TomG replied to ABLeather's topic in Dyes, Antiques, Stains, Glues, Waxes, Finishes and Conditioners.
I haven't tried this but have been meaning to for several years now From Fiebings site https://www.fiebing.com/tips/mixing-fiebings-leather-dye-and-prime-neatsfoot-oil-compound/ Mixing Fiebing’s Leather Dye and Prime Neatsfoot Oil Compound For generations saddle makers and other manufacturers of leather goods have used a combination of oil and dye to both control color as well as to maintain the suppleness of the leather. To achieve this highly desired result the trick is to mix 6% of Fiebing’s Leather Dye with 94% Fiebing’s Prime Neatsfoot Oil Compound. This works especially well with all of the brown tones and the primary colors like green and blue. Apply as usual to unfinished, vegetable tanned leather and allow to dry. You can try to buff the surface when dry to remove any excess dye but due to the low concentration of dye in this mixture you should not have much of a rub off issue. Once dry, feel free to seal with Fiebing’s Acrylic Resolene. Our R&D testing has proven that Fiebing’s Leather Dye combines more effectively with Fiebing’s Prime Neatsfoot Oil Compound then does Fiebing’s Professional Oil Dye. We suggest you use the standard Fiebing’s Leather Dye when attempting this dye/oil combination.
