.jpg.e13e7809a690335a89b8a4ed2e876db1.jpg)
Northmount
-
Posts
6,539 -
Joined
-
Last visited
Content Type
Profiles
Forums
Events
Blogs
Gallery
Store
Everything posted by Northmount
-
To get greater depth of field (in focus from the front edge to the back edge) you need to use a smaller lens apeture (f/22 for example) and a slow shutter speed, maybe 1/8 second, all depending on your lighting. Bracket you shots with longer and shorter exposure times so you can pick the best exposure. After some practise with the same setup, you will not need to bracket with as many shots and of course will save a little time. Here are a few links that you may find useful. There are many places on the web with great information. Aperture http://digital-photography-school.com/aperture Seamless background product shots http://digital-photography-school.com/how-to-create-simple-seamless-background-product-shots Inexpensive Light Tent http://digital-photography-school.com/how-to-make-a-inexpensive-light-tent Seamless White Background http://digital-photography-school.com/diy-seamless-white-background-for-product-shots Get your White Balance Correct http://digital-photography-school.com/get-your-white-balance-right-in-seconds-using-grey-card You can build a portable light tent out of some tubing and a flat white bed sheet. You can build it to any size needed for your products. For starters, build something that will fit on your table top. It is much easier to work around than crawling around on the floor. Tripods for camera and lights make it easier to arrange and setup. A boom type tripod is handy for your camera so you can position it above the product if you want to. Photography can be nearly as addictive as leatherwork, so watch out. You may have two addictions to deal with now! Tom
-
A tent does make a lot of difference. I can see your fluorescent tube reflected in the snaps. Include a piece of white paper in the edge of your photo. Then use it as noted above to set what "white" should be. There is another setting in PS under color. It is to remove any colourcast due to lighting, reflections, etc. when removing colourcast, sample something that should have "no color". Either white, grey, or black. Between the two types of settings, you should be able to come closer with matching your colors. There is also a selection for color correction. Sometimes auto works fine, but some manual adjustments may be required. See if your camera has a setting for manual white balance. If so, use it to get correction started properly in your camera. If you always use same light, same distance, same f-stop, same shutter speed, you should get same color rendition. Auto isn't always your best friend. Tom
-
The blade needs sharpened, even though new. The typical new blade, especially Tandy, needs a lot of work. There are other threads about sharpening swivel knives. Do a quick search and you should be able to find them. Tom
-
.thumb.jpg.6e903dd66163ad5672f00f144058c571.jpg) Very nice! Tom
Very nice! Tom -
Question About Hand-Stitching Thick, Curved Leather
Northmount replied to Cameroo's topic in How Do I Do That?
Lay the collar out over a 4x4 or round post so you can keep the curve while you are punching your holes. I would also glue the 2 straps together before punching and stitching. Keep your curve while gluing it up. It is very nice to be able to keep the curve while you are working on it. Makes a more professional looking piece. Tom -
I ocassionally buy kits to get a pattern for cutting out more of the same style. Also if the sale price is really good, and sometimes when there is a great interior or one I want to copy. I rarely buy any of the pre-punched kits cause I don't like round holes for my lacing, or big round holes for sewing. Cost wise, it's usually better to buy some leather and cut and assemble your own stuff. You can decide on the quality of the leather and cut around defects. Tom
-
I Have No Way To Work. Tooling Is Too Loud.
Northmount replied to Blakebcg's topic in How Do I Do That?
Somebody here used rawhide dog chews as a source for rawhide for a maul he was making. Soak and pull, stretch out, nail down and dry flat. You might be able to find his post if you do some searching here. Tom -
The fake stuff will melt if you hold a small flame against it. If the middle of the coloured leather looks blue or grey, it is likely chrome tanned. You can test casing and stamping to see if it willc ase, and it it will burnish and retain the samping. That will help tell you if it is veg tanned. Tom
-
Rawhide Covered Stirrups, Nuts Working Loose
Northmount replied to 2palominos1bay's topic in How Do I Do That?
Several grades of loctite. Some are quite permanent, others will let you unscrew the nut if needed, but won't work its way off by itself. In a pinch, fingernail polish or other plastic glues work too, but loctite is best. Tom -
Adding some elbow grease will get more shine. Take a nice soft cotton cloth (old tee-shirt) and buff it lots. That will add some shine, but still may not match the original. If you look at the original cushions, you will see some difference between where clothes have "buffed" the surface, versus the areas not touched. Hopefully your new cushion will come close to the un-touched areas of the old cushions. Tom
-
Adding Tooling/stamping To Finished Leather
Northmount replied to artycpt's topic in How Do I Do That?
I had to do a little fix on an item that was already finished. I dampened the leather from the back and left it sit for a while until I could see moisture showing through, left it dry for a while, then stamped it. Worked a lot better than I thought it would. Take your time, don't saturate the leather. Tom -
I Have No Way To Work. Tooling Is Too Loud.
Northmount replied to Blakebcg's topic in How Do I Do That?
Supporting a 1" or there abouts thick piece of granite, marble or quartz at only the 4 corners will eventually result in a crack and breaking the piece. So I would use the piece of carpet idea. Stone masons mark a line by chiseling lightly across the surface where they want to "cut", then rap the mark sharply several times along the mark. And it falls apart. Sometimes internal cracks cause it to break where not wanted. So hidden internal cracks in an unsupported area of a thin slab will eventually break. The 3 or 4 inch thick stuff will take a lot of pounding with no problems. Tom -
How Do I Make A Cheap-Ish Imprinting Machine For Big Stamps?
Northmount replied to lightingale's topic in How Do I Do That?
Order a 1 ton arbor press from Busybee. Closest store to you is Ottawa, but you can order online. http://www.busybeetools.com/categories/Metalworking/Arbor-Press/ Using a maul (or mallet) on large stamps results in a bounce that gives double impressions. You can get a dead blow hammer that doesn't bounce. Check Busybee or other tool stores near you. Tom -
See what your seller recommends, in case any warranty issues come up. Otherwise, Fiebing's 4 Way Care Leather Conditioner. May darken light colours. Use sparingly and follow the directions. Tom
-
Mop N Glo Speckling
Northmount replied to Elmore's topic in Dyes, Antiques, Stains, Glues, Waxes, Finishes and Conditioners.
And black speckles are not due to the mop n glow. It is iron and tannic acid in the leather that produces the black specks. It can be bleached out with oxalic acid or even lemon juice. Tom -
Maybe a description of the specific problem you are having might help. Is it the gradient in the text that is bothering you? For it, I would suggest masking it off and using an airbrush. Tom
-
Thin leather doesn't need to case as long as thicker leather. It dries out faster too, so may need additional misting before you finish. If the leather isn't burnishing (turning darker) when you stamp it, needs more moisture. Some will wipe with a wet, not drippy, sponge to add more moisture, then wait for the colour to return to near the same as it was before wetting or casing it. Tom
-
Great job. Keep tapping! Tom
-
Two comments: Looks like your leather is too dry while stamping. Light weight leather can dry out fairly quickly. There is a pinned topic here on how to properly case the leather. If it dries before you get done, mist the leather some. Tip your veiner more so the impression stops before the edge of the leaf. And the veins curve upward (toward the tip of the leaf) on leaves, not downward. Examine pictures of leaves (real ones) that you are trying to produce. You'll get other comments too, but I won't run on. Practise doing the same pattern a few times and you'll see improvement in each one as you learn what works best. Tom
-
If you type the search items you are looking for (in google) followed by site:leatherworker.net, the search will be restricted to leatherworker.net. Helpful for eliminating all the other stuff that often crops up. Tom
-
Search other threads for how to apply antique. Misapplication will result in a mess. The article needs to be sealed with a good and compatible resist so you will be able to wipe off the main surface, leaving the antique in the cuts and depressions. Another thread this past week discussed the right stuff for a resist. Tom
-
Since you are having the frame cast, consider doing it in two parts that will snap together. Could add some epoxy to ensure the pieces stay together. Tom
-
Speed Reducer And Servo Motor?
Northmount replied to buffalobill plus Ed D's topic in Leather Sewing Machines
The motor tension direction was straight down before, now it has to swing more to the rear so the motor and tension brackets really need to be modified a little. I spent probably around $40. I bought the bearings, small pulley and a short belt. The rest of the stuff I have around here. Do my own welding, etc. Even have the reamer I needed to fit the bushings to the shaft. But I have the time, being semi retired. So I work when health allows and complain the rest of the time. If I was really busy, I'd buy the complete assembly and just have the installation time to worry about. These pillow block bearings are actually bushings. But they last a long time. So I wouldn't be concerned about a reducer using bushings. A good part of your machine head uses bushings. Some of the speed reducers have stepped pulleys, so give you a fairly quick speed change if you need it. With the pulley all machined as one piece, takes less width so makes mounting easier, usually with one bracket on one side. Just have to get 2 belts the right length to go with it. Tom -
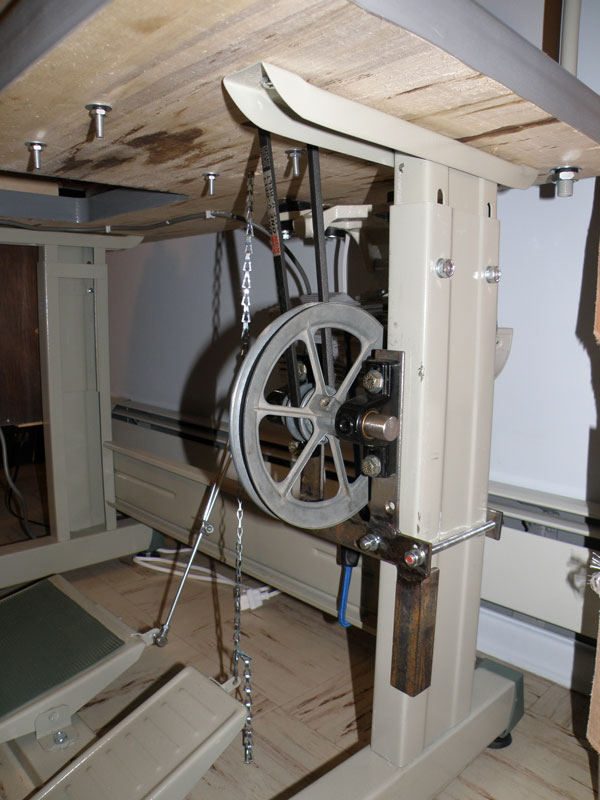
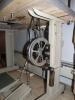
Speed Reducer And Servo Motor?
Northmount replied to buffalobill plus Ed D's topic in Leather Sewing Machines
Here are a couple pictures. The slot in the table had to be lengthened to use the same belt as had been used for the motor. The pillowblock bearings are for a furnace fan that typically runs 900 RPM so I'm not worried about them lasting. Had to shift the motor over a bit, and play with the tensioning adjustments, finally decided to keep it real simple and use a bungee cord for the motor belt tension. For the belt to the head, just slide the jackshaft bracket down to adjust, then tighten the clamp to the leg. Since the leg material is on the light side, there is a block inside to keep the leg from being squashed. Tom
-
Speed Reducer And Servo Motor?
Northmount replied to buffalobill plus Ed D's topic in Leather Sewing Machines
Up to 2 each 8 to 10 oz veg tan. And as low as one 3-4 oz. 3-4 oz was obviously no problem. But 8 oz and up was a problem low speed wise. Tom