.jpg.e13e7809a690335a89b8a4ed2e876db1.jpg)
Northmount
-
Posts
6,553 -
Joined
-
Last visited
Content Type
Profiles
Forums
Events
Blogs
Gallery
Store
Everything posted by Northmount
-
.thumb.jpg.6e903dd66163ad5672f00f144058c571.jpg)
I Have No Way To Work. Tooling Is Too Loud.
Northmount replied to Blakebcg's topic in How Do I Do That?
Supporting a 1" or there abouts thick piece of granite, marble or quartz at only the 4 corners will eventually result in a crack and breaking the piece. So I would use the piece of carpet idea. Stone masons mark a line by chiseling lightly across the surface where they want to "cut", then rap the mark sharply several times along the mark. And it falls apart. Sometimes internal cracks cause it to break where not wanted. So hidden internal cracks in an unsupported area of a thin slab will eventually break. The 3 or 4 inch thick stuff will take a lot of pounding with no problems. Tom -
How Do I Make A Cheap-Ish Imprinting Machine For Big Stamps?
Northmount replied to lightingale's topic in How Do I Do That?
Order a 1 ton arbor press from Busybee. Closest store to you is Ottawa, but you can order online. http://www.busybeetools.com/categories/Metalworking/Arbor-Press/ Using a maul (or mallet) on large stamps results in a bounce that gives double impressions. You can get a dead blow hammer that doesn't bounce. Check Busybee or other tool stores near you. Tom -
See what your seller recommends, in case any warranty issues come up. Otherwise, Fiebing's 4 Way Care Leather Conditioner. May darken light colours. Use sparingly and follow the directions. Tom
-
Mop N Glo Speckling
Northmount replied to Elmore's topic in Dyes, Antiques, Stains, Glues, Waxes, Finishes and Conditioners.
And black speckles are not due to the mop n glow. It is iron and tannic acid in the leather that produces the black specks. It can be bleached out with oxalic acid or even lemon juice. Tom -
Maybe a description of the specific problem you are having might help. Is it the gradient in the text that is bothering you? For it, I would suggest masking it off and using an airbrush. Tom
-
Thin leather doesn't need to case as long as thicker leather. It dries out faster too, so may need additional misting before you finish. If the leather isn't burnishing (turning darker) when you stamp it, needs more moisture. Some will wipe with a wet, not drippy, sponge to add more moisture, then wait for the colour to return to near the same as it was before wetting or casing it. Tom
-
Great job. Keep tapping! Tom
-
Two comments: Looks like your leather is too dry while stamping. Light weight leather can dry out fairly quickly. There is a pinned topic here on how to properly case the leather. If it dries before you get done, mist the leather some. Tip your veiner more so the impression stops before the edge of the leaf. And the veins curve upward (toward the tip of the leaf) on leaves, not downward. Examine pictures of leaves (real ones) that you are trying to produce. You'll get other comments too, but I won't run on. Practise doing the same pattern a few times and you'll see improvement in each one as you learn what works best. Tom
-
If you type the search items you are looking for (in google) followed by site:leatherworker.net, the search will be restricted to leatherworker.net. Helpful for eliminating all the other stuff that often crops up. Tom
-
Search other threads for how to apply antique. Misapplication will result in a mess. The article needs to be sealed with a good and compatible resist so you will be able to wipe off the main surface, leaving the antique in the cuts and depressions. Another thread this past week discussed the right stuff for a resist. Tom
-
Since you are having the frame cast, consider doing it in two parts that will snap together. Could add some epoxy to ensure the pieces stay together. Tom
-
Speed Reducer And Servo Motor?
Northmount replied to buffalobill plus Ed D's topic in Leather Sewing Machines
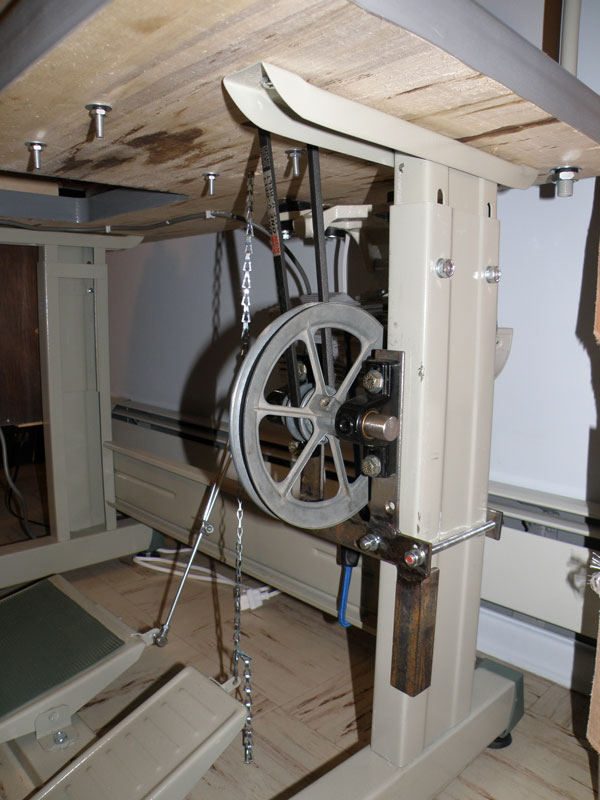
The motor tension direction was straight down before, now it has to swing more to the rear so the motor and tension brackets really need to be modified a little. I spent probably around $40. I bought the bearings, small pulley and a short belt. The rest of the stuff I have around here. Do my own welding, etc. Even have the reamer I needed to fit the bushings to the shaft. But I have the time, being semi retired. So I work when health allows and complain the rest of the time. If I was really busy, I'd buy the complete assembly and just have the installation time to worry about. These pillow block bearings are actually bushings. But they last a long time. So I wouldn't be concerned about a reducer using bushings. A good part of your machine head uses bushings. Some of the speed reducers have stepped pulleys, so give you a fairly quick speed change if you need it. With the pulley all machined as one piece, takes less width so makes mounting easier, usually with one bracket on one side. Just have to get 2 belts the right length to go with it. Tom -
Speed Reducer And Servo Motor?
Northmount replied to buffalobill plus Ed D's topic in Leather Sewing Machines
Here are a couple pictures. The slot in the table had to be lengthened to use the same belt as had been used for the motor. The pillowblock bearings are for a furnace fan that typically runs 900 RPM so I'm not worried about them lasting. Had to shift the motor over a bit, and play with the tensioning adjustments, finally decided to keep it real simple and use a bungee cord for the motor belt tension. For the belt to the head, just slide the jackshaft bracket down to adjust, then tighten the clamp to the leg. Since the leg material is on the light side, there is a block inside to keep the leg from being squashed. Tom
-
Speed Reducer And Servo Motor?
Northmount replied to buffalobill plus Ed D's topic in Leather Sewing Machines
Up to 2 each 8 to 10 oz veg tan. And as low as one 3-4 oz. 3-4 oz was obviously no problem. But 8 oz and up was a problem low speed wise. Tom -
Speed Reducer And Servo Motor?
Northmount replied to buffalobill plus Ed D's topic in Leather Sewing Machines
Yup. I switched from a standard digital servo to the Sewslow pro, but still needed some help at low speed. So cobbled together a jack shaft with a 6" and a 3" pulley, added a short belt to the motor, and it does what I want now. Mine is a Techsew 2700, same as Cowboy 227, which has about a 4" pulley in the hand wheel. If you are getting a heavy stitcher with a large pulley on the head, you might not need to double up the reduction like I did. See if you can test out the machine first with the heaviest leather you will ever sew, and the lightest you expect to do on the same machine. Tom -
If you have a business name, registered, you don't need to buy a membership at Tandy, and you get the elite pricing. Most places, cost less to register a business name than the elite membership costs. You don't need to incorporate a business, you can run as a proprietorship, and work it in with your personal income taxes. Each has their advantages. Even though an incorporated business has limited liability, you, the President, Chairman of the Board, etc. still can be found liable for your errors. A corporation also has a lot more record keeping to be done. So small time business or busy hobby business, you may find it well worth your while to register a business name. Of course if you are doing your business dealings under the table, no taxes, it doesn't make a lot of difference. Tom
-
Fantastic. Great ideas and really great work. Tom
-
Speed Reducer And Servo Motor?
Northmount replied to buffalobill plus Ed D's topic in Leather Sewing Machines
Motors have reduced torque at low speeds. So when you are trying to go slow through a difficult part, there isn't enough torque to punch through thicker or harder leather. Then you either hand wheel it, so now have only one hand to guide the leather with, or you step on the pedal harder, and ... Whoops, went further and faster than you wanted too! So adding a speed reducer lets the motor run faster, so it has better torque output, plus the torque amplification due to the speed reducer, now you can run heavier leather at low speeds and keep both hands on the job. I have both a speed reducer and a servo with 3:1 gear reduction. Can go as slow as one stitch in three seconds, so can stop at any needle position, and make complicated turns, all without hand wheeling it. My top speed is a little on the slow side, but I'd sooner have it a little slow and have the torque I want at low speeds. Tom -
Use neatsfoot oil or extravirgin olive oil (EVOO) to lightly oil the leather after it is dyed. Some people also lightly oil before applying the dye. Don't apply too much. More is not always better. Neatsfoot oil darkens the leather more than EVOO. Let the item sit 12 to 24 hours after oiling so it can soak in evenly and any splotchy areas will even out. Hard to make it look perfect immediately after oiling without getting too much oil on. So don't panic. Uneven or blotches will disappear after sitting. Tom
-
Sears Commander Model 151.270... Singer 15 Clone?
Northmount replied to JohnBloch's topic in Sewing Leather
Don't try to replace the wires that go into the field windings. Be careful of how much bending you do next to the field windings. You don't want to break them off. You can get some heat-shrink tubing at electronics or electrical parts stores, or Lee Valley. You can unsolder the ends of the wires from the connections away from the field windings. Carefully remove the brittle cracked insulation. Slide the heat-shrink tubing over the wire and heat it with a hot air gun. Some people use a butane lighter, but you are safer and have more control with the hot air gun. Resolder the connections. The armature commutator looks really good. Don't do anything to it as long as there are no grooves that need to be cut out. It makes better contact with the carbon impregnated smoothly worn surface than it does with bright copper. WWII bomber's electric servos were failing on the way back to Britain after bombing raids over Germany. The failures were finally traced to shining up the commutators during servicing before the flight. When you replace brushes, replace the springs too if they are separate. Weak springs, poor contact with the commutator. Hope this helps get it back together and working. Tom Edit: I just went back to look at your pictures. The brushes and springs look good. Make sure they slide freely in the brush holders. -
A natural dried leaf surface is fairly smooth between the veins. So my preference is less matting. But, leatherwork is also art, and it is the artist's interpretation that counts. Toss a coin! Tom
-
Ditto what BeaverSlayer says, It is an oxygen scavenger used to preserve foods and prevent oxidation. Also used in steam boiler water treatment to reduce the residual disolved oxygen level to less than 20 ppb. Tom
-
How much can you disassemble without doing more damage? If there is room to work ... You can lift the leather away from any backing material. Cut a patch to be inserted behind the leather. May need to skive the edges to reduce the transition around the patch. Use a slower setting glue and work it into the surface of the patch and the underside of the leather. Press it all together and let it set. Depending on what if anything is behind the leather, you may be able to use a roller to help press it together and roll out any bubbles. I've done this with leather jackets and had an almost perfect repair, hard to see or find after it was finished. Didn't have to rip the lining out of the jacket. There is no glue that will hold the leather edge to edge. Also as the leather is very old, dried out, etc. it would only tear beside it if it did hold together. You may need to remove fuzzies from the edges to provide a cleaner edge to work with. This type of repair can be used for small cut or tears as well, however you may have to cut the small tear longer to give enough flexibility and room to work the patch and glue in behind. There is a post somewhere here about a material used to fill in cracks on shoes that may be used to fill in surface cracks. I think it was sort of like a latex and painted on in layers to build it up. Before you start doing the repair, try to condition the old leather by working a little neatsfoot oil or other leather conditioner into the surface of the leather to make it more flexible, but DON'T saturate it. Glue doesn't stick to oil, and you don't want the oil getting on the clothes of anyone that sits on the chair when you are finished the repair. Take your time, go carefully. Tom
-
When you add a hint of green, I would keep it closer to the stem. The outer edges of the leaf dry out first, so shouldn't have any green left. And I like it without the green. Looks like an inverted carving style, which is fine. Been doing some myself. But as mentioned, reduce the amount of matting. The leaf surface in nature is smooth between veins. Tom
-
There should be a piece of leather, sort of like a welt, between the outside and the lining leather. It should be the same thickness as the magnets. Punch a hole for the magnet to rest in. Glue the magnet plus welt to the outside layer. You can use a layer of strong cloth over the magnet to the welt. Then glue the lining in place over all of it. Depending on where your folds and stitching lines are, you could do some decorative stitching to provide some more strength. And you may need to skive the edges of the welt to help it blend in. Mount the magnets in a welt in the purse body as well. Won't likely need any extra reinforcement so no cloth. Make sure your magnets are placed with the right polarity before you glue up. As a side note, I tried using just a thin roughly 24 AWG piece of sheet steel in the flap to keep the bulk down. It doesn't hold as well as using magnets in both pieces. If you do use a steel plate in the flap, use several magnets, and larger diameters, like 3/4 inch to get enough holding power. Do a mock up to see if it has the strength you want. Tom