


.jpg.e13e7809a690335a89b8a4ed2e876db1.jpg)
Northmount
-
Posts
6,540 -
Joined
-
Last visited
Content Type
Profiles
Forums
Events
Blogs
Gallery
Store
Everything posted by Northmount
-
Sure. If your don't use a shorter liner, it will bunch up in the fold. And for the typical billfold, the more cash a person stuffs the bill section with, the liner bunches up even more. The liner needs to be shorter in the direction perpendicular to the fold line. To accommodate the difference in length, a one piece liner should not be stitched or laced to the back in the fold area. If the liner hasn't been trimmed back in the fold area at the bottom, then cut a notch in it about 1/4 x 3/4". Match the ends up, glue in place, punch the holes and lace it up. This will force a natural fold in the wallet (won't lay open flat, so don't attempt to display it that way). Some liners are an expandable type that accommodate the difference in length flat versus folded. The centre piece of the liner fits into slots cut into the two end pieces and "floats" between them. Again, this floating centre piece is not stitched or laced to the back. Tom I see Chief answered at the same time, so you got it from 2 directions!
-
.thumb.jpg.6e903dd66163ad5672f00f144058c571.jpg) Here is another good tutorial on bookbinding. http://www.johan-potgieter.com/bin02.html Tom
Here is another good tutorial on bookbinding. http://www.johan-potgieter.com/bin02.html Tom -
Very nice and neat work. Tom
-
I have noticed that during casing, if the color is inconsistent, it will be when finished too. So I often treat Tandy leather with oxalic acid to even out the colour. I decided recently to do it early, as part of the casing process. It doesn't fix all the evils, but certainly helps. Tom
-
Yup, the leather flap reminds you there is something under it that you need to watch out for.
-
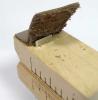
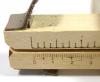
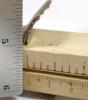
Here are the pics. So if the blade sticks out, either cover it to protect your fingers, or do as Bruce says and snap off the excess so it will be buried below the top of the bar. Tom
-
The blade is just slightly over 1", maybe a 64th if I could read it! When set to cut a 3 to 4 oz strip and with the blade flush with the bottom side, the top of the blade is proud by 1/8". When adjusting for thinner leather, if you accidentally place your finger or thumb above the blade (when the end is buried, not visible) and squeeze, you suddenly have a nice clean cut when the blade rises above the surface. Possibly the newer models have thicker guide bars, then there would be less chance of cutting yourself since the blade would be fully buried. Any how, it hasn't got me since adding the little leather flaps! Tom
-
And be careful how you handle your strap cutter. The exposed ends of the blade are hard on your fingers. I glued a small leather flap across both ends of the blade. Can still replace or move the blade by folding the flaps back. A little less blood on the strap too! Tom
-
Agree with Particle. You need greater depth of field so the object is in focus from front edge to back edge. So with a tripod, you should have no trouble using an f-stop f16 to f22 and slow your shutter way down to what ever it takes to get enough light. Nothing wrong with using shutter speeds from 1 sec to 1/15 sec. See also this thread for more related comments and links. http://leatherworker.net/forum/index.php?showtopic=45745&hl=+tent%20+camera%20+light#entry287926 Tom
-
Check you needle is in the right direction. The scarf (thinned spot) should be on the hook side. Tom
-
Very Simple Question - How Do You Do This With A Belt?
Northmount replied to laspace's topic in How Do I Do That?
For edge burnishing, see http://leatherworker.net/forum/index.php?showtopic=18101 Check out the forum, "how do I do that" Tom -
Cute! And you better watch out for the vegans. Tom
-
As above, and your reach is not limited by the depth of the jaws. Rotary punch is good for a few holes just as convenience. And you can buy several drive punches for the cost of a good rotary. Tom
-
I'd burnish the edges after assembly so the pieces look like a single entity after burnishing. No misaligned edges. Helps to cut a little oversized as well so you have room to trim the edges even before burnishing. Tom
-
My First Scally Cap
Northmount replied to Samalan's topic in Purses, Wallets, Belts and Miscellaneous Pocket Items
Looks like some pretty good guessing. Very nice cap. Tom -
The $5 to $10 rotary punches aren't any good. Handles are just thin material stamped out to look like a handle. They collapse under any amount of strain. You need solid steel drop forged type handles, good and heavy. Look at $30 and up. Try this http://www.tandyleatherfactory.com/en-usd/search/searchresults/3230-00.aspx or Osbourne. Tom
-
Consew 210 Snapping Top Thread.
Northmount replied to shadowryder's topic in Leather Sewing Machines
I suspect you pulled the top thread out and didn't get it back in the same way. Don't start pulling everything else apart to fix the problem. If you take a real close look at the side of the needle, you may find some numbers that identify the needle and size. Go back and ask what thread was being used in the machine. As above, get a PDF manual. It will give you more info about the needle and the proper thread path. There are a number of threads here about needle size and thread sizes. Seems to me cowboy bob has a table of needle and thread sizes. Tom -
Belts shrinking or stretching are all about health. At least if you are overweight, you know what to do. When your belt stretches 3 notches, and you have lost all your energy, dropped 1/3 of your weight for no apparent reason, then you get concerned. Neither situation is great, but I know which one I'd sooner cope with. Back to stiffening your belt. Add a stiffener between the layers, something like Kydex, or poly type sheet. Tom
-
Use it for stuffing toy animals. Can use some of your leather scraps to make the animals. Tom
-
Just Another Newbie Tension Question Consew 206 Rb
Northmount replied to HuntingRobots's topic in Sewing Leather
General comment for any machine: Check the bobbin is threaded correctly and seated correctly. If that is all right, then reduce the bobbin tension. There are several threads here about how to set the bobbin tension. When you get the bobbin tension down, you can reduce the top tension. Tom -
See http://www.tandyleatherfactory.com/en-usd/search/searchresults/6015-01.aspx Includes several patterns and types. Once you get what you want working, ask blackriver laser to make a template set based on your drawings and spec. Tom
-
Admire Someone's Unique Design, But Don't Want To Copy
Northmount replied to spooky's topic in Getting Started
There's an old saying ... Great minds think alike, but fools seldom differ! I'd have to say we have great minds. Hard to change schedule, we're in the same timezone, and not that far apart. Tom -
Admire Someone's Unique Design, But Don't Want To Copy
Northmount replied to spooky's topic in Getting Started
Different spots, different conchos, different stamps, different order, your choice of colours. Putting stuff on a belt or collar is nothing new. Whether you use hearts, butterflies or elephants, have at it and arrange things the way that suits your mood. Now if you copied the exact layouts, colours, etc., then you would be copying what they have done. And yes, some of your conchos, spots, Tandy 3D stamps may be the same as some of theirs, but it is your arrangement and interpretation. What they have done is not new or completely unique. It's done all over the place. If you copied Lightingale's unique pattern, that would be infringing on her art and expression. There is a difference. Tom -
Thank you for posting it. Tom
-
One use for some wood carving tools is to use a wide gouge to cut nice round inside or outside corners. Straight chisels also for cutting slits. Tom


