


TheCyberwolfe
-
Posts
166 -
Joined
-
Last visited
Content Type
Profiles
Forums
Events
Blogs
Gallery
Store
Everything posted by TheCyberwolfe
-
 Just a sharp, narrow blade like an X-acto knife. You can also use a chisel which may help make sure you don't get any loose fibers on the back side.
 -
That color effect may not be what you were looking for originally, but it's kinda cool as-is. Maybe just go with it? The best advice I've ever seen for applying dye with an airbrush or sprayer is to thin it out and apply several light coats until you reach the color you want rather than a single application.
-
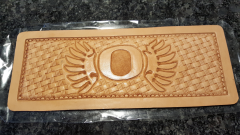
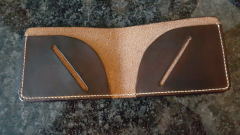
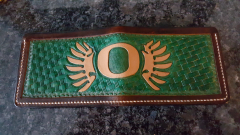
Sheridan Women Wallet
TheCyberwolfe replied to vhoang1102's topic in Purses, Wallets, Belts and Miscellaneous Pocket Items
Extra points for the red berries -
My older brother is having a birthday this month, so I made him this to take his mind off it. Of course, this was made before their early season losses, so I don't know how much he wants to be flashing it around
-
-
-
-
How To Get This Look From Dying?
TheCyberwolfe replied to panchoskywalker's topic in How Do I Do That?
It looks like that leather has a surface texture with lots of cracks/creases, in which case it would have been possible to use a technique from wood finishing where you dye to the darker color, and then sand/abrade/scrub the leather to remove some of the dye and reveal the natural color beneath on the very top surface, but not so deeply as to pull the color out of the creases. If you're worried about damaging the leather, you might want to try using a very light coat of dye resist brushed on the very top surfaces before dying to the darker color. -
I'm going to disagree with MissionVao on this, I think watch straps are a great beginner's project. There's very little leather involved, and the small size means you can usually find enough good leather on a cheap-o belly for several complete sets. This particular strap is just pretty leather and some thread, and it could be made with the tools included in a standard Tandy beginner kit. (With the possible exception of a creasing tool, I can't remember if they include one in a basic kit.)
-
Minimum Thickness For Granite Slab?
TheCyberwolfe replied to Artificial Intelligence's topic in Leatherwork Conversation
If you can't find something for dirt cheap in your area, the next-best bet is to dig through Amazon for a "surface plate", which is a 18"x24"x3" granite slab machined to be as near to perfectly flat as you can get. I got one for $80 including freight, but I have seen them cheaper. Just make sure you have a sturdy table, damn thing weighs over 50 lbs. -
Anyone Know Where To Get These Tweezers For Dyeing?
TheCyberwolfe replied to bylinesupplyco's topic in How Do I Do That?
The old-school method Al Stohlman describes in his books is a clothespin holding a chunk of felt, like that used for a saddle pad. -
Dye Edges How To Avoid Getting Dye On The Grain Or Flesh Side?
TheCyberwolfe replied to DavidL's topic in How Do I Do That?
I've been using the Dye-Liner brand felt pens for some time now, they make it a breeze to apply edge dye and it's a very convenient tool for short bouts of dye application. Be sure to get a couple of the eye droppers they sell for loading the dye into the pen - that cuts down on the mess greatly. To avoid problems with hand tremors, you may need to adjust your application process by say, putting the leather flat on a piece of paper so you can rest the tip on the paper and slide it down the edge as opposed to doing it freehand. That should give you more control over the process. -
One Of The Coolest Keyrings I've Ever Seen
TheCyberwolfe replied to tboyce's topic in Patterns and Templates
Krisbee, for heavy leather you could probably make the two end cuts a little longer, plus a little creative skiving to induce a little more bend in the folded arc. If the normal one is ___|-----------|___ then for heavy maybe ______|----------|______ y'know? -
Project To Work On While Camping?
TheCyberwolfe replied to cgleathercraft's topic in Leatherwork Conversation
Well, the entire point of any vacation is to relax, and i find both camping and leatherwork relaxing, so I used to join the two as well. Until, of course, I accumulated too much camping gear and essentially ran out of room to bring leather tools along I kept it to small projects while I was out. I did do some tooling, using a smaller slab that was easy to transport. Mainly either camping-related stuff (like the hatchet scabbard you mention), or stuff for the toolbox like a needle case. -
Very nice. In the business world they call those a 'pad folio' and charge ridiculous money for them.
-
I'm going to have to agree with Bruce's choice from 2007 - The Star in Elko. I went there once back in '99 - couldn't even look at food for a solid 18 hours afterward, but damn if that wasn't a fine steak. (My compadre on that trip warned me about the serving style, so I'd starved myself since breakfast.)
-
 At least until the wife stubs a toe on it and yells at me to cram it into the closet
 -
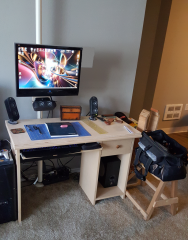
I think i came up with a solution to my current lack of a dedicated workspace - I've modified my computer desk to double as a workbench. This involved getting the monitor and such up off the desk so they wouldn't accrue damage when I bang away at rivets and such, and I've had to pick up a new poundo board and a new slab (the 70-pound surface plate / tombstone is too much to be moving around) but I should be able to keep on working now. There's a full write-up over at my main leatherworking blog, and here's a shot of the finished bench:
-
From the album: Workbench 2.0
-
When Do You Stop Cutting Yourself?
TheCyberwolfe replied to Chief31794's topic in Leatherwork Conversation
Hell, if it was only the knives I had to worry about, I'd be fine - it's things like paper and cardboard that get the better of me. (And every computer case I have ever screwed a motherboard into, but that's another story...) -
Well, you've got the pliers now, and you know how to squeeze rings together again - you're halfway to making chain maille
-
I don't think I'd ever be able to get a gas pump near my bike again if I put that much work into a tank cover
-
For small jobs, that works fine paper right on the leather, but I ran into paper warping issues on some of the larger tracings I've done, and that's where the film works better - it won't wander off on you during those long swoops. Of course, the first time I used tracing film I damn near lost a finger to a papercut just getting the film out of the package.
-
Wallet
TheCyberwolfe replied to LoneWolf1973's topic in Purses, Wallets, Belts and Miscellaneous Pocket Items
You can get away with light treatments on items that won't get tons of wear, but the edges of a wallet are going to take some serious abuse, so you need something a little more thorough. I picked up a 6" buffer motor at Harbor Freight and then cut a stack of 2" diameter wool disks out of a saddle pad and put them on the spindle. I then mixed up a batch of paraffin and beeswax (melted about 50/50 by weight together). Spin up the motor, rub some of that wax into the felt pads, and then use that as a burnisher. You can get the same result with hand tools, it just takes a lot of elbow grease. -
I think the phrase folks are looking for is "beautifully grotesque". Well executed bit of work there.