Tree Reaper
-
Posts
1,870 -
Joined
-
Last visited
Content Type
Profiles
Forums
Events
Blogs
Gallery
Store
Everything posted by Tree Reaper
-
Knife Sheath
Tree Reaper replied to dillpickle's topic in Gun Holsters, Rifle Slings and Knife Sheathes
Nice work, excellent for the first one. -
Segma Snaps Got Loosing - How To Fix?
Tree Reaper replied to Suicide's topic in Hardware and Accessories
One of the parts may be deformed. -
How Do I Make New Toe Caps For My New Boots?
Tree Reaper replied to DreadPirateRedbeard's topic in How Do I Do That?
Do you have an old pair that you can wet form the leather over? You could put the boot in a plastic bag and wet form over that as well. How are you going secure them, with glue? -
Aaron; You banged that off it good time and it looks very professional, good job!
-
Segma Snaps Got Loosing - How To Fix?
Tree Reaper replied to Suicide's topic in Hardware and Accessories
If it can't be reset then it will most likely have to be replaced. Those things can be a pain. Try and reset it first. -
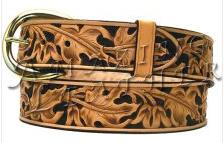
Maple Leaf Belt
Tree Reaper replied to Hibbert's topic in Purses, Wallets, Belts and Miscellaneous Pocket Items
Here's a belt like yours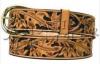
-
Maple Leaf Belt
Tree Reaper replied to Hibbert's topic in Purses, Wallets, Belts and Miscellaneous Pocket Items
I'm sure they will enjoy the belt, was that design for a belt? When I looked at the seeds I saw flowers because of the color, the wings could have been a little lighter. Do you see any room for improvement? I know it would take me several attempts to get what I wanted in a design like that. -
Maple Leaf Belt
Tree Reaper replied to Hibbert's topic in Purses, Wallets, Belts and Miscellaneous Pocket Items
Sorry about that, they look like one brown and one red. I now see some maple seeds so they must be maple leaves they just don't look like maple leaves. The leaves look stretched out but I'm thinking red maple where you leaves may be something else. -
Maple Leaf Belt
Tree Reaper replied to Hibbert's topic in Purses, Wallets, Belts and Miscellaneous Pocket Items
The red belt looks like maple but the other looks like oak, were they different stencils or are there both leaves on the each belt? Here's a maple leaf ... http://leatherworker.net/forum/index.php?showtopic=30459&st=0&p=190729&hl=+maple%20+leaf&fromsearch=1entry190729 -
Nicely done!
-
Maple Leaf Belt
Tree Reaper replied to Hibbert's topic in Purses, Wallets, Belts and Miscellaneous Pocket Items
I think those are oak leaves, if you search for oak leaves on here you can see the added tool work. There are probably at least a half dozen different stamps you can use for oak leaves. -
A picture would help. Which awl blade are you using? Kevin
-
My understanding is it comes oiled and waxed. From Tandy ...
-
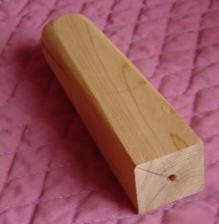
This is what I'm using, a piece of softwood with a deep hole drilled into the end grain.

-
Maple Leaf Belt
Tree Reaper replied to Hibbert's topic in Purses, Wallets, Belts and Miscellaneous Pocket Items
That's a lot of carving and back grounding, probably took a while. The one thing I see is you could use more detailing in your leaves. The color is too dark for me but that could be the color you wanted it to be. -
I'll have to router out a piece of cedar, make a matching insert for it minus the thickness of leather, put the leather in the cut out portion, place the matching block on top then clamp the two together. I think it might work.
-
http://leatherworker...showtopic=32648 contact Johanna, she can do it. Thanks for the detailed description and pictures. Kevin.
-
Nice stuff and welcome to the forum. Can you tell me how you formed that compass pouch? Thanks. Kevin.
-
 Nothing less than fantastic! A true artist.
 -
It's the life of a leather worker! I usually have to do everything two and three times, maybe more before I'm happy with it.
-
Survival Knife Sheath
Tree Reaper replied to otak's topic in Gun Holsters, Rifle Slings and Knife Sheathes
Other than the wavy stitch line it looks good to me, can't really see the burnishing on the edges. Does the knife slide in and out easily? Welcome to the forum. Kevin -
Keep it straight. You can stab it while it's damp.
-
Did you try this link from Ohio? If you are an individual looking for hardware or parts for a personal project or hobby, please click link below and let us know what you need. We will connect you with a merchant where you can buy what you need. Individual/consumer.
-
Nice work, welcome to the forum.
-
New Wallet
Tree Reaper replied to SheWolfSilver's topic in Purses, Wallets, Belts and Miscellaneous Pocket Items
Looks good, have fun lacing that puppy! I made one of those for myself and it was well worth the effort, they hold up well.