Tree Reaper
-
Posts
1,870 -
Joined
-
Last visited
Content Type
Profiles
Forums
Events
Blogs
Gallery
Store
Everything posted by Tree Reaper
-
New Purse
Tree Reaper replied to hjett1's topic in Purses, Wallets, Belts and Miscellaneous Pocket Items
There's a fair amount of work in that, I would focus on the stamping as mentioned, are those rivets or spots, can't tell from the picture? What did you use to stitch it? I too like the over all look of it. Kevin -
There really isn't a normal knife because it depends on what you are carving. You can use a larger blade on long straight lines but when you get into detailed work you will want something small and angled. I have a few knives but the one I always grab is the sk3 with a 3/16 angled blade but at times this blade is too large so I just ordered another sk3 with a 1/8 angled blade. The barrel size is more personal.
-
Try this link for the list of videos http://www.tandyleatherfactory.com/en-usd/Leathercraft-Videos.aspx
-
I really like the Eco-Flo Gel Antique in Saddle Tan finished with super sheen.
-
Hey daddy; I'd say 8-9 oz. anyway. http://www.adirondackpackbaskets.com/basketharnesses_leather.htm
-
Get a very small paint brush and just block out the horses,let that dry , do it again and let it dry then dye the entire concho, leave the dye on for thirty seconds then wipe the entire concho with a damp sponge very lightly. You'll see the horses better. Instead of the eyes maybe you could just put one on the concho as a birth stone if you have different colors. Check this link ... http://www.tandyleatherfactory.com/Resisting-Techniques/Resisting-Techniques.aspx
-
Hey Cheryl; I'm not a bling guy so the stones don't do anything for me, I'd probably put them somewhere else, on the lace maybe. If you use some block out on the stamp impression it won't get as dark and you'll be able to see it better plus you'll get some contrast. The impressions around the edge look good.

-
Ok; Well that's it then! Thanks all. Kevin.
-
Key Fob
Tree Reaper replied to SheWolfSilver's topic in Purses, Wallets, Belts and Miscellaneous Pocket Items
The medical term is wiggle factor. I prefer using a press when ever I can. -
That would be called a carabiner key plate. What does Ohio call it?
-
Having the guide on the right of the needle makes me wonder if I really need the extra space on the right side of the guide. My thought is, most of my work will be using the guide .
-
This is a good idea. I made one this morning from a hand tile cutter and a soon to be broken boot lace. I'm very pleased with the results.
-
I'll be relying on lots of help no doubt, I wanted to deal with Bob because of his input here but Ryan has been very accommodating and I'll speak with him tomorrow. I'm not sure if I need the extra length on the 4500 or whether the 3500 will suffice? I'm absolutely clueless about sewing leather with a machine but I'll learn.
-
Key Fob
Tree Reaper replied to SheWolfSilver's topic in Purses, Wallets, Belts and Miscellaneous Pocket Items
Something else to experiment with would be an inlay. I made a fob for a trapper and added a beaver tail inlay.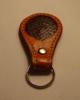
-
I'm looking at buying a Cowboy machine, I hit a link on the ad up top and got some overseas site which put me in touch with another dealer in Ohio. I was expecting to contact Bob but ended up talking to Ryan. I'll be looking forward to getting the machine but not the learning curve. Kevin
-
Need Some Style/technique Guidance
Tree Reaper replied to matthewspahlinger's topic in How Do I Do That?
Sounds like you might be looking for some basic carving to start... http://www.tandyleatherfactory.com/en-usd/Basic-Carving-Leather-Craft-Vide.aspx Do a search on knife sheaths here and you should get some ideas. Kevin. -
Please Help! Need To Fix Mismatched Boot Finishes
Tree Reaper replied to yayners's topic in How Do I Do That?
yayners, You might have better luck at a shoe/boot repair than you would at a Tandy. -
Clay B might be the eye guy ... http://www.dimensionsinleather.com/workshops3.htm
-
Please Help! Need To Fix Mismatched Boot Finishes
Tree Reaper replied to yayners's topic in How Do I Do That?
If they are on a level surface I'd say they were two different boots made from different leather. Other than putting them in your clothes dryer for a couple of days I'm not sure if there's anything you can do except dye them both darker to try and hide the grain and wear them or just wear them. -
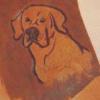
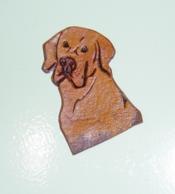
That's the last nose job for this guy, he's been promoted from test piece to fridge magnet.

-
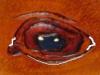
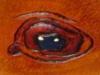
After it was done I could still see errors from the tracing. It would be nice to have the image on a laptop next to you for clarity. The white lines in the image show the deviations to be corrected. Anyway I think you can see how it raises up from being flat. On thicker leather you might have to skive the back to use the modeling tool.
-
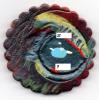
Cut and bevel. You have two raised areas, one being the area around the eyeball and the other being the eyeball itself so I see back to back beveling to raise both areas to reduce the flatness of the leather, probably use blockout around the lighter areas of the lid if using dye. Under cutting the leather won't do anything for this that I can see. You can see the raised affect by using a modeling spoon on the back of the damp leather after all the work is done. Each step in the eye is a raised progression. I'm not sure if this is what you're looking for but you can let me know. I didn't have the lighter blue so my eye looks like it was out a little later at night than yours! Kevin
-
Key Fob
Tree Reaper replied to SheWolfSilver's topic in Purses, Wallets, Belts and Miscellaneous Pocket Items
I think you did a good job on that, the beveling isn't too wide, it's just right. Looks like you missed a little on one of the veiners but you already know that. The upper left may require edging and/or burnishing but over all it looks good. I started on key tabs and you can dress them up by adding suede to the back and practice your stitching. -
That's the thing with working on leather carvings for the first time and not getting the proper instruction to help you advance. I'm just as new to carving and my experience is the same, don't expect to get it right the first time. That eye has a lot of surface area and appears flat because the leather is flat. One thing you can try is to raise the eye from the back side with a rounded tool large enough so that is doesn't leave small marks in the leather or maybe a modeling spoon. Keep thinking and trying different methods on scrap until you get what you want or a result that you are happy with. I have your picture so I can experiment on it a bit, not that I know what I'm doing but it's hopefully better than no help at all. Kevin At 1 I think you need to bevel the eyeball to get rid of that sharp edge and at 2 I think that needs to be cut and beveled in the same manner. It's not that far out when looking at it when made smaller and a little tweaking is all it needs but do it on scrap first, that's what I learned on the dog carving.
-
I may be close to having what I want after reworking the nose.