mlapaglia
-
Posts
1,442 -
Joined
-
Last visited
Content Type
Profiles
Forums
Events
Blogs
Gallery
Store
Everything posted by mlapaglia
-
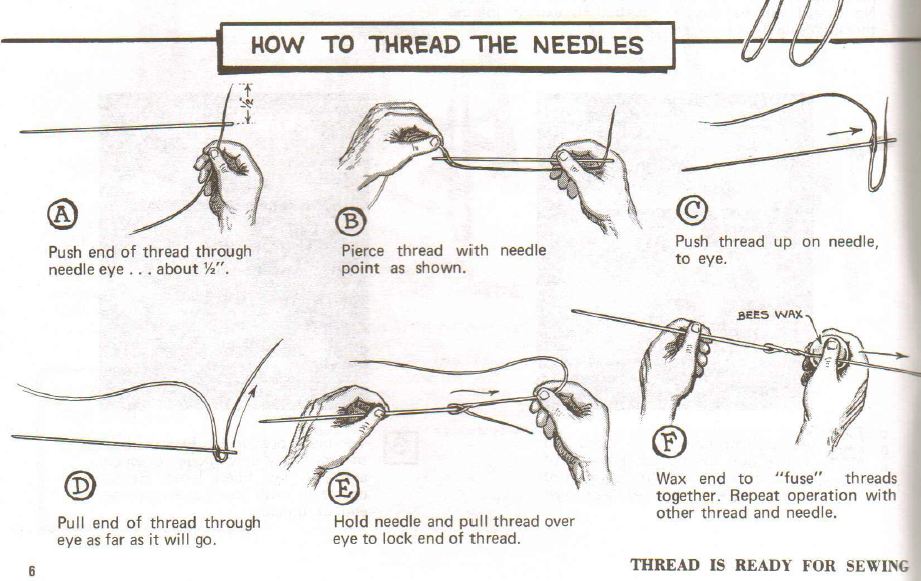
Yes, Get yourself some harness needles #0 to start. once you master threading them you can go to #1 or #2. Bigger the number smaller the needle. You will probably have to thin the thread with a knife like it shows in the same book. With those two changes it should stop the breaking. The big eye needles let the thread slide around and break fast. Plus the #0 is easier to pull through the hole.
-
Dont use the large eye needles from Tandy and are you "tying off" your thread like Al Stohlman shows in his book about sewing leather?
-
Rit dye or other packaged dyes work well. Dye unwaxed thread then wax it yourself. Waxed thread wont take the dye. Waxing your own thread is pretty easy. There are several threads on how to do it. Basically you take the thread, double it and put the end over a hook and then run some beeswax over the string until it has enough wax on it. The amount depends on what you like.
-
As far as I remember it will do 138. I have 207 and 277, both work fine.
-
Only one, Practice, Practice, Practice. I take it slow and turn the leather as the needle pulls the leather back. Makes it easier but it takes practice.
-
Most of the Craft Tools sold at Springfield Leather are from Tandy.
-
Pancake Holster For Revolver
mlapaglia replied to cowboy bowhunter's topic in Gun Holsters, Rifle Slings and Knife Sheathes
Standard formula is 1/2 the thickness of the widest part of the gun + the width of one layer of the leather. So a gun with a 2" cylinder would need a offset of about 1 1/4 ". If used this on a pre-27 S&W and it worked great. -
if you want smooth even dye apply it with an airbrush. Its the only way that have see it work well every time
-
If the tension is working leave it but I believe you will have a better time with the one counter clockwise I grew up in Tucson so I still like it as a place to visit.
-
Try this it worked for me and looked the same just a little lighter. Thanks. Miix Eco flo dye and stain, 1 part eco-flo Hi-Lite color stain briar brown #2650-03 and 1 part eco-flo dk coco brown leather dye #2650-01. I mixed 1 tablespoon of each one in a 1.5 oz plastic bottle. It separates so keep it well shaken. It tends to streak so I worked in small sections and was careful not to overlap much with the previous section. Once you get the feel for it its not hard but if you go back over a small section that part may be lighter than the rest. When I had to redo the breach I actually did the top of the slide ending on an obvious site line so any difference was hidden be the curve of the molding.
-
Im out of town in Tucson for the week but Ill try to make something in a draw program for you. Give me a day or 2 FYI my tensions routing are, Secondary is counter-clockwise and primary is clockwise as far as I remember. Michael I got some simple drawings done. Hope this helps. If not call me. 303 eight eight one 1045 If you can turn the leather in the throat this works. If you cant then this is the method I described in my other post. Hope you can understand them.
-
Start 2 stitches out. Call them 0 1 2. 0 is at the start of the leather and 2 is where you make the first stitch and 1 is between them. Stitch #2 pull back and stitch #1 pull back and stitch #0 then go forward like normal and stitch the line. Thats how I start them and its fine. I have also just done 0 1 and it works but 0 1 2 is really strong and the bottom isnt nasty looking.
-
Here is a template for a laced version of an ipad sleeve. It might help you figure out the offset. Its Martha Stewart but dont let that stop you from looking.Id run my stitch line down the middle of where they have the lace holes.
-
The only way I would do a job like this is by the hour with a weekly advance payment for the next weeks work. People like this will never be happy. The best thing is what you did. say no. A place I worked had a policy, "Fire your worst customer". It made sense. People like that cost you more than you make. Ya did good.
-
This one is different as you push the blade instead of pull it. I always wanted to try one. It looks like it might be easier than the wooden pull ones.
-
I wrap both. Then set them to the starting point that Tippman says. At that point I only adjusted the main tension nut.
-
I hope I do not jinx it but Once I got my Boss tension set I have not had to change it. I hve sewn a 5/6 single layer, 8/9 single and double layer with black and white thread. I still have not had to adjust the tension. The stitch length needs adjusting depending on the thickness but the tension seems to be solid and stable. Im sure I am a lucky one but once you get the tension adjustments figured out its pretty easy to set it up for new leather thickness or thread. As for the material quide I bought one. I use it on belts but not on holsters. It has its uses. NEVER NEVER remove the material guide and put the mounting screw back in the hole on the Boss without the guide. It will lock up the Boss solid. Guess how I know?
-
Tippman Boss will do all that.
-
Id use an 8-9 to tool and a 2-3 or a 4-5 to line it. All depends on what you want it for. A nice stiff gun belt is made with 2 pieces of 8-9 flesh to flesh. 2-3 or 4-5 makes for a nice everyday belt or a dress belt.
-
Did you only dampen the area you stamped? If so that might be the problem. Also stamped leather will absorb dye differently than non-stamped leather. Try casing the whole piece and when it is almost dry dye it again.
-
How much for just the Boss, no touch pad?
-
Stain is a color agent, Finish is for after you dye/stain. Use Resolene, Mop and Glo 50/50 with water, Leather balm and atom wax, or any of the other finishes. You should at least oil the leather with neetsfoot oil or wax it. You need something to protect the leather.
-
It's Been A While -- Just A Simple Belt
mlapaglia replied to katsass's topic in Gun Holsters, Rifle Slings and Knife Sheathes
Mike, Well done sir. Classic example of "less is more" My son has asked for a dress gun belt so I will have my first chance to make one that is just a belt and not fancy stamping. Thanks for an excellent example. Michael -
Move Burnish leather, if you mean burnish the edges to after dye and stain. If you mean drag a piece of glass over it then leave it where it is. Add condition leather (neetsfoot oil, olive oil, or Lexol) after Tool and carve. No need to dry the leather before you condition it. In fact the dampness can help the oil spread through out the leather faster. Let it rest over night after you condition. Move Dry completely to after Dye and stain and before Burnish. No need to have the leather dry to dye it. Some say the dye goes in better if it is a little damp. Let it Dry over night on the dry step. Add Buff well after the dry phase. If using a dark or black dye you need to Buff well until the color stops coming off.
-
I have a steel straight edge. I use 3-4 small C-clamps and clamp over the leather to the table this way it does not move when I cut the leather. Works for me. After about 7 months I am able to cut a line straight or curved. I use a roller knife for straight and a utility for curves. It just takes a lot of practice.