bruce johnson
-
Posts
4,411 -
Joined
-
Last visited
Content Type
Profiles
Forums
Events
Blogs
Gallery
Store
Everything posted by bruce johnson
-
Tim, As far as is the extra cost worth it? That extra expense will be the cheapest part of that saddle. Your time to take out and stick a new tree in to replace one that is broken is way more. If you and the tree maker do eveything he wants, then if it breaks - it just plain broke from use and no excuses. Some tree makers used to put a steel "skid plate" in the gullet and bolt the horns on rather than screws too. I am not sure if anyone does that anymore. Regarding what size to order, I'd talk with the treemaker and see how much they think the extra will take in. They should have a pretty good idea. It sure could be 3/4-1" figuring doubling up on the back of the swells and depending on if you measure the cantle at the peak or the front of the face.
-
It seems like these books kind of sell more on their collectible value most of the time than the actual information in them. Another one that tends to sell high but has pretty good info is the one by John Beck. I bought my Cowboys Complete a few years ago for about $90 or so on Ebay, probably worth that to me. Sometimes they'll sell around that, and other times way more. Just depends on how many dogs in the fight. I've seen them in some used book stores for $50 and $500. I don't know how many were ever printed and sold. The saddlemaking section is alright, but the section on making other things in the back is pretty good.
-
I got hurt one winter and didn't have much going. I started doing a little more leatherwork than the hobby and make for myself stuff. I got some award orders from local rodeo and equine groups which is sort of like wholesale. They want it as inexpensive as they can get it. I made all the rookie mistakes - price based on comparison instead of time and materials, beat any price to get an order, spend time in your shop instead of making money on fewer orders. That did lead to some resellers wanting to do some consignment, which I didn't do. I wholesaled to them. I did the old halve the retail price the other guys were charging, which also lead to some negative pricing deals. Don't do this. A few years later it did lead to some inquiries from better resellers though through word of mouth. People that would pay me what my time and ability was generally worth then. I got orders for 30 belts, 20 spur straps, 10 planners at a whack deals. I got hooked up with an interior decorater. Orders for 30 leather covered toilet lids, 40 double lightswitch covers, stuff like that. I got better at pricing and eventually paid off some pretty hefty medical bills. The upside was I could buy some nice tools and equipment, they paid back in time savings, and could start paying me back. The downside was I still have/had a day job, was a single parent at that stage and never missed an event, and spent a lot of long nights and weekends in the shop. The scenery never changed. When you have 30 toilet lids to do exactly or pretty much the same - it wears on you. I would batch them all and do each step on all of them before going on to the next step. It sometimes took two weeks before you could look and see the first one finished. I got the advice to only do a batch I could finish in 5 days so I could "see" the progress and the end in sight. Do 12 a week and three of something else just to mix it up. Break the mindset of assembly line work. I got to do a lot of different things, that was good. The issue with wholesale and awards are that you can make a steady check. You can burn out if you don't keep it mixed up. Try not to neglect a higher paying single order to do three smaller things at wholesale rate that take more time. Allow time for higher paying stuff, and allow for time off. There are other guys here who do a lot more of this than I did, and higher end. Hope they will chime in too.
-
Happy Birthday, Andrew.
-
Johann, and others, Thanks for the compliments and suggestions. We are working to get the links deal fixed, and the suggestions for improvements put into place. I appreciate all of the on the forum, PMs, and email suggestions. On the business side of things, a week into this, and it is working out well with orders and serious inquiries. Thanks everyone,
-
Working in flipflops + sharp string bleeder rolling off bench top + that big vein that runs across the top of your foot = the reason they came up with the name "bleeder" for that tool. Fleem was too arachaic a term I guess. Much like most other accidents and the reason for slow motion effects in movies, I can still visualize in great detail the whole process of it rolling, falling, that little half turn sumersault to go blade down, and me just standing there with it impaled on top of my foot. The draw gauge hanging off my left index finger knuckle by the blade, it took two shakes and some bad words to get it off - always pull the blade into the work or make a starter cut with a knife, don't push the work into the blade. The Osborne #86 splitter I was looking at that "used to work pretty good". The blade was pretty dull in the middle where he used it all the time. The sides were pretty sharp where Herb French had done his work. Lesson learned - don't run you thumb down the whole edge of dull blade, it may not all be dull.
-
Hilly, I will admit I am a splitter fan. I have started out low and traded what I think is up as I went. The basic deal is a fixed blade and some type of adjustable roller the leather rides over into the blade. The height of the roller can abe adjusted by screw or lever mechanisms. You can pull the leather through through the blade in one style, or feedwheels push leather into the blades on the crank splitters. The high end other splitters are bandkinfe splitters. Basically a horizontal band saw that levels wider pieces. There are several threads dealing with splitters. The big key is a sharp blade and keeping it sharp. With a sharp blade you should be able to do what you are looking for in several styles. I have a 10" Osborne Chase style that I can pull 7" widths through without a lot of effort. The bevel on those blades is pretty flat though. I had an American crank splitter that was alright. It was tedious to crank on long straps though, and softer latigo tended to bunch up against the blade sometimes. I ended up and just pulled straps through and let the handle freewheel. The handcranks are usually narrower than the pull through splitters too. I got a Krebs 6 weeks ago, and they are everything their reputation says they are. I like having the top and bottom roller to keep the straps from flipping up or riding the bevel and chopping. The Krebs and the Chase pattern splitters both have these. Neither of these have probably been made for 60 years though. If you are looking for new and like a handle splitter, the Keystone from Campbell Bosworth is probably the closest to the old good ones there is right now. It is not much more than the lower priced ones, and looks to be worth the extra. Otherwise Osborne still sells the makings of a decent tool. The blades will require some work to get them right before you use them. The others have a steeper bevel on the blade and more effort to pull something through, but still work alright. This is really one of those things that the old antiques generally outperform the new ones. Looking at the prices for new bench splitters vs. proven old ones from a guy like Bob Douglas or Keith Pommer, the oldies are the bargain in my hands. I think you get more for your money from those guys. You'll come away smarter after talking to either of those guys too.
-
I think it really depends on the blade material, bevel angle, what you are splitting, and how much of it. I sharpen mine when they need it. If there is resistance or much noise to a normal kind of split, time to sharpen. I use fine wet/dry on a hardwood block on the bevel side to remove material. Early on I let them get too far gone and it took a while to get that off and back to a clean edge. Now I strop more often, and a few strokes of fine wet/dry on a hardwood block is enough to hone with when needed. Big key is maintaining that bevel. I split a bunch of veg tan the past couple weeks, probably used each one about equally. Stropped the Chase twice and the Krebs once. The Krebs has a steeper bevel, but is a bimetal blade. I put a slight secondary bevel on the Chase blade (just from the bevel side), and it seems to hold the edge longer.
-

30's saddle - rawhide saddle tree
bruce johnson replied to pella's topic in Saddle Identification, Restoration & Repair
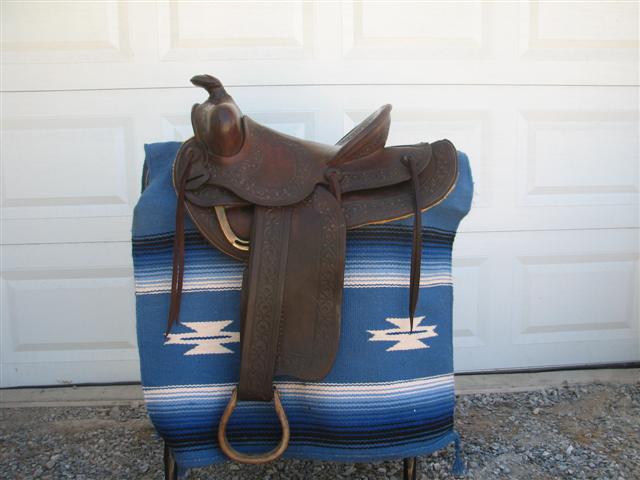
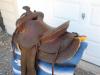
Timbo, I'll attach a couple of pics that show the fenders. Pella, I didn't change the rings. These are probably the original EZ dees. I think the EZ dees came out about 1915 or so. Interesting note - these dees are curved to follow the contour of the horse. I had thought for years that it was from use. After reading a discussion among some other makers, I am sure someone formed them. Several guys will form the larger rings to have that slight arch before they hang them on the saddle. The horse was saddled for the train trip. My great grandfather used to feed a lot of cattle. He asked for them to send along a ranch horse on a load. He came down the ramp packing this saddle. He must have been pretty broncy. Apparently he rode the horse to my grandpa's. He could tell he was having some trouble with him and offered to drive him home and they'd lead the horse out the window. Great-grandpa figured he got him there, he could get him home. My dad isn't sure, but seems to remember he sold the horse to a local guy who put on Sunday afternoon catch-all bronc ridings.
-
30's saddle - rawhide saddle tree
bruce johnson replied to pella's topic in Saddle Identification, Restoration & Repair
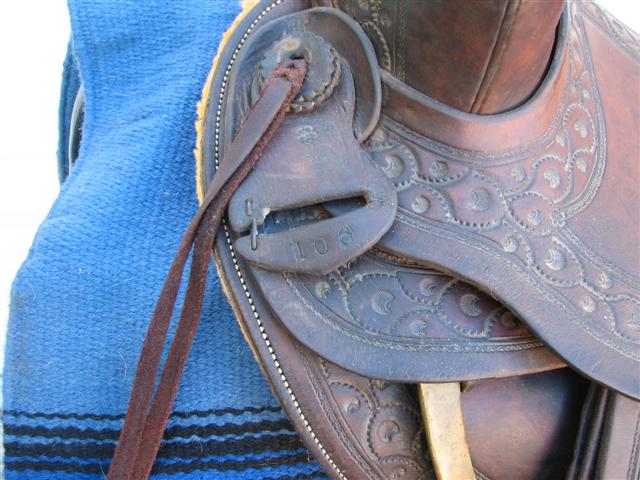
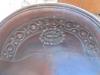
Pella, Here is the northern cousin to your Texas saddle. This one came on a saddled horse in a trainload of cattle my great grandfather bought from Miles City in the 30s. Johanna probably didn't believe me at first, but it sits in my living room. Actually I have two oldies in here. That was a pretty common way to cover horns back in the day. I have seen some with a small brass nail and others with a slotted head wood screw securing the tab. The saddle came from Duhamels on Rapid City, South Dakota. The latigo carrier for this particular maker was stamped with the model of the saddle - #106 was the Ellensburg tree from Newton Bros, I was told. I have always heard this pattern referred to a a shell pattern also. One guy who has a Duhamel catalog told me they called this pattern the "acorn". I would dearly like to get my hands on a Duhamel catalog. The only one I have ever seen was under glass and they couldn't open the case. I heard from a collector that one of the Mile City catalogs called it an acorn pattern too, and another Miles City shop called theirs a shell.

-
30's saddle - rawhide saddle tree
bruce johnson replied to pella's topic in Saddle Identification, Restoration & Repair
Pella, That is a pretty cute little 8 button saddle. Who made it? If the tree feels solid when you push on it form the different directions, you are probably alright. Not sure what others see, but I find those older trees generally to be more solid with the rawhide compromised or worn than the ones that came along later. I wouldn't trust it to pull a truck, but if it fits the horse decently should be a down the road kind of saddle. I worry about the riggings and leathers more than anything on therse oldies. Some of them have screws that have worked around enough and the wood has shrunk away from them. Make sure they aren't loose and the cut tacks aren't all backed out. Check the leathers for strength, if they look original, I'd replace them just because. Laced leathers or Al-Ray buckles? -
One of the finest tributes I have ever read.
-
If you have a drill or drill press, chuck the punch. Turn it on slow and slide the stone against it. You can strop the same way.
-
Tim The slick forks are the easiest to cover because you don't have much slack to work out. The split you see in the handhole is the result of getting the cover over the horn and not having a big hole at the neck. If the horn cap is big or it necks down a lot, you have to split it to get it over. On some horns if you do a tradtional one piece cap and wings and cover the horn first, you might need to split one that wouldn't need it on the bare horn.
-
Timbo, I don't much care for cutouts in skirts. They mights tear out if you get in wreck, although I'd hope the tug would break first. The strap and dees can also, but usually they are an easier fix. Most of the saddles I have seen the slots on have them positioned lower than I like to set my breast collar dees also. Echo, That stirrup leather through the fender deal was used in the past. You still see some guys who will bring the leather out through a slot in the fenders down low. The fender leg then makes the inside layer for the stirrup pin to rest on. Interesting look and a little different. Some old fenders had two slots and just slid on the leathers too. I guess it was fairly common on some dude ranch model saddles at one time. I can't think that riveting and sewing a fender to the skirt and then running the leather through it would have any advantage for anything.
-
Always a pleasure to see pics of your work. I get something out of it everytime. Note to self - more "over and unders" and crossing stems. Thanks for sharing.
-
Thanks to everyone for the feedback so far. The links deal is in the hands of someone with with way more savvy than me, as this whole deal has been. The colors and gradients are displaying differently on some screens and browsers too. All part of the tweaking process. Thanks for everything, and keep it coming.
-
My local sewing machine guy has been in the household business for a quite a while. I see those 99s in the antique stores a lot too. I asked him about them, and he said to find a 66. Ummm, my wife has her sewing machine (66-16) in the living room her mother bought the year my wife was born. I threaded it up the other day and it didn't balk on two layers of 4 oz chap. I was looking for one to do wallet interiors and little stuff. While I was in the store he showed me a new Singer CG 550 (?). He had some pretty hard old dried up pieces - skirting weight and some chrome tan. It didn't even cough sewing a stitch at a time. I was pretty impressed. It was priced at about $400 last time I was in there. I wouldn't go to war with it, but it did impress me for what it did. It might be worth checking around. I got prices $100 different locally (one had it on a weekly special), and it seems to be one of those things not many list an internet price - call them for info deal.
-
do roses & sheridan style scrolls go together??
bruce johnson replied to sodapop's topic in How Do I Do That?
Like peas and carrots, biscuits and honey, and kids and mud. There are some very well done tame roses and Sheridan style scrolls that have been done. Someone who has the King of the Western Saddle book about Don King and the Sheridan Style Carving book handy can point you to an example or two. I heard Lloyd Davis (?) did some good ones too. Some guys will put oak leaves and acorns on the same stem as flowers and beech leaves. I think we had a Sheridan scrolls and skulls example here a while back. Anything goes. -
I would like to invite you to check out my website and see what you think. This has been much like an elephant pregnancy. It has been about two years in the idea and acting on it, and now it is time to trumpet . Criticisms, critiques, and complaints will be borne on my shoulders. Any compliments and congratulations will be heaped upon the site designer and developer . Here's the link - Visit My Website - brucejohnsonleather Feel free to sign the guestbook too.
-
Trees Explained<--that's what I want.
bruce johnson replied to Echo4V's topic in Saddle Construction
It kind of looks like the things that are interfering with what you want to do have more to do with the maker than the tree. At least they are things the maker can help out a bunch. The width across the middle that makes you sit wide. - Wider midseats are a plus for a calf roper to stand out there and not be leaning into the center. That is about the only place a wide seat is much of a benefit to me. One of those function vs. comfort factor things. Otherwise I wouldn't ride mine to the road (50 ft). The groundseat makes a lot of difference in how wide a saddle sits. You can build one up higher with narrow build ups and the rider will swear they are sitting closer than a broad across the middle model. My first flat seat was a Billy Cook board. It about split me in half, and I was young and limber then. The seat on that one was right down on the bars, and I'd wager those bars were not real thick. As far as getting your feet up into the flats. You can do that probably the easiest on a 14" wide association tree with a 5/8 EZ dee setup. The rigging style and frender and leather shapes probably limit more stirrup swing than swells. For a general using saddle that you want a little swell in front of you there are several options. I like something I can kind of lean up into. I use some Dee Picketts, Nikkels' High Country is a good tree, Olin Youngs, the land of Bowmans, etc. I am not a fan of low TMs personally as a user. That leg cut is just asking to bruise you when you hit it, and they put it on a lot of them. It really sounds to me like a narrow seat with a plate rigging to allow some forward swing will be pretty close to what you are looking for. -
CW, The ones I use the most are 1/4, 3/8, and 3/4. I use the 1/4 to gouge channels for folds. I use the 3/8 the most probably for sharper tapering. I don't use the 3/4 much except to skive riggings where they go up around the swells.
-
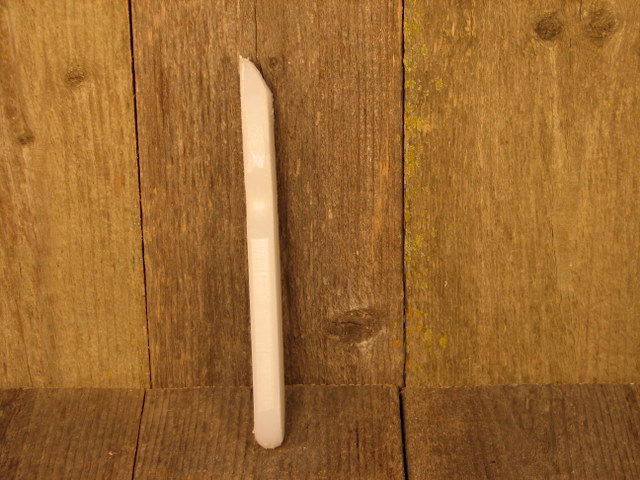
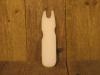
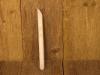
Some of you on another leather list have no doubt read about this. A guy was using a jerk needle and ran it through into his waiting finger on the bottom side. He had to call some friends to get him unhooked from the saddle, and then to emergency to have the jerk needle removed from his finger. I had sent this guy one of my cantle binding helper things a few years ago. He usually used it, but didn't here. I am attaching pics of this deal. I never really liked beating up a tickler pushing a binding up, broke the awl tip occasionally on the small hammer handle, and tacks caught thread and were a pain. I made this deal up out of scrap LDPE cutting board. I cut it with a jig saw and shaped it and rounded over edges with a benchtop belt sander and a Dremel. The bottom is angled to really push up into the crease. The slot gives a place for the awl to come through without embedding into something. They really don't take long to make - 10 minutes maybe. I've done about a dozen and mostly given them away to guys who asked what "that" was on the wall. One guy has added a wrist loop to just drop it to pull thread, and flip it up into his hand to use it. Saves time picking it up.
-
How about Pictures of Your Workshops
bruce johnson replied to Jordan's topic in Leatherwork Conversation
Elton, Interesting way to mount the rounder alright. However, I am not seeing one item in your shop that should be a necessity. Where is the CD player to play the Kandace Kalona CD??? -
JW, I have some with pretty thin blades with very little angle, and others with more meat and a relatively steeper bevel. None of these have much bevel though, at least the way I like them. I got some of my first french edgers and read the Stohlman book. At the risk of sounding like a heretic, I don't think his method is correct for all situations. He recommended keeping the bottom flat (I'll agree with that). His method of removing material was to use a stone on top between the channels. Looking at any of my favorite french edgers, it personally would be hard for me to maintain that same bevel angle as original and work a stone back and forth across the width of the blade. I would be making a steeper angle with the stone. With a thicker blade and steeper bevel, maybe it would work Ok for me. I now have better luck maintaining the bevel by doing my material removal from the bottom. It is a lot easier for me to keep the bottom flat and work it on a stone or piece of wet-dry than maintain the angle on top. I will make a few passes on top to make a burr, but the material has been mostly taken off the bottom. I mostly use wet-dry now and very little time on stones unless they have a chip or pit to get past. I was taught this by an old guy who asked me why I had stone marks on top of my french edgers. This would be have been right after I told him I didn't like french edgers much. On the thinner blades I do put a slightly steeper secondary bevel with a stone on top. This is to help keep from rolling the edge. On the meatier blades I don't. I power strop with a soft wheel and am good to go. As I sharpen some, the toes start to get longer as the material is taken off the bottom. Once in a while I will knock those toes back with a grinder. As an aside Herb French has a pretty good little book on sharpening leather tools. Costs about 10 bucks or so from him, or Vandy at Sheridan Leather Outfitters sells it also.