


lightingale
-
Posts
256 -
Joined
-
Last visited
Content Type
Profiles
Forums
Events
Blogs
Gallery
Store
Everything posted by lightingale
-

July And August Challenge
lightingale replied to TwinOaks's topic in Special Events, Contests and Classes
Just wanted to put out there that this Stohlman ebook is VERY useful in learning about embossing techniques. If you're an Elite member at Tandy, you'll have gotten your $10 leathercraft library coupon a few days ago, which shaves off the majority of the cost of the book. -
Monthly Challenge Poll
lightingale replied to FaireLeatherFriend's topic in Special Events, Contests and Classes
I voted for "other". One of the nice things about the monthly challenge is that it invites people to try something new or apply something they already know in a new way. One of the challenges with the challenges, is that sometimes the topic is a bit too narrow. For instance, not everyone is interested in cosplay or has a use for a costume piece, so you'll find a lot of people passing up that particular challenge. Everyone has their niche, whether it's holsters or handbags or armor, and broadening the challenge topic to more of a "theme" would invite more folks to participate. I recall a previous challenge in the summer with a "fire" theme. You had people submitting photos of projects with fire tooled on them, other projects using fiery colours, and projects incorporating flames in other ways. This theme allows anyone to apply the challenge to a kind of project they like, with room to apply it to a new kind of project they're learning. My favourite past challenge was the "break through" one, even though I wasn't able to participate in it. The challenge was thought provoking, and there were many different ways the theme could be applied to pretty much any kind of project. Hope this helps! -
The Tandy near me (Quebec, Canada) carries "European tooling cowhide" I like the quality of this veg tan leather, and is close to that from Moore Pearsall, the other local leather distributer from whom Cirque du Soleil buys their leather to make their masks (so I'm told).
-
Are you hand sewing? If you are, you don't need to tie in any knots. Just backstitch a few times and cut the thread flush with the leather. Lightly tap your mallet on your stitches to close them up, and the threads won't go anywhere.
-
When you study the patterns in the aforementioned books, you'll see that they're just a short floral motif that is flipped and repeated over the length of the belt. Look at the curves in the lines of the pattern, and how they become seamless when repeated. It's surprisingly easy to draw your own unique patterns once you realize this. Scan your motif, and use photoshop to flip and repeat it. Voila, a new, unique pattern!
-
First Attempt Of Sheridan Style Carving.
lightingale replied to jessebeckham's topic in Floral and Sheridan Carving
Holy cow.. THAT'S your first attempt?!? Geez, at that rate you'll be a pro by your fifth project, coaching the rest of us! Nice work! -
I'm a redditor as well, though I gave up on the Leatherworking subreddit for the reasons you mentioned. /grumpycat A little brag here: one of my tooled belts hit #1 on the front page, which was a huge deal for me. Evidence and story here: http://salukifeathers.com/199/super-mario-belt-on-reddit/ After this event, my website and Etsy views skyrocketed, and I had so many orders for belts and dog collars that I had to turn some orders down as I physically was not able to keep up with demand. The post (made by my brother) was not intended as a marketing strategy, but the attention it garnered really helped kick off my online business. A big part of this was that many bloggers around the workd wrote about the belt for months after, and I still get daily hits from them to my website, 6 months later. For the most part, I think reddit is perceived to be more for the younger generation who "get" the memes on the main subreddits, though a subreddit on a particular topic doesn't have to be that way. The subreddit would be a great way to draw in new folks interested in the craft who wouldn't normally happen across it in their regular Internet presence. I'm there, and I'll participate if you do . The more of us there are, the more likely we are to upvote ourselves to the front page!
-
Thanks, Scott! Replacing my tools has actually been quite therapeutic, and it feels great to be crafting again! I have to keep everything in plastic totes, but hey, it's there! The problem with the rose pins is that the legs are too short. You'll get it through denim and maybe garment leather, but no thicker. To apply the rim sets to leather as thick as 8-9oz, you need the extra long leg. They only come in 4 prong from this website. Their crystal applicator tool might work for rim sets with the rose pin die. The setter plus the die are $110, which is a bit on the steep side just to test out a tool that "might" work on hardware it isn't specifically intended for. I'm curious now though... Perhaps i can try it when my money trees start to fruit... The darn things are barren every year!
-
I love the company and have been to their brick and mortar store many times. Near me, they're the only alternative to Tandy! A lot of their Zeli products are very reasonably priced and of excellent quality. I use their finishes and glues as well. I haven't used their dyes though, and I don't think I'll trade my Angelus dyes for another brand
-
Trying To Locate A Neatsfoot Oil Manufacturer In Canada?
lightingale replied to CraigAndrew6643's topic in Suppliers
I get 32oz jugs for about $10 (with discount) from Zelikovitz which is based in Ottawa. http://zelikovitz.com/courses.html?page=shop.product_details&flypage=flypage.tpl&product_id=1829&category_id=200&keyword=Neatsfoot Not sure who their manufacturer is, but it was the best price I could find for a larger amount. -
While the bronze effect wasn't intended, I think it looks quite nice, actually! I'd be sealing it on to keep the effect, but that's just me! You could try diluting the dye with rubbing alcohol. Layer it on until you get the effect you want (an airbrush is best for this so you don't get streaks from the dauber). Buffing should help as well. Or use a different dye. The Angelus ones look great.
-
I scan my sketches into the computer and print out a template. I cut the template to fit to the edge of the leather, and hold or tape it down. I draw over it with a stylus. The leather is cased so the lines take on a little burnish and are easy to see. I can flip up the paper to see if I missed any lines. Once my template gets a bit ratty from use, I print out a new one.
-
Lol, these questions look familiar! I'll post my reply to TerribleOne's email. Slightly edited, to remove irrelevant bits about dog shows and career choices ;-) I got your follow-up email, and I'll get back to you probably tomorrow. Had a busy day and I'm way behind on Etsy convos!
-
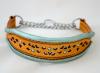
6-7oz vegtan, tooled and filigree punched. 2 layers of blue metallic lambskin on the back (about 3-4 oz each layer). Same lambskin used for the roll. Genuine Swarovski crystals with rim sets for bling. I was itching to try something new, and this project was a first for many techniques. I made a few mistakes, and my fingertips are covered in a film of superglue that I think will take days to wash off! 1. Rolled edges - Inspired by Kevin King's tutorial, I wanted to try this with some nice soft lambskins that were a special buy at Tandy. I sure learned a lot! First of all, the lambskin seems to be a bit too thick for this job. I guesstimate it's around 3-4 oz, like tangerine peel. It was difficult to skive because it's very stretchy. I wasn't sure how to "end" the rolled edge on the collar, so I just cut it on an angle. Any suggestions as to what kind of skiving knife works well on thin, stretchy leathers? Yes, the stitching is all done by hand, on a crappy Tandy stitching pony. I'll probably make another post about my stitching pony experiences soon. Nobody seems to sell good stitching ponies, and I don't have the tools to build my own. I tried to use hem tape, but the 5/8" one I bought was far too wide, and gummed up every blade I tried to cut it with. I ended up using crazy glue to hold the roll down while I stitched it. It did the job, but it's messy, and some of it got on the back of the collar. I think I'll try to clean it up with nail polish remover later. 2. Filigree - a technique I've been wanting to try for a while. For starters, I used the filigree punches from Tandy (they were on sale this month). They aren't perfect; the shapes are a bit irregular and I stropped them, but they did the job! Next, I'd like to try filigree on a floral design. Filigree in general was pretty easy, but I think I'd go with a thinner leather if I were to do a floral one. 6-7 oz is tough to get through, and it leaves a thick "window" through which to see the pretty background. I chose 6-7oz because I wanted a strong enough leather to hold the martingale hardware on its own. 3. Setting Swarovski crystals using rim sets. I've been wanting to use genuine swarovski crystals instead of the acrylic ones Tandy sells, which get scratched up and dull in no time. I used the advice from this thread, and bought extra long 4 prong rim sets from dreamtimecreations.com. I used my sewing awl to stab the leather where the prongs go, and used the 1/4" spot setter on the Tandy hand press. The prongs went all the way through... I'd say it's a success! Considering how many technique "firsts" I threw in there, I'm happy with how this turned out. As always. I welcome suggestions for improvement!

-
I grew up in Germany, but my German is a bit rusty. It would be refreshing to read German content on my favourite topic
-
Nice work! It's so liberating to move away from the kits. The kits are great for teaching the basics, but now you can make the pattern your own and use nicer leather.
-
That's genius! You could definitely sell those online! What is holding the awl in? Is the strap tight enough to hold in the awl (the handle for which is facing the floor)? I stick mine in a chunk of beeswax on my workbench to keep the business end of the awl from hurting anyone. I have this fear of the awl falling on the floor and going through my foot. I had a close call once! A suggestion would be to add a thin strap that snaps open and closed. I'd put a spool of thread on it for when I'm working on large projects (just finished hand sewing a dog leash... took forever!).
-
Very nice! The turquoise flower centers really make the design "pop". Clean edging and stitching, too.
-
New Tandy Crafttool Pro Stamps
lightingale replied to WanderingStar's topic in Leatherwork Conversation
The only time these would be worth it is if you live in another country where you have to pay ridiculous duty fees on any shipment from Barry King. Since you live in Utah, go with Barry King. -
Beautiful! Can I ask what you used as a resist and dye? Your results look perfect!
-
I have experienced the cracking at the buckle, and that's from bending dry (and cheap) leather. I fold the buckle end over when the leather is still cased. If it's dry, I spritz it with water to make the leather pliable enough to bend without cracking. If you're going to get Tandy leather, get the European Single Bends. They're a much better quality than Tandy's standard stuff. They've even on sale right now (in Canada, at least)
-
I make my collars from veg tan, and I apply a small amount of mink oil to the leather and let it sit overnight before finishing. It supposedly helps with waterproofing. I tried using resolene finish once... full strength, and it cracked and flaked off the collar the next day. I've used an acrylic sealant since then (Zeli Pro Satin Finish). So far the collars have been standing up fine to the elements, with the inevitable darkening from the sun and fading of colours if it gets wet often. It would help to strongly encourage your customer to condition the leather regularly to maintain a water-repelling coat of oil/wax. Even better would be to use an oil-tanned leather instead of veg-tan if the collar will be getting wet often.
-
Ouch! Ruboff is never a good thing. In another thread on here, most folks seemed to agree that acrylic paintings won't stand up to the wear and tear on a bike seat in the long run. What brant of acrylic paint were you using?
-
I've never had to deglaze, and I haven't had issues with dying. I don't have greasy hands and I wash them often though, which might be why. If I had to deglaze, I'd use rubbing alcohol from the pharmacy. I bought Fiebings deglazer once to fix up dying mistakes, and it smelled just like nail polish remover.
-
I've had good luck tooling this black veg-tan: http://zelikovitz.com/courses.html?page=shop.product_details&product_id=4128 It's 8-9oz and only in strips though, but you might be able to skive it down. Or use the search terms to find a hide somewhere else. Or contact Zelikovitz for their supplier and purchase from the supplier directly.

