SooperJake
-
Posts
657 -
Joined
-
Last visited
Content Type
Profiles
Forums
Events
Blogs
Gallery
Store
Everything posted by SooperJake
-
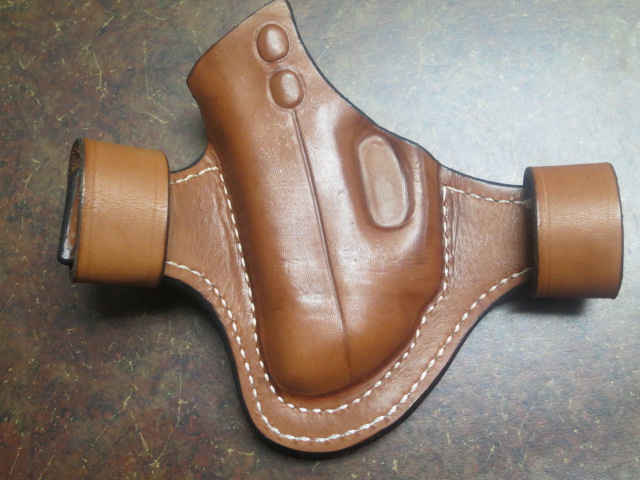
 I think this topic has been covered before but I can't find it. http://www.brigadegunleather.com/holsterphotos/IMG_9417.jpg How is this holster sewn, as in what are the steps. I can't seem to wrap my brain around it. Thanks
 -
Two Birds With One Stone.
SooperJake posted a topic in Gun Holsters, Rifle Slings and Knife Sheathes
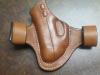
I had yet to try making a snap-style pancake or a closed toe holster ( which some of you disdain) so I combined them in this LC9/CT holster. W&C Chestnut scrap ( belly area), Angelus dye on the edges and I haven't put any finish on it yet. I tried something new for establishing the stitchline. I took two pieces of scrap rectangles, and glued them at 3 edges. The top edge of this had my pattern profile cut in it ( along the reinforcement area). Molded the gun, then stitched around the perimeter with no thread in the machine. Then tore the results apart and flattened out the scrap. Lots of work but was more out of curiousity of how to stitch around something pre-molded, as I know some of you do. I'm pleased overall but I have a long way to go. Retension is good but I'm not satisfied with the boning details. More practice needed. I didn't use the vacuum this time. I think I'll leave off the decorative lines on the loops , next time, and maybe round the wings more. Comments?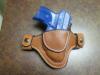
-
How many holsters do you make per year, and do you earn your living doing this or just as a paying hobby? I'm curious where the custom market is in general. It seems like most maker's sites I go on are backlogged for 6-12 or more weeks and, in some cases, they have their ordering systems shut off.
-
Reinforcement Steel
SooperJake replied to usmc0341's topic in Gun Holsters, Rifle Slings and Knife Sheathes
Matt, might you have a picture of the metal piece you have made? -
Glock Gucci
SooperJake replied to renegadelizard's topic in Gun Holsters, Rifle Slings and Knife Sheathes
Looks like the stippling vs. checkering has become factory standard on at least one manufacturer's model .Here is the new G2 Millenium from Taurus http://www.taurususa.com/product-details.cfm?id=872&category=Pistol&breadcrumbseries=&search= -
Glock Gucci
SooperJake replied to renegadelizard's topic in Gun Holsters, Rifle Slings and Knife Sheathes
Looks good, Lizard. -
Burnishing edges on a holster
SooperJake replied to LeatherCaptain's topic in Gun Holsters, Rifle Slings and Knife Sheathes
The more saddle soap you apply, or the more dye you apply? Please clarify. Thanks -
Pair Of Police Positive Holsters
SooperJake replied to DHopper's topic in Gun Holsters, Rifle Slings and Knife Sheathes
I like em too -
Lcr Pancake Holster
SooperJake replied to Haystacker's topic in Gun Holsters, Rifle Slings and Knife Sheathes
When i've put waterstain on an edge, in particular, a black edge on a natural belt, I could see a faint creeping of the fluid (water I assume) out from the edge into the surrounding leather. It ends up looking like a waterstain to me. Just a fine line along the black. Not sure how to prevent that other than going back to spirit dye on the edge, which burnishes better anyway I have found. -
Lcr Pancake Holster
SooperJake replied to Haystacker's topic in Gun Holsters, Rifle Slings and Knife Sheathes
Nice job, Jeff. How do you like the waterstain out of the airbrush? Any problems? Thinned or straight? -
Belt Measurement
SooperJake replied to SooperJake's topic in Gun Holsters, Rifle Slings and Knife Sheathes
Thanks for the clarification, guys. -
While perusing on Del Fatti's site, I noticed he says to measure the belt from the fold of leather for the buckle to the middle hole. I always thought the measurement started at the inside front bar of the belt, as per Al Stohlman's books. How do you measure for your gunbelts?
-
First Holster
SooperJake replied to Justinlee's topic in Gun Holsters, Rifle Slings and Knife Sheathes
Very nice. -
First Rifle Scabbard Done
SooperJake replied to DHopper's topic in Gun Holsters, Rifle Slings and Knife Sheathes
Very cool, Dave. Nice work. -
first art work
SooperJake replied to ironarmknives's topic in Gun Holsters, Rifle Slings and Knife Sheathes
I think the stamping is interesting..it has an organic, almost ruffled appearence. Reminds me of something out of the ocean deep. I like it. -
Mint Green
SooperJake replied to Carbon2077's topic in Dyes, Antiques, Stains, Glues, Waxes, Finishes and Conditioners.
I'd say the willow green or Nile green are pretty close to mint. You could get the willow and a white and adjust from there I'd wager. See the link, below. http://www.shoetreem...lors_p/1007.htm -
Welcome, from the land of cheese (Wisconsin)
-
Beautiful rig! I especially like the window on the knife sheath.
-
First "gun" Belt... Questions
SooperJake replied to Sixer's topic in Gun Holsters, Rifle Slings and Knife Sheathes
I thought there might be such a thing as a "belt burnisher"...some special machine for belts.Thanks for posting the picture, Dwight. -
First "gun" Belt... Questions
SooperJake replied to Sixer's topic in Gun Holsters, Rifle Slings and Knife Sheathes
What's a belt burnisher, Dwight? Where would one acquire such a device? -
Attaching The Keeper On A Gunbelt
SooperJake replied to SooperJake's topic in Gun Holsters, Rifle Slings and Knife Sheathes
What size slot do you use for the buckle and how far back tothe first Chicago screw from the slot, typically? -
Thumbbreak Stiffener
SooperJake replied to usmc0341's topic in Gun Holsters, Rifle Slings and Knife Sheathes
Tubular rivets get flared down with a special tool, which Tandy sells (#8099-00) I've attached a picture of what the copper tubular rivet looks like when peened. It is a very strong rivet but will have the potential to scratch anything that passes over it, like the gun. Even when it is well anchored into the leather. The discoloration surrounding the rivets was caused by the leather still being wet from molding.
-
Holster Questions
SooperJake replied to LederRudi's topic in Gun Holsters, Rifle Slings and Knife Sheathes
As to your question about a stitching groover/ creaser : I stopped using a groover. I use a small stylus ( ball end) inserted in a compass in place of the lead. With the needle pivot flipped over and inserted to act as a fence on the other leg of the compass. I put a drop of super glue on each to keep them in place, as the screws used to tighten aren't very good, and I didn't want anything to slip. It works like a charm. It works so well I don't even wet the leather. It basically burnishes the groove in. -
Wiz, I do have the foot pressure turned down to the bare minimum. I haven't used the table yet and was told that would also help, in conjunction with the roller guide. Is that so? I still have the standard plate on, and I went back to the standard double foot. I was pretty sure the problem is me and not the machine. On smaller stuff like holsters and my test and practice pieces it has worked flawlessly.
-
Ipad Bag/tote
SooperJake replied to Gypsy's topic in Purses, Wallets, Belts and Miscellaneous Pocket Items
How was the dark bead made? Applied or cut in?