


bladegrinder
-
Posts
514 -
Joined
-
Last visited
Content Type
Profiles
Forums
Events
Blogs
Gallery
Store
Everything posted by bladegrinder
-
Thanks folks!
-
Sig 938 pancake
bladegrinder replied to Hags's topic in Gun Holsters, Rifle Slings and Knife Sheathes
I like it, nice color and nice contrast. -
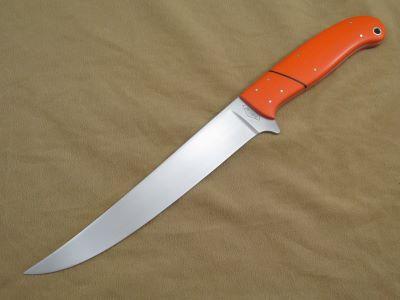
Just finished this fillet knife sheath, Herman Oak undyed natural finish. I used a mules foot stamp to kind of simulate fish scales. Thanks for looking!


-
Can’t you stitch in reverse two stitches to the metal loop then switch to forward, stitch however long you want, then reverse again for a couple stitches? Maybe I’m not sure what your asking.
-
Line 20 Snaps hard to open and close
bladegrinder replied to rmcninch108's topic in How Do I Do That?
You might be deforming the inside of the female part by setting the post to firmly. I set mine with the hammer anvil method and end up doing that sometimes, also your post might be to long, for thinner leathers I shorten my post on a belt sander, takes some finesse put I try to get each one the correct length for the leather their going on. -
Holster for a Sig.
bladegrinder replied to Hags's topic in Gun Holsters, Rifle Slings and Knife Sheathes
That looks great, well done! -
A few Pancake sheaths for Trappers
bladegrinder replied to TomPetty's topic in Gun Holsters, Rifle Slings and Knife Sheathes
Those look great! -
I use the 2” oblong punch from Springfield leather
-
Recommend a permanent low sheen sealer
bladegrinder replied to jasonsmith's topic in How Do I Do That?
Mop and glo - the god’s elixir! After reading all this im beginning to think we found a cure for the common cold, ha ha. -
Recommend a permanent low sheen sealer
bladegrinder replied to jasonsmith's topic in How Do I Do That?
Ok, I’m going to bite, I’m getting low on resolene so next weekend when I go to town I’m going to get some mop and glow. So is there more then just one kind of this stuff or is there different mixes? Also, I’m kind of hooked on using an airbrush so I assume this stuff will flow thru an airbrush ok? And, what’s the standard mix? 50/50 with water? Once I get this wonder juice I’ll try it out and post back here. Might be a couple weeks. Worse comes to worse, I’m only out a few bucks and a little time. -
Recommend a permanent low sheen sealer
bladegrinder replied to jasonsmith's topic in How Do I Do That?
I use Resolene cut 50% with distilled water. I use an airbrush to apply it. 2-3 light coats is usually good and the leather has a nice glow. Now if I were to go several more coats or go heavy with them then yes, it looks like it’s plastic coated to me and looks awful. But I’ve been doing it this way for years and everyone seems to like the finish. Would mop and glow be the same? Who knows, I really don’t care myself. I’m just using what I’ve been doing for years and don’t foresee changing things up now. -
That looks great!
-
Wow, that looks great!
-
I've never heard of the feet breaking off but that's another thing you'll want to play with is foot pressure, you want to adjust it so you don't get heavy marks on the leather.
-
Recommend a permanent low sheen sealer
bladegrinder replied to jasonsmith's topic in How Do I Do That?
I’ve never tried mop and glow only because if I didn’t like it that would mean I’d have to mop a floor, and that ain’t happening. I know a lot of people do use it and are happy with the results, I’ve heard of using it 15-20 years ago. -
I have the Cowboy 4500 version I bought from Bob at Toledo industrial a while back and I'm loving it. I would recommend the narrow plate for one thing, that's about all I've added to my machine. As for threads, all I've run so far is 277 but Pretty much all I make so far is knife sheaths and holsters. I keep it oiled up good and wipe the feet and needle area before running it. the bobbin holds a lot of thread, no worries there. I don't know if you have experience with sewing machines, I never touched one before I got mine so there was quite a learning curve but I feel comfortable running it now. I just glued up a LOT of scrap leather and got to it. I put 3/4" of glued up leather under this thing and it stitched it right up. Probably the thing I kept messing up most was not double checking the forward-reverse lever position before I got to stitching, but thinking about it now I normally start and finish both in reverse so I don't have a problem there anymore but I make sure to look first anyway! that and turning corners before the bobbin thread was picked up. now I go really slow turning or even use the hand wheel at that point. Speaking of the hand wheel...my machine came with a brake, looks like a Kia brake pad inside the motor, when you step on the pedal it releases the brake, a little more pressure and the motor starts running. I took the brake pad out, it's easy, otherwise you can't turn the hand wheel with out stepping on the pedal. you can do a search here for 441 machines and find a ton of info. I wish I'd have bought mine years ago I hand stitched thick leather for over 30 years, I recently retired, moved to the woods,,built a new shop and decided it was time for a machine.
-
I'd offer him $50.00 just to clean it up and park it in my shop for the cool factor.
-
Looks great! Your a lefty huh? My wife is a lefty to. The Taurus plant that makes those is a few miles up the road from me.
-
Nice work, that guy's going to love it.
-
That looks really good!
-
That does look like belly, first things first…don’t buy leather on eBay. It shows that leather is from Latvia, who knows how it was processed. I’ve had Mexican import leather that had that spongy foam kind of back too it. It’s even hard to cut with a razor. Anytime I make anything I take a really good look at where I’m going to cut a piece out on both sides under really good lighting, looking hard you’ll almost always find some kind of imperfection and sometimes you can orient it in your project so it won’t show. Leather like you’ve shown won’t glue or stitch properly either so you need to keep that spongy stuff away from welts and stitch lines. Someone told me many years ago, once you feel your skills are moving up never use bargain leather or leather from unknown sources. At the time I was using Tandy shoulders I then switched over to Herman Oak and never looked back. I mostly make knife sheaths and holsters though and it’s perfect for me.
-
Diesel, being a knife maker you won’t have any problem sharpening them. There pricy but it nice to just give it a couple good wacks and have a perfect hole.
-
A wood chisel is a great idea Chuck, I never thought about that. When I was trying to find out how to do these without a pricey pinch all I found were people using hole punches on the ends and cutting out the middle with a razor so I tried that but they kept ending up wonky looking. I don’t actually use a sledgehammer but I use a 2# hammer with about 1/2” of glued up scrap leather underneath.
-
Diesel, the punch i have is Springfield leathers 2” craftmaster. now I knew this thing needed to be sharpened before use but wow, I think it needed more than just sharpening, I’m a knife maker so this didn’t bother me but for the average person they may spend a lot of time getting this to where it performs good. It’s built like a tank and will certainly take a beating with a 2# sledge hammer with no problem. I put it to my belt grinder and thinned out the sides before I even did the edge, after beveling the inside edge with a needle file I sharpened it up on the outside and it’s good to go. Like I said though, this thing needs some work before it’s ready to hammer thru multiple layers of leather. That being said… I tried the hole punch and cutting with a razor and just didn’t get the results I wanted, probably just me but once this things ready it punches a nice perfect oblong hole.
-
I can give you the size tomorrow Diesel, my shop is detached from the house and I'm ready to call it a night. Thanks Hags, I think I'm going to make another 1911 holster soon and I'm going to try the reinforcement panel on that one.