Nuttish
-
Posts
428 -
Joined
-
Last visited
Content Type
Profiles
Forums
Events
Blogs
Gallery
Store
Everything posted by Nuttish
-
Laser or waterjet cut pieces screwed to plate. File and buff the filleted edge yourself. The die you showed a picture of would only take a few minutes to cut in a few dollars worth of scrap aluminum or mild steel. Tool steel then hardening would cost a lot more, and you don't need it if you're just wet forming leather. Waterjet will be the most cost effective since it can be made from a single piece of plate and the shop can gang your job with a larger one using the same gauge steel. In a big city, your part might cost less than $100 one off if ganged with other jobs. If you've got technical drawings, I'll give you a quote to machine the die part in one piece out of aluminum and cut the counter out of aluminum plate. I can't do steel. It will cost a lot more than getting the parts waterjetted locally and assembling the die part yourself.
-
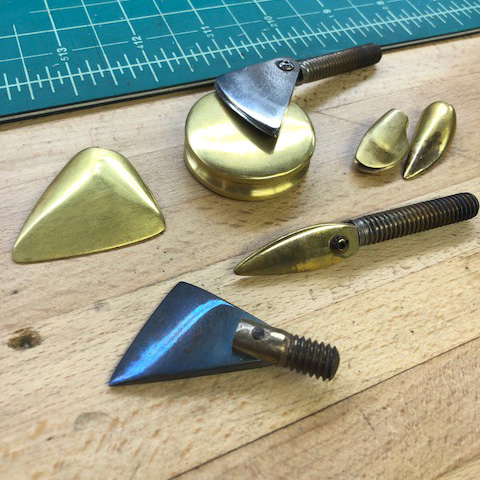
Mine came with a brass disk with a 2mm round groove on the side, but I think you can choose if you call Sam at CR. I'm not kidding though - tips are really easy to make with cheap tools. You probably already have a hand drill and a vise or clamp. You otherwise only need a cheap file set, a variety pack of sandpaper up to 800 grit or higher, a 6mm drill, and a 6mm tap and handle. You can buy the brass cutoffs from a local machine shop if they don't just give them to you. Drill and tap a 6mm hole in a small piece of brass, screw it on your upcycled soldering iron handle (off and cool), file and sand it to the shape you want, profit. Alternately, grind the side off a 6mm machine screw, drill and tap it for a screw to hold the business end, and make the business end itself out of brass. With the exception of the round edge tool, which required a lathe to make, the brass tools took no more than 20 minutes each to make for specific needs as they arose. In case anyone is contemplating using steel, don't bother. Just use brass. If you're able to make the tools yourself, the CR unit is a real bargain.
-
Upcycled soldering iron, eh. Someone who owns one can answer whether these Regad style units have thermocouples in the handles and PIDs in the head units. I've never seen an off the shelf PID with a knob, so I doubt it, but I admit I don't understand why those handles look like lightsabers instead of upcycled soldering irons, which is all you really need unless you like spending money. The Campbell Randall unit uses a very reliable infinite switch unit to heat the business end. It's not as accurate as one with a PID, but I don't find that it matters much. You can make your own tips out of brass to serve your exact need. Use a hacksaw, a file, some sandpaper, a drill, and a 6mm tap to thread your hole to fit the handle. The Campbell Randall unit does exactly what it's supposed to very nicely and is reasonably priced. I like mine.
-
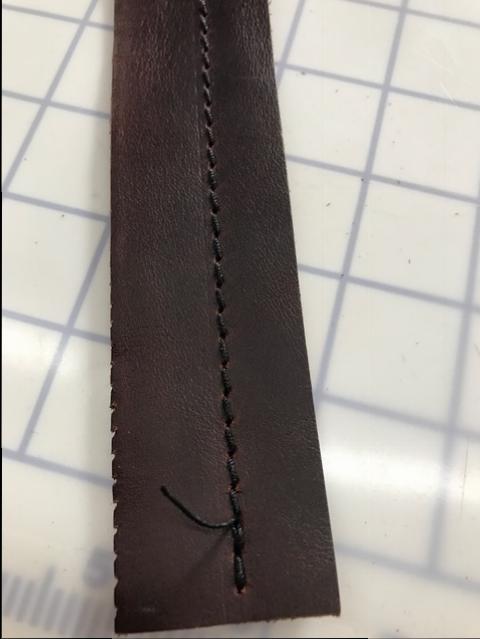
Not to anyone who knows what they're buying because it's in the nature of the technique. As someone said below, longer runs of linen thread will break. They also untwist and pick up dirt and dye. A good coping strategy is to use no more thread between two needles than you can put through your first hole and comfortably pull and tighten without stretching your arms too much. The thread closer to your needles will show more and more wear as you work. Just start a new one when you get to a point where the old one looks cruddy or is breaking at the needle eye. I'm looking at several instances of new threads started in the middle of a run on an old luxury French calf duffle bag. If anything, it's evidence that someone made this thing entirely by hand.
-
Leave enough thread to tie a lose granny knot over the top of your piece. Count back 3-5 stitches. Start a new thread and stitch over those 3-5 stitches. No need to backstitch. Rinse. Repeat. Trim tag ends of threads. Finished.
-
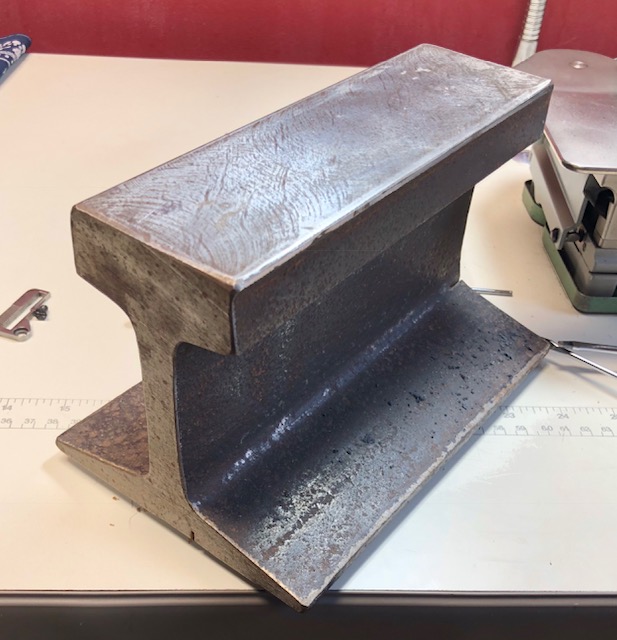
Great minds think alike, eh. From a section of old rail that was so work hardened from use it ate a horizontal bandsaw blade before I could correct things. Roughed the top flat on a vertical mill because I use it for whacking more things than rivets.
-
A square hole that deep would be drilled and broached.
-
One option for a very thick piece of granite you can whack on that 's also smooth enough to skive on without significantly damaging the tip of your knife is a granite surface plate for a machine shop. The best plate to get them is at an industrial auction. I've gotten nice Starrett and Brown & Sharpe ones for less than $50. You can also find big dinged up ones on eBay that are no longer useful in a machine shop but are suitable for your purposes. They'll cost a fortune to ship, but local pickup makes them worth the trouble. You'll never go back to working on any other surface.
-
You can score a very nice used arbor press on eBay, Craigslist, or local industrial auction or used industrial machine dealer. Get one that will do 2 ton +. Bonus if it has a platen work surface. Make a sandwich of 1/2" cold rolled steel the size of your die, your die, leather, 1/2" polypropylene sheet from McMaster-Carr, scrap of cold rolled steel the size of your arbor press base if isn't a platen base type. Cut stuff.
-
Letterpress plate makers can make foil stamping dies from .ai or .svg files out of magnesium, copper, and brass. Magnesium is cheap and perfectly suitable. They charge by the surface area and will cut the plates apart on cutting lines in your art using a bandsaw, so you can easily gang your art to get multiple dies. $35 plus shipping would get you 10 square inches of 1/4" magnesium next day turnaround cut however you want from Owosso in Michigan. See here. That's potentially a lot of dies. Then there's the question of how to stamp them. I'll post some pics of a homemade stamping machine I made out of an arbor press if anyone wants. If you already have an arbor press, it costs less than $50 all in to make if you have access to scrap materials, a drill press, and taps/dies.
-
Heat, pressure, and dwell time. Our pneumatic stamper is always set at around 145ºC because that's what Crown Roll Leaf foil calls for and it works fine with or without foil. Pressure and dwell for foiling leather will just require a lot of experimentation and note taking. The shop air gets regulated down to 80-100 psi. Dwell will never be more than half a second. Pressure and dwell for blind impressions is a lot more forgiving - you just want to avoid cutting the grain if your die has sharp lines or fine typesetting and avoid discoloration. For oily chrome tan, I strike the die on the impression multiple times, sometimes holding it for a few seconds, until I get nice results. Blind stamping shop dyed veg tan is tricky because it nearly always discolors to some extent. If the grain is firm enough, I'd just use foil. I can post some pictures of 1, 2, 3, 4, etc die strikes on some Chromexcel at 143ºC/100 psi if you want.
-
Rubber doesn't burnish. Put some blue masking tape 1mm in from the edge so you've got plenty of material to dye/sand/burnish.
-
Mind sharing how you apply the paint?
-
Interesting machine. Do you mind describing its construction?
-
How Do I Clean Grain Prior to Oiling or Dyeing?
Nuttish replied to TBigLug's topic in How Do I Do That?
God's honest truth, if you're dyeing and reconditioning, and quick wipe with xylene does great. Otherwise, a mild solution of oxalic acid (Barkeep's Friend is a consumer product that I believe is 100% oxalic acid). -
You need a PID with a thermocouple or a pulsating on/off switch like a Robotemp, which is what Campbell-Randall uses on their unit. I don't think the temperature controlled soldering irons go low enough.
-
The round end of a high speed steel drill bit works just fine to roll the burr over.
-
You can get a used single phase 1HP Baldor or Dayton for less than 150 and avoid the ~1/3 power loss you'll see with a VFD.
-
Those are all effective as well as a surgeon's knot with the tag ends woven back a stitch. You can also try altering the saddle stitch to make an over hand knot in the center. 5 back stitches is excessive if you're correctly saddle stitching.
-
Atom wax is an alternative to carnauba creme. It's also carnauba wax, but builds more rapidly. It doesn't tend to alter the color much. It goes over most finishes.
-
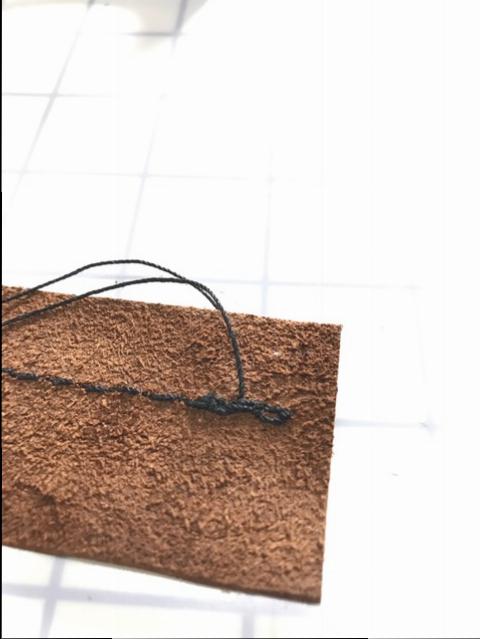
Knot used to tie two ends of a cuff together.
Nuttish replied to Mike516's topic in How Do I Do That?
Please post a pic of the ends you want to secure -
Thanks very much for the quick reply! See attached.
-
Get yourself a Harbor Freight fractional/mm or better electronic calipers and both metric and imperial steel rules, and never think about it again. I say two rules because I at least personally find it confusing not to be able to flip and rotate a ruler to get the scale I want without having to also look at a completely different measuring system. If you get really obsessive about accurately converting between metric and imperial, which is overkill, get yourself a machinist's rule with inches in 10ths and 100ths.
-
Agree 3 layers, but from the inconsistent quality and occasional straight bits, it actually looks like that person cut the scallops with a knife. Scalloping punches usually come straight or with a ~160º (close enough) arc (see http://brucejohnsonleather.com/leather-tools-sale/leather-scalloping-and-pinking-punches-sale). You can make yourself a suitable single scallop punch with a piece of steel tube in what looks like 1/4" or 5/16" ID. If you can't find one at your home center, go over to the bathroom towel bar section and find one of the el cheapo bent ones made from tube tubing. Then to the grinder or sand paper. In any event, your punch will be unhardened poor quality steel, so you'll have to get used to sharpening it.
-
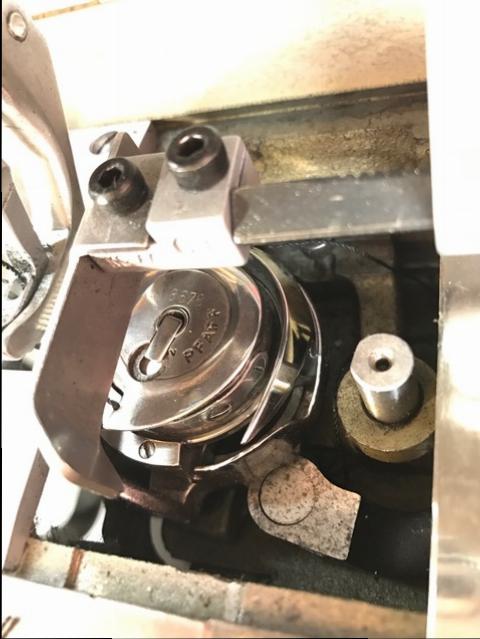
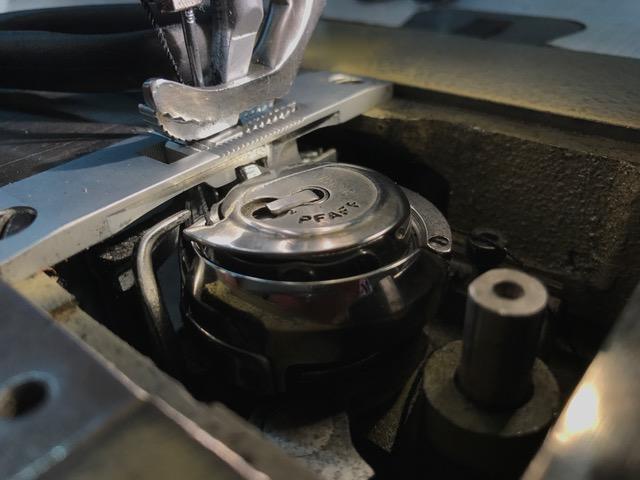
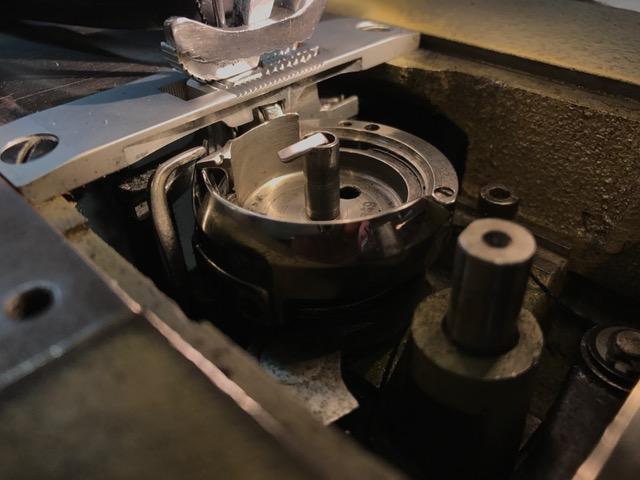
Hi all, I'd be grateful for some help getting my Pfaff 1445 going. I previous posted about feet, which I got from Hong Kong. They're mediocre but acceptable quality given the rarity of the machine. The machine wouldn't have been a bargain if it were free considering the time and expense that's gone into it. But hey, we've got another machine so I'll consider this thing a hobby. I've got the hook correctly timed, but I'm finding that it's very difficult to correctly balance relative top and bottom thread tension, or top dog pressure may be incorrect, or the bobbin case opener isn't correctly timed or distanced. Or all of these. Compound feed is accurately synchronized, needle bar centered in all dimensions, all stroke lengths are correct, bottom feed dog height properly set to ~.020" (.5mm) per the service manual. I've got a new needle plate, feed dog, and feet, which feed perfectly straight. I do need to take the needle plate over to the buffer and ease some of the edges the thread goes around. No problems with inconsistent tension between the cone of thread and tension rings. Top thread is correctly routed per the operating manual (unusual design and route). Bobbin thread is correctly placed and pulled. Pictures attached. Symptoms are: • Occasional skipped stitches and slightly inconsistent bottom stitch; the bottom and top quality don't match consistently • Backtack thread tension is very loose • Starting the stitch occasionally results in a squirrel's nest mess of thread on the bottom • When I get the top and bottom tension balanced such that the thread is more or less locking in the middle of my material, I occasionally find when turning the handwheel that the top thread is very tight as it crosses over the top of the bobbin and the motor may even slip on the belt I strongly suspect some kind of binding or tension issue is causing thread to get pulled off the bobbin or through the top inconsistently. I'm running a 3/4" HP servo motor with what I believe are the correct thread/needle combination for layers of 3 - 6 oz chrome tanned and retanned vegetable tanned leathers (the same size combination has always worked quite nicely on another machine).