SARK9
-
Posts
391 -
Joined
-
Last visited
Content Type
Profiles
Forums
Events
Blogs
Gallery
Store
Everything posted by SARK9
-
I believe it should be TAKE-UP LEVER at highest position, not *needle bar*, to index the timing marks. Re-read Gottaknow's advice. -DC
-
IF you have the physical strength to safely remove the sewing machine head, I find it vastly more comfortable to remove the unwanted clutch motor with the table laying on its top. The machine head will lift straight up out of the hinges and may be set on a sturdy workbench bench or protected table where it will be out of the way. It IS heavy (+/- 50lbs) and it will mar a finished surface and/or possibly drip some oil where it sets. Be warned. The knee lift mechanism and drip pan may stay where they are. If the drip pan has any puddles of oil in the bottom, you'll want to blot it all up before inverting the table. Remove the thread winder (usually just 2 screws) thread spool stand, and the lamp (often just a large threaded nut from below) and anything else that may be on top. Carefully tip the table onto a padded or otherwise smooth spot on the floor...the attached clutch motor makes it very top heavy so you must be prepared to take its weight as it passes its tipping point, and lower the back table edge to the floor. Tip it again with the legs straight up. Now it is much easier to remove the nuts attaching the very heavy and awkward motor, as well as any wire staples and the switch box attached to the motor. The motor will lift off the long carriage bolts and may be disposed of as desired. The head and any accessories can be replaced just like they came off. You may need a shorter V-belt (most use a 3L (3/8" width) between 39 and 42 inches long, depending on your pulley diameters. Example: A 40" belt will be designated "3L400", a 39" belt is "3L390" a 39-1/2" belt would be "3L395" etc. The motors have a pivoting adjustment to compensate for minor length differences and belt tension. Don't take this on unless you are sure of your own lifting strength....dropping a heavy cast iron machine head tends have unpleasant side effects. -DC
-
On my Mitsubishi LS2-180, that "pre-tensioner" is provided for machines that are or can be equipped with an underthread trimmer and "wiper"....the smaller disc's tension is adjustable to control the length of the thread tail left on the upper thread after the automatic foot lift releases the main tension discs as a component of this programmable routine. The guide it is mounted to has holes that you can use to bypass it. Its probably not something you will miss. -DC
-
I think I remember that when that *N* designation was used on the later models of the LU-563, it was something to do with changes to the oiling system or some such internal detail. It may apply to your machine as well. Someone else here may remember "better". -DC
-

Information on Chandler C75/ or Mitsubishi LU-105
SARK9 replied to simran's topic in Leather Sewing Machines
The upper looks very much like our Mitsubishi CU-865s -DC -
I've used mine on very light to moderately heavy stuff. Like most machines of this type, there is a limit on the foot lift and pressure capacity, the stitch length, and the ability to properly tension thread much above T-70, though mine is quite happy with T-80 Nomex sewing canvas aprons. I don't normally use it for anything heavier as I have other machines designed for the T-90 to T-210 range. The bobbins are quite small, like most other legacy fabric machines. You probably should look at the brass tag on the rear of the column for the exact model and subclass, since there are several similar machines that look exactly alike. My 481 came with a heavy duty aggressive feed dog and needle plate, as well as the std. set with finer teeth, so I suspect its capable of the higher end fabrics. There is excellent documentation available for using and maintaining this model. -DC
-
Looks exactly like my 481....which is a top and bottom feed (needlefeed) machine. The stitch length adjustment is to the right of the reverse lever, mostly inside the belt guard. The rear thread guide is for the bobbin winder....which I suppose is what you are mistaking for the stitch knob? The center guide looks like its been replaced, since it usually has a post type guide at that location. The front guide is a part of the normal thread path. They are pretty nice machines for a variety of fabrics. -DC
-
Agreed. The main upper tension spring's coils are fully compressed, we can't tell what loading is also being contributed by the upper pre-tensioner above it. The thread looks completely taut running into the first guide before the pre-tensioner, with no hint of a normal catenary curve. Check for a snag coming off your thread cone, or a loop on or under anything. Back off the main tension to a looser "starting point" and observe the results. Good luck! -DC
-
I think its pretty advisable to stick to the initial baseline starting points when assisting someone who has had to have a "mechanic" thread the machine for them. By the time you are attempting to get a repeatable balanced stitch in sandwich of 6 layers of 1000D Cordura around an .065 layer of ABS plastic crossing over a layer of 4088 webbing in two places while using glazed T-120 Kevlar thread top and bottom, you have probably figured out you have to *wing it* sometimes! My hat is off to the production process specialists like yourself who have to make this stuff happen quickly! -DC
-
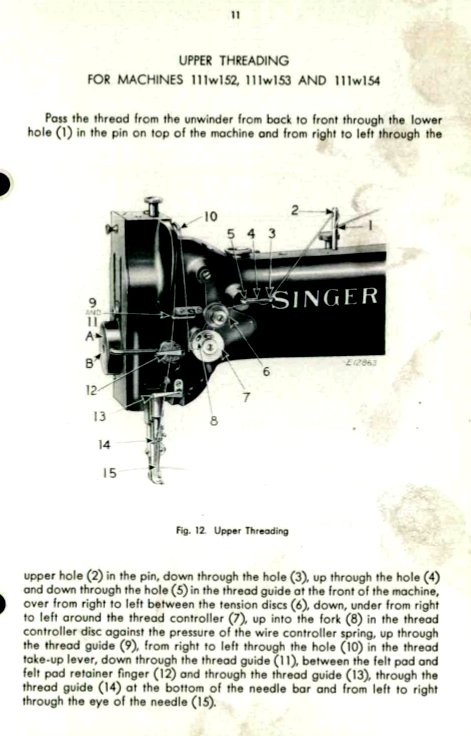
A page from a Singer manual for most of the 111W models- I've noticed several instructions which suggest you need to run your thread under the pin in the tension discs...as far as I know, that is NOT part of the recommended thread path. That pin is there simply to prevent the tension discs and the other components from rotating. -DC
-
I didn't notice the video of the machine he posted at first go (oops) ....and the first snap is for sure the case opener adjustment. However, the *second snap* was what got my attention, since I had just finished correcting an identical defect on the relic machine I am working on at the moment, and I wondered if his machine was similarly afflicted. There were two causes for a second snag or snap after the thread cleared the notch/tab on my old castoff machine, and the primary cause was: The rotational position of the hook assembly placed the trailing edge of the *hook gib* in the path of the rising thread just long enough for it hang on its sharp outer corner, allowing it to tense up and snap when released as the hook rotated past the breakover point. I could see the point where it was hanging on the old derelict hook of this 111W152, and my first thought was to blend and polish the gib's trailing edge to allow the thread to slip over it smoothly. --> If you look closely at your video of the Tacsew 563 clone, you will see someone has given this treatment to the leading and trailing edges of the hook gib on that machine. <-- I had just timed this machine by the numbers (now that I can actually clamp the needle bar!), and it still had this brief hang-up, so I wrote it off to additive tolerances in the poor old thing and advanced the timing very slightly...that cured it instantly, and still seems to form stitches normally. Another post-tab snap on my junker was caused by the sharp edges of the needle hole on the underside of an after-market feed dog...it was reluctant to pass the knot/loop with heavier thread and caused a inconsistent tension issue plus an audible snapping hesitation with each stitch. Those are some other snapping issues on vertical axis machines I thought might be worth a look. -DC
-
If its not the bobbin case opener not moving the case far enough, check your timing. Sounds like it may be slightly retarded....the thread passing around the bobbin case may need to get past the centerline of the hook assembly slightly sooner, and it will miss or slide off the hook gib more easily if so. -DC
-
Smaller bobbin thread for leather upholstery?
SARK9 replied to bryanmartin's topic in Leather Sewing Machines
I've used bonded Kevlar thread in the bobbins of certain machines for specific applications....particularly jobs which need the patcher-type machines with their miniature bobbins, as well as some of the fabric-type single needle machines with A or L bobbins. T-45 is a good match for the bigger top threads I use frequently, but getting the color selection can be problematic. Its a good option to consider. http://www.thethreadexchange.com/miva/merchant.mvc?Screen=CTGY&Category_Code=Kevlar-Thread&gclid=EAIaIQobChMIxdOmhaev2AIVQrnACh2o1gkjEAAYASAAEgJRvfD_BwE -DC -
Most of the 3L belts are available in half-inch steps, at least here in these parts. Its why the size is designated in 3 digits, such as "3L425" being a 42-1/2" belt. -DC
-
I've used both the RPC and the electronic *static phase converters* and I would have to say, the static version is probably the way to go for indoor (such as IN HOME) use. Once connected, they are invisible to the process....like they are not even there. You do take a small HP hit with either the rotary or static, and the roto is said to be slightly better in that regard, but really, for sewing machines, its probably academic. The roto phase type requires a 220v single phase motor to run constantly if you are needing 220v/3ph power....so you have a couple of the primary disadvantages of using a clutch motor right there....the motor is always running, meaning noise and power consumption, in addition to your always-on old school sewing machine motor. The upside is, the roto is rated in terms of the motor HP it will START...it will *run* several motors simultaneously as long as the start load is not exceeded. An electronic servo motor or a VFD are probably similar in cost, but it won't give you the high production automatic functions like programmable back tack/thread trim/needle up/down etc. if those things are required. -DC
-
Here is one in the wild: https://tricities.craigslist.org/art/d/leather-sewing-machine-heavy/6388815167.html -DC
-
Do narrow edge guide feet for the Consew 227 (et al) exist?
SARK9 replied to SheltathaLore's topic in Leather Sewing Machines
It doesn't look like any of the feet you pictured are the type you need, and as far as I know, the 227 uses the ultra-common SInger 111W style inner and outer foot. The ones you pictured are (1) the normal single-needle high shank feet mostly used by garment class machines, and the others(2) all appear to be the walking foot style which Pfaff uses to fit their own proprietary take on walking foot machines....they are superficially similar but will not interchange with the Singer machines. The width of the inner foot and the feed dog its self make the "spring loaded edge guide foot" a bit tricky to make for any distance less than 1/8". You may find a narrow inner foot combined with a right or left toe zipper foot used in conjunction with a fixed edge guide to be the route to explore, if I understand how you are going to sew the edges. Your dealer should easily be able to set you up with a couple of edge guide options and get you a set of zipper feet....I suggest getting both a right and left outer foot while you are at it. -DC -
I think I would keep practicing one of the various *stitch locking methods* evolved in a time when reverse was rare, while you scour the sale lists for a bargain on a (non-subclass 3) LU-563 or one of the other dozens of roughly equivalent walking foot machines which come with reverse. It DOES happen. You will certainly be money ahead in this endeavor. I sort of prefer the LU-563 and some of the Singer 211's simply because of the *U* style bobbins... -DC
-
Every one of the table-edge yardsticks I have are pretty inaccurate...I suspect the vinyl T-molding edge trim that these rules are printed on stretches over time, or was stretched varying amounts at the time of application. The older green Singer tables as well as the newer gold ones (still ancient) both are useless. The later model tops with their rule printed on the surface laminate seem OK. -DC
-
I've been making up my tables with the "servo" mounted on the top rear of the table....where the "dead space" for big lamps and thread stands usually is. This is a bad picture of my "universal table" for various "domestic" sized machines, and I set up my 29B that way as soon as the box was opened. The price point is now attractive enough to kill off the pathetic "domestic" stock motors for good, in my hideout. And... Since we don't have to shoehorn in 45 incredibly awkward pounds of archaic, buzzing, *watermellon sized* motors anymore, the main reason for going underneath the table at all has sort of gone the way of the dodo, at least for the casual user. I doubt I'll ever slot a table for belts again. -DC
-
https://tricities.craigslist.org/atq/6130821742.html -DC
-
Pfaff 335 binding attachment on Seiko CW-8b(consew 227)
SARK9 replied to Jordanball33's topic in Leather Sewing Machines
One thing about off-the-shelf binders in general, assuming you find one to mount on your Seiko, is they are usually made to accept pretty thin materials, and wont feed or fold properly if you go to a bit thicker or wider material than their design specs....some don't ever seem to work well even then. The folders from Suisei have a good reputation for off-the-shelf functionality. One of the advertisers here may handle them, or you can call Sailrite to see about a rush purchase. You WILL need to tell them what you are using it with, if you can use an in inline or need a right angle folder, if its for single "raw edge" tape or double fold/bias/straight fabric, how thick the tape and material to be bound is, and how wide the tape you want to use is. You also may need the correct feet/feed dog and needle plates, depending on what you are trying to do. Assembling random folder components which will produce professional grade results for demanding clients can be.....problematic. Good luck! -DC -
Amazing machine- If the Singer 11 version is any guide, it could do ALL the above, depending on which subclass it is and what accessories it has. The rod in the slot just left of the front handwheel does seem to be the adjustment for ZZ width. Getting across the arm, up the arm, or zig-zag in one model is pretty awesome. -DC
-
If it is actually a *feed up the arm machine*, as hinted at by the shape of the foot, then that slide arrangement could be a possible stitch length regulator and/or a part of a needle feed mechanism, as the throw for both would travel in the long axis of the arm. Whichever it is, it needs to live here with me. -DC
-
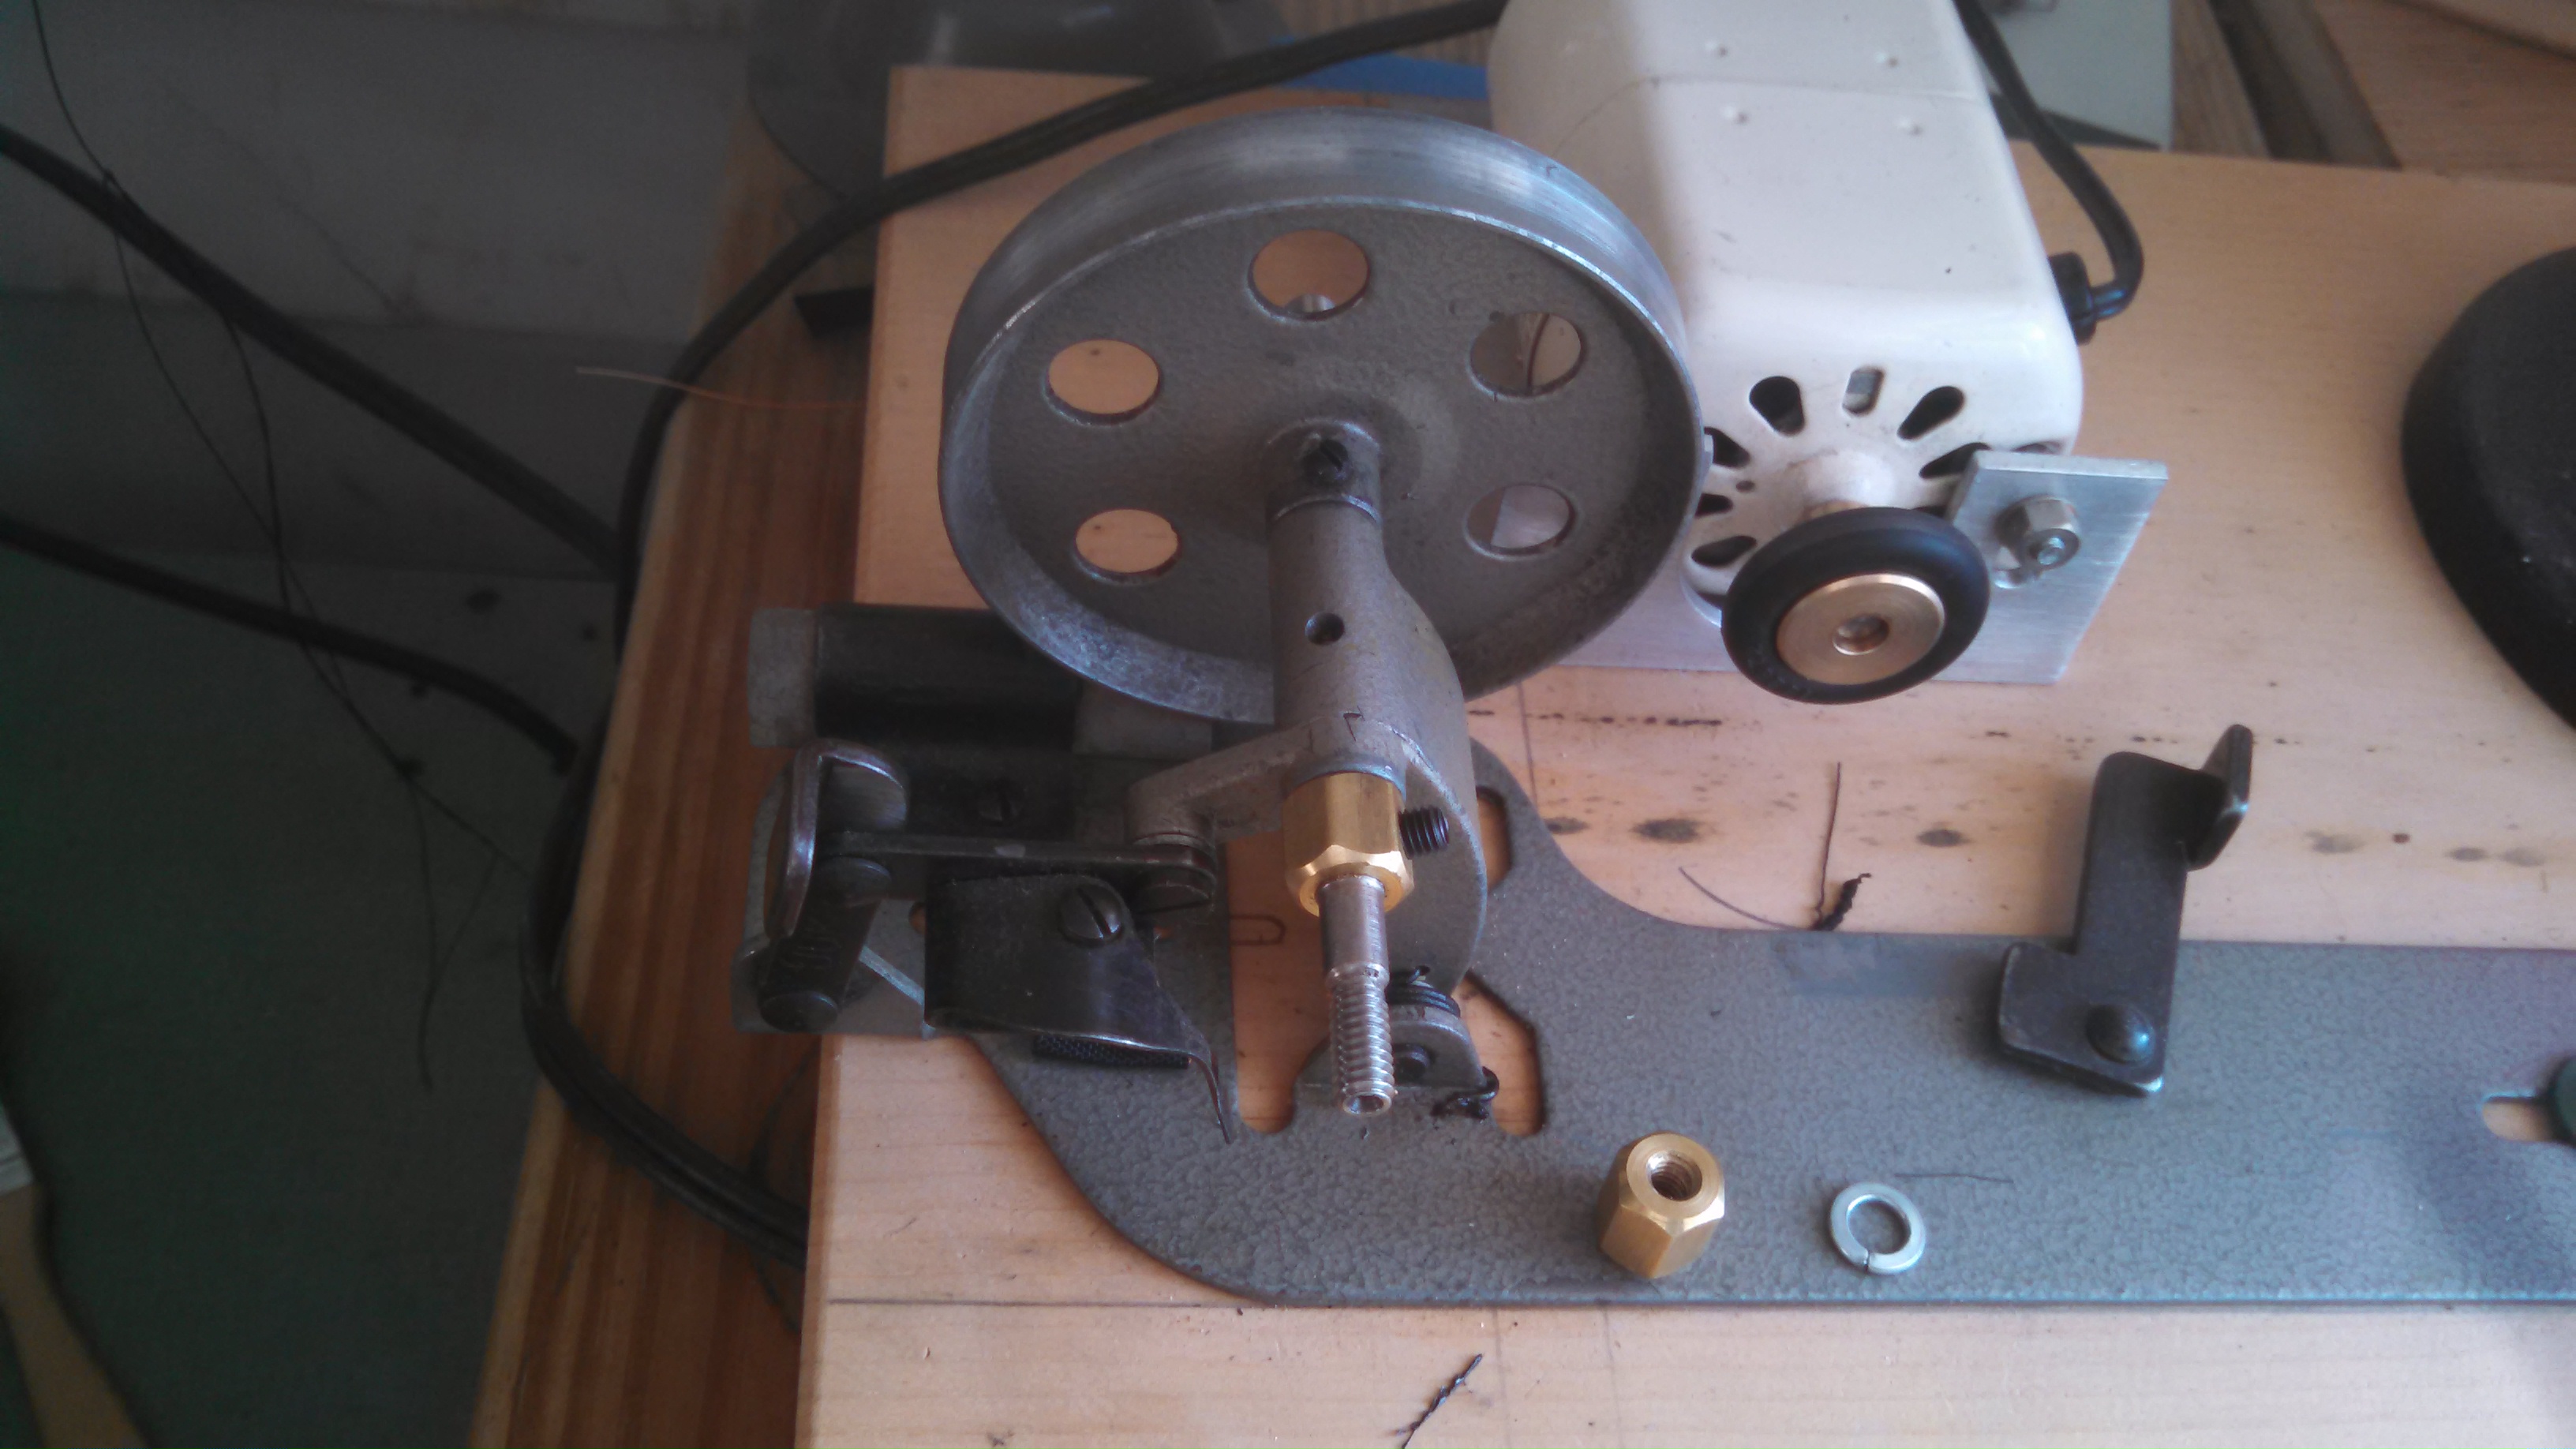
DIY Electric Bobbin Winder - Singer 111 and 45K Type Bobbins
SARK9 replied to Constabulary's topic in Leather Sewing Machines
About the only thing I do different on mine is to replace the shaft with a threaded version that will accept every bobbin type I own...from the Singer 29K's large bobbin to the Juki LU-563. A #12 thread works about right with the diameter range.