SARK9
-
Posts
391 -
Joined
-
Last visited
Content Type
Profiles
Forums
Events
Blogs
Gallery
Store
Everything posted by SARK9
-

What machines are these and any worth getting?
SARK9 replied to myjtp's topic in Leather Sewing Machines
#1 looks like a Singer 241 or 245....oil bath type garment machine with no oil pan to be seen. #3 is one of the 211 models...I can't see a reverse lever on it, but who knows. At worst its similar to one of the Singer 111W machines, so its useful if its cheap. The Juki is one of the more modern single needle straight stitch machines, from a front view I have no idea exactly which one, but it is straight stitch only. It also needs its oil pan, and the table and rubber corner mounts that make it fit the cutout properly. #4 is a most likely a Singer 281, another straight stitch oil bath type machine with no reverse. #5 looks to be a model 78 Singer, its a walking foot machine with NO LOWER FEED, but some folks like the stitches it makes just fine and keep them around. Last one looks like a Singer model 31, the 31-15 is most common but there are several others, including at least one model that has reverse. All the "oil bath" machines really need the reservoir pan that holds the oil for the pump pickups. Caveat Emptor. -DC -
I have a manual screw machine (turret lathe) that uses the spring-loaded variable pitch pulley pairs which are activated by a lever....it is not effortless to move the lever, nor is the response time particularly quick. This arrangement could have the components reduced in scale for the very light demands of a sewing machine I suppose, and overcome some of the physical effort and response disadvantages. With the other options more readily available, like VFD's, various servos, and even the antiquated clutch motor itself, this seems to be more like a proposition of "why open a door when you can just tunnel under it?". -DC
-
Alas, the hammered rosemary seems to have been discontinued. There may yet be odd cans on high shelves that have not been sold here and there, but none of the Rust-oleum sites online show this as a current color offering. If there is any retail stock remaining, I certainly can't find it. -DC .
-
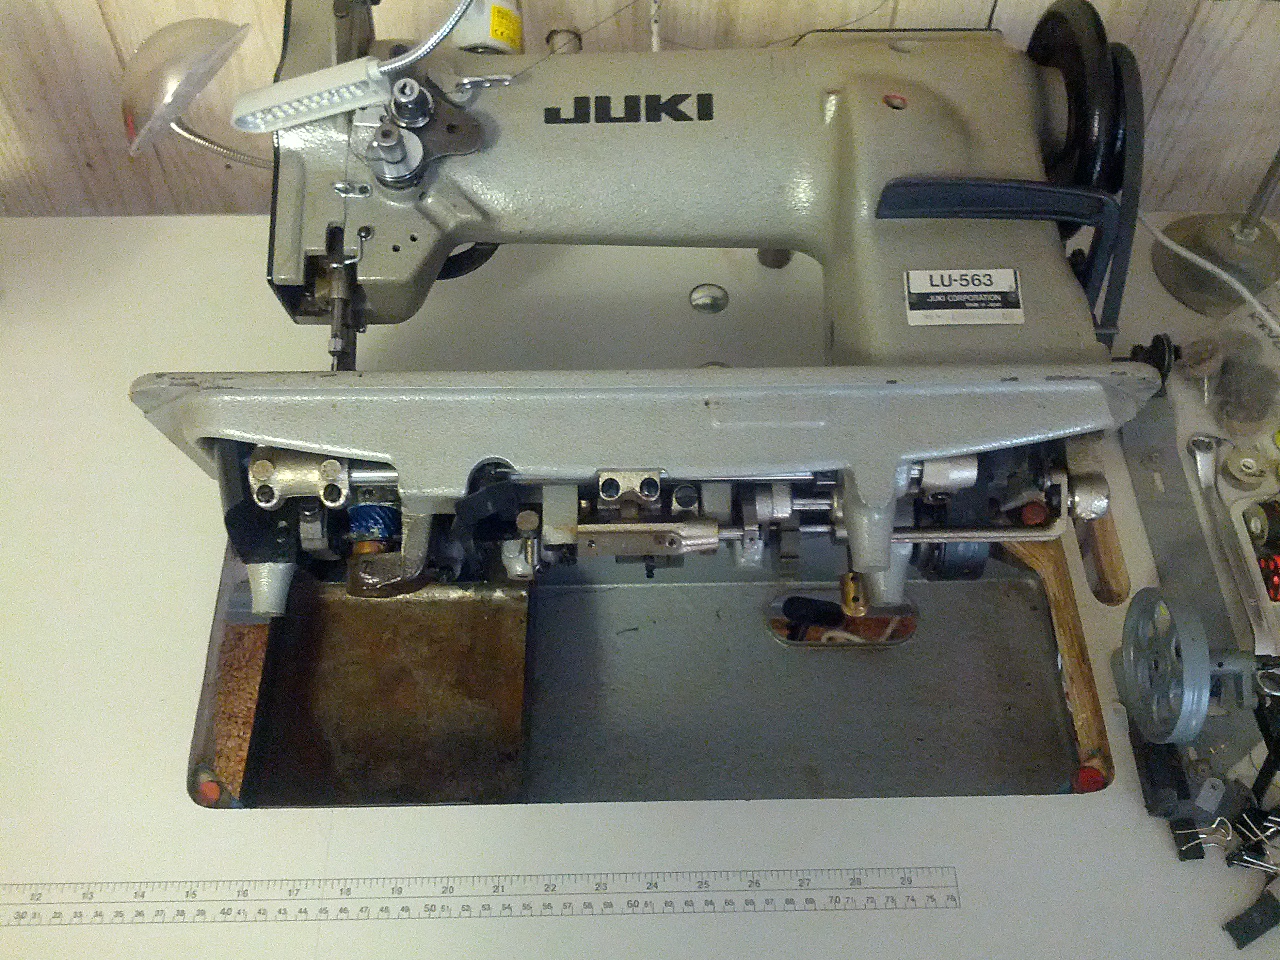
What should I look for on a used Juki LU-563?
SARK9 replied to LederMaschinist's topic in Leather Sewing Machines
Its possible you are thinking of the problem with the Consew 206 series that was corrected with the 206-RB5's stitch dial locking lever. The Juki stitch length control is similar to the Singer 111W models. You may have meant the reverse lever? -DC -
You might look this thread over..... -DC
-
I'm pretty sure some of the non-electronic "servo" motors have a brake pad of sorts....try depressing the pedal slightly to see if it disengages it. -DC
-
When I'm using a table with a "normal" stand and existing pedal, I made up some adapter brackets for the remote sender unit: -DC
-
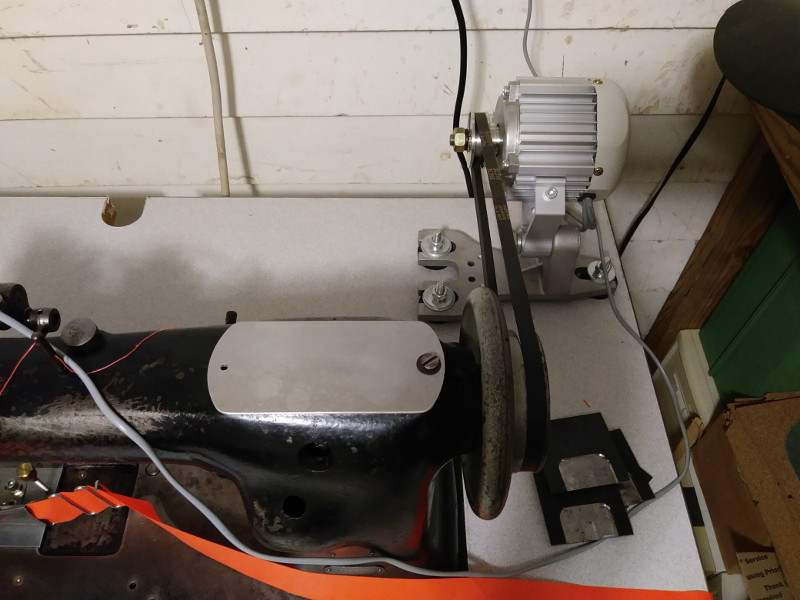
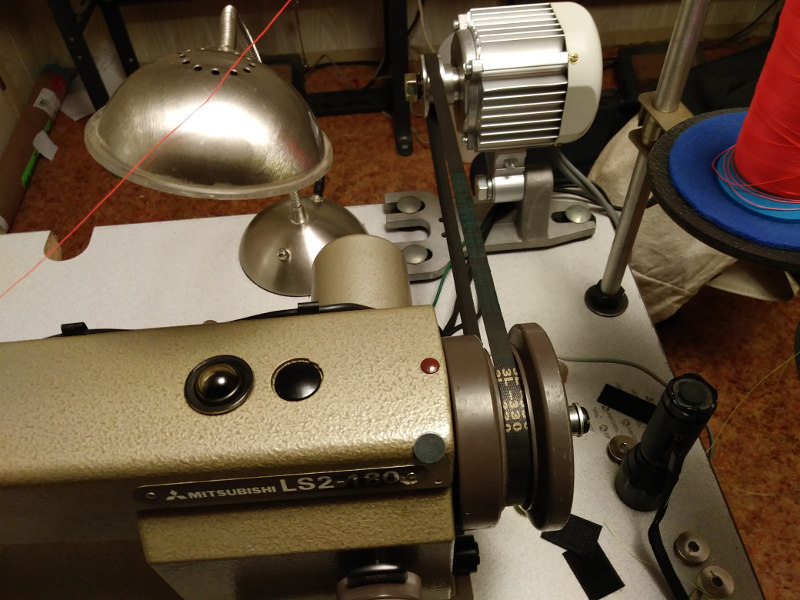
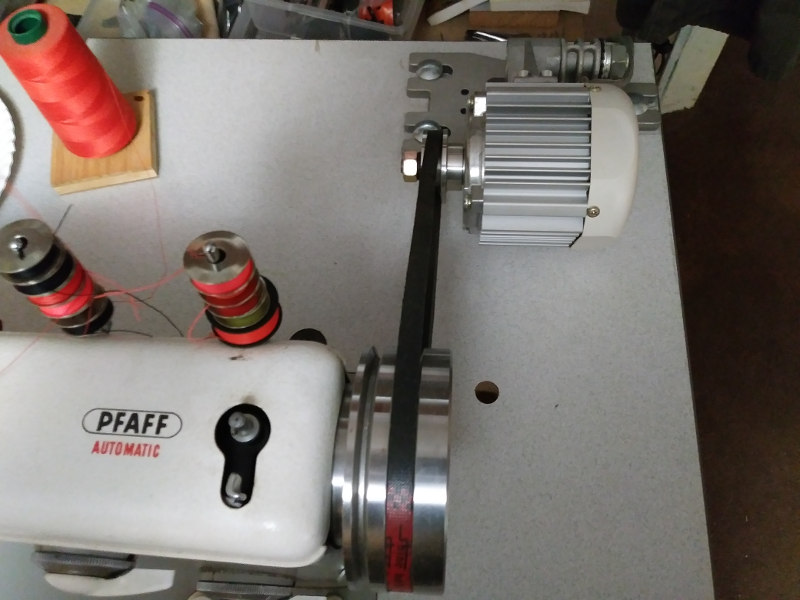
Most of these "servo" motors are reversible, so you can mount the bulk of the motor outboard and it won't interfere in the slightest with tilting the head. I really like NOT having to weaken the table with the belt slot that is needed for an enormous underslung 40lb watermellon-sized noise generator. -DC
-
Do all Singer 111W155 machines have a walking needle?
SARK9 replied to CEA's topic in Leather Sewing Machines
In my last post, I had included a link to a much later model Consew 244....walking foot with reverse. The manual is still available from Consew. Its still listed on the same KSL site. Google Maps shows it is less than 15 minutes from SLC and a few bucks cheaper than the 111W. Sheesh. -DC -
Do all Singer 111W155 machines have a walking needle?
SARK9 replied to CEA's topic in Leather Sewing Machines
I really don't know what type of foot is installed on that machine...I just don't recognize it as any of the typical 111W types that are simply everywhere. Though I've not tried it myself, I believe you can unclamp the presser foot bar and rotate it 90 degrees to use the "paddle" type feet, so that may not be too much to alter. Disconnecting the "walking" (outer) foot motion to use that type of foot would be possible if desired, but the inner foot, needle and feed dog would need to remain in synch like a needle feed machine. If the only thing that is left functional is the feed dog, why would you want it at all? The button for locking the mechanism to adjust the stitch length has also been removed, another strong hint that the machine has been used for a dedicated custom operation making a specific component in a factory setting. Its possible all the feed mechanisms have been altered for use with an external puller. Personally I wouldn't drive across town for it, or offer any more than a K-leg stand and a salvage casting was worth to me. These machines in good condition are frequently available for a third of the ask. Just sayin'. Here is a prospect listed with the same service: https://classifieds.ksl.com/listing/53555838 -DC -
Do all Singer 111W155 machines have a walking needle?
SARK9 replied to CEA's topic in Leather Sewing Machines
If this is the same machine, it shows no "-7" subclass on the tag: https://classifieds.ksl.com/listing/52874558 Difficult to say, but it does look a bit like it has the paddle-type foot mount from a needle feed like you would expect on a 111W151 etc. It has a non-standard bobbin cover plate and a zillion tapped holes for custom fixtures, plus a repaint, so I would guess it has seen some customized/specialized service on a factory line and all bets are off as far as what is "original" with that sort of history. -DC -
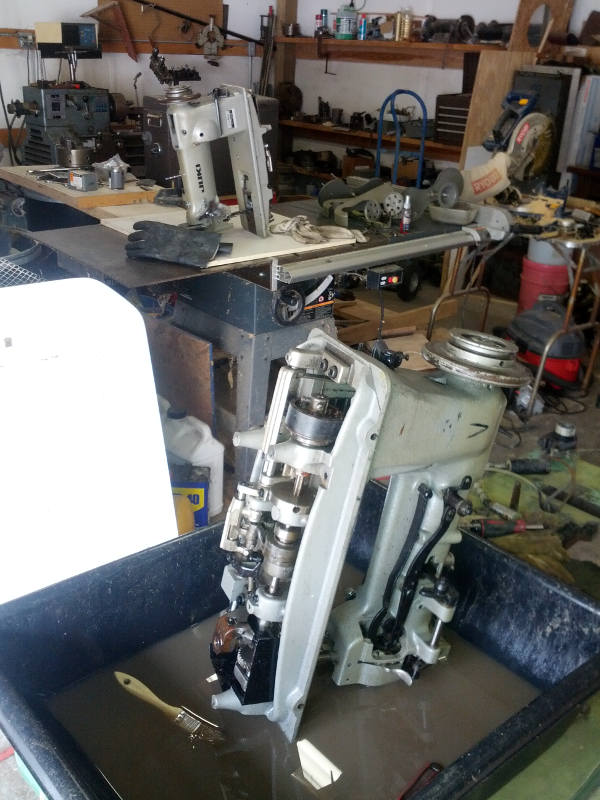
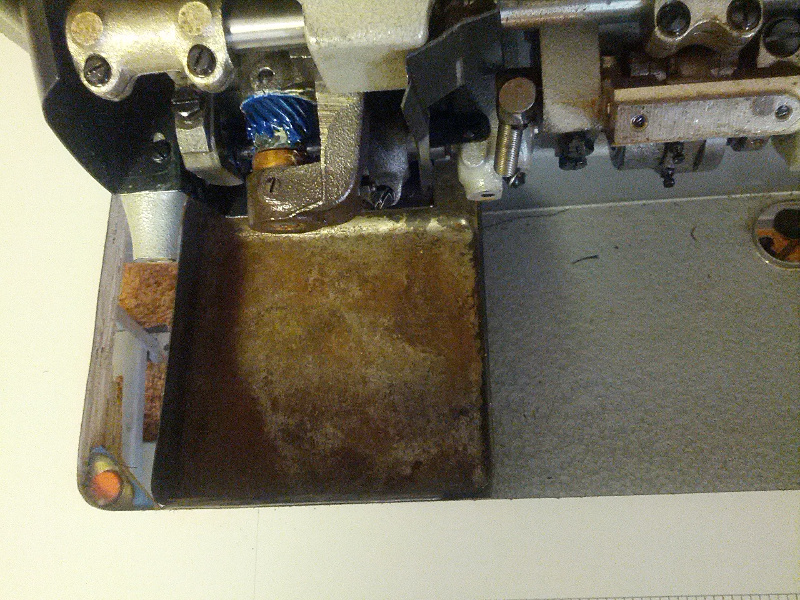
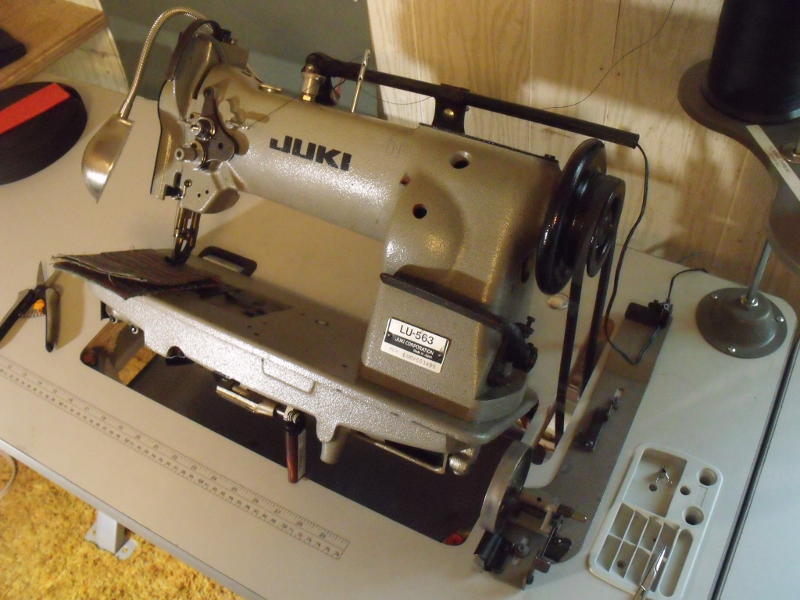
I bought a pair of 563's which had been set up for use in production....both had this original "reservoir" installed. The pan nails into place inside the drip pan, and directly under the hook shaft lower bushing. It contained a thick felt pad which was saturated with oil, kept at a level which allowed the spiral ground flutes on the gearshaft to draw oil up the shaft and keep the hook assembly lubed. The felts were still available the last time I inquired, but I don't use mine these days. The picture shows one of my old pans set into the approximate position they are used in....this is not the original table. In the second photo, you can see the upper "shroud" attached to the underside of the machine, which controlled slinging oil at high speeds. The table I'm using won't allow the pan to be correctly positioned without some mods. -DC

-
One of my last functioning synapses is insisting there may have been some subclass of the 335 (or a closely related casting) that HAD a 4-motion feed option, but I think its just a dodge to have way more Bailey's dumped in the decaf. -DC
-
That looks like a REALLY short stitch length for that size thread and a corresponding leather point needle....is it possible the "skipping" is actually the thread occasionally pulling up through the leather and "bridging" the previous stitch? A couple of millimeter's hesitance in the material feed would allow the needle to cut right thru the super short area between the piercings, particularly with a powerful machine, though I don't see a knot formed...... It may work on one lot of material, but not others. Just a thought. The other badly shaped stitch may be the knot acting funny if its is partially pulled up? Loads of variables, as usual. -DC
-
Its possible you were referring to the "small arm" cylinder arm mechanism (commonly called the Pfaff 335 style etc) vs. the large arm (Singer 153 etc). The small arm type doesn't have the "4-motion" or eliptical feed dog movement...rather it tracks front-to-back with the needle and inner foot, but does not lift and descend with each cycle. The feed dog does indeed move with the needle, powered by the same mechanism that makes the binder plate's motion "synchronous" with the feed dogs. The material is trapped under pressure between the inner foot and moving feed dog, and its surprisingly positive, as it does take a good bit of force to drag your binding and materials thru a right angle binder. Mine feeds like gangbusters when the binder specific needle plate, feed dog, and inner/outer foot set are replaced with the standard parts. The 335 accessories are available in any quality and price range you like. Virtually all "walking foot" machines have the needle and inner foot synched with the feed dog while the outer foot "jumps up and down" to hold your materials in place as the needle resets for the next stitch. Apologies if the type of machine you are referring to is built like the Singer model 78, which truly has "no lower feed". -DC
-
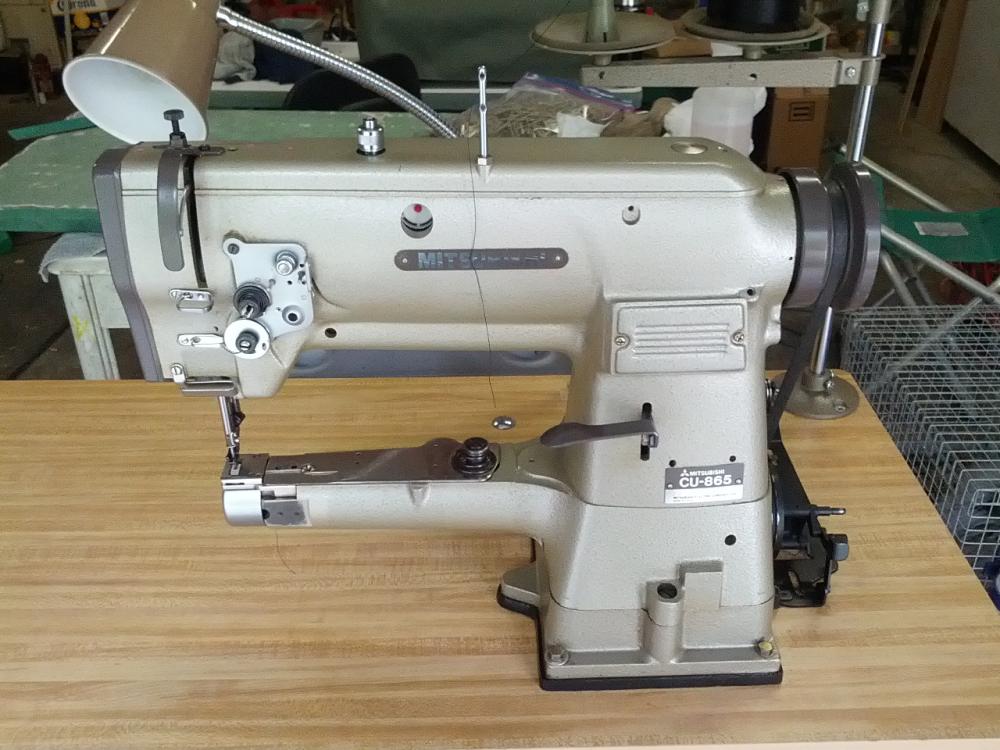
Another model worth a look (if you encounter one) is the Mitsubishi CU-865-22. It uses several of the synchronous binding accessories common to the Pfaff-335 type machines and has the larger *M* style bobbin. -DC
-
Most likely a rebadge, knockoff or clone of a Mitsubishi LS2-130. https://item.rakuten.co.jp/mishinkakaku117/fu-u1071_90327-14/ -DC
-
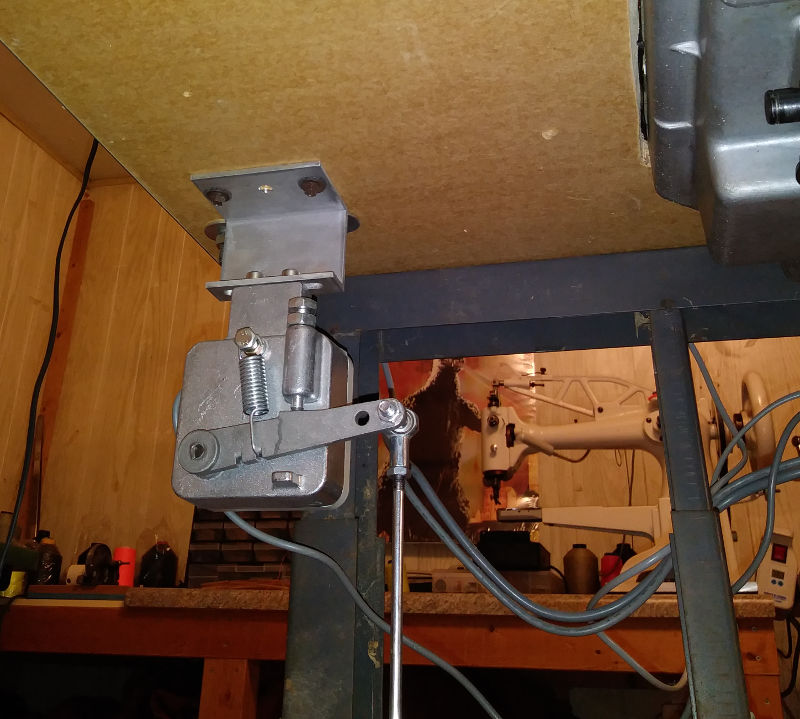
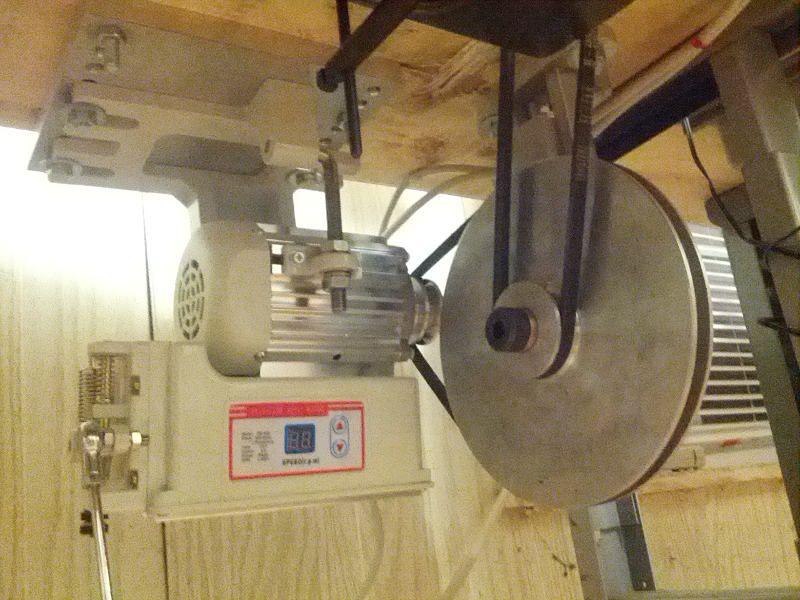
The main limiting factor I encountered when mounting a speed reducer/servo combo was the location of the stock motor's bolt hole pattern in a "regular" 21x48 industrial table. If you reused those holes for mounting your servo motor, it was nearly impossible to place the reducer pulley's mount far enough back to keep the large pulley on the reducer from actually interfering with the motor pulley, since to allow your machine head to tip back normally, the reducer pulley must be located in a position which places the centerline of its axle BEHIND the centerline of your machine's hinge pins. You actually need the pulley which has the belt driving your handwheel pulley to end up in about the same fore-and-aft location as the original stock clutch motor's pulley, in a nutshell. This lets you have the tilt feature and requires no modification of the table's belt slot for extra clearance. When using a "pedestal" mounted speed reducer of the type shown, the easiest solution was to make a motor mounting offset plate which attached to the 3 existing table bolt holes, and had a set of 3 tapped holes by which to attach your servo motor to the table in a new location. No one likes drilling more large holes in their table! -DC
-
I like these heavy poly mixing pans like this: https://www.lowes.com/pd/MacCourt-Drywall-Mud-Pans/1054711 Inexpensive, gives good splash containment, and quite strong enough to scoot a 75lb head around in with no danger of leaks.

-
Be sure to have a look at the video created by member Uwe- Nice visual walkthrough of several adjustment procedures, and a great accompaniment to the manuals. -DC
-
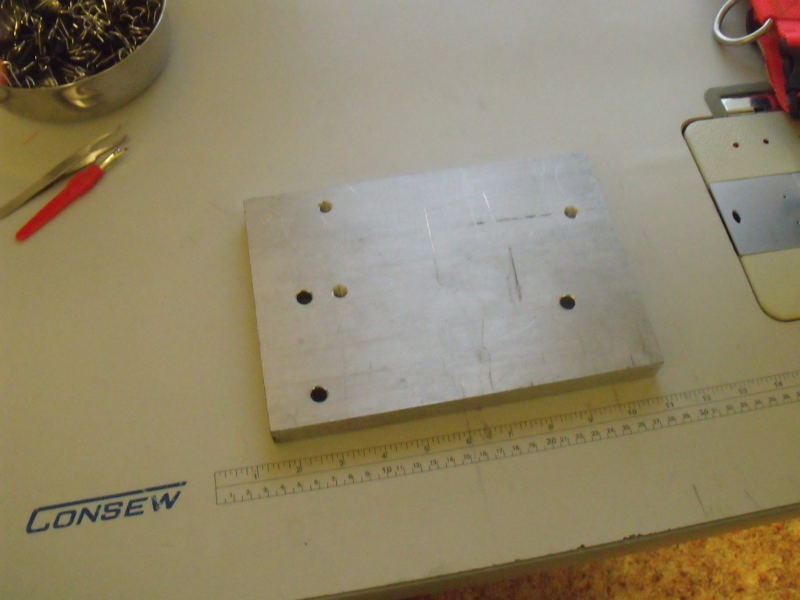
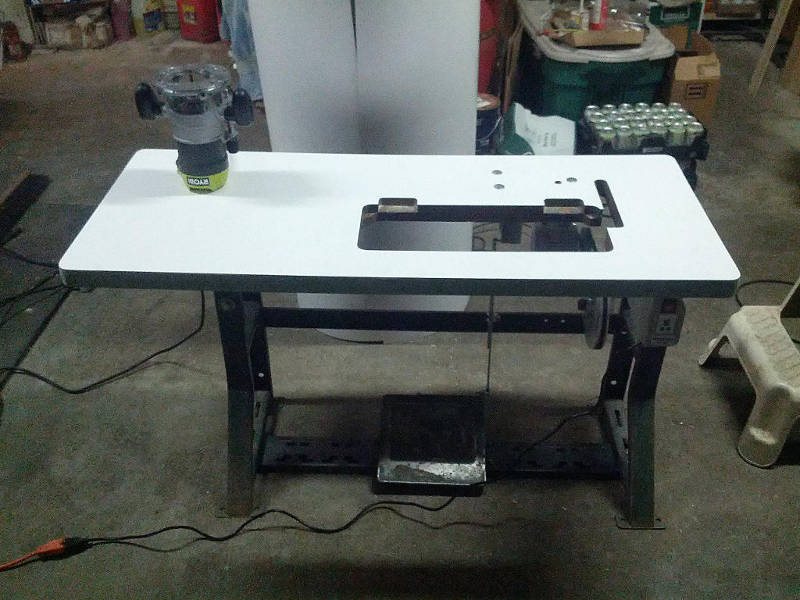
Since the topic of tables came up yet again, I thought I'd add my latest DIY effort in table top replacements. This machine came with an abbreviated "L" shaped top which was quite prone to catch larger draping items as they traveled across the surface. I was able to harvest a few desk bridging sections from our engineering dept. when they upgraded all their work stations...its some type of super high density compressed fiber product which comes with a good Formica-type surface and nice edge banding. They are slightly more compact in size at 23-1/2 X 42". I leaned on a friend to cut out a nice aluminum router template on the water jet.... Perfect inletting every time from now on. -DC


-
After some poor experiences with the "modern plywoods produced by some of our Asian trading partners", I've stuck with the old tables for my own use. As long as they are still straight and sound, they can be put back in top form with a bit of worthwhile effort. Block sand the surface perfectly flat with flooring sandpaper, fill in any gouges or other holes with an automotive body filler, and bond down a countertop grade HPL liike Formica in the color/pattern of your choice. The edge banding can be a problem, but it can be replaced if needed. -DC

-
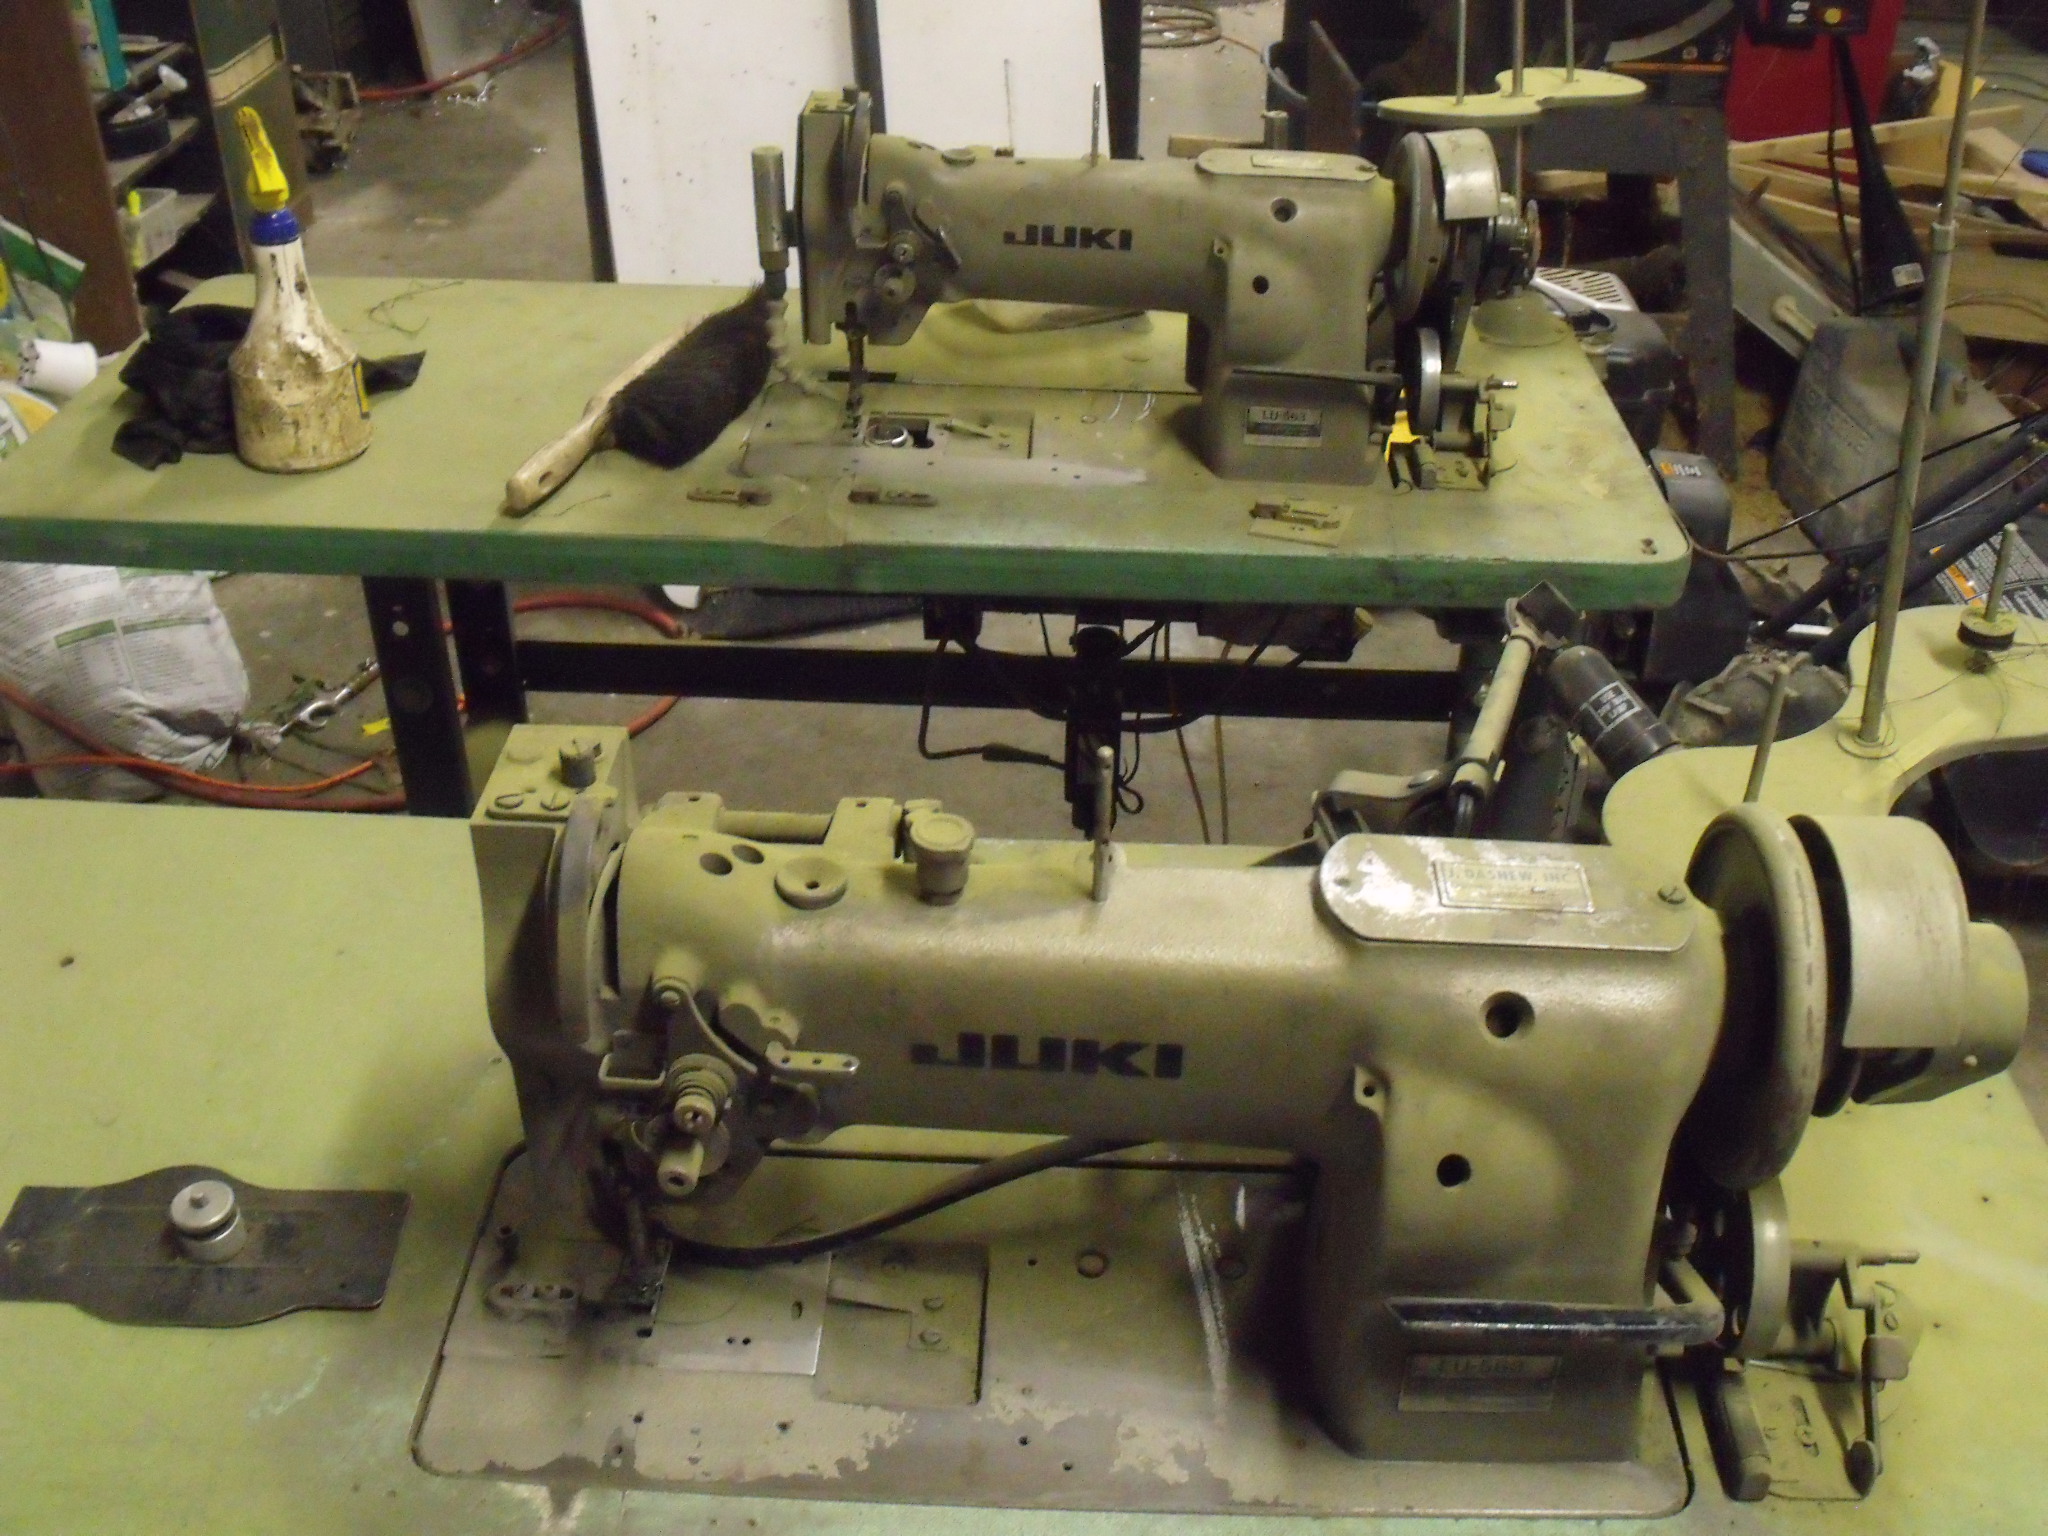
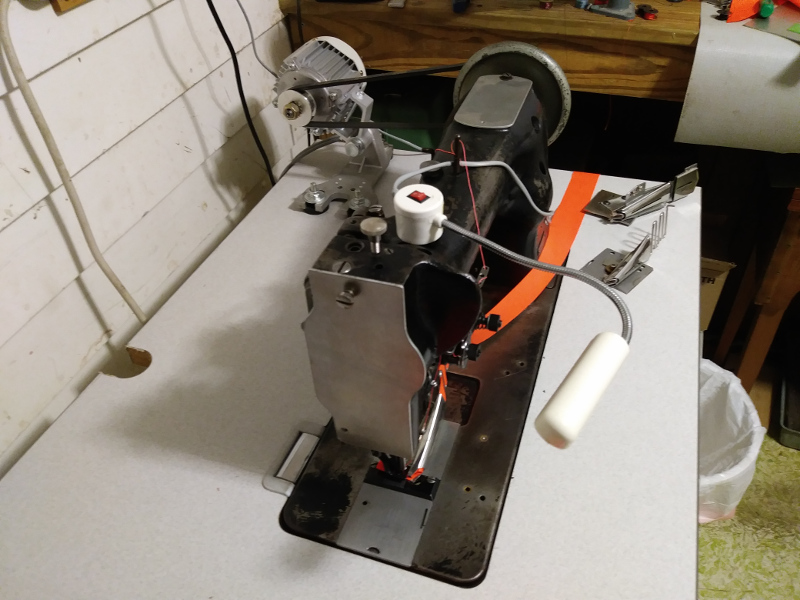
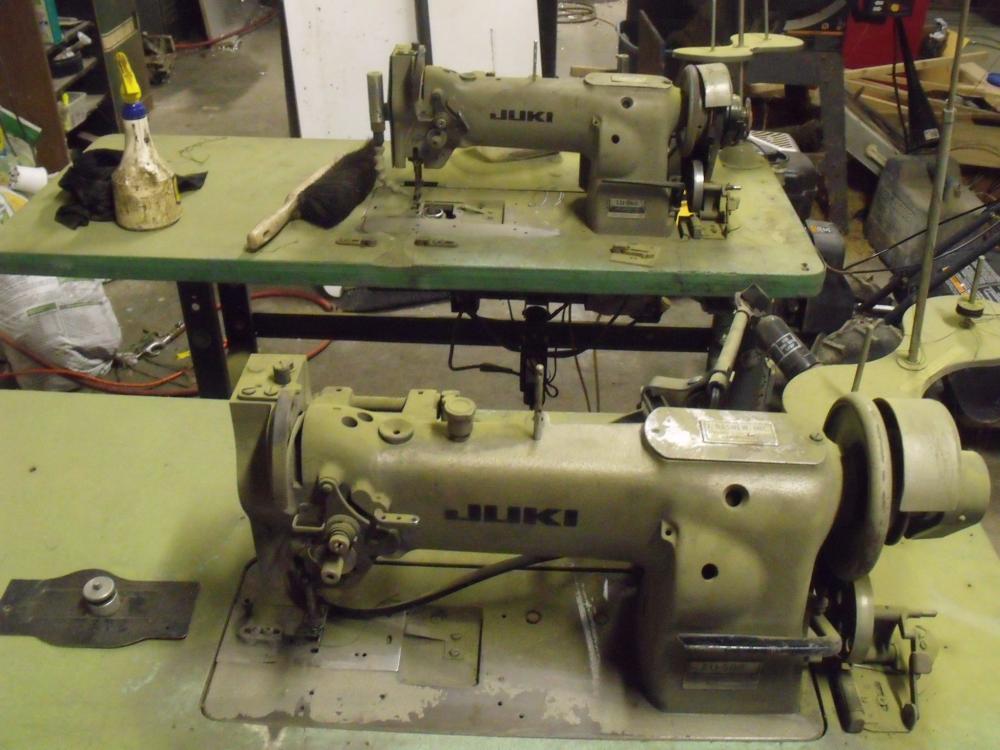
The 563 is a great machine. Here's what a pair of mine looked like when I bought them- and one after a bit of TLC.

-
I had thought about mixing a couple of the non-aerosol hammertone colors to hit this shade, but never "got around to it". The main problem I have run into with this particular spray product is......no one seems to have it in stock. -DC
-
The truth is out there....