.jpg.d60258221c476480a6e073a8805645bb.jpg)

TexasJack
-
Posts
765 -
Joined
-
Last visited
Content Type
Profiles
Forums
Events
Blogs
Gallery
Store
Everything posted by TexasJack
-

"Hand of God" holster tutorial.
TexasJack replied to Chakotay's topic in Gun Holsters, Rifle Slings and Knife Sheathes
Ghormley's tutorial is on leatherworker.net. Talented people who are willing to share their knowledge with others are special in my book. Will is one of the very best. -
Remington 1858 Holster.
TexasJack replied to Forester's topic in Gun Holsters, Rifle Slings and Knife Sheathes
The actual numbers are arguable because they were manufactured on both sides of the Mason/Dixon and some foreign countries, too. Somewhere I seem to recall that 100,000 Colt 1860's were made and 50,000 Remington 1858s. Allegedly a lot of them were thrown away during long marches. (As a friend of mine who served in Afghanistan told me, "There were days when I thought about cutting the buttons off my shirt to lighten the load.") -
Holster Finishes Test
TexasJack replied to wizard of tragacanth's topic in Gun Holsters, Rifle Slings and Knife Sheathes
I love when people take the time to field test stuff. Too often we get caught up in doing what we've "always done" or listening to someone's advice that may have no basis. Doing any kind of craft, you learn from your successes AND your failures. Good knife makers have thrown away at least dozens of blades, for example. I'm a little surprised that Sno Seal performed so miserably. I would have thought that a wax would perform well. -
Remington 1858 Holster.
TexasJack replied to Forester's topic in Gun Holsters, Rifle Slings and Knife Sheathes
That's a real beauty! Simple layout executed almost perfectly. The Remington 1858 was the second most common pistol of the American Civil War (after the Colt 1860). Clint Eastwood used one in the movie "Pale Rider". When you watch the movie, notice him reload by replacing the cylinder. -
Nice job
-
I'm in stitches !~
TexasJack replied to SShepherd's topic in Gun Holsters, Rifle Slings and Knife Sheathes
Nice job -
Knife sheath
TexasJack replied to Dave Richardson's topic in Gun Holsters, Rifle Slings and Knife Sheathes
Thanks to those who expanded on my comment and sent some photos to illustrate tapering the welt. A big reason people post on this forum is to get feedback and ideas that will help expand their own efforts in the future. Sometimes individuals will take comments in a negative way, but really this is how we learn and expand. -
Knife sheath
TexasJack replied to Dave Richardson's topic in Gun Holsters, Rifle Slings and Knife Sheathes
They look pretty nice, until the side view. Wow! Very thick! And all the layers show because you didn't finish the edge enough. If you skive the spacers at the top of the sheath, you can taper it so that it more tightly fits the thickness of the knife. -
Thumb Break snap protectors
TexasJack replied to HDL's topic in Gun Holsters, Rifle Slings and Knife Sheathes
BR549? You still remember that number?! I think Junior Samples kicked the bucket 30 years ago. -
FIF Knife Sheath
TexasJack replied to TexasJack's topic in Gun Holsters, Rifle Slings and Knife Sheathes
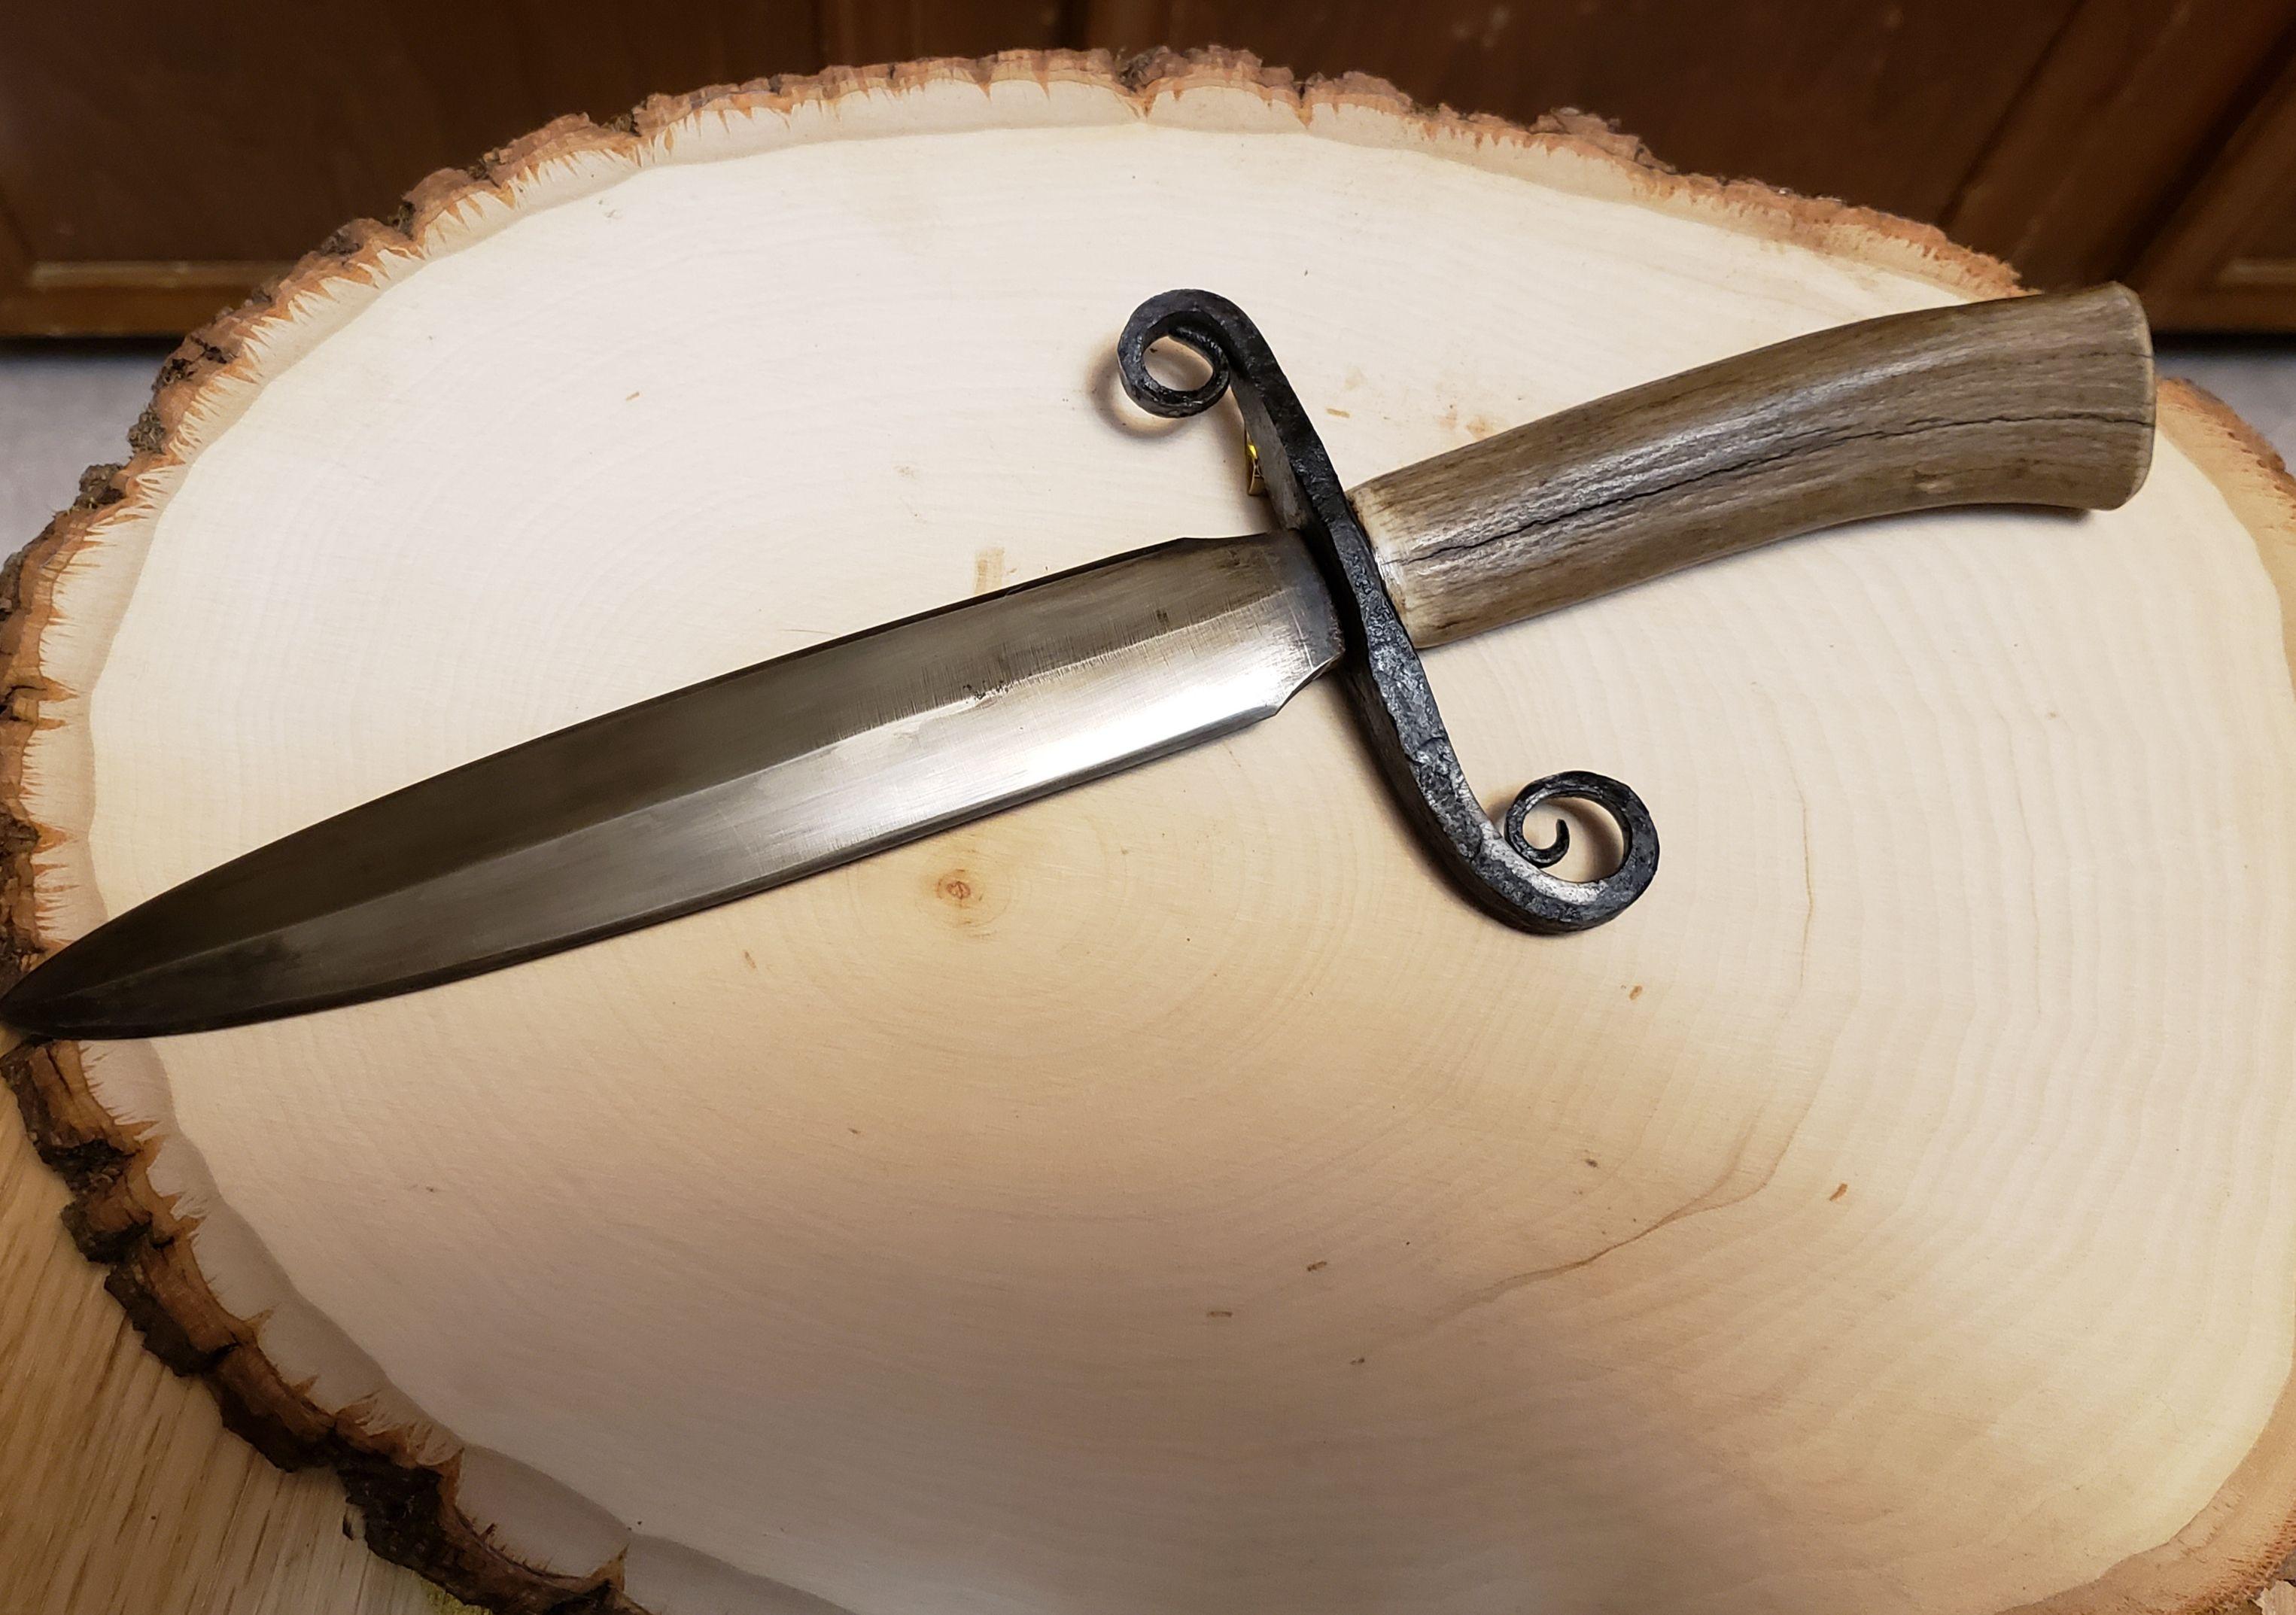
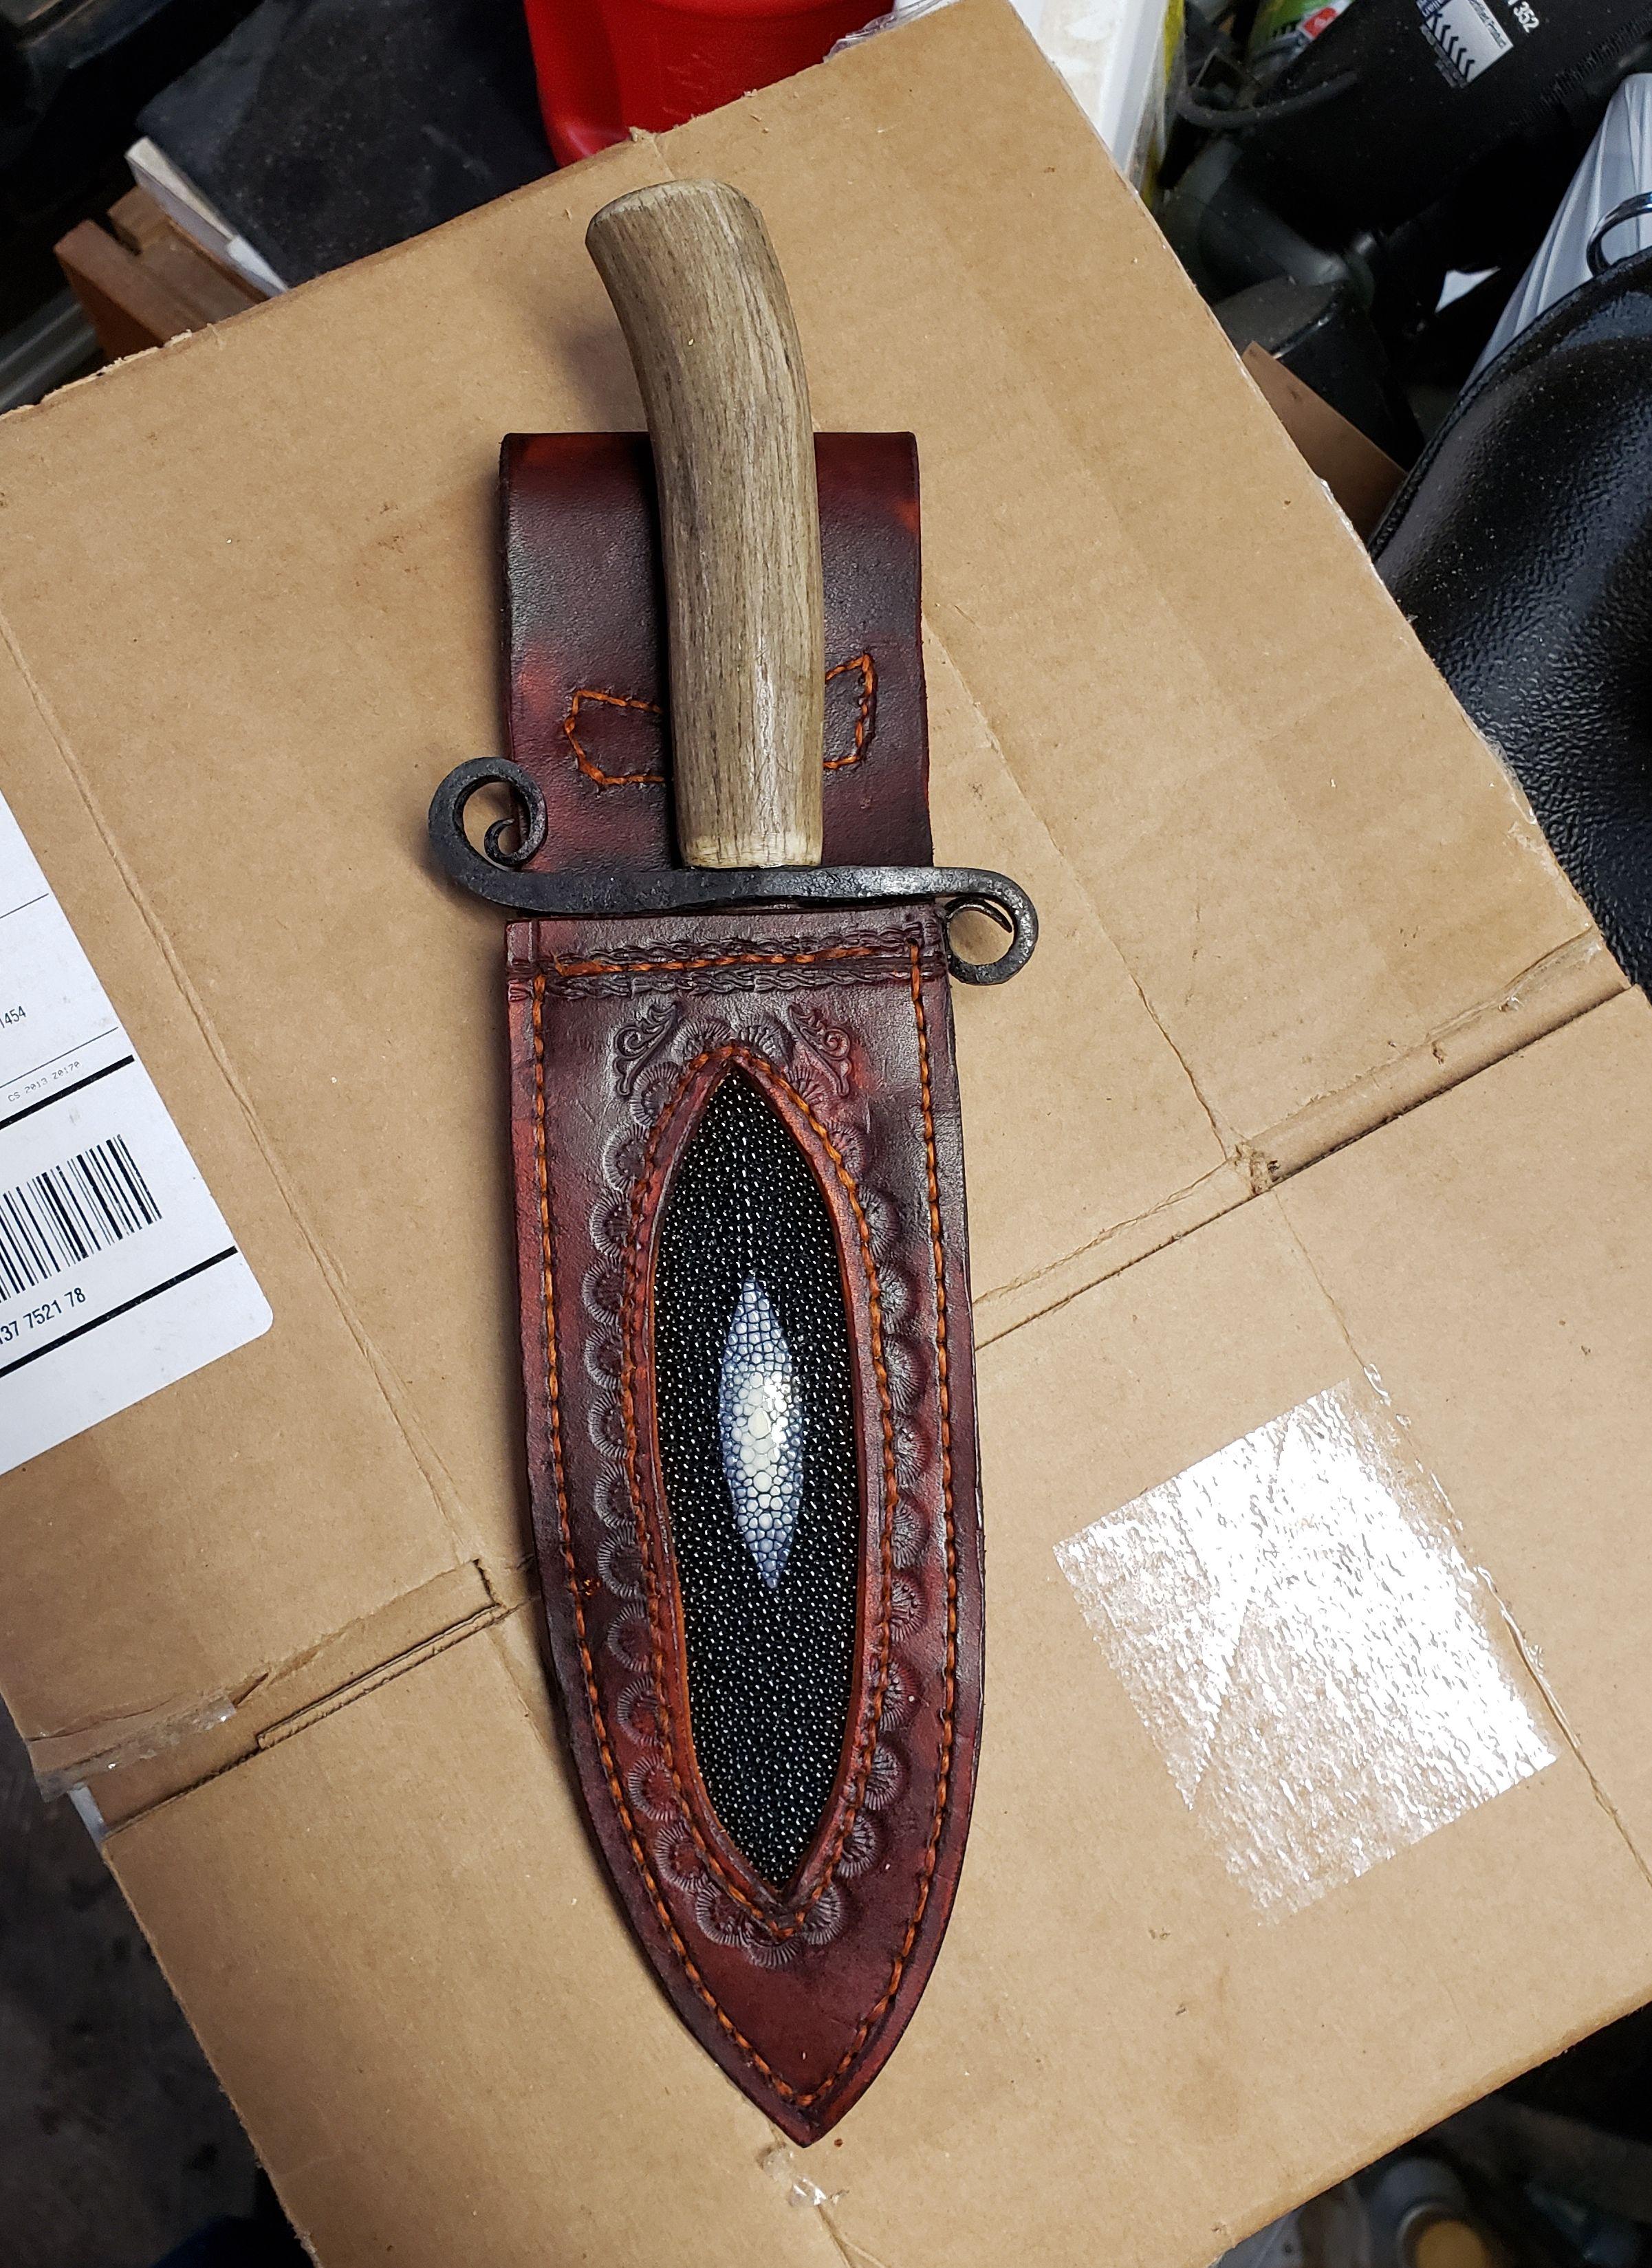
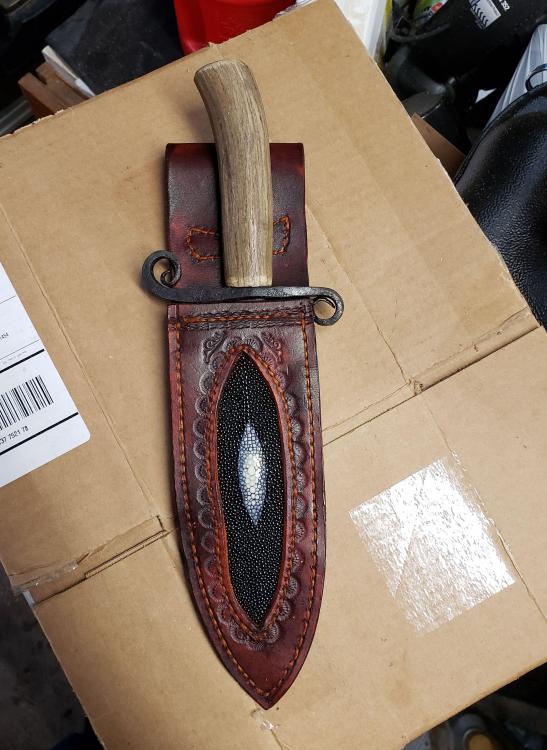
The knife is too pretty not to post! Made by Dustin Rhodes, FIF Season 4 Episode 2 winner (also Season 1, Episode 1 winner of Master of Arms). 9260 steel spring for the blade and 1018 mild steel for the guard. Stabilized elk tine handle. Blade is 7 1/8 inches long.
-
The smiths who have competed on the History Channel's Forged in Fire have an auction site on Facebook. I really liked this knife and managed to have the winning bid. However, it didn't come with a sheath, so it was time to dig out my leather tools and make one. I think that piece of stingray has been around for 10 years waiting to find a home. I think the next time I do one like this again (because of the large guard) that I'll probably use a frog.
-
I like it!
-
I think the late Chuck Burrows pointed out in one of his holster videos that dyes have solids in them that remain on the surface. If you don't let it dry and wipe them off thoroughly, they will end up in the top coating.
-
Nice job!
-
Huckleberry Rig pattern
TexasJack replied to Dorado's topic in Gun Holsters, Rifle Slings and Knife Sheathes
A good source would be to ask Will Ghormley, who is a member on here. I don't know if he did the Doc Holiday rigs, but he did some of the others, including Johnny Ringo's (which he described in detail on this forum). Here is someone selling a rig based on the movie rig. You might be better able to see the design in the picture than from the movie still. http://www.westernleatherholster.com/western-movie-holsters/ -
1911 White Lizard Holster
TexasJack replied to Boriqua's topic in Gun Holsters, Rifle Slings and Knife Sheathes
Very nice! -
So, let me ask this: If you look at the photo, what things would you do differently? Every new piece should be a learning experience. And it's probably better to discuss issues among friends, rather than among customers.
-
a speedy holster
TexasJack replied to Sblades76's topic in Gun Holsters, Rifle Slings and Knife Sheathes
Love it! -
Are expensive whet stones worth it?
TexasJack replied to Artificial Intelligence's topic in Sharpen it!
A great stone means nothing if you don't learn how to use it. Also, when you sharpen a knife, you wind up with what's referred to as a "wire edge", where there is a very thin amount of metal sticking out of the edge. It will feel sharp, but fold over and become dull quickly. To get rid of that, you use a leather strop after sharpening. Many people think they've failed at sharpening the knife, but don't realize that it's just that last step that's missing. As others pointed out, there are videos all over the place for sharpening. And they're free. Avoid the ones that are selling you sharpening devices. If you don't want to invest in stones, get a series of very fine sandpapers. (Some hardware stores sell it by the sheet.) Tape the sandpaper down on something VERY flat - steel or a piece of glass. (This is a technique woodworkers use called "scary sharp".) Start with the lowest grit - maybe 400 - and work your way up to the finest grit - say 1200 or 1500. Put oil on the sandpaper and it will make the process work better. Wipe ALL the grit off the knife before going to a finer paper. If you want to get really good at sharpening without screwing up your good craft knives, go in the kitchen and get all those dull knives out of the drawer. When all of your kitchen knives are razor sharp, you're ready for your good knives. -
1911 Western holster
TexasJack replied to TSes's topic in Gun Holsters, Rifle Slings and Knife Sheathes
Very nice! -
Nice job on the sheath, and there are some pretty accurate comments to consider. In my mind, the most important thing about a sheath is whether or not the construction will insure that it holds the knife and stays intact. I think you easily meet that goal. After that comes the various levels of "fit and finish". There's ALWAYS room to improve on that, no matter how many sheaths you make.
-
The thickness shouldn't be an issue. The design of the sheath will determine the "support" - i.e., how comfortably it will attach to a belt. Take a look around at some of the longer sheaths for ideas.
-
I just assumed he meant to type "platinum", not radium.
-
I'll unload what I know and then we can wait to see what the experts say. I put gum tragacanth on the back, let it set up a bit, then rub it smooth. The best way to have a smooth back is to glue (and sew) in another (usually thinner) piece of leather so that the 2 rough sides are glued together.
-
Makes sense. Including the "..more decorative than anything else.." part. Thanks! I don't know why this threw me for such a loop except that I have in my mind that buckles are meant to be stout enough to hold things together. The bar on this one is so thin that I may have to start over and use thinner leather - something that also works counter to my view of what a belt is for.