TwinOaks
-
Posts
4,513 -
Joined
-
Last visited
Content Type
Profiles
Forums
Events
Blogs
Gallery
Store
Everything posted by TwinOaks
-
You'll probably want advice on material from your side of the pond- I'm in the deep south in USA. As for offering DIY kits, I'd stay away from it unless you intend to become a supplier. Focus your efforts on the products you make, not here's a kit, now get busy. You'd sell yourself rather short if you offered product X, for one price and the kit to make one for 1/2 of that. If your intent is to become a leather supplier, then by all means do so, these are just my idea on things.
-
Great news Josh! I'm glad to hear that you're able to combine your two trades.
-
+1 to Ray's advice. Another thing to try...since you'll be practicing anyway....is to make a variety of items. When items begin selling, you'll know what to make more of. When possible, make accessory items, or items that lead to another. Check out Ray's blog on "selling sideways" for more pointers. Having different types of items in a wide range of prices also helps make spontaneous sales, as often times customers have money to spend but don't know what they want to buy. Give them some choices for small "nik-naks", key fobs, coaster sets, easy to make bracelets, etc. Things that help you practice essential skills (test new color mixes on something big enough to be a key fob), but don't take a lot of materials or time to produce.....i.e. high profit items.
-
Gluing to Latigo
TwinOaks replied to McJeep's topic in Dyes, Antiques, Stains, Glues, Waxes, Finishes and Conditioners.
If it's to be a truly permanent piece, how about cutting the tank bib to allow for mounting straps? Simply feed the strap(s) through one slot, under the bib, and wrap back around to a snap or buckle to secure the mounting point. That way you can get around having to try and rivet it, but still have the peace of mind knowing it won't go anywhere the bike doesn't. -
A little clarification: Block dying means wrapping a "block" or anything else with a good firm edge with a cloth and applying the dye to the cloth. Then the straight edge is pulled across the leather, so that any portion that is indented/bevelled/stamped/etc, (below the surface of the leather) doesn't get any dye.
-
ready to learn how to finish
TwinOaks replied to rccolt45's topic in Gun Holsters, Rifle Slings and Knife Sheathes
Not sure what resylin is, but I can answer the vinegaroon question. Vinegaroon is a common name for a brew made by soaking rustable metal in vinegar. After it all works itself out, the result is a lightly odiferous liquid that chemically reacts with the tannins in leather, turning it black....not dying it, chemically changing it. There's really several pages of info about it, so it's easier for me to say "type vinegaroon in the search window", than try to retype all of it. -
For intro level carving/stamping, you'd go good to start with something like a "basic 7" kit that Tandy sells. I'm not particularly endorsing Tandy, because I feel that the quality of their stamps has fallen off recently, but that type of set. Keep in mind that with a little creativity, each tool has a multitude of uses. Tilting a stamp produces different results, and who said you HAVE to hit it with a mallet? I use my bevellers and drag them, push with them, etc. For the other tools.... Good choice with the awl. It's not an "everything" model, but nothing ever is, and this will get you started. Nylon slicker- 50/50, you don't have to have it, but it does help round an edge. I made a folder/creaser/slicker with a $2 chunk of nice wood from Woodcraft by sanding to shape, and added a groove to the back of it. The groove starts wide, then narrows down, allowing different thickness of leather, depending on the angle I hold the tool. edge beveler- go middle of the road with the size. These tools (very) basically shave the corner off an edge. Pressure and angle will really effect how it cuts and it's better to make several passes with a small guage, than to cut a 45 deg. angle on the edge of the leather in one pass. Gum Trag- before buying this item, do a search for "burnishing" here on the forum. There's a few topics on it, and some great info (sp. thanks to Hidepounder) to get really good edges. If you're looking at very limited, getting your feet wet, type work you might check at some of the fabric stores (Joann, Hobby Lobby, Michaels, even Walmart) and see about their snap kits. They have a little anvil, and setters in the kit. They aren't fantastic, but they ARE functional. And they're cheap. Groover- If you're only going to be working close to an edge it's fine. If you're going to be stitching away from the edge, you might look for a free hand groover. Recently, I've gotten away from using them; I prefer to set a groove with a creaser/stylus to keep the grain intact. Among other things you'll likely need- Spraybottle- Dollar store variety works fine. You need to be able to mist your leather after casing to keep it moist. OR sponge- get a new one, just for leather. Don't use the one from the sink. A knife of some sort- Utility, Olfa (snap off blade), Exacto, etc. You'll need a knife that's exceptionally sharp. See next item. White or Red "rouge"- This is essentially a lapping compound, or whatever you'd like to call a very fine abrasive. It's used to further sharpen and polish your blades, 'cause out of the box 'razor sharp' isn't sharp enough. You apply it to a scrap of leather to make a strop. Any time the leather 'grabs' the blade, it's time to strop the blade. I routinely strop my razor knife between cuts. Also use on the awl blade. A compass- kid's version from 1st grade school supply will work. It's got all your circle sizes included. Straight edge- A steel ruler makes a great cutting guide for your knife. You can also use it to measure things. Something to measure angles- I've got some "drafting" triangles, and a protractor from way back. Good way to get square cuts. Also available in school supplies. Tracing paper- not essential, but handy if you're transferring patterns. Blue painter's tape- stick things down, but not forever. Some type of leather glue. I'd recommend a particular type, but it's not commonly available anymore, and that would start a thread hijack for which is best. Use the search function and do some reading, then decide which is best for your application. Sharpening device- self explanatory. Use it when stropping your knife and awl isn't doing the trick. Cutting surface- prevents resurfacing counter tops and tables. Stamping surface- Something heavy to absorb the impact of stamping. Helps keep double stamps and bouncing to a minimum. A lot of us use marble or granite slabs/chunks. Know anybody with a spare headstone? When you get your awl, determine how you'll be holding it, get the correct angle, mark where your thumb is, and make a flat/rough spot. That's an index for you to keep the awl in the same position. Lots of this stuff is available at stores other than leather suppliers. Look around a little and get the best deal for anything you don't already have. Post what you want to be working on and we can help narrow down the list. Keep asking questions, too. We're always glad to help. P.S. Please read the disclaimer on the main page. I'm not accountable for you getting addicted to leatherworking.
-
To me, the best reason (besides looking fantastic) for using an awl instead of a drill or punch is after stitching, the leather will close up around the thread. There's funtionality to this, not just a cosmetic side. When the leather closes up around the stitch, it helps keep out gunk and grit that can wear away the thread. Using machine stitching, there's no prepunched holes. The needle makes a path for the thread, and afterwards the leather can swell back around the thread, sealing the hole made by the needle. On the other hand, saddle stitching or lacing through a hole 3 times the size of the needle is a lot easier.
-
thumb break snap placement
TwinOaks replied to troop's topic in Gun Holsters, Rifle Slings and Knife Sheathes
The issue probably isn't so much the placement of the snap, but the stretch of the leather. Reinforcing the snap on the holster side of things, as opposed to the strap's snap, will make life easier. If you take a look at some models of holsters (and can see the back side) you might see a little metal tab. This provides leverage against the snap, allowing the user to open it without stretching the leather around it. You may be able to find the actual metal ones, but since I didn't want to order bulk quatities, I made mine out of kydex (thanks K-Man). It's pretty easy to do, just take a piece the right size (mine are the width of the snap and about 1.5-2 x the snap's diameter long. Drill a hole in one end and set the snap through it. If you have any problems with the tab swiveling, you can add another hole and a rivet. If you do multiple layer holsters, or line them, you can hide the tab between the layers. -
In this context, I'd think "perfect for upholstery" means that the machine will handle several layers of fabric, and sew at production speeds. Go over to "sewing leather" and do a search for "singer 111". Or google the model name/number. Most of these machines are similar to it- flatbed, walking foot, and I think the brother is a needle feed. AFAIK, the only real difference between a leather and regular walking foot is the one for leather is "dulled" so it doesn't leave tracks in the leather. Maybe some of them have rubber feet? All a walking foot does is help feed the material. Instead of trying to lift and move it (feed dogs) it more or less pinches it to move it. Can't help you on the speed rating, other than suggesting you get a motor that can chug along and provide torque at slow rpm instead of one that'll sew 5000 spm.
-
A phone call to Cobra Steve will have you straightened out pretty quickly.
-
I'm still pretty new-ish to braiding, but I found one of out member's websites to be an absolute treasure. Here's the URL to the page with the Spanish Ring: http://myriam.dakotabraiding.com/Tutorials...ing3Passes.html One of the biggest issues I've found is that various patterns for braids work on a set foundation, or a multiple of that. Ex: The ring shown above works wonderfully with four passes/bases/whatever you call the first steps where you cross/go over/cross....or with 8. Try it with 6 and the tail ends up on the wrong side of things. There's got to be a mathematical correlation there, based on the geometry of the braid.....but I'm not a math major. Something to do with topology (not topography).
-
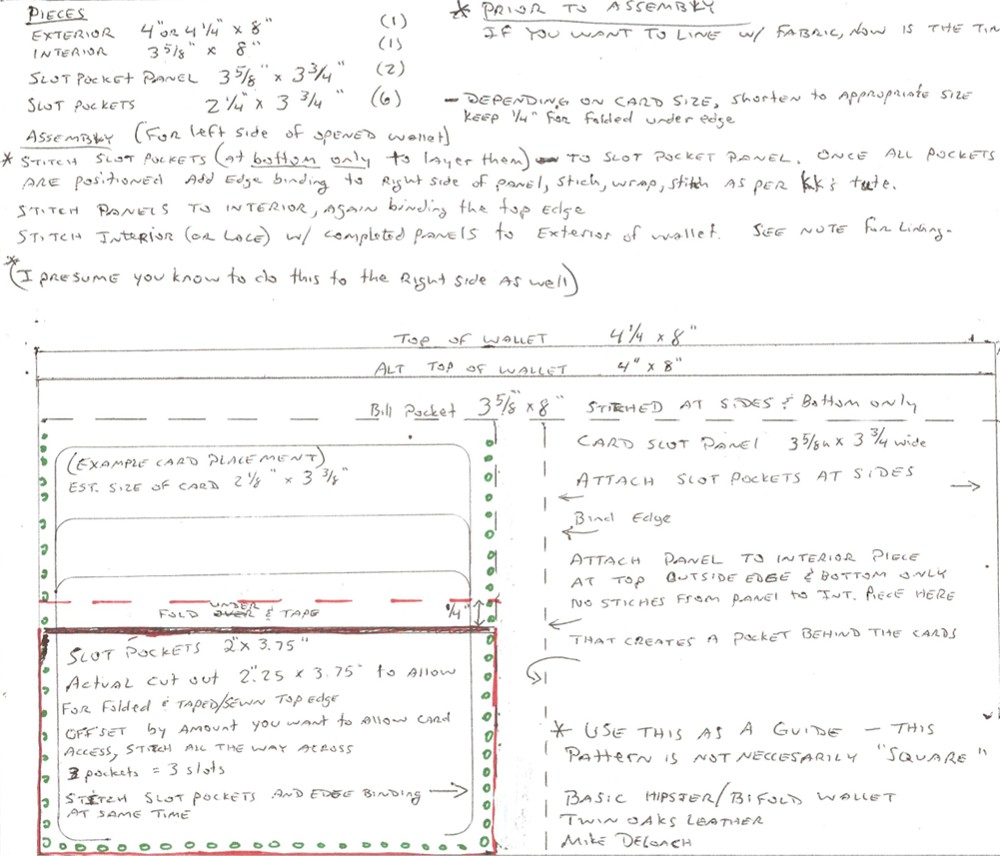
Instead of all the PMing..... NOTE: You can use the pattern for cut outs, but I suggest using it as a guide, and making your own measurements. This is done this way to show how things lay out. I don't really have a "pattern" for cutting out pieces.....just a method of construction that is heavily influenced by Kevin King. If you haven't checked out his tutorials, you need to. Now, if you want all that fancy stuff that KK does.....sorry, not my thing. If by chance you are not a doctor, pharmacist, or cryptographer, and can't read my writing, say so. There's a reason I've had to get good at typing.....
-
Good idea Noah, using multiple pieces and all. I'm just wondering if that style bag is suitable for pumps and heels....
-
Shorts, I hope I'm not overstating the obvious, but have you turned the speed down? IIRC, the servo motor that comes with the machine has a dial adjustable speed limiter. Set that low and let 'er rip...I mean sew. With the whole thing set at slow motion, you'll still benefit from machine sewing, but be able to work on the muscle memory of when to turn, how to guide, etc. I did something of the sort learning on my little machines....basically I hand cranked everything to learn how to hold, guide, and turn the project.
-
"Go to the task manager by right clicking in the task bar and choosing "Task Manager" from the menu" see, I told you I went around my elbow to get to my thumb.
-
With XP, it's as simple as 'ctrl+alt+del' which brings up a prompt with several options such as 'shutdown', 'log off', lock computer, etc. One of the options is "task manager"; click on it. That will open a small window that shows tabs for Applications, Processes, Performance, and Networking. Selecting a tab shows what's going on, in real time. Selecting Apps. shows the currently running applications. Select Processes shows all the stuff that runs in the back ground, and the memory usage for each. For example: I'm currently using IE7 (on purpose for this explanation) and it's using 91,678K. SYSTEM is using a bit over 66K, and there's several things using mid-20sK- those are the security progs., and other little things that make the computer.....umm....compute. A few times (when I had a crisis because I'd forgotten to turn on the protection) I've had some nasties get in the system. Everything bogged down so I checked the task mgr. By checking what was running, I found a prog. I'd never seen using up a HUGE amount of mem. So I ended the process. It came back. Aha! There was the problem, so I shut down, fired it back up on a live disk (linux), found the file(s) aka BUG, removed a few lines from it to keep it from running, then restarted windows and ran the security progs. That cleaned it out. Back on point....the task mgr. can let you see if something is eating up all the memory, whether it's a bug, or whether you forgot that you were compiling 3 million lines of code.... It's just a useful and easy way to see what's using memory, and how much of it. Yes, this could have easily been typed at the beginning, but what fun would that be? btw, after my little adventure, I found that I went around my elbow to get to my thumb. I know just enough about programming code to seriously wreck a computer on accident, so it's best to just get some good (free!) programs and have them run in the background, with daily scans, auto-updates, and make sure you have backups for your files in case you ever do what I did lose important data.
-
Hi and welcome to leatherworker.net!
-
Simple holster.
TwinOaks replied to CapableGuardian's topic in Gun Holsters, Rifle Slings and Knife Sheathes
Not bad at all! I wish my 3rd holster looked that nice... Here's something to consider- That looks very much like a mkIII 22/45, and if so, it probably has a big honkin' gut hook sight on the front, or maybe the fiber optic kind. That's going to interfere with the draw unless a sight channel is included. You can mold it, or sew it. (keeping it simple, folks) Here's a really easy way that I shared with (member) Freedom who runs 7xLeather. Do it backwards. Yep, just like it sounds. Put the folded portion of the leather at the trigger guard side of things. Don't worry, you can still stitch up where you need to for retention.....or put an adjustable tension washer there. What this does is move the "has to be done" seam to the top of the pistol. Sight channel? Add a welt (spacer strip) between the two halves when you sew it. Cut out for a scope? Easier to do here (I think) than try to get the notch lined up just so in the fold. It's also a whole lot easier to burnish the insides of the notch before assembly. -
Something else occurred to me... Several times I've had to 'clean out' all the files, cookies, etc. from the cache. (tools->internet options->delete browsing history.) This computer seems to get a little sluggish if I let it all build up too much. But before you do, make sure you remember all your passwords, b/c this will delete the cookies that say "here's my password". Another thing to do is open the task manager and see what programs and processes are running. If you've got one or two programs using a huge amount of memory (that shouldn't be) those would be the place to start. Possibly run a registry cleaner. Maybe throw in a defrag once you get everything else done.
-
First holster and need advice
TwinOaks replied to JoelR's topic in Gun Holsters, Rifle Slings and Knife Sheathes
Good to see you're making progress and the pics show you're doing a great job. Good burnishing is the result of lots of friction and pressure. Motorized is the way to go. One day, I'll even manage to get my edges looking like Hidepounder's. About the 'roon: Yes, it will get warm. There's a chemical reaction taking place, and temperature change is one of those indicators. It will also produce gas. Keep this in mind if you ever make it in a glass container. It isn't as easy to clean up as you might imagine..... To recondition the 'rooned leather, you'll need to heat it a bit. You can use a hair dryer, lots of hand pressure while rubbing, or an oven. When I use the brew, I wet form to the weapon and allow to partially dry so that it keeps the molding. Then I stuff the holster with paper towels (moisture wick) and place in my convection oven at ~140-150F for about 20 minutes. As soon as it's cool enough to not burn me, I rub in Aussie Conditioner, then let it sit for a few hours. A note about forming the holster on the pistol. As the leather dries, it may shrink just a little bit. The result is incredibly good retention....and a very slow draw. I've gotten around that by placing the pistol in a ziploc bag while the leather dries. Just that few thousandths of an inch is enough to allow a smoother draw, without compromising retention. Another thing I've done with good success is to spray the interior of the holster with 'dry-lube'. It's a spray on teflon lubricant. It really slicks up the interior. -
I'm running AVG8 on xp, and also have spybot (Search and Destroy). Between the two, I haven't had many problems.....except when I forgot to update and turn them on......don't ask.
-
Hi and welcome to Leatherworker.net. We're glad you found our little corner of the internet. There's lots of members, both amateurs and professionals, who'll be happy to help with any questions you might have. Ask away, and enjoy one of the friendliest sites on the 'net. BTW, great work that you've already done, thanks for the pics.
-
Holster Mouth Reinforcement
TwinOaks replied to RVM45's topic in Gun Holsters, Rifle Slings and Knife Sheathes
Agreed Dwight, I primarily use just leather. However, one of my customers wanted Kydex around the mouth of the holster.....so Kydex it was. Also, it doesn't hurt to know a little more about something is done so if one should ever get the request, one can make an item to a customer's specs. -
Hand stitching a Liner
TwinOaks replied to CharlieR's topic in Purses, Wallets, Belts and Miscellaneous Pocket Items
Just noticed you asked if there was a way.... Yes. Presumably you'll be saddle stitching; the way I do it is to back up a couple or three stitches and start there. If you're careful, you can hide the previous piece of thread under the new so it looks continuous.