Uwe
-
Posts
2,221 -
Joined
-
Last visited
Content Type
Profiles
Forums
Events
Blogs
Gallery
Store
Everything posted by Uwe
-
I hope you got a good price on this machine because the seller apparently did NOTHING to ensure the machine worked right before they sent it to you. Consew themselves are providing help in all the wrong ways. If you're following the how-to video Consew posted on YouTube, then you're playing russian roulette with the bobbin case - it' may work if you're lucky until it suddenly and inexplicably doesn't. The guy in the video does not know how to properly insert that bobbin case into the machine and he manages to get it exactly wrong at the 4:10 mark By coincidence I had made a video about what to watch out for when inserting the bobbin case in a machine with a horizontal axis hook very similar to yours.
-
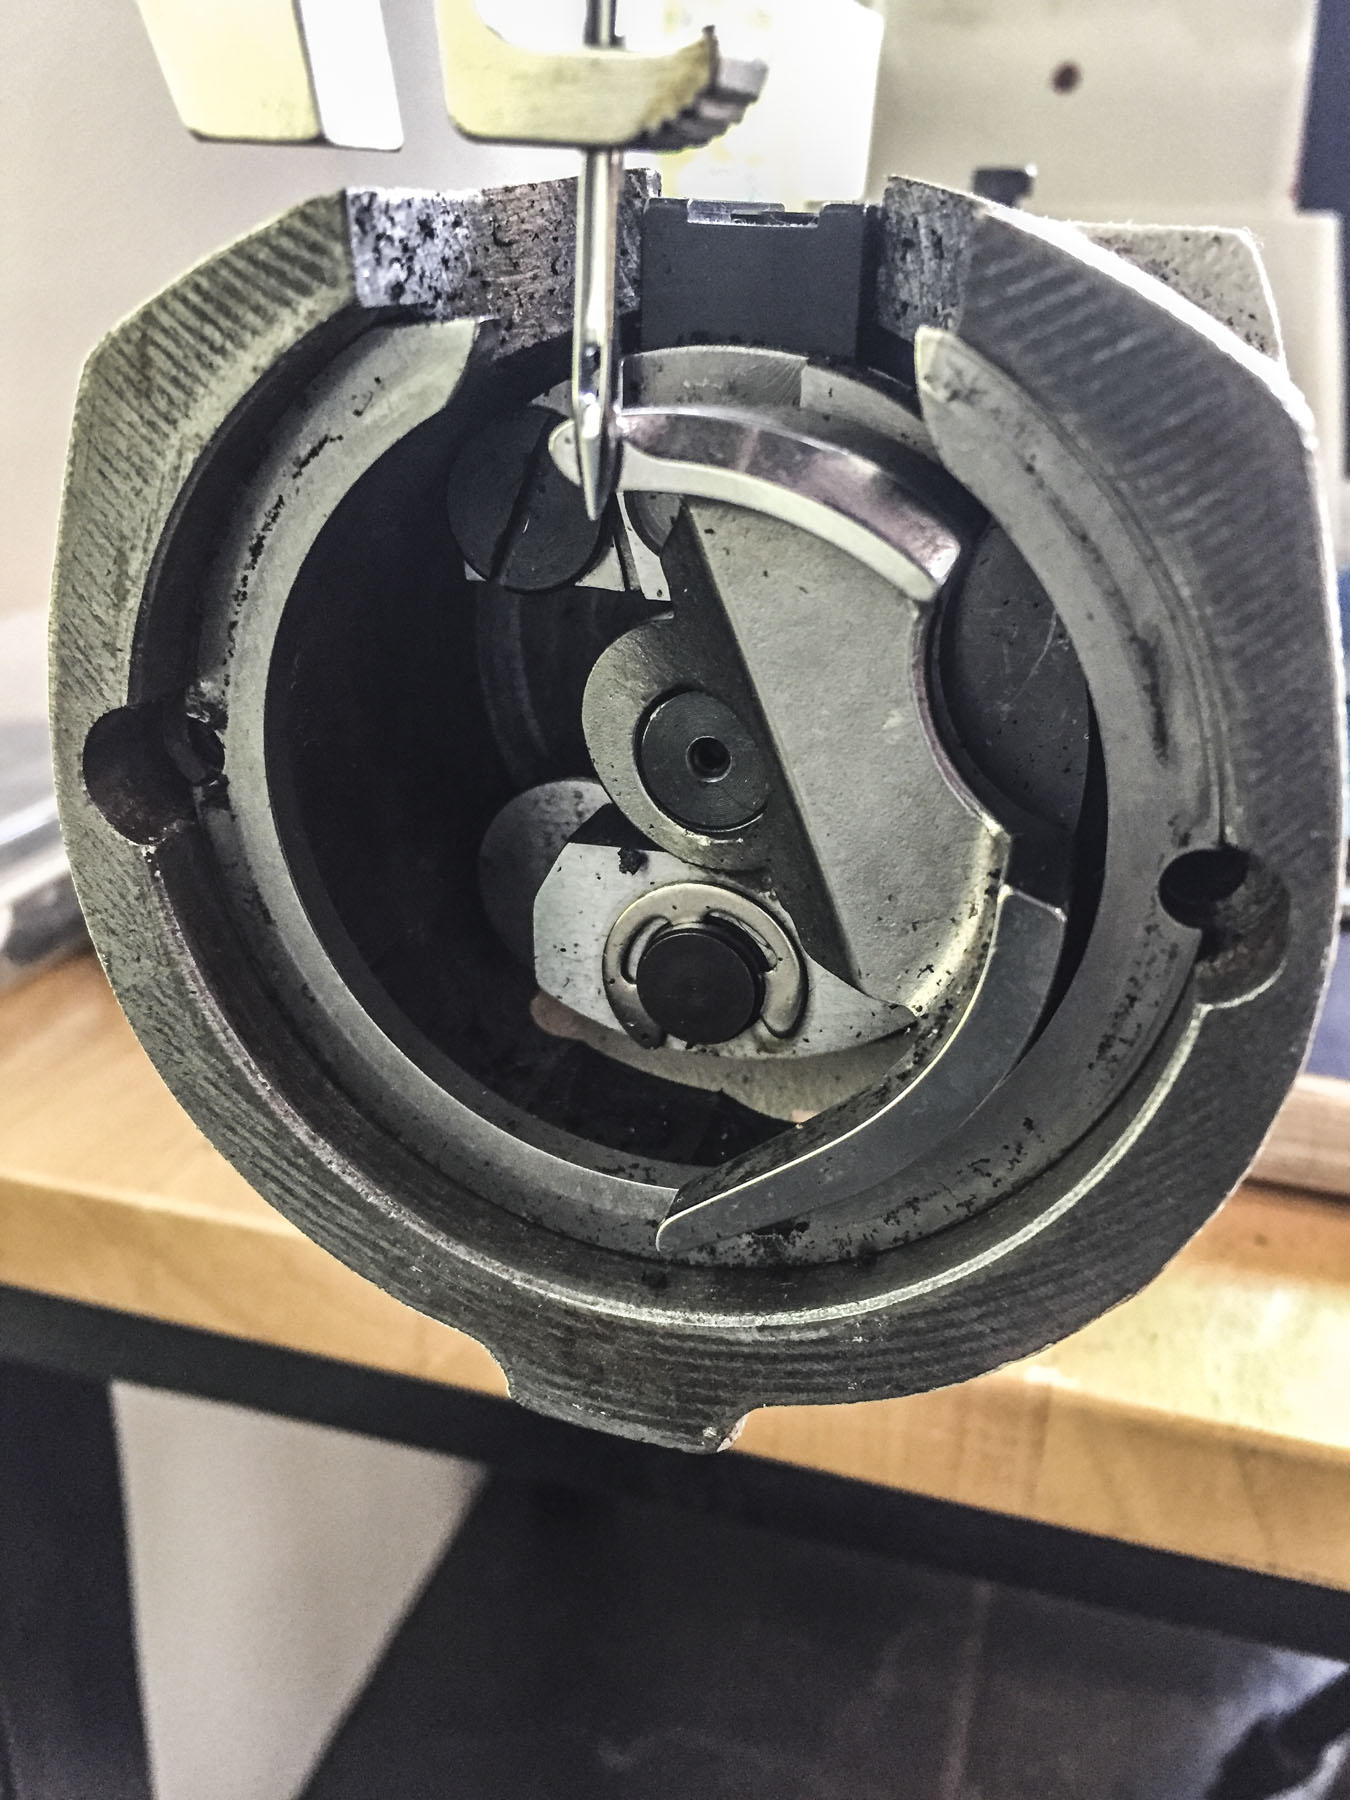
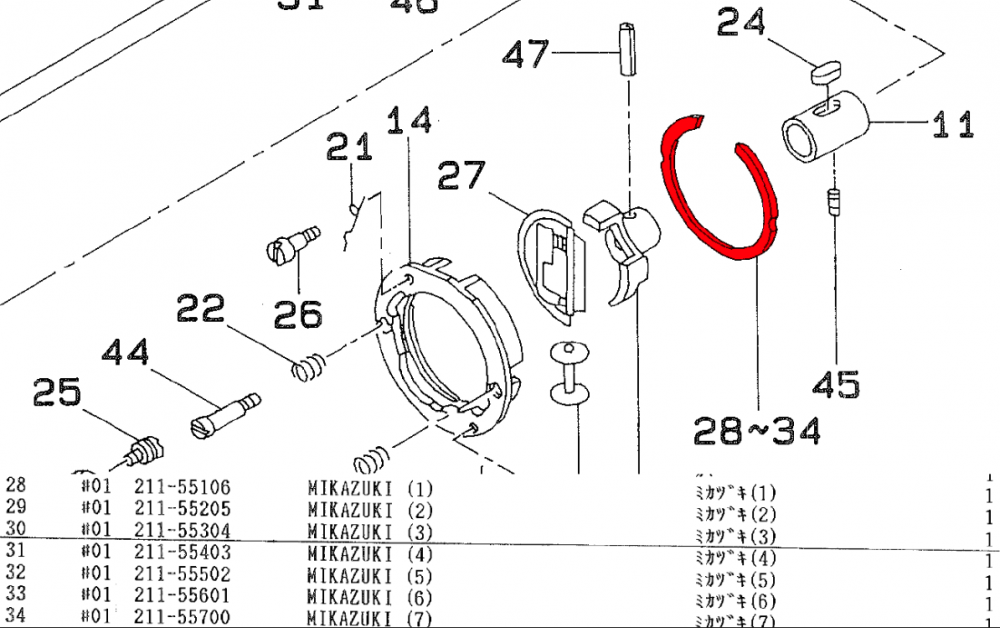
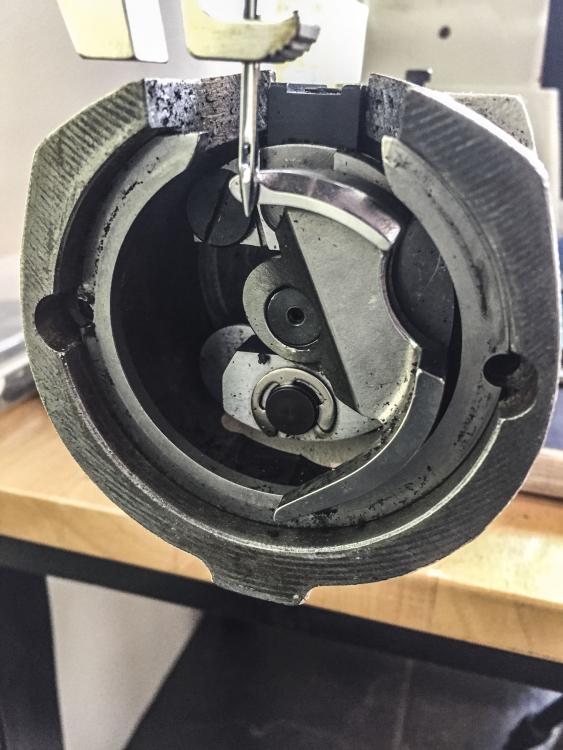
Your shuttle driver face looks quite worn in the needle guard area and the angled slope above it. Perhaps the needle comes down on the slope every single time and is deflected a large amount while it drags along the face of the shuttle driver. That constant friction metal on metal over a long time (and many premature needle deaths) may have worn your shuttle driver from a smooth face with rounded edges to a sharp knife-like edge that cuts thread. It's possible that your machine was somehow set up with a shuttle race back that is too thick, which made the hook touch the needle. Then, instead of installing the correct shuttle race back, somebody adjusted the shuttle driver position to push the needle away from the hook tip. But that's just a theory based on a single photo. To properly fix the problem, you may need to install the correct shuttle race back and also replace the worn shuttle driver itself. Installing the shuttle race back is relatively easy, replacing the shuttle driver may not be easy (I've not yet done it myself.) The parts may be hard to find and not exactly cheap. Plus, you don't even know yet exactly which of the seven shuttle race backs you need. At the factory they just have all of them available to choose from. Before you start ordering parts, make sure that what I described really is the problem. I'm just guessing based on a single picture and I've been wrong many times before. Here's the parts diagram again that shows the shuttle race back (the red open ring) that comes in seven different thicknesses. Juki uses it to set the hook position relative to the needle on the Juki TSC-441 design. Normally that's done at the factory and never needs to be changed. Here's another photo of my shuttle driver and needle from a slightly different angle:
-
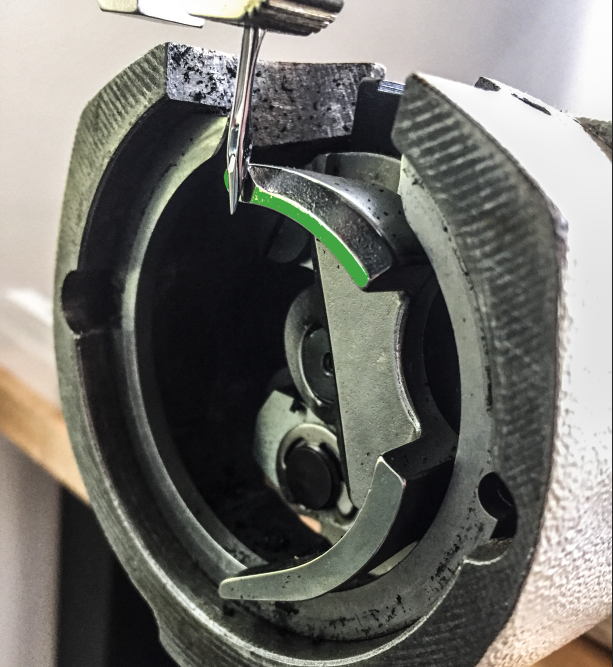
Here's a picture with just the needle and the shuttle driver. The green area on the shuttle driver is the needle guard which prevents the needle from coming too close to the tip of the hook. That green needle guard area on the shuttle driver is the ONLY part that is allowed to touch the needle, very lightly.
-

Filson Factory Auction Dozens of 211W151 Starting at $20
Uwe replied to JJN's topic in Leather Sewing Machines
If you want to help save the remaining Filson factories, shop here: https://www.filson.com/ -
What is this "fur/leather" this machine for?
Uwe replied to d72hemi's topic in Leather Sewing Machines
Here are two pictures of the Pfaff in that Ebay auction, just to preserve it for posterity here on LW. Auctions tend to disappear along with their pictures. It's for sewing fur and other "hairy" materials, similar to this Bonis: They can also be used for sewing certain operations on shoes, like the modern Strobel in this video (with annoying music) . . . and Neoprene: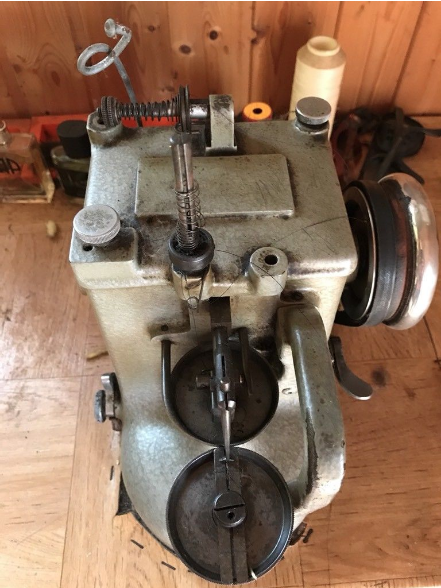
-
Filson Factory Auction Dozens of 211W151 Starting at $20
Uwe replied to JJN's topic in Leather Sewing Machines
Lots of interesting machinery in that auction. Unless you can pick up items in person within two days of the auction closing, it's best to figure out shipping options before placing a bid. Post Falls, Idaho is REALLY far away from places like Atlanta, Georgia. I wouldn't count on the auctioneer to be of much help with arranging shipping. -
Chances are it's not actually the throat plate's fault, but it's the easier and cheaper part to modify. The real cause may be the top of the hook not being as low as it should or the hook being too close to the throat plate due to a worn tip. The too-high hook could be due to slightly too-thick needle guard washer or the hook just being a tiny bit taller than the original. Half a millimeter or so can make all the difference. Make sure there's no thread bits stuck under the hook which may raise the hook's position a tiny bit when reinstalling. I made a video about removing and re-installing the Adler 67 series hook some time ago. The too-close hook may be due to a tip that was significantly worn. The hook may have been moved closer to the needle (and thus throat plate). On a new hook the pristine tip will stick out a little more and require you to move the hook away from the needle. That alone may open up the passageway between the hook and the throat plate enough to resolve the snagging thread issue. A worn and too-short hook tip may also require an advanced hook rotation to make it work, which in turn may bring a taller part of the hook close to the throat plate sooner than it should. It's all connected and sometimes it requires a series of fixes and adjustments. I've worked on machines that had multiple parts very worn and multiple adjustments made to compensate for that wear. When I install a new part that is to spec, things are suddenly too tight and all manner of problems manifest, setting off a cascade of adjustments and new parts.
-
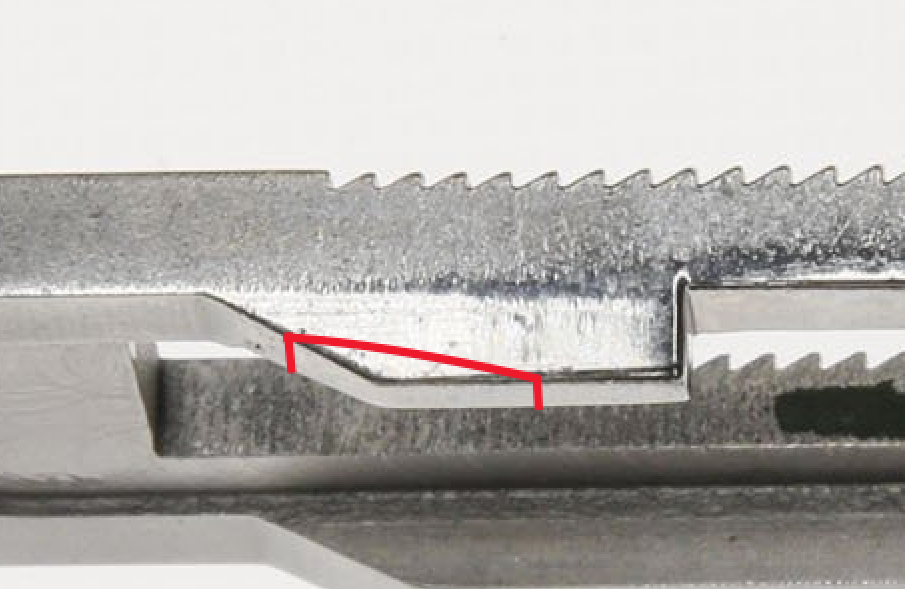
It looks like there's not enough of a gap between the hook and the throat plate. It's possible tolerances of aftermarket parts added up the wrong way. The hook is not original but I can't quite tell if the throat plate is. If the throat plate was inexpensive, it may be worth grinding a little (with a Dremel) and polishing a lot to enlarge the gap where the thread snags. It's important that this area is very smooth because the thread needs to slide past it without catching a burr or any other imperfection. You want very smooth, rounded edges there, not sharp machined corners. The OEM and worthy aftermarket parts are usually carefully polished in key areas. I marked up a picture of a throat plate to show the area I think may need to be inspected and potentially modified/polished on your throat plate.
-
Beautiful table @thesergeant, love the wood veneer pattern. Your camera work is just a nice. Some shots look like they're from a special issue of Elle Décor: "How to decorate with industrial sewing machines".
-
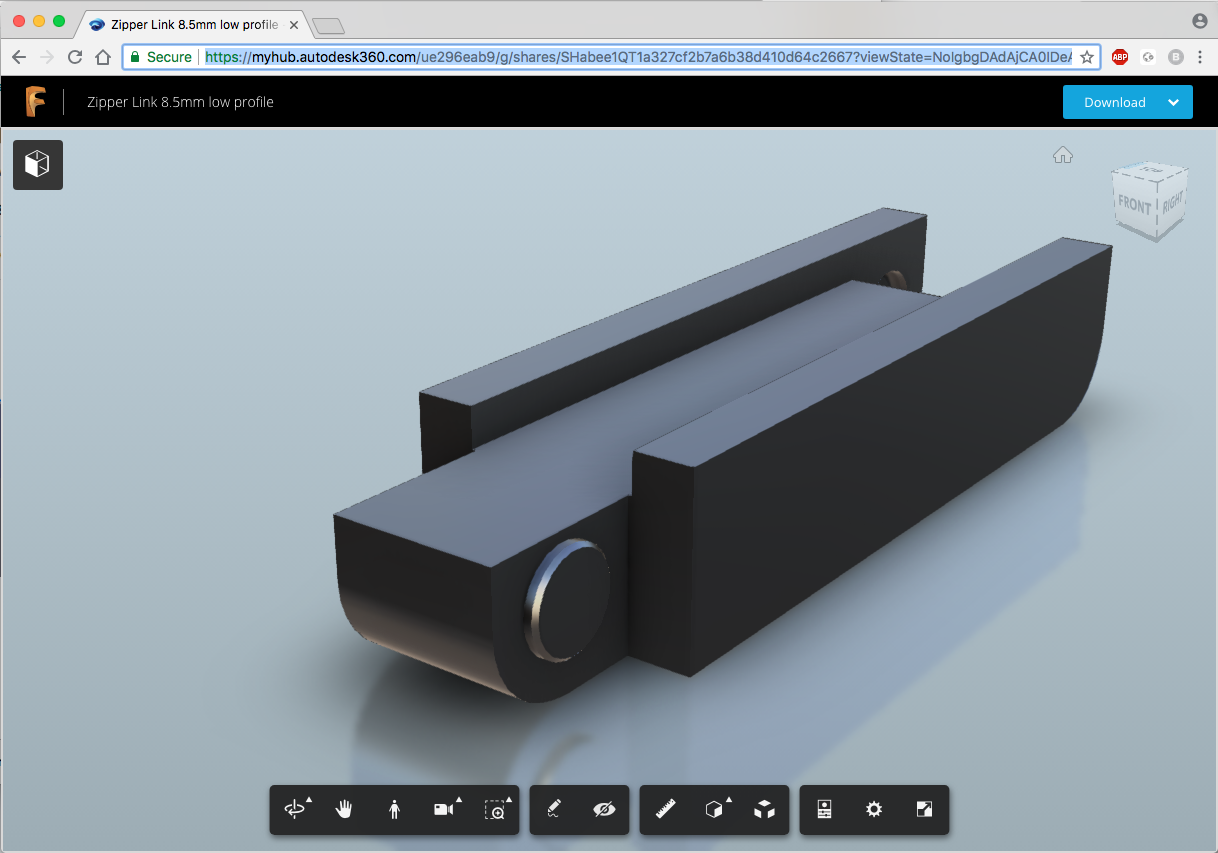
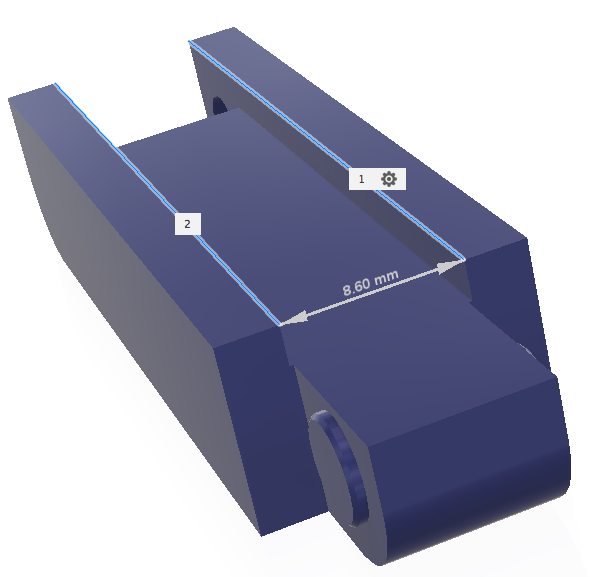
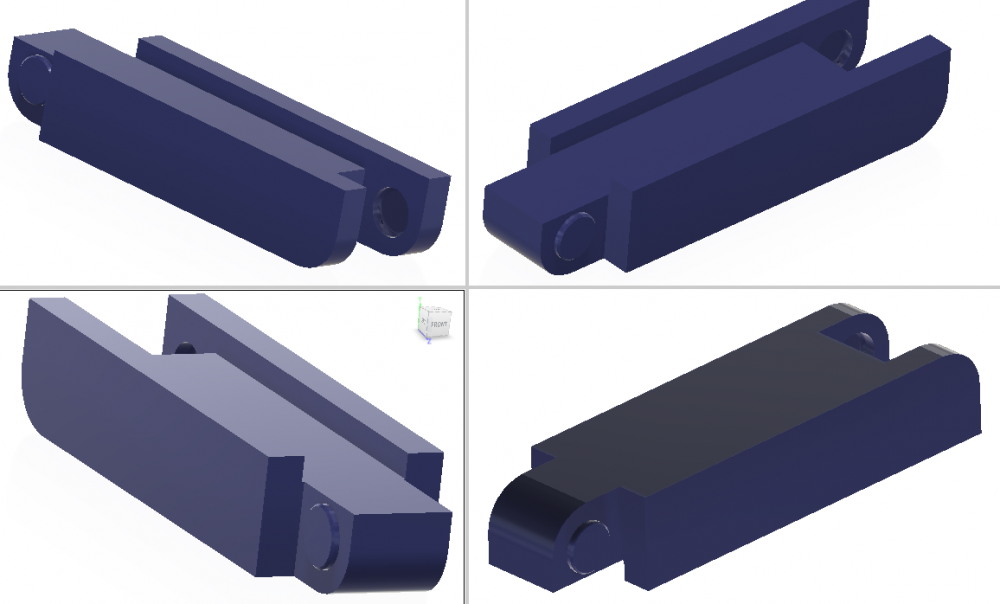
My part has a 8.6mm wide slot in the CAD model and my printed version ended up within 1/100th of a millimeter. Here's a public link to my Fusion 360 CAD file, in case anybody wants to inspect it or tinker with it: https://a360.co/2PeQpnd (this turns out to be a very cool browser interface for viewing the part. below is a screenshot on my Chrome browser)

-
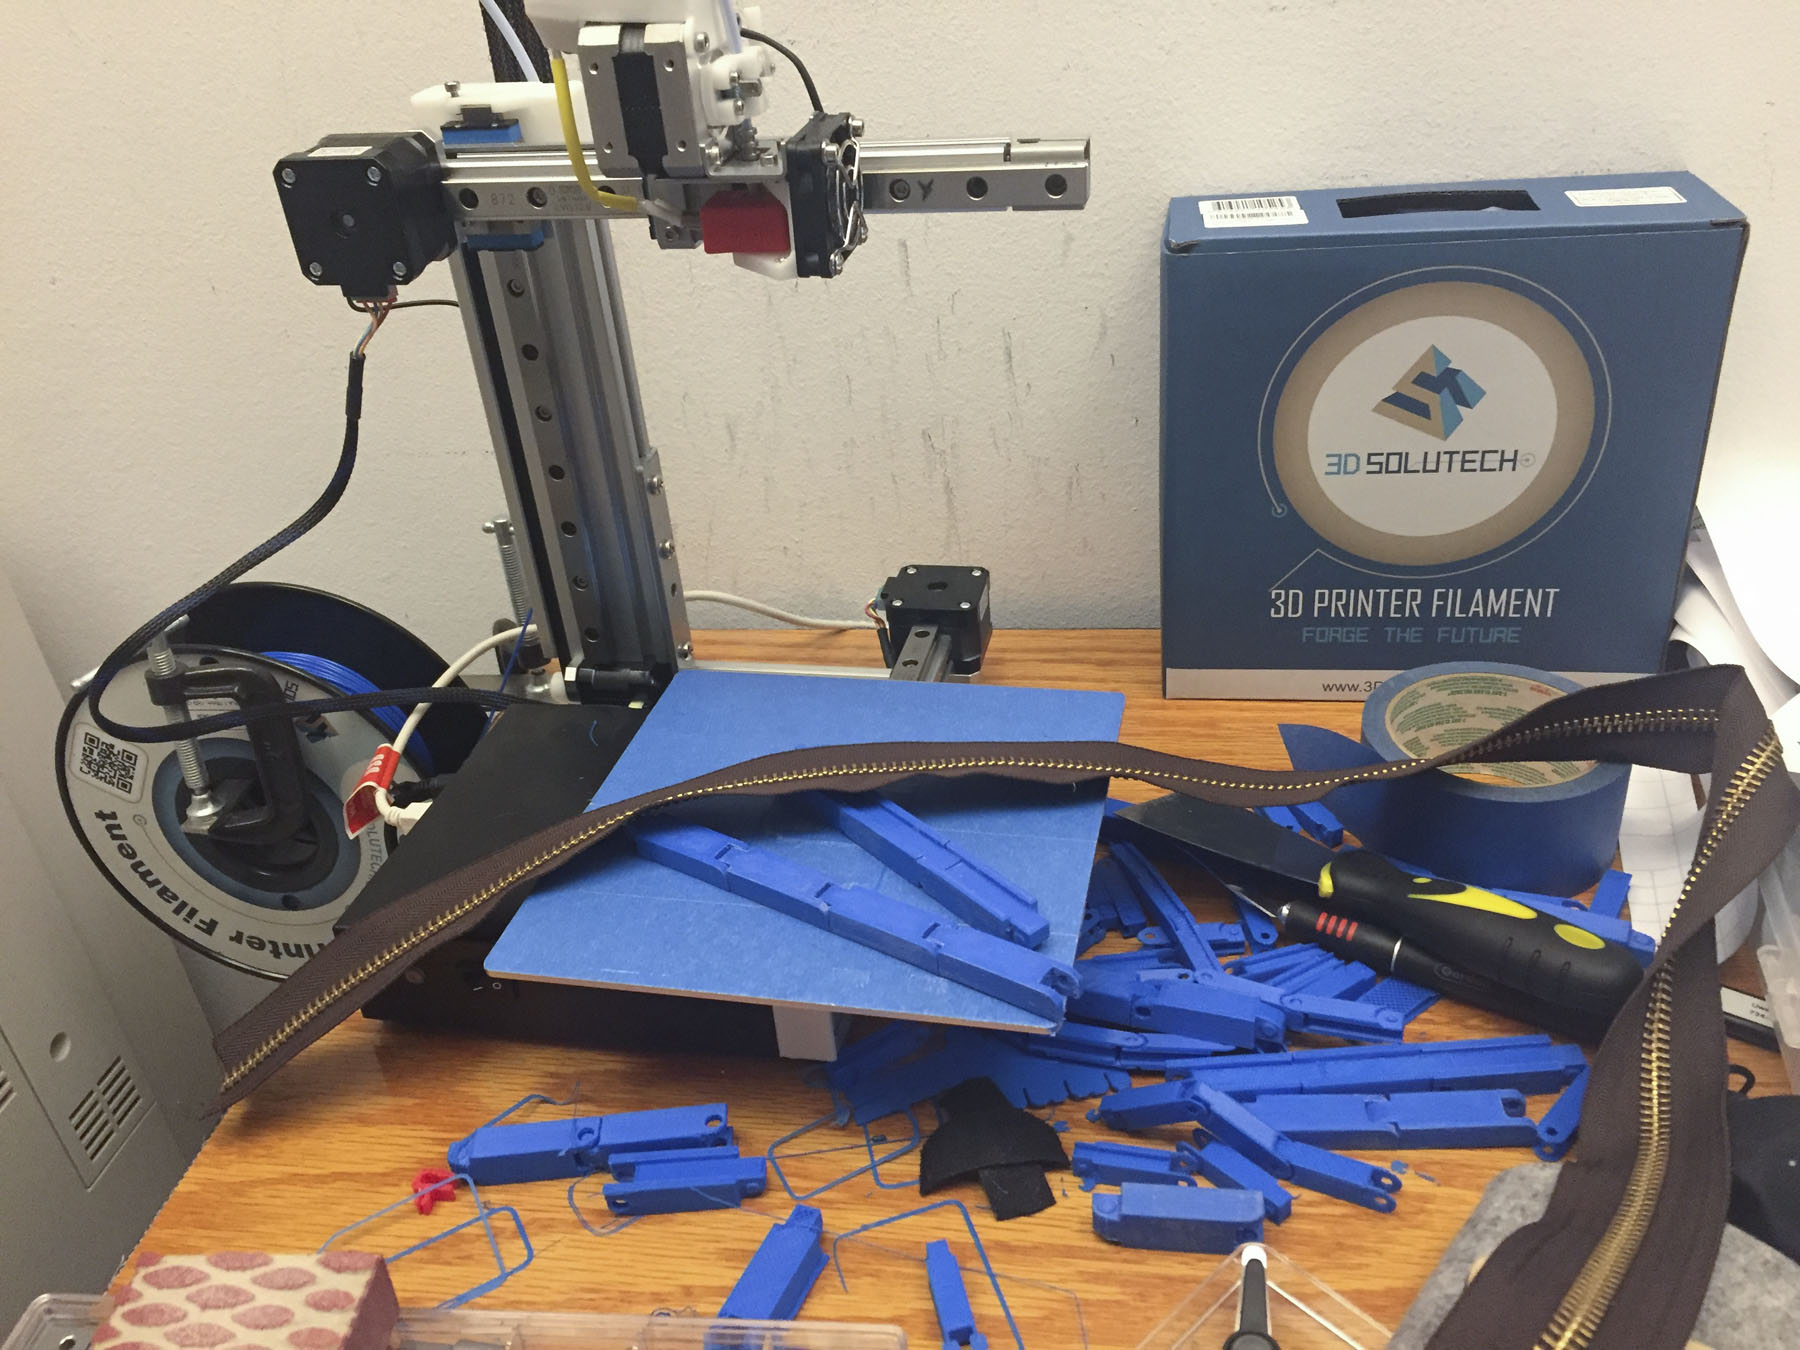
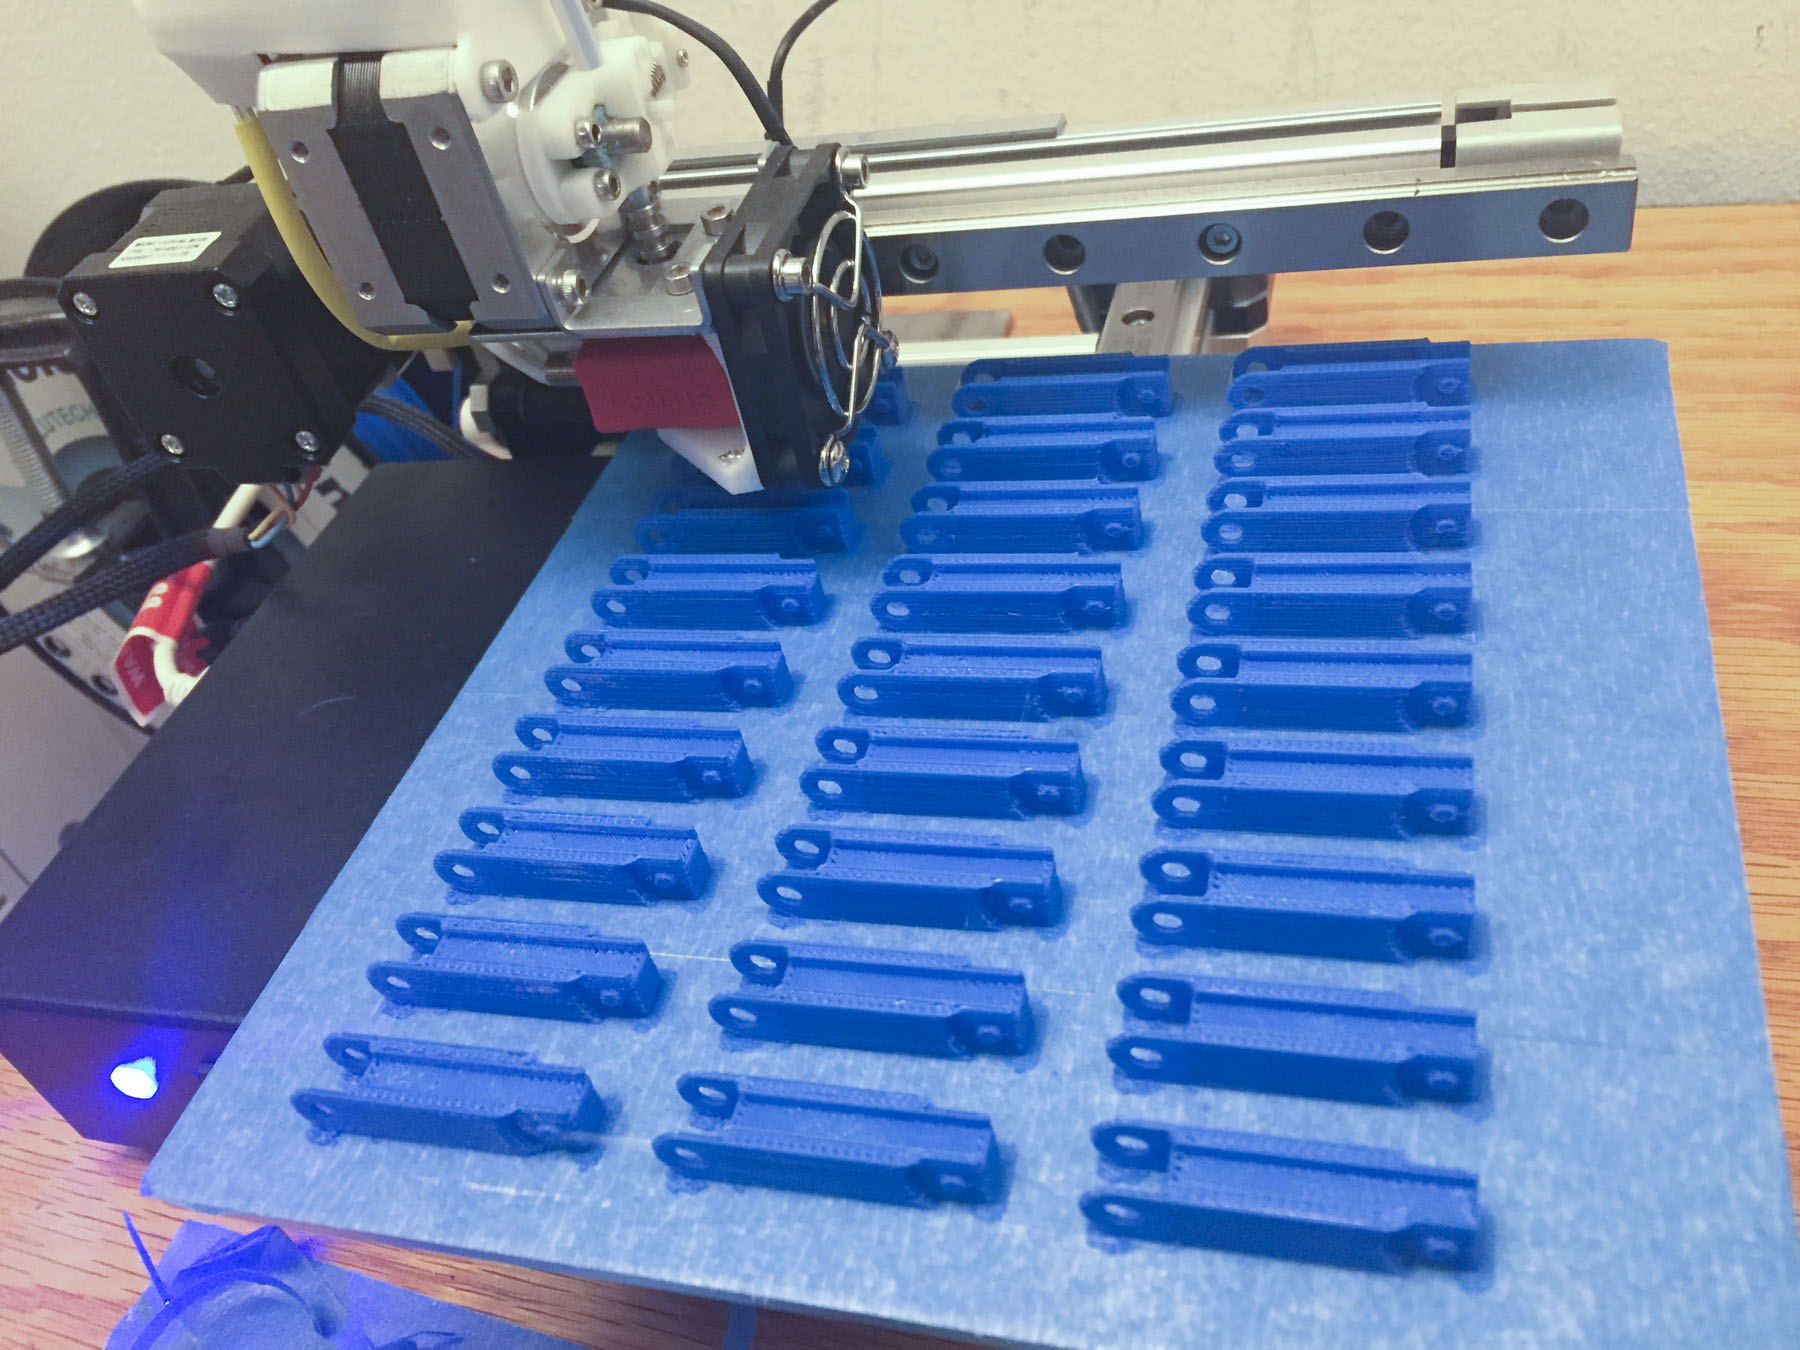
After spending several days testing, printing and exploring different slicing software (SLIC3R and Simplify3D) to produce G-Code, I managed to solve some key problems I had with my original 3D printer control software. My parts are now strong and precise. Unfortunately they still won't hold my YKK metal zipper. I dialed the dimensions to 1/10th of a millimeter, but no luck - either too loose or can't press the zipper in. Perhaps my parts are too rigid now. I had created a slight variation on the original design in my CAD program so that I could control dimensions of the part and the STL file precisely. I'm not a zipper expert and the zipper display at my local fabric store was quite overwhelming, and they don't even carry YKK or Riri zippers. My local Tandy Leather was locking the doors as I was pulling up - I think it was because they were closing anyways. In my experience, a single STL file can produce dozens of slightly different parts, depending on which printer, which slicing software, and which print settings you use. I couldn't even get my parts to work properly for one single zipper in three days, let alone for a dizzying array of zippers available commercially. It sure looks pretty in my Fusion 360 CAD software: So, kudos to @RockyAussie for inventing the part and actually making it work for his zippers, and thanks for giving me a shout-out. Alas, making a product that is suitable for sale is not as simple as it seemed at first. I'm not convinced that I can produce this part in a quality that folks would consistently be happy with, so I decided I won't try to sell them. I'm attaching the STL file (Zipper Guide low profile 8.6mm.stl) of the modified part I used (sized for my 8.6mm YKK metal zipper) If somebody can make it work for them, go for it.
-
A couple of factory fires and the occasional world war is what happened, in a nutshell.
-
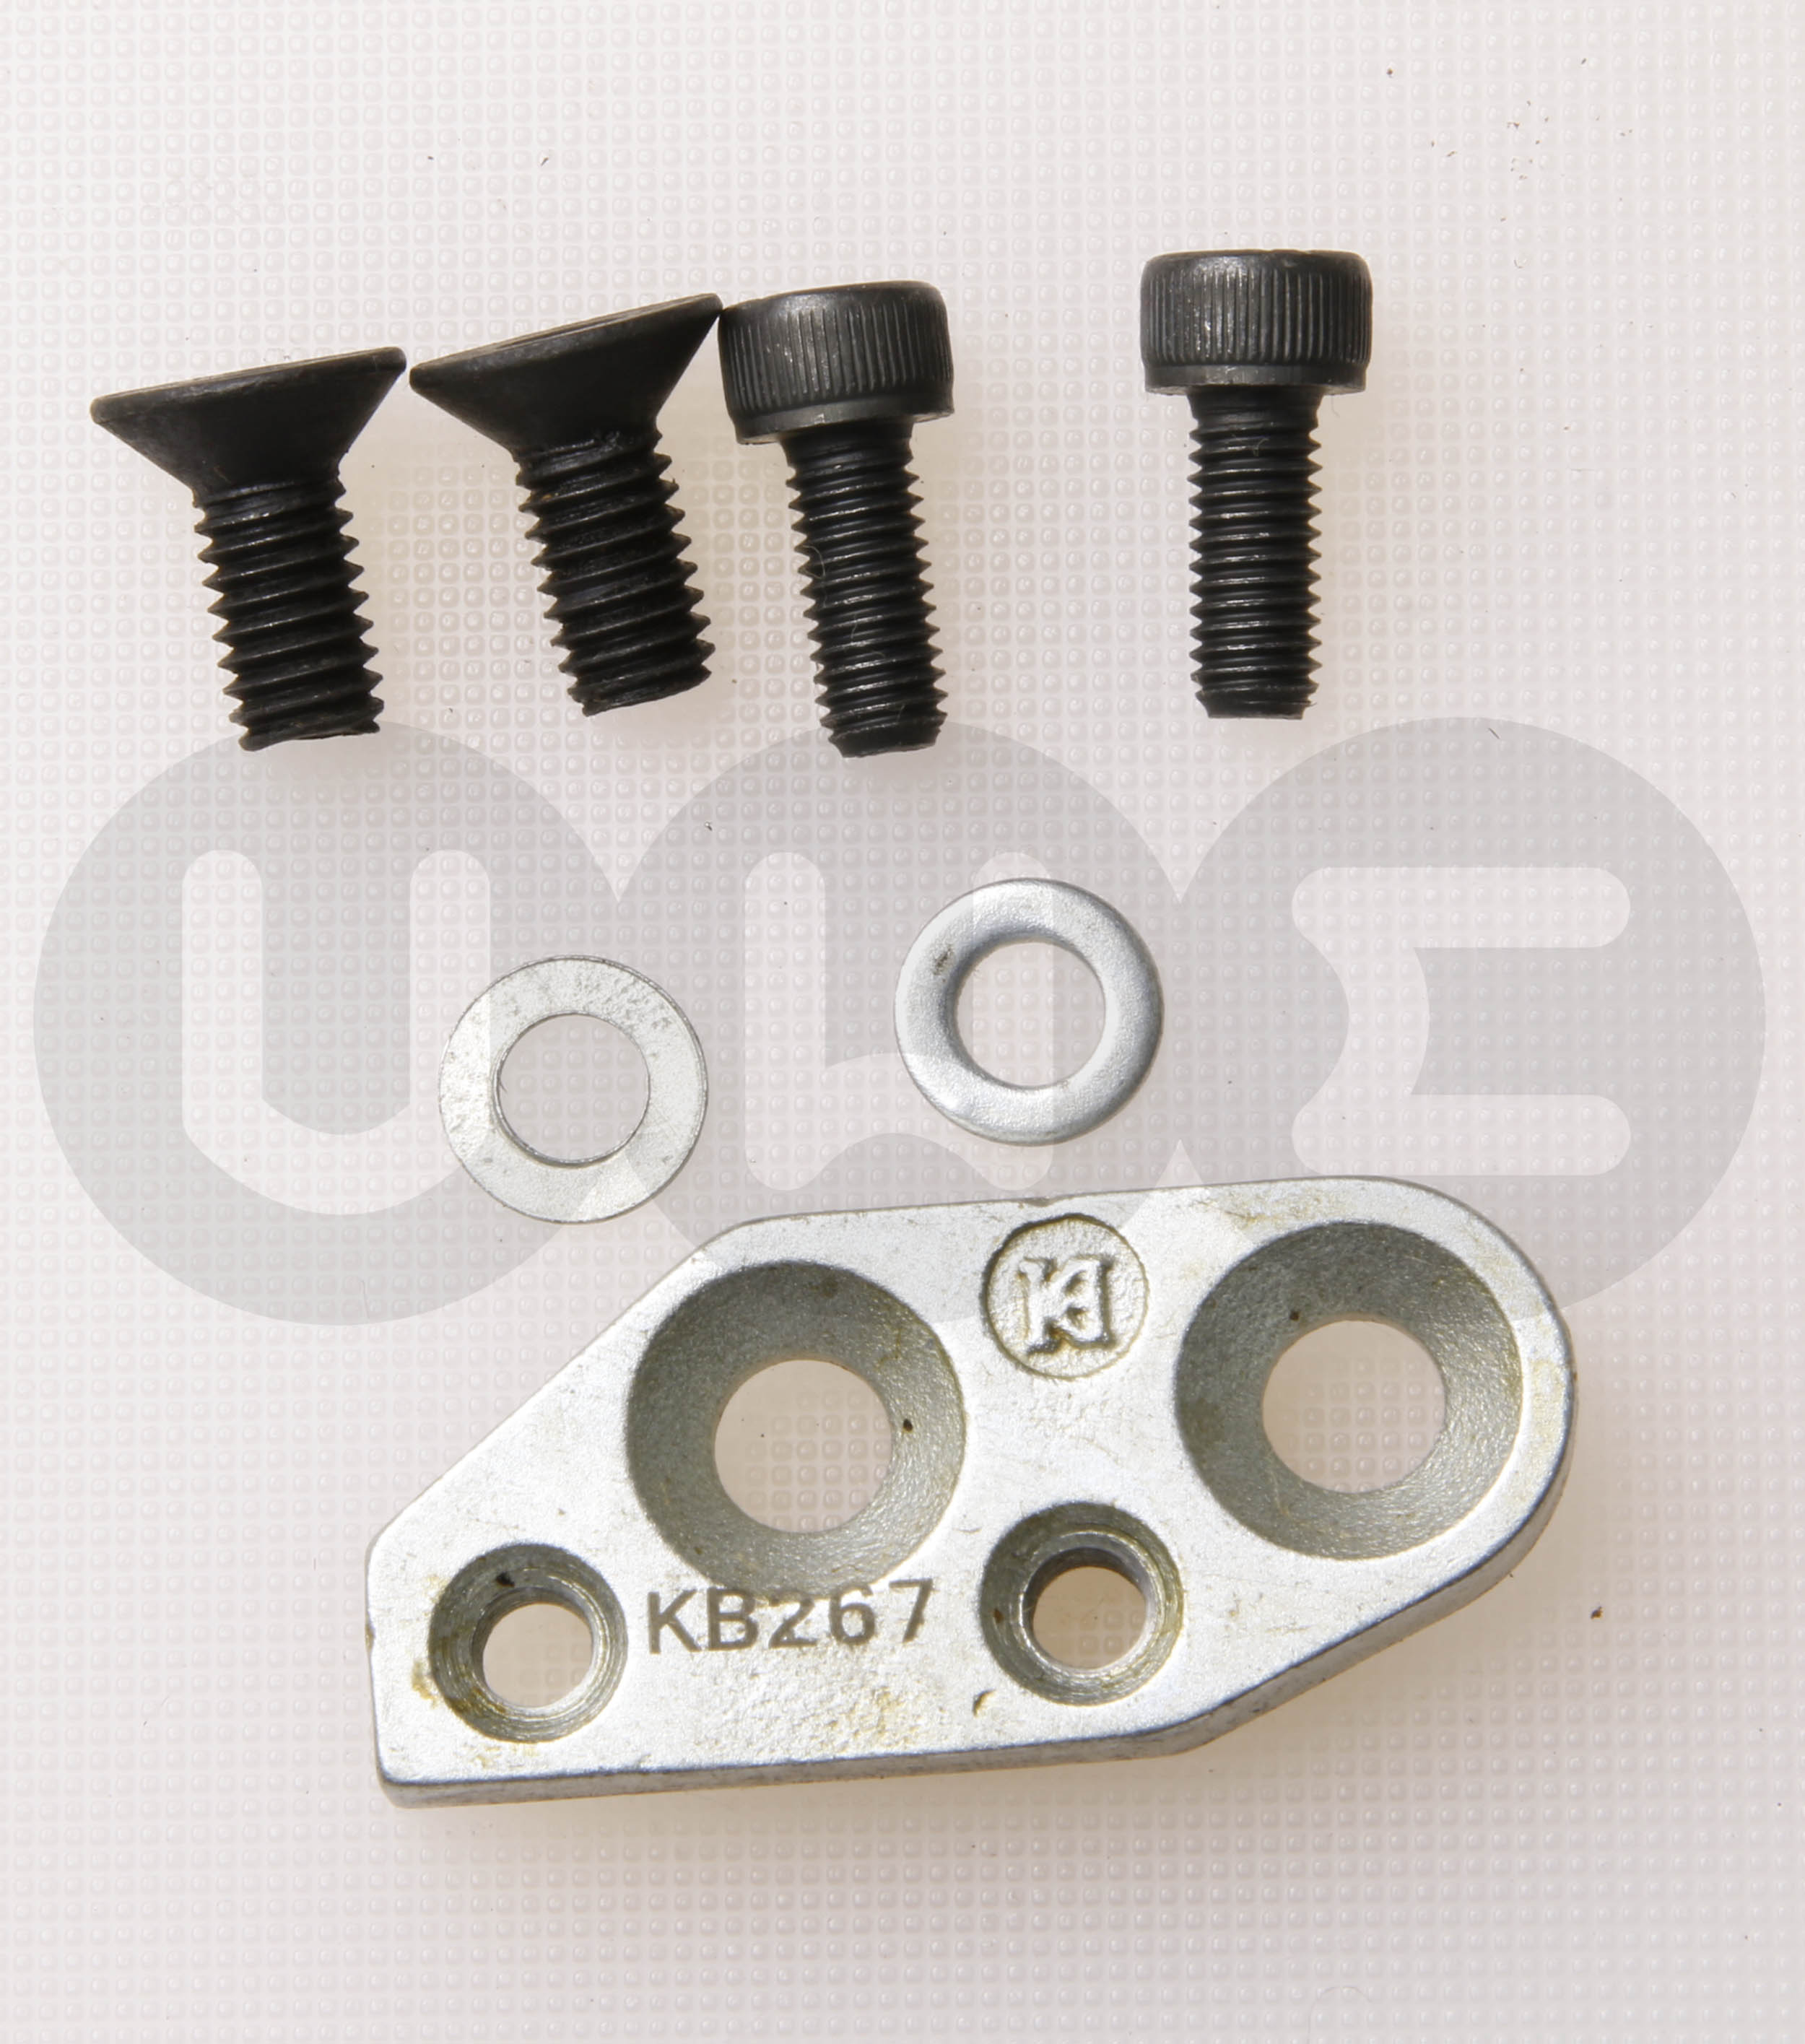
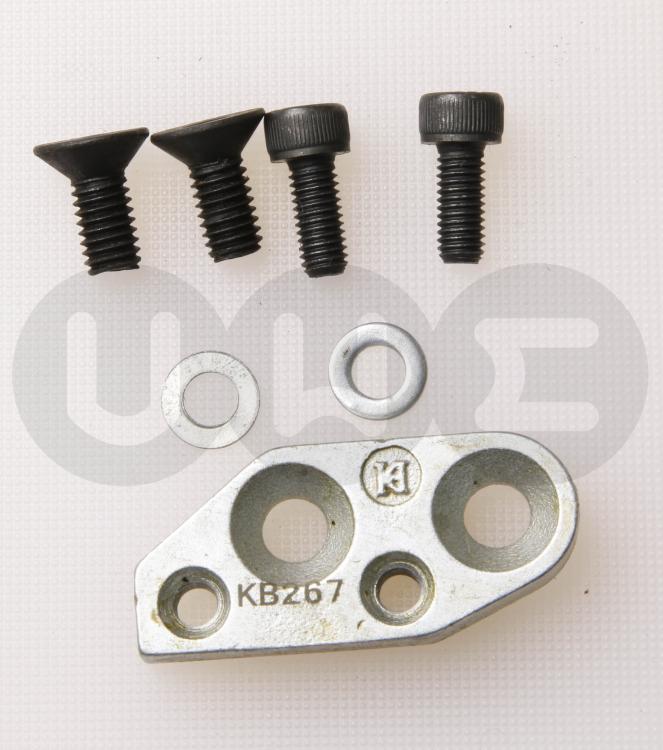
I think you actually need the KB-267 adapter bracket (i still have some in stock) to install a KG series edge guide on your Consew 206RB5. The adapter provides just enough of an offset to clear the casting on the machine. Various swing-down edge guides have the same mounting hole arrangement and the adapters allow them to fit a large number of machines. Here's a picture of the KB-267 adapter:
-
Juki Machine Identification and Tips for Buying Used
Uwe replied to Askal's topic in Leather Sewing Machines
It sure looks like a Juki LU-562 or LU-563 to me. The two are identical except the LU-563 has a larger bobbin/hook. Reverse lever is a good sign - that means it's not one of the odd "Subclass 3" machines without reverse. The type plate is normally just below the reverse lever handle. Ask for a picture of that area. They're GREAT machines, really, but don't tell the seller that. More like "You want how much for this tired old thing?" -
Adler 067 GK-373 tension problem (advanced)
Uwe replied to HardenGoods's topic in Leather Sewing Machines
I had typed an elaborate post and then realized that I had already said the same thing earlier in this topic. I can't delete my own post for some reason, so i just cleared out my own, superfluous post. -
It's good form to post what you found. Here's the German Language manual for the Durkopp 241 ( Durkopp_239_241_242_541_542_DE.pdf), which may or may not be the book you referred to. You can always type a few key paragraphs into Google translate. It'll make as much sense as most other translated technical manuals. This manual is really as good as it gets for vintage machines like this. You just need one annotated graphic to explain hook timing requirements, regardless of language (hook timing position is at 1.6mm needle rise, by the way). Most other adjustments are the same as dozens of similar machines. Many parts and assemblies on the Durkopp 241 are practically identical to the Singer 111. If it looks the same it probably works the same. It's a little like riding a bicycle. You wouldn't say "I can't ride this bicycle - I've never seen a saddle like that before." If you're comfortable with the Singer 111W155, then you're 90% there for this Durkopp 241.
-
Adler 067 GK-373 tension problem (advanced)
Uwe replied to HardenGoods's topic in Leather Sewing Machines
edited post repeating myself. -
It'll sew lighter weight leather just fine: Here's the Pfaff 138 User Manual (Pfaff138_9-86.pdf) and the Pfaff 138 Service/Adjustment manual (Adjustment Pfaff 138.pdf)
-
1969? Industrial Sewing Machine Sales Brochure
Uwe replied to JJN's topic in Leather Sewing Machines
And they're all photographed in the same, already-bowing table top. -
1969? Industrial Sewing Machine Sales Brochure
Uwe replied to JJN's topic in Leather Sewing Machines
Great find - thanks for sharing! And just to put those 1969 prices in perspective, the roughly $800 for the nice Pfaff in 1969 is equivalent to about $5,550 in 2018 money. So, a high quality premium brand machine costs about the same now as it did fifty years ago. -
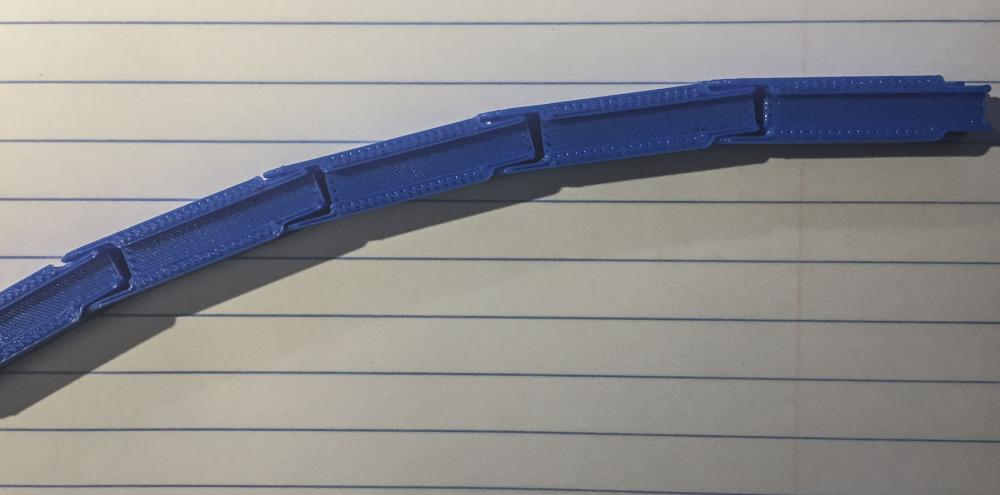
The sideways wiggle room is due to a gap/play between the walls where the parts connect. The part should be snug, but mine have play. The holes and pivot points are fine, actually. I think I'll rustle up a link in Fusion 360 and see how the dimensions come out when printed. I feel the outer legs with the holes need to be stronger on my printed parts. The inner leg with the pivot points is plenty strong. I have a YKK metal zipper from Tandy Leather that I was going to use to make some luggage. I'll try to make a link to fit that, just for practice and 3D printing fun.
-
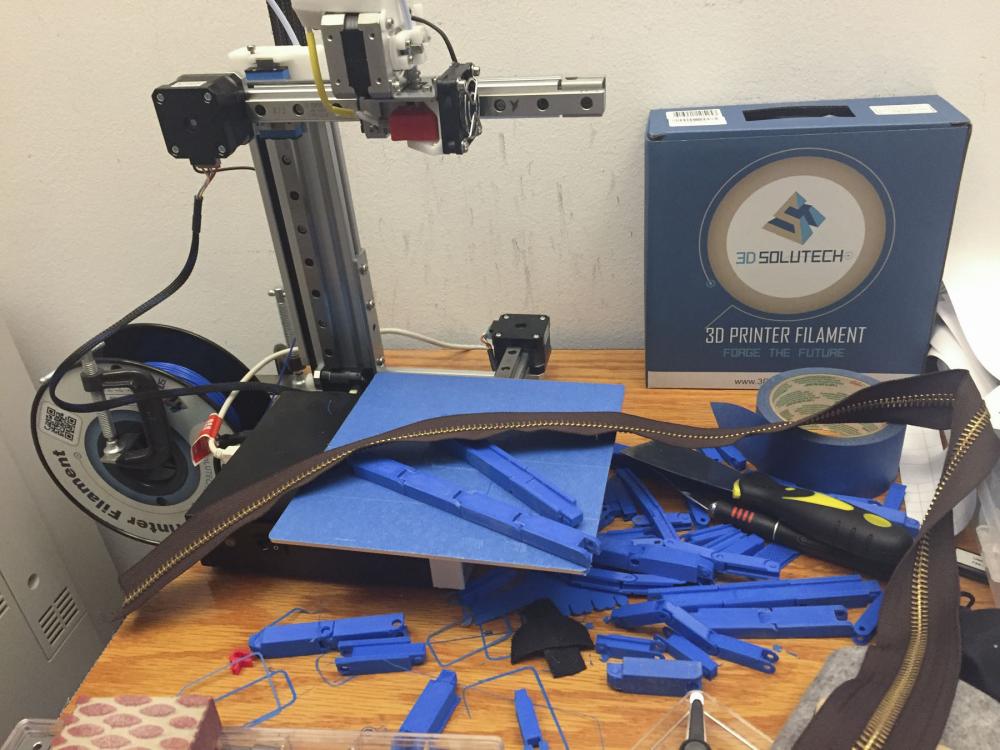
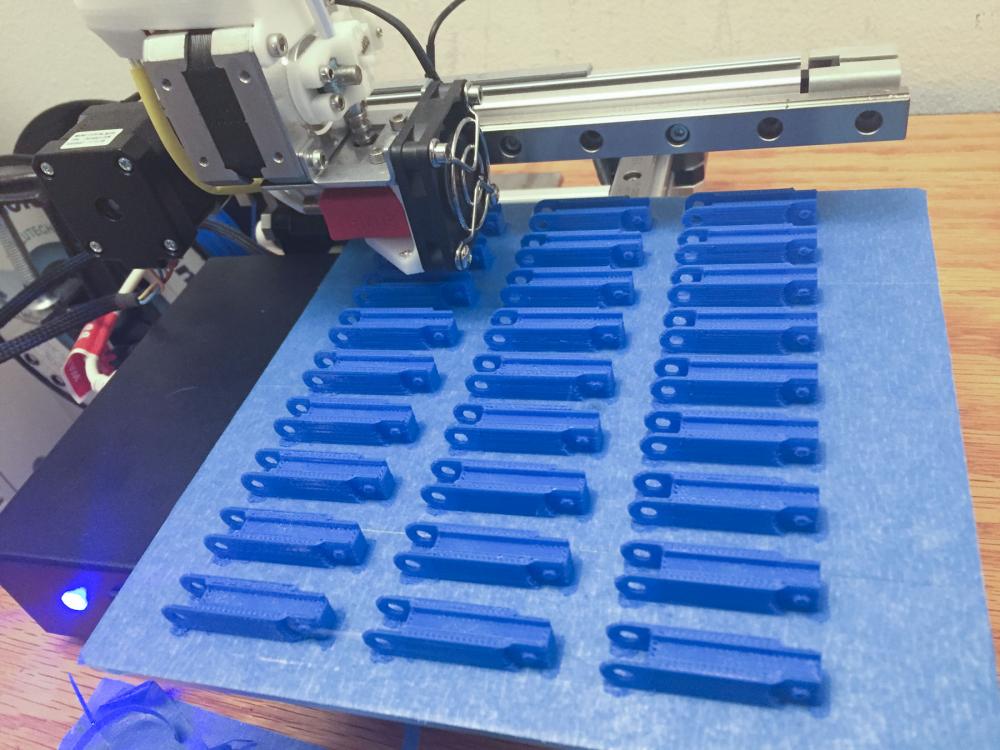
Even without getting into G-Code, there's still a fair amount of twiddling with the settings to get things to print right. I printed batch of the links last night just to see if my printer was up to it and how they turned out. Turns out printer is up to the task, but the links connect somewhat loosely. The original photos look like the links connect quite solidly. On my links there's a tiny gap between the wall of the linking elements, allowing for play. They might still work, but I don't have any suitable zippers to test with. Nozzle size, layer thickness, filament material, fill, wall thickness, alignment of the planets, and other parameters may affect certain dimensions. That's not a problem if you print little Yoda figurines, but mechanical interconnecting parts require a little more precision. Like cutters, there may also be settings to print "on", "inside" or "outside" the line but the software driving my printer is not super fancy. Alternatively, the CAD model may need to be tweaked to compensate for printer variations. I have a feeling that no two printers will produce truly identical parts, only parts that are quite close. Here's a picture of my batch of links. I took just under six hours to print 27 links with PLA filament, 0.2mm layer thickness and 65% fill. Here's a picture of the sideways curvature play my connected links have::
-
It's nice that you got a new motor quickly and for free from The Leather Machine Co. Kudos to them for doing something they didn't really have to in order to get you out of a bind that wasn't really their fault. Every one of their customers helps pay for that new motor indirectly. That new motor may die during your next power surge. It would be misleading to give the impression that a vendor of electronic devices is responsible for your local power grid failings or that the vendor should have to bear the replacement cost. In reality, that burned out motor control board was your responsibility, not that of the Leather Machine Co. If you complain to your local power company about power surge damages, they will just say you need to take steps to protect your electronic equipment from inevitable power surges. Depending on your home insurance policy, it may cover personal property losses due to power surges or lightning strikes. But it may not be worth bothering to file a claim - I did it once, which is how I know it's not worth bothering. Everything electronic that I care about in my house is protected by a surge suppressor and/or battery backup device. I must have close to thirty of these devices around the house, either separate devices or integrated into the power outlet on the wall. I also have a whole-house generator that automatically kicks in and separates my house from the grid during an outage. The generator does not switch back to grid power until it's up and stable again. Those generators are not a viable option for many and they don't prevent lightning strikes in your backyard.
-
Thank you @Northmount! Here's a brief rough cut of a video snippet that shows how to adjust the friction gib on the feed driving eccentric. This snippet is just temporary and has some audio and focus problems. I'm still working on a "proper" video that goes over the whole assembly. I'll delete this temporary video once I get the final version published.
-
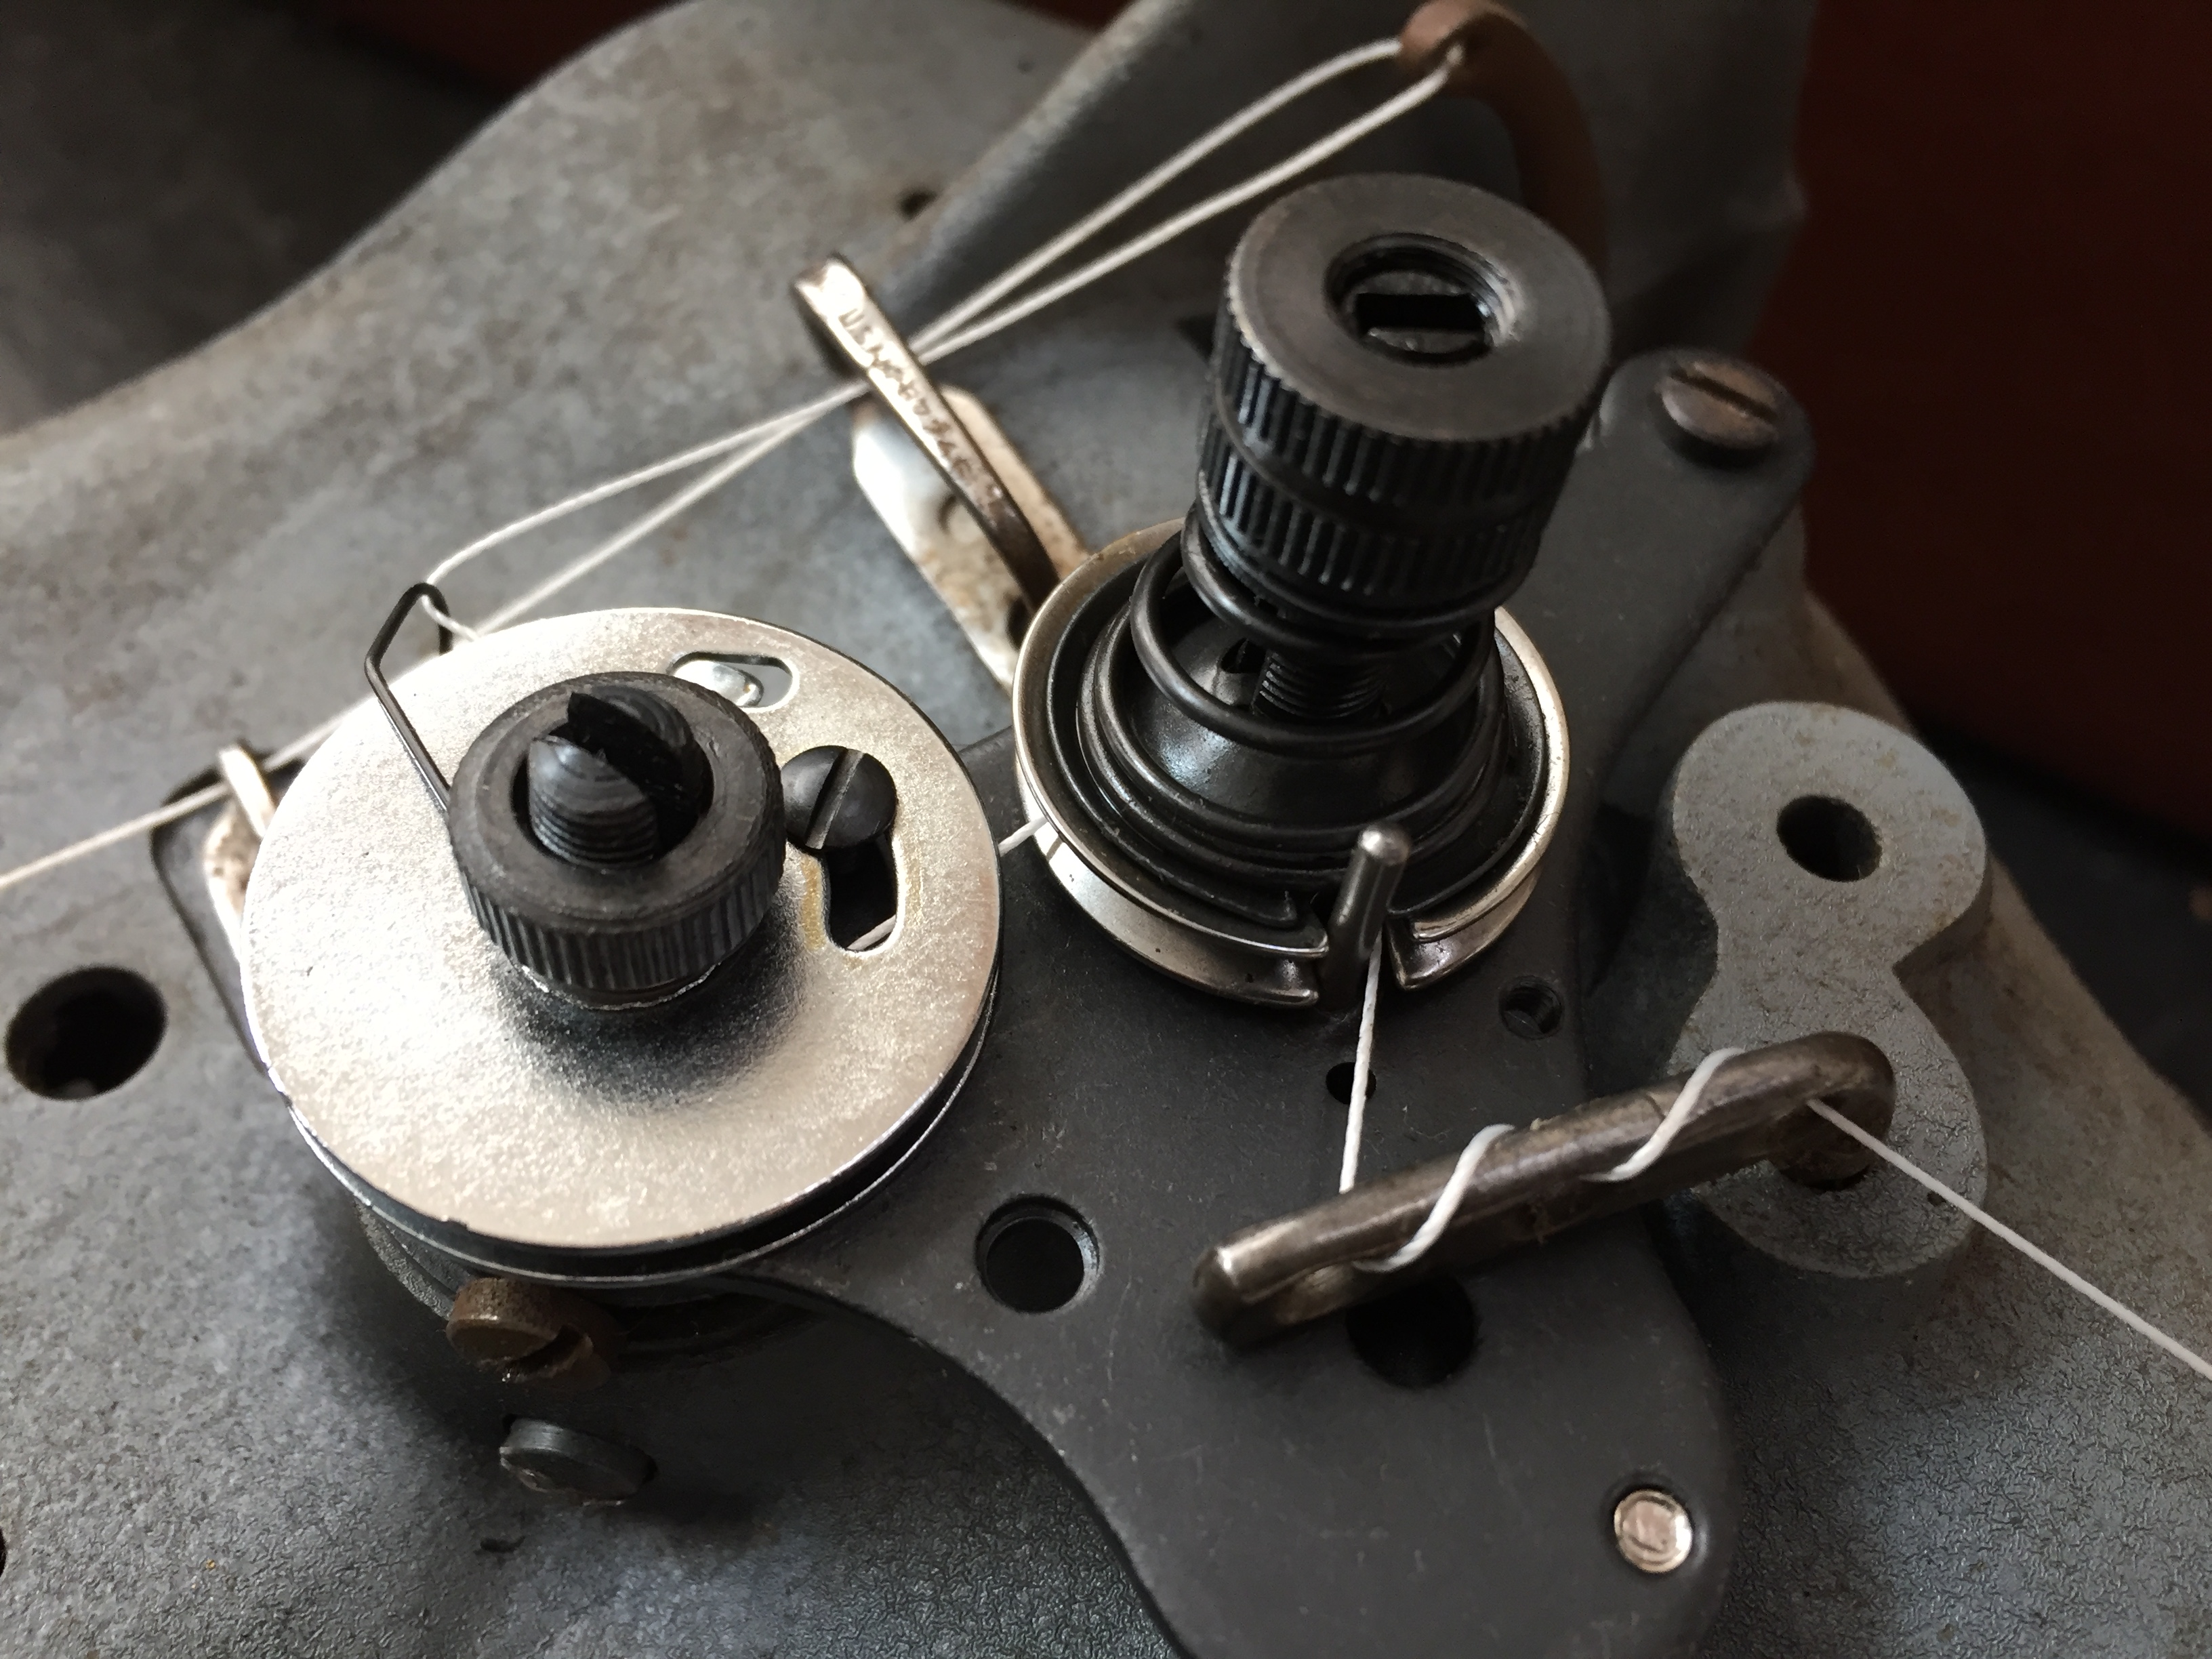
Just a picture of what you were describing at the end of your video. I think it's a good approach to keep your thread from popping out from between the tension discs.