


Tugadude
-
Posts
2,656 -
Joined
-
Last visited
Content Type
Profiles
Forums
Events
Blogs
Gallery
Store
Everything posted by Tugadude
-
 Gene, that is why stitching is as much art as craft in my opinion. There are constant challenges whether it is the change in materials, i.e. thickness of leather, temper of leather, tannage, etc. or changes in thread size, etc. I am in the construction industry and in my experience a journeyman can take any circumstance and make it work. That ability takes years to develop. Teachers like Nigel Armitage can shorten the time it takes to get up to a reasonable level of aptitude, but I think he would agree that there are nuances that you simply have to learn over time. There is no microwave for experience. Having said that, the right approach and the proper understanding of the medium and the tools required will give a person a big headstart. When I started, my stitching was poor to be charitable. I watched Nigel's video and the first project after that brought a big grin to my face. I can't thank him enough.
 -
Thanks for the detailed information. I think the thing about soft, thin leather is that casting is made less effective due to the overall thickness of the piece. I have no problem getting a nice slant on two layers of 4/5 oz. leather but when doing a leather strap or bracelet, casting just doesn't work as well for me. I find it easy to tug too hard in order to get the knot to sit down. Anyway, thanks for sharing your process!
-
Great in all aspects. Yes, I would like to know details about the stitching. Method and materials would be interesting to know. Thanks!
-
Never seen one but with the opportunity for abuse I have a suggestion. I have seen briefcases where the sides are made of wood, so instead of a leather gusset, a solid piece of wood is substituted and the leather nailed to the wood with decorative-head nails. You could make the cylinder bottom and top out of 1" wood rounds in the appropriate diameter and then have the body of the cylinder nest together to close. Have a buckle or a Sam Browne Stud on opposite sides of the case to keep it closed. I would make the top and the bottom the same diameter and have the bottom in two layers with the "inside" layer longer to allow the cap to slide over it. Sew and rivet a handle to the side. That would give it a very clean look. I'm thinking 10 oz. leather maybe for durability. You could decorate it or leave it plain. If decorating, maybe a basketweave or you could cut in lines with a groover to give it some geometric patterns. Picture this with wood top and base instead of leather as shown. But it has the stud closure method. Buckles would work too. This one has a cap that is larger but you could do the way I described and then it is very clean and all in one plane. I think it would be very classy and last a long time.
-
I really like this idea. You could go a step further if you want and make the top a tad longer, allowing it to be glued to a piece of card stock and glue the entire bottom piece to the card stock That way there is little chance of shifting. Then when the slits are cut you cut the bottom off, cut off the top to the glue line and you are all set. If you don't want to use glue I'm sure it could be clamped in some fashion as well.
-
Thanks, I always like to see all of the little details. Great job on those.
-
Thanks for sharing. If you get the chance, I'd like to see the interior of the cups along with the seam on the outside. Curious is you used a baseball stitch or what. thanks!
-
Gorgeous
-
Lookee What Followed Me Home Today!
Tugadude replied to Sheilajeanne's topic in Leatherwork Conversation
Funny, I have the same X-Acto set. You did great, hope you find some gems in there. -
I've observed the same thing. Just search topics from 5 years ago and you are amazed how many "regulars" have gone. Go back further and most all the names you see don't participate anymore. I have backed off at times myself. Life gets in the way sometimes.
-
Is this stitching weakening the belt loop?
Tugadude replied to GeneH's topic in Leatherwork Conversation
If I were you I would glue it and then install the Chicago screws and leave it be. It will suffice. Try it and you be the judge. -
I agree. I don't tool so don't offer any advice or suggestions. I weigh in on stitching questions because I have acquired a level of consistency that I feel I can at least help folks on the basics. I also suggest they watch Nigel Armitage and Ian Atkinson demonstrate on their various youtube videos. Probably my biggest contribution! One thing that I see opinions on is using pricking irons and awl versus stitching chisels. There are proponents on both sides of the spectrum. I'm in the middle somewhere, meaning I use chisels mostly but definitely use my awl at times and if I need to can complete a project that way. I just choose not to on most items. To me it is not either or, but just a comfort level thing. I think some who eschew the use of diamond chisels have never tried them. If they did, like Nigel, they would see the inherent power in the tool. Some would say advantages, I will suffice to say power because I believe for some projects they can contribute a lot. Good topic!
-
Thanks for sharing the link to your Pinterest board. Very nice collection of decorative stitching and when I clicked on one of the examples it brought up a ton of cool ideas on small leather goods and gadgets such as cord (ear bud) holders and the like. My opinion is that adding a bit of flair is always nice so long as it is appropriate for the item in question. In other words, sometimes less is more and the item would suffer from adding superfluous adornments. But at times a piece can be made to pop with the addition of something out of the ordinary. Sometimes that is a unique inlay, sometimes it is a color contrast and sometimes it is decorative stitching. What I would urge Alexis to do is to explore a "look" and to consider adopting it and incorporating it whenever it makes sense. In that way you establish your "brand" and there is continuity from item to item. Regarding silk, remember you said old journals. Maybe back then colors were mainly to be found in silk whereas these days you can get linen in any color under the sun probably. So whether linen or silk, you can do what you need with either one I suppose. I'm not a thread historian. Is that even a thing? lol, good luck.
-
My first real "bag" a toiletry bag
Tugadude replied to bvdv's topic in Purses, Wallets, Belts and Miscellaneous Pocket Items
I like how you added leather backing to the zipper. Many folks don't do that but I always do. Might be unnecesary but it makes me feel better so I do it. I liked the numbers on the bottom. When I see that type of thing it captures my interest. I would say you are ready to attempt a briefcase or such. Good luck! -
Is this stitching weakening the belt loop?
Tugadude replied to GeneH's topic in Leatherwork Conversation
That works -
Is this stitching weakening the belt loop?
Tugadude replied to GeneH's topic in Leatherwork Conversation
The stitching could stop at the screws. No need to go past them as it would add little. Or skip the stitching altogether and just move two of the screws higher. -
Is this stitching weakening the belt loop?
Tugadude replied to GeneH's topic in Leatherwork Conversation
How about two vertical stitching lines spaced 1/2" apart just to keep the leather tight there? This way the stress is going "against" the line of stitching. -
Is this stitching weakening the belt loop?
Tugadude replied to GeneH's topic in Leatherwork Conversation
Yes, by definition any time you cut a hole in something it weakens it and possibly compromises the strength. Think of it this way, when you get a paper check, the paper is typically perforated in a dashed fashion to make it easy to tear where you want it to. Kind of what is going on here, right? But an equally important question is how much is the strength reduced and is it enough to cause failure? I think that will be problematic in the long run, especially if it is flexed repeatedly. If it is just going to hang there, maybe it isn't a big deal but then I would ask, if it isn't there to reduce stress or keep the leather together do you need it anyway? The fact that it is 8oz. leather helps some. Maybe go down to 5 spi? Just some thoughts. -
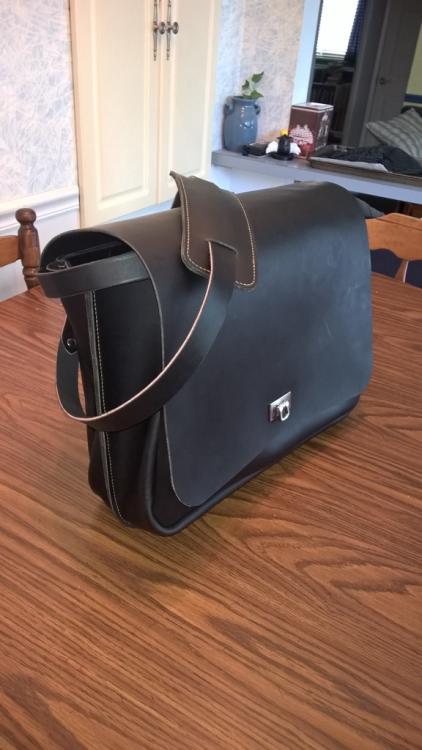
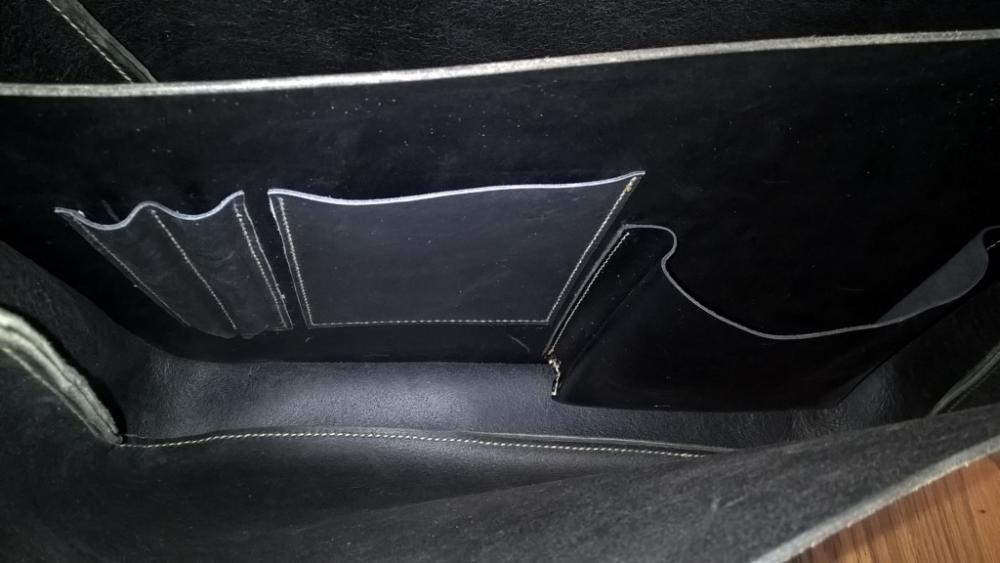
I appreciate the comment. My son is away at college and needed a large computer bag. He has a gaming laptop which is a little over 17" I believe. It has held up great for the last 3 years. Rugged was a necessity. The clasp is holding up great and that was the main thing I thought I would need to replace.
-
Here is said bag. You can see the thickness inside. This is buffalo culatta from Springfield Leather.
-
5/6 oz. leather is fine especially if it is a decent sized bag. I did a mailbag style briefcase for my son in that weight. It was a combination turned out and exterior stitched bag and while it wasn't a walk in the park, it was doable.
-
There are youtube videos demonstrating various techniques. What I do is cut the rivet as close as possible then use the doming part of the setting tool to mash it down some. I then tap all the way around to dome it even more. Sometimes that is good enough, sometimes I finish off with the doming tool again. Copper is reasonable soft and if you get too aggressive you can bend the burr as you have discovered. BTW, my pliers can snip qute close. If yours do not, and you have access to a Dremel tool with a cutting wheel you can get really close with that. I think 1/16" to 1/8" is fine though and sounds like your pliers can achieve that.
-
You bring up a good point. When I looked at the holster I mainly saw stamping and yes, I sometimes stamp after I apply the dye. But carving is obviously different if you cut deep enough to expose flesh where the dye didn't penetrate. In that case you would dye after. If doing a wallet with carving on the exterior then it would be appropriate to dye it after you are finished, but the interior could be dyed prior to cutting to maintain size and shape.
-
Awesome! Best part is the camaraderie and the bonding time. When things don't go so great you can both learn together. When things go right you can celebrate together! Only thing I will say is I typically dye first, then cut out my shapes, but it worked for you on this project. On wallets and such, with smaller pieces, you can get shrinkage after dyeing and sometimes it messes up your project. For that reason I always do it first, then buff it out with carnauba creme or similar and then lay out my templates or whatever.
-
A weekender bag I made
Tugadude replied to twotrees's topic in Purses, Wallets, Belts and Miscellaneous Pocket Items
https://www.etsy.com/listing/624253089/bag-pattern-leather-diy-pdf-download?ref=shop_home_active_1

