


Tugadude
-
Posts
2,656 -
Joined
-
Last visited
Content Type
Profiles
Forums
Events
Blogs
Gallery
Store
Everything posted by Tugadude
-
I went to euro-joe.com and found where they sell spools of leather for making leashes. They call it chrome leather. So chrome-tanned. The way you describe the leather it is definitely chrome tannage. If you are wanting to buy the exact leather, best way to do that is to politely K9 where they source their leather. They may or may not tell you as some folks want to keep it a secret and make it harder for competition to reverse-engineer. Horween makes leather for baseball gloves. You could always reach out to them.
-
Hard to say for certain. Many leathers stretch, so that isn't really an indicator. Glove smell might indicate chrome tannage. The fact that the surfaces have a finish applied, like a coating, would also lead me to believe it is chrome-tanned. What color is the raw edge? If it is bluish, it is chrome-tanned. Where did you get the piece you were able to smell?
-

Help understanding this applied edge trim for turn shoes, please.
Tugadude replied to sulla's topic in How Do I Do That?
I don't see why this technique wouldn't work on thin leather using glover's needles. https://www.google.com/search?q=hidden+whip+stitch&oq=hidden+whip+&aqs=chrome.0.0j69i57j0.6696j0j7&sourceid=chrome&ie=UTF-8#kpvalbx=1 -
You can't really put on a light coat of oil dye in my opinion unless you use an airbrush for uniformity. You said you have not dyed leather before. Well, the dye is very thin and it will immediately penetrate the leather, not sit on top like a paint. And if you put on a light coat by hand, I doubt you'd be happy with the aesthetics. It will be blotchy. An airbrush, with practice, might achieve a fairly uniform, thin application. Still prone to unevenness on overlaps, etc.. Personally, I think a chrome-tanned leather that has a black "finish" is likely your best bet.
-
Yes, some bag makers have proprietary designs as part of their signature. So finding an exact one is likely not possible. Ohio Travel Bag is one I'd reach out to ask.
-
Question about lining a leather bag
Tugadude replied to panchoskywalker's topic in How Do I Do That?
Actually glad you mentioned that as the canvas, while strong would likely tear over time. So sandwiching the canvas between the leather is a great idea. -
Question about lining a leather bag
Tugadude replied to panchoskywalker's topic in How Do I Do That?
Not sure exactly what you are asking. Regarding the Chicago screws on the strap, I would use brass rivets instead and eliminate the zipper. I mean the zipper on the lining. -
I agree that if you are looking for strength and durability you really should be using solid rivets. They take practice to get a good dome shape, but once you get the knack, it is pretty easy. Try looking on youtube, I seem to remember some demonstration videos on there. BTW, I had to remove a copper rivet the other day to accomplish a repair. Let's just say it wasn't fun. They really do the job.
-
Card wallet
Tugadude replied to LeatherLegion's topic in Purses, Wallets, Belts and Miscellaneous Pocket Items
Heat definitely adds to the creasing effect. However, plain old friction works pretty well too. The trouble is that when you vigorously rub the creasing iron you have to maintain focus and control because it can "wander" on you and then it is hard to mask. Definitely try the heat. -
Edge paint VS Burnished edges showdown!!!
Tugadude replied to immiketoo's topic in How Do I Do That?
Great work on both versions. You didn't mention using any heat on the edge paint, so if that is true, this example shows that you certainly don't HAVE to use heat or a special tool to get superior results. BTW, a clear lacquer could be used over the "traditional" edge to give it some more wear-resistance. -
Good luck and check back with your progress!
-
This is similar to what you are wanting to achieve. Obviously it can be scaled to size. https://wkdesigner.wordpress.com/2009/01/17/the-weekender/
-
The makesupply templates are great. I can fit two cards into each slot with no binding. If I were you, I'd invest in their plexiglass templates, they make things very easy on you.
-
Good tip!
-
Welcome! I've used 5 oz. buffalo leather from Springfield Leather Co. and it was fantastic. I made a briefcase out of it. It was firm enough yet supple enough. I hand saddle stitched the bag, but it certainly could be machine sewn.
-
Nice score! I'll bet you can sell of what you won't use and get your money back. I saw a Craigslist ad from a guy selling off some leather and tools and responded. Turned out he had gobs of veg tan leather, a granite slab and a host of tools he was happy for me to take. I felt a little embarrased, but happy!
-
OK, so I went and looked on the google and found several leather gun rugs to compare to. Seems very simple to do, but maybe not if you aren't familiar with zippers. I won't link the photo, as the website is copyrighted, but look for one made by Sun Canyon. It is similar to yours and with a small tweak to your design, you can emulate exactly what they did. No gusset required. The padding they used might be a little different from what you are proposing, but you should be able to make yours work in any case. On the zippers, make sure that there is enough fabric on the zipper to cover the padding. If not, then you will have to sew a thin strip of leather along both sides to widen it. To me, the technique they used looks like the best approach and reasonably simple to do. Take a look and let me know if you agree or are still stumped. Good luck.
-
You really need to show us the zipper installed. Then we can comment on what you did. Have you had the opportunity to handle one of the "store bought" ones to see how it was made? Sometimes you can pick it up in photos, but sometimes you have to have the item in hand.
-
Yep, practice and try different things. Hopefully you'll get that "eureka" moment and can rest easy.
-
BTW, on the bag I posted, I wonder whether the leather at the very top could be "splayed" out similar to a French seam. Seems like it would work since it is being covered by the rolled edge. That way it would lie even flatter. You would only have to do it on the last 1/2" or so.
-
Sometimes I think the final result you want to achieve involves a bit of compromise. I will comment on the picture you posted after I share another pic with you. I found this picture by googling "leather briefcase with piping". It shows exactly what I wanted to convey in words. So what I meant by compromise is that in order to pull this design off you will likely be limited to thinner leathers, much thinner than what is used on the bag you posted a picture of. Even so, the maker likely skived the edges down to minimize any bulging that might occur when wrapping the leather over the edge. I'm guessing that the result is similar to what you are after, a finished look to the termination of the piping at the opening of the bag. Now, back to the picture you posted. It looks like the piping, or welt was already skived down quite a bit. Likely no more to be done there, but the leather on the bag itself is quite thick and does not appear to have been skived or thinned at all. It basically represents a "raw" condition. What might be done to make it look a little better is to edge bevel both sides of the "seam" and black and burnish the edge. That process might lift it up to an acceptable result in your eyes. We all have our own construct of the way things should be. I know folks that don't like any raw edges and others that love them. I know some will not make a wallet without turned edges because they can't stand the look of burnished edges. To each his/her own when it comes to aesthetics. Some projects cry out for a more refined look and therefore should have turned edges. That doesn't mean there isn't a place for a rough-and-tumble messenger bag with raw, unfinished edges. Hope some of this helps! Let us know what you come up with.
-
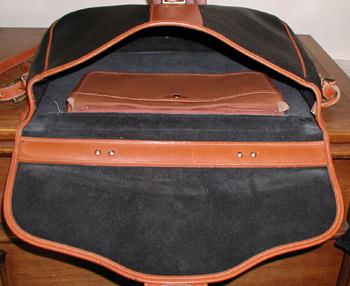
Scratching my head here to remember but I think I attached the front to the gusset first followed by the divider and second gusset and finally the back panel. I didn't have to do much coaxing as I remember. Not saying it was a walk in the park, but not a huge struggle either. I used a combination of clips and needles to help keep things lined up as I remember
-
O.K., you asked for it. That is the first leather taco I've ever seen! Hopefully someone will say something constructive!
-
Interesting question. If bulk is an issue you can certainly skive the piping, the bag pieces or both. Obviously you'd skive the piping on the inside. It also depends upon the project I would think. For instance are you using a rolled top edge?
-
That explains the concern. Card stock is very stiff. BTW, when cutting your gussets, leave extra length. If you measure exactly it is almost sure to come out too short. The first one I did, I glued together and then punched holes and stitched. The second go-round I pre-punched the gusset stitching holes and the panels and everything lined up great.I left 2" of extra length on the gussets, but so long as you start on one side and have the holes spaced equally from the top edge, it should line up no problem. BTW, if you are wanting to practice on real leather but don't want to spend a fortune, check out Springfield Leather's website. They frequently feature $25.00 sides. Used to be $20.00 when I would walk in their store, but I guess everything goes up. Anyway, they have limited colors as you can imagine, but it would be a great way to make a bag, have plenty of leather to work with and use it as practice. If it turns out good and it is neon yellow, give it to a kid for school!