-
Posts
2,656 -
Joined
-
Last visited
Content Type
Profiles
Forums
Events
Blogs
Gallery
Store
Everything posted by Tugadude
-

Multitool pouch
Tugadude replied to Bolanca's topic in Purses, Wallets, Belts and Miscellaneous Pocket Items
Love it! I noticed the grommet. Is that to hang keys from? -

Repairs to an old ranch saddle
Tugadude replied to thenrie's topic in Saddle Identification, Restoration & Repair
Saddles are waaaay out of my realm, but I can appreciate the skills required. Your work is amazing to me. Attention to detail and the creation of a custom tool is inspiring. Thanks for sharing! -

Long Wallet
Tugadude replied to kyrrk's topic in Purses, Wallets, Belts and Miscellaneous Pocket Items
If you mean square corners, look at Nigel Armitage's video on Youtube where he describes using a round hole on the corner and using it as a "hinge" to achieve a nice transition from axis-to-axis. Are you using a 2-prong iron on the rounded corners? The long wallet corners look fine to me.- 23 replies
-
- longwallet
- handmade
-
(and 2 more)
Tagged with:
-

Long Wallet
Tugadude replied to kyrrk's topic in Purses, Wallets, Belts and Miscellaneous Pocket Items
Some folks are content with "good enough" while others continue to strive for what they feel is the "perfect" stitch. Your work is already good enough in my opinion. Taking it to the next level would require experimentation and studying sources such as Valerie Michael ("The Leatherworking Handbook") or Nigel Armitage's videos on Youtube. Ian Atkinson also has some very helpful videos. Both gentlemen share a ton of tips and techniques that if understood will lift anyone's work to another level. I'm a fan of the traditional zig-zag saddle stitch. I strive (and often fail) to achieve the slant on both sides of my work. When I do succeed it brings me great satisfaction. You've achieved a lot in a short time. Keep reaching higher and your work will be astonishing.- 23 replies
-
- longwallet
- handmade
-
(and 2 more)
Tagged with:
-

Long Wallet
Tugadude replied to kyrrk's topic in Purses, Wallets, Belts and Miscellaneous Pocket Items
BTW, your overall skills are quite good also. The cut of the pockets, the zipper, all look very clean. Well presented work.- 23 replies
-
- longwallet
- handmade
-
(and 2 more)
Tagged with:
-

Long Wallet
Tugadude replied to kyrrk's topic in Purses, Wallets, Belts and Miscellaneous Pocket Items
Some great pictures in that link. Even with the same iron you can achieve different looks. Notice how some of the smaller thread helps accentuate the slanted, or zig-zag look. Changing the teeth per inch on the iron and the size of thread gives you many possibilities. But again, I think your stitching is fine.- 23 replies
-
- longwallet
- handmade
-
(and 2 more)
Tagged with:
-

Long Wallet
Tugadude replied to kyrrk's topic in Purses, Wallets, Belts and Miscellaneous Pocket Items
You will find that there are sometimes "rules of thumb" or "conventional" ways of doing things. Small items usually demand more stitches per inch and smaller thread diameters. The idea is to keep the proportion of the stitching consistent with the size of the article. However, you can certainly take license to change that up to achieve a particular look or aesthetic. I did that on a watch strap that was made out of a repurposed baseball glove. I just felt the glove leather wanted beefy stitching and so I used 1mm braided waxed polyester thread and was happy with the result. For only a year in the craft, you should be proud of your stitching!- 23 replies
-
- longwallet
- handmade
-
(and 2 more)
Tagged with:
-

Long Wallet
Tugadude replied to kyrrk's topic in Purses, Wallets, Belts and Miscellaneous Pocket Items
- 23 replies
-
- longwallet
- handmade
-
(and 2 more)
Tagged with:
-

Long Wallet
Tugadude replied to kyrrk's topic in Purses, Wallets, Belts and Miscellaneous Pocket Items
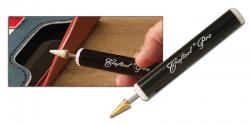
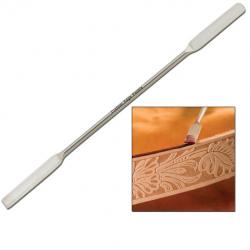
Your stitching looks great. I was simply noting that the thread is large in comparison to many wallets I see. I actually like the look. However, some folks will feel it is a bit large, or what is sometimes called "chunky". Regarding edge coat, it is an acquired skill like anything else. Once you get the technique down, it actually becomes very easy to do. The trick is getting the proper tool, learning how much Edge Kote to apply and a steady hand. You almost have to have guts to do it right. You have worked hard on the project and don't want to ruin it, so you maybe skimp on the amount of Edge Kote you apply and it just doesn't work well that way. Practice on some scrap. And if a little runs over the edge, just wipe it off immediately. A couple of recommended tools are a metal spatula as offered by Tandy, a roller applicator also through Tandy and a common pencil. Personally, I use flat, wooden stir sticks intended for stirring coffee and they work great for me. When I'm done, I just wipe them down and re-use.- 23 replies
-
- longwallet
- handmade
-
(and 2 more)
Tagged with:
-

Long Wallet
Tugadude replied to kyrrk's topic in Purses, Wallets, Belts and Miscellaneous Pocket Items
Long wallet turned out very nice! I personally like the chunky stitching, but some will likely say it is a bit big. Shows off your nice, consistent stitches. The edges probably should be edge coated. Just get them as smooth as you can, fibers compacted down and then edge coat. Keep up the good work and your third one will be even better.- 23 replies
-
- longwallet
- handmade
-
(and 2 more)
Tagged with:
-
That link is actually to a "turned" bag where the seams are on the inside. The pics I posted are from the accordion bag. BTW, the turned bag turned out great and while I didn't use the piping or welts, I was very happy with the results.
-
I did not skive the edges. You certainly could if you want to minimize the thickness of the visible join. If I make another one, I might, but it doesn't help the bend. In order to do that you'd have to skive all the way across the bend and like I said, I found that unnecessary. I've completed two bags now with same construction and zero issues.
-
-
Borrowed from Andersen Leather where he details the construction of this beautiful bag. It is an "Instructable" and you can google it to see the complete details. Pics didn't load, so see post below.....
-
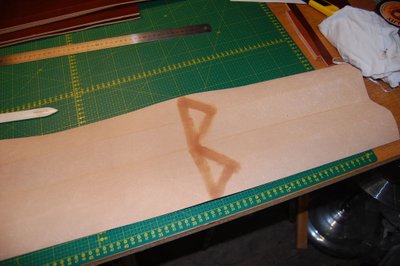
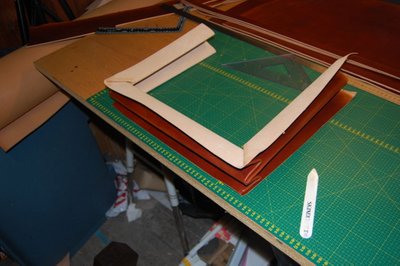
I think the triangles the OP is referring to are actually triangles that are creased into the leather on accordion briefcases, wallets, etc. No stitching involved in the triangle. The leather is wetted and a bone folder used to crease along predetermined lines. I used 5-6 oz. buffalo culatta on a bag exactly like the one pictured and the leather had zero issues making the turn. No wetting either. I just worked fine. There was no lining or stiffening used or required.
-

Chrome tanned is longer lasting than vegetable tanned?
Tugadude replied to doorty's topic in All About Leather
I suppose you might get some suppliers to split it down for you. Maybe call around and tell them the qualities you are after. I've had good luck with Springfield Leather. -

Chrome tanned is longer lasting than vegetable tanned?
Tugadude replied to doorty's topic in All About Leather
If we go back to the original post, it seems there are two standards being compared. Vegetable tanned leather aging better and chrome tanned leather lasts longer. In my opinion an argument can be made that those are different and can both be true. Chrome tanned leathers can acquire a patina due to sweat, oils, friction and just plain dirt. This is especially true of re-tanned leathers such as some of Horween's product that is chrome tanned and then vegetable tanned. However, in my experience, vegetable tanned leather wins the patina "contest". -

Chrome tanned is longer lasting than vegetable tanned?
Tugadude replied to doorty's topic in All About Leather
Were all of the testers of similar weight? Did they have similar biomechanics, i.e. pronator versus supinator? Heel strikers? -

Chrome tanned is longer lasting than vegetable tanned?
Tugadude replied to doorty's topic in All About Leather
Latigo is typically very thick, but a few sources sell it in 4-5 oz. I'll leave it to you to decide whether that thickness would work. It certainly would be durable to the outdoors. -

Chrome tanned is longer lasting than vegetable tanned?
Tugadude replied to doorty's topic in All About Leather
I don't think it is possible to settle the argument over tanning and longevity on this forum. But good luck. -
Regarding your second question, many leathers do not case and accept stamps like vegetable tanned leather does. So in those instances, heat is the way to add your maker's mark. So you are actually "branding" the leather. So whether it is convenient or not, on some leathers, heat is the best option. Other options would be dye stamps or lasers I suppose. Regarding the first question, I will leave that to folks that use heated irons such as a fileteuse. I only paint edges with Edge Kote then burnish and wax. Works for my purposes, but I'm a hobbyist. Edge finishing is a process for which there are no shortcuts or "magic elixirs". When I see good edges, I applaud because I know it requires effort.
-
I also used the Andersen pattern, at least for inspiration. I actually made my own pattern after studying his and modified it some to meet my personal needs. Worked fine for me. I think that is something you might consider.
-

Stubby / Can Holders
Tugadude replied to Handstitched's topic in Purses, Wallets, Belts and Miscellaneous Pocket Items
Yes that helps. I like to see different methods because I can learn so much. -

Stubby / Can Holders
Tugadude replied to Handstitched's topic in Purses, Wallets, Belts and Miscellaneous Pocket Items
Nice stuff, but would like to see the seam and the bottom if you get the chance. -
I've had the same issue with the tape but still use it on some items. Glue is best if you can wait for it to dry. Contact cement is awesome but you have to clean it off of the edges if it oozes out. Not difficult, just an extra step I guess. There are many projects I do where I use no adhesive. Just depends.


