Tugadude
-
Posts
2,656 -
Joined
-
Last visited
Content Type
Profiles
Forums
Events
Blogs
Gallery
Everything posted by Tugadude
-
 Part of the problem longterm is preventing the veg tan areas from darkening in sunlight. I made a sleeve for my Yeti cup and couldn't believe how much and how quickly it changed. You say you want to preserve the "pinkish" color. IMHO it probably won't be possible for long. Some finishes claim UV resistance but I'm skeptical.
 -
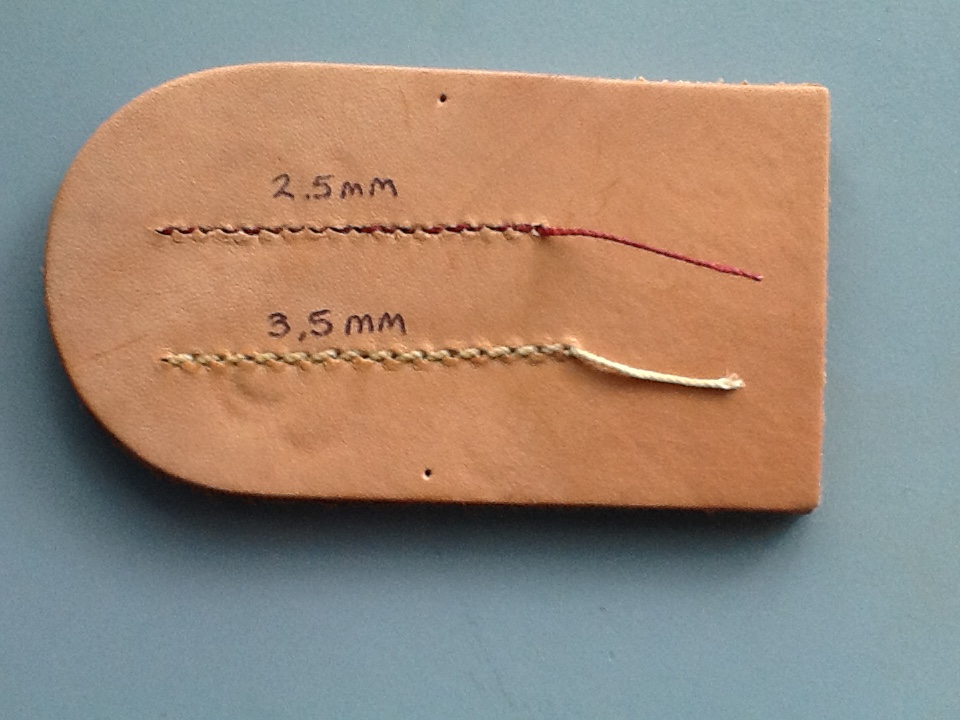
As promised, here are some stitched samples. I used the thread I had handy. Both threads are 3-ply with the red being close to 0.6mm and the tan a little larger, close to 0.8mm. As you can see an angle was achieved on both sides. I pulled the red a little tighter than normal apparently or the veg tan scrap was unusually soft. I stitched two layers of approx. 3mm veg tan. I think both stitches are serviceable. Just a quick show, but effective in demonstrating what the tools can do.
-
I've had good luck with carnauba creme as a finish on many items. For things that I want to shine, I use Supersheen from Tandy. It provides a nice, durable finish. There have been a couple of items I experimented on and used a neutral shoe wax and actually found it had good results.
-
Good luck and Godspeed! I always appreciated the work you shared.
-
Welcome and come on in, the water is fine. There are some true craftsfolk that hang out here and lots of enthusiasts like myself.
-
Lets talk about WOW factor in leatherwork.
Tugadude replied to immiketoo's topic in Leatherwork Conversation
JMixx makes some good points. Strive for perfection but be willing to accept less if that is your best. And appreciate mistakes as just less than perfect. And BTW, nothing we do is ever perfect. Nice story about the cardigan! -
Try waiting 24 hours before buffing. Did you say you are buffing for 20 minutes, or are waiting to buff 20 minutes? I've never buffed anything for more than a minute or so and I've never had issues like you describe. I've tried applying Neatsfoot oil first and then dye, dye straight over clean leather and not having issues. I typically use Fiebings Pro oil dye.
-
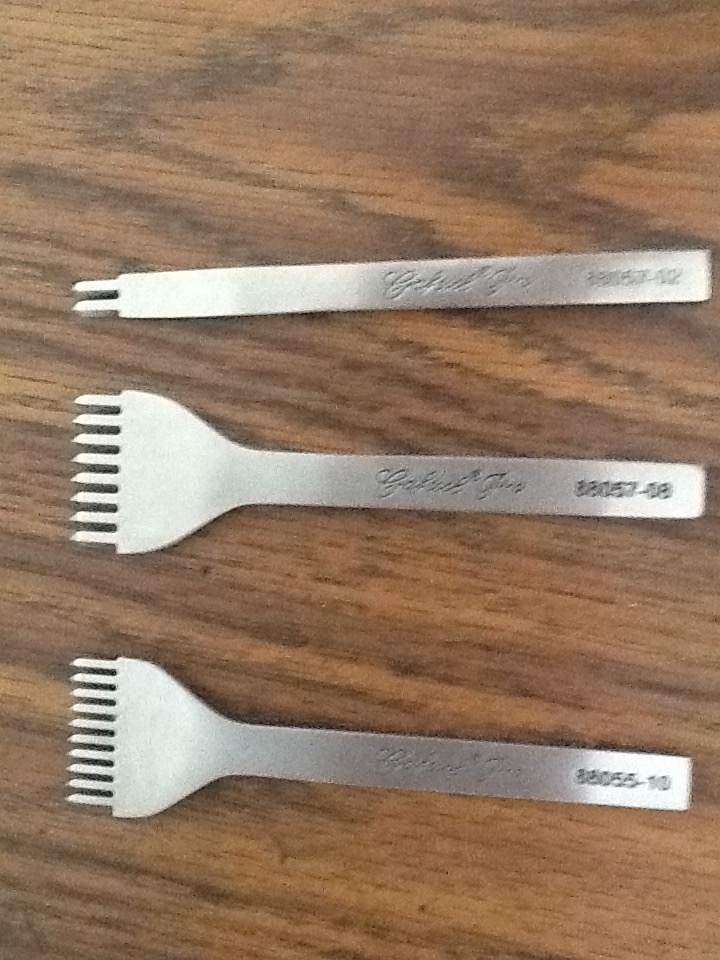
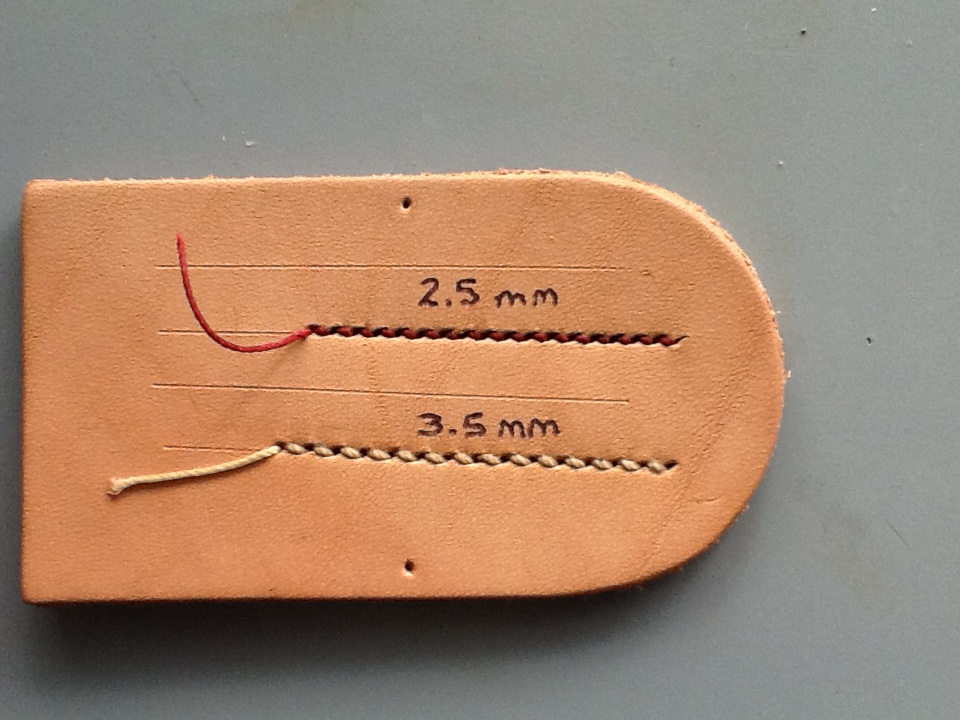
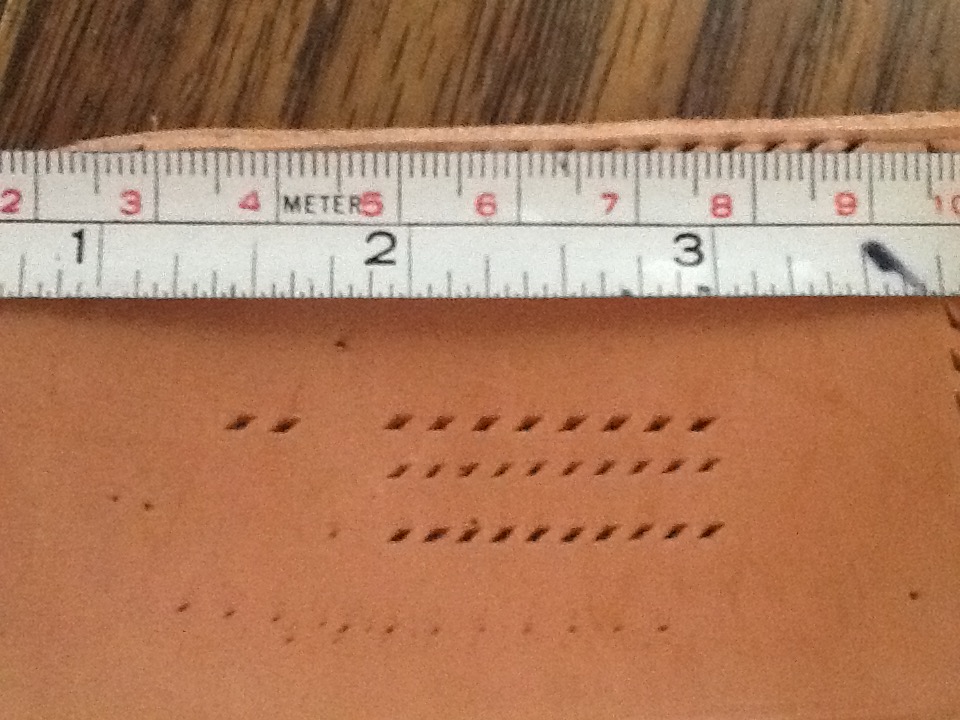
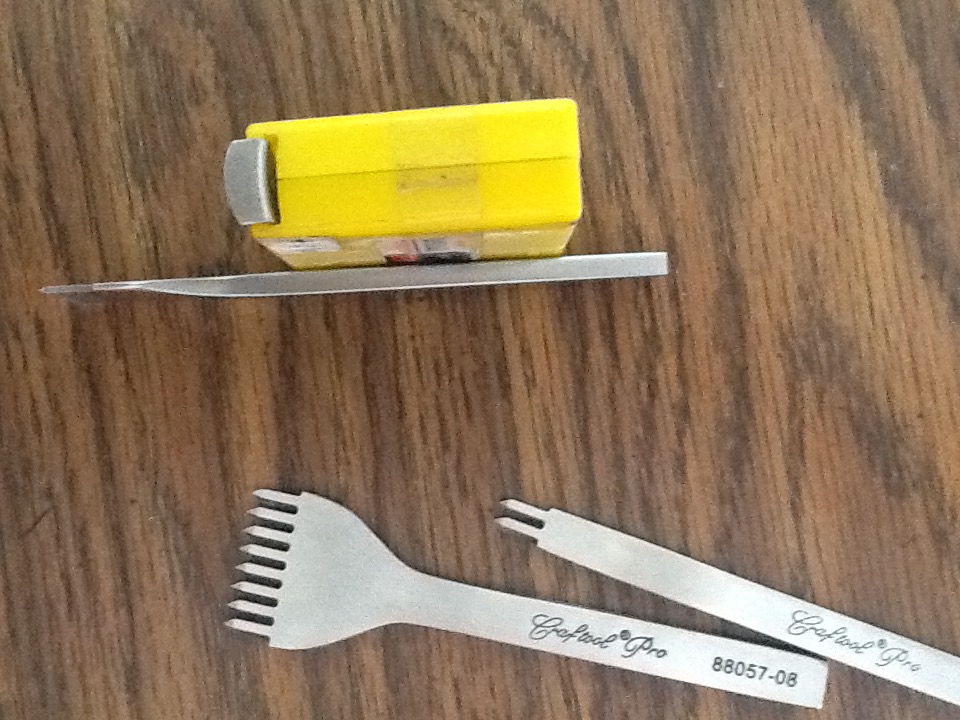
There are many threads on the forum discussing diamond stitching chisels but I thought another one was in order. Several years ago I purchased a 2.5mm Tandy Craftool Pro diamond stitching chisel. The chisel has 10 teeth and at the time was not offered in a 2-tooth version. I didn't buy the 1-tooth iron because I believe it is mostly useless. I will explain later. Those who use chisels already know why. I really liked the chisel and hoped that Tandy would listen to feedback and begin producing the same iron in a 2-tooth model. Well, good news, they have! Around the time I purchased the iron I was doing some fine work such as watch straps and because of that was looking to achieve 9 SPI. I already owned some of the Tandy Craftool diamond chisels (the black ones), but the SPI I had was approximately 7 and I felt that was too big of a stitch for the straps. The chisel is not perfect, but I still find it very good and use it quite often. I will add some photos (sorry for the poor quality) and add some thoughts that I hope will help folks who might be considering these chisels. It at least should be helpful for comparison's sake. Since the first chisel I have purchased two more but in the 3.5mm size. I went with the 8-tooth and the 2-tooth models. First, a comparison of the holes. The tools are made the same, but the size of the tooth and the spacing is different as shown below. As you can see, the row on top has 8 holes and then 2 just to the left of the main line. I wanted to show both irons so you can compare the two irons and see that they indeed match in tooth size and spacing. The middle row is the 2.5mm iron that has 10 teeth but only punched about halfway through the leather. I did this to show that it could be used as a pricking iron should you wish to do that. Notice that when the iron is given a light tap it creates a nice impression but not nearly as big as when it is hammered through. This certainly could be used as a reference in traditional saddle stitching with an awl. The angle is flatter than what is optimal, but it still is functional. Finally, the bottom row is the 2.5mm 10-tooth iron struck all the way through. I had a piece of approx. 3mm vegetable tanned scrap as the subject piece. The irons themselves present very well. They are stainless steel and have a satin finish to them. Nicely engraved with the name of the tool and an item code and number of teeth. Would be nice if they said 2.5mm or 3.5mm but they do not. I also took a pic of the 2.5mm iron sideways to show how sleek the tool is. In this orientation, the tooth is very slim. The real problem with the tool is the width of the tooth. If it were only a little narrower..... Here are a couple of figures that I hope you find helpful for reference. Tandy Craftool Pro 2.5mm diamond stitching chisel Tandy Craftool Pro 3.5mm diamond stitching chisel Tooth options: 1, 2, 4 and 10 Tooth options: 1, 2, 4 and 8 Stitches per inch: 9 Stitches per inch: 7 Recommended thread: 0.6mm Tiger Thread or similar Recommended thread: 0.8mm Tiger Thread or similar In summary: I really wanted to show the tools, the holes they create and discuss some of the features so that if someone is considering buying them they have a frame of reference and a testimonial from someone that has used them. Earlier I mentioned that I believe a 1-tooth chisel is mostly useless. I didn't say totally useless because I suppose there might come a time where you need to make just one hole. However, for most work a chisel with 2-teeth is a better option. When doing a long row of holes, the 8-tooth or 10-tooth chisels are great. When you come to a curved section of stitching, you change to the 2-tooth and continue around the radius. Since the tool has two teeth, the required spacing between holes is maintained. How do you do that with a 1-tooth tool? Well, there is a way, you basically use the tool with 8 or 10 teeth but hold it on an angle and just make a faint indentation beyond the straight section into the curved section. You then pick up the 1-tooth tool and hammer it through in the location of the indentation. So it does work, but you have to be very careful of the angle now. You might end up with the correct spacing but get the orientation of the tool out of whack and end up with an errant stitch. So a 2-tooth tool is the way to go IMHO. I didn't take the time yet to actually put some thread in the holes but I will and submit it later on. But for now, I trust there is some helpful information here that will give you some food for thought. I mentioned that the tools aren't perfect and here are some reasons why. Although the tools are quality SS, nicely weighted and finished, the teeth themselves are quite rough on two of the 4 sides of the diamond. Because of this, the iron tends to bind in thicker leather. Makes it necessary to use a wooden block to remove the iron. This can be helped by punching the iron into beeswax every so often or polishing on a buffing wheel, but it would be nice if you didn't have to do that. Second, the width of the tooth. I would like to see the size of the tooth slimmed down just a bit. As it is, you can see in the pictures that the "diamond" hole that is created is fairly thin but quite long. Wish it could be a little shorter. Finally, the angle of the tooth. As it stands, the angle is probably around 30 degrees or so. Would be much better if it were steeper, say 40 to 45 degrees. I think a steeper angle of the hole would result in a more angled stitch. So what's my bottom line? Am I glad I bought them? Yes, I find them to be good tools. I don't use them on everything, but in the right place they do the job. I use the black Craftool chisels on some of my work and use a traditional awl method on others. I'm hoping that Tandy will evaluate the tools over time and respond to the feedback they have received. Tandy has stepped up its game, introducing some really nice tools lately. If they could make just a few adjustments in these irons they would have a real winner. If you want more detailed information on these tools and reviews of a number of pricking irons and diamond chisels, you can look up Nigel Armitage on Youtube or at his website, ArmitageLeather.com. The Youtube videos are awesome and you get to see Nigel actually stitch the holes created by the irons. Nigel's website has a .pdf file which contains detailed reviews much more comprehensive than what I offered on not just these irons but most of the major players in the marketplace. It is THE reference for this type of tool. Nigel is a master, I'm a hobbyist with a strong desire to do good work. Hopefully this will help someone.

-
First clutch purse
Tugadude replied to Alisdair's topic in Purses, Wallets, Belts and Miscellaneous Pocket Items
Very nice. I like brogue elements so I appreciated what you incorporated into the work. I also know how hard it is to do box stitching like you did on the side panels, so kudos to you for pulling it off. Strap is pretty cool also. It all harmonizes very well I think. -
Lets talk about WOW factor in leatherwork.
Tugadude replied to immiketoo's topic in Leatherwork Conversation
Now that I'm warmed up, might as well keep going. I wanted to chime in on the subject of criticism. I made a comment once to a post that was in the "Show Off" area of the forum. The OP apparently was not thrilled with my comment. I believe I was spot-on with my comment but didn't reply, just let it go. It was at that point that I decided to refrain from making any critique in the "Show Off" section and reserve that type of feedback for the "Critique My Work" section. The OP didn't ask for critique so I was wrong for offering any. Lesson learned. I try to be balanced, in other words pointing out something good and then something that might need attention. There is always something good to say and good work should be praised. But all praise and no criticism leads to a false sense of accomplishment. So I believe critique is absolutely necessary in order to improve. But the feedback should obviously be constructive and offered with the best of intentions. -
Lets talk about WOW factor in leatherwork.
Tugadude replied to immiketoo's topic in Leatherwork Conversation
This is a great topic and and this post in particular reminds me of something I was thinking the other day when looking at a topic concerning a ladies long wallet. I want to follow up on immiketoo's response to KingsCountyLeather's post. It nailed the issue pretty well. So I read the post on the ladies long wallet and noticed that the maker had used a pocket design that I hadn't seen before. It was a sort of wave shape, but had some unique curves. I pointed out that it was his "signature". That shape alone, just a pocket shape, to me contributed to the "wow" factor of the piece. I think I might have commented that I hope others don't copy the design. So my take for what it is worth is that leatherwork is so old by now that it is getting harder and harder to come up with something original. I'm sure that anything I've created that I believe to be unique to me has been done before. Probably over and over. The trick, I believe is to create that "style" (and I agree with immiketoo that it can be nebulous), and continue to refine your own personal look. Don't overtly copy. Take a design and change it to suit your style. Add a touch or two. I saw a nice luggage tag on here the other day and decided to make one myself. I took the basic idea and created one, but it is far from a copy. I used the skills I'm comfortable with and altered it enough to make it an expression of my style. So to KingsCountyLeather, who has always been a gentleman on the forum I say don't be too hard on yourself. The mere fact that you are thinking about it speaks volumes about your character! -
It is ink. Doesn't have the look of pyrography to my eye. I'll go with some form of printing.
-
Well, you did good. BTW, you might want to put zipper stops on next time. They go just before the leather at the end where the zipper starts to bind. This will keep the zipper from going too far and messing with the leather. There is another thread on here where the process is described.

-
Even lined I think the friction will be sufficient. Even open on one edge I have to tug to get the bills out. Or maybe it is all psychological?!!!
-
My second laptop bag.
Tugadude replied to jasonphx's topic in Purses, Wallets, Belts and Miscellaneous Pocket Items
I got this image off of the web. I don't have a way to easily upload my own photo at the moment. The "keeper" I'm talking about is standard fare on many messenger bags and mail bags especially. It can be fixed length or adjustable. It helps to take the stress off of the top of the bag when it is stuffed. It also can "pinch" the width of the gussets in so that your flap might hang better. It was just a thought.
-
I made one where the middle had to be accessed by squeezing the ends and found it to be a pain in the tookas. It was especially hard with multiple cards in the slots due to the added stiffness. So for me, the open flap was very helpful.
-
Nice job on your first big project! You have a bunch of essential skills in the construction including zippered pockets, turned edge, etc., and you executed them nicely.
-
Personal project wallet!
Tugadude replied to Rodeoman's topic in Purses, Wallets, Belts and Miscellaneous Pocket Items
Forgot to say welcome! -
Personal project wallet!
Tugadude replied to Rodeoman's topic in Purses, Wallets, Belts and Miscellaneous Pocket Items
Nice job. Gotta show the inside now! -
There is craft and then there is art. You have entered the realm of art.
-
Portrait of a German Shepherd (my doggy Gerda)
Tugadude commented on ABHandmade's gallery image in Gallery- Our Leatherwork
.JPG.21da956aeb6996972439ea6b15b7791b.JPG) There is craft and then there is art. You've entered the realm of art.
There is craft and then there is art. You've entered the realm of art. -
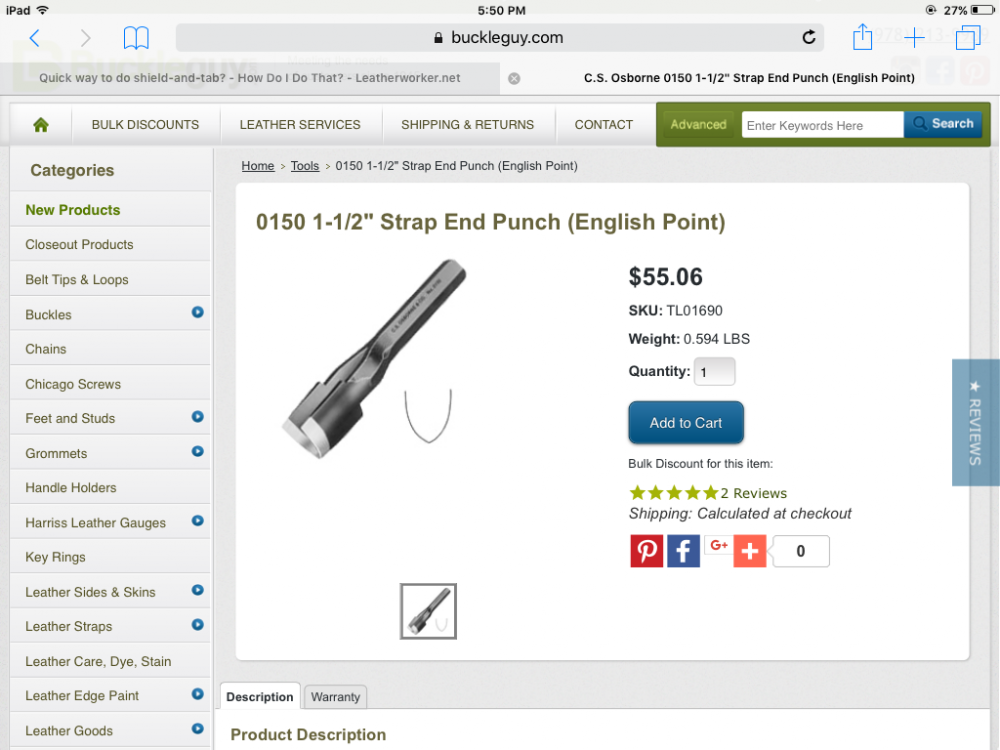
They are spendy, but you can buy an English strap end punch that has the shape you are looking for. Can use on belts too.
-
My second laptop bag.
Tugadude replied to jasonphx's topic in Purses, Wallets, Belts and Miscellaneous Pocket Items
Congrats on the new job! Overall very nice bag. One thing that sticks out is the proportion of the front pockets. I'm thinking they could be deeper and maybe a little wider. Maybe should have flaps on them for security. Stitching is good but got a little wonky on the retainer tab below the D ring. I don't quite understand the stitches on the right. There are places where it looks like you backstitched but in a weird place. ??? Need to be really good there because it is literally front and center. You might consider a couple horizontal keepers at the top sides of the bag to reign it in a bit. As it is, the flap doesn't drape so good. Look at your last pic to see what I mean. Cool bag and I'm sure you'll get comments on it! Hope you take my comments positively. -
Well that is way beyond cool. Doing faces, whether human or a dog such as this has got to be one of the most difficult things to do. You pulled it off quite nicely. Looks very realistic.
-
First watchstrap
Tugadude replied to Alisdair's topic in Purses, Wallets, Belts and Miscellaneous Pocket Items
Nice job. I have a color that would work better so if you want to send me the watch..... What was your thinking on having the fixed keeper and the floating keeper not match? Watch straps are notoriously difficult to do well. Even high-end houses have the occasional wonky stitch. You did well.