


dikman
-
Posts
4,828 -
Joined
-
Last visited
Content Type
Profiles
Forums
Events
Blogs
Gallery
Store
Everything posted by dikman
-
Questions - Shotgun cartridge belt
dikman replied to stormdevil's topic in Gun Holsters, Rifle Slings and Knife Sheathes
The first time I made some loops I had very little idea of what I was doing (pretty normal for me!) and #1 seemed like the right way, as at that stage I hadn't seen any drawings etc like this so made it up as I went. It worked, but next time I tried #2 and find I prefer that as i think it looks neater, but that's just my opinion. I found that by cutting the loop strap slightly oversize for the slot and wetting it down first it fits without showing the slot afterwards and wetting it allows it to sit flatter on the back. As Dwight said if the backing piece is glued then the whole thing becomes more rigid. I also made a "cheat sheet" but drew mine on paper and then laminated it. -
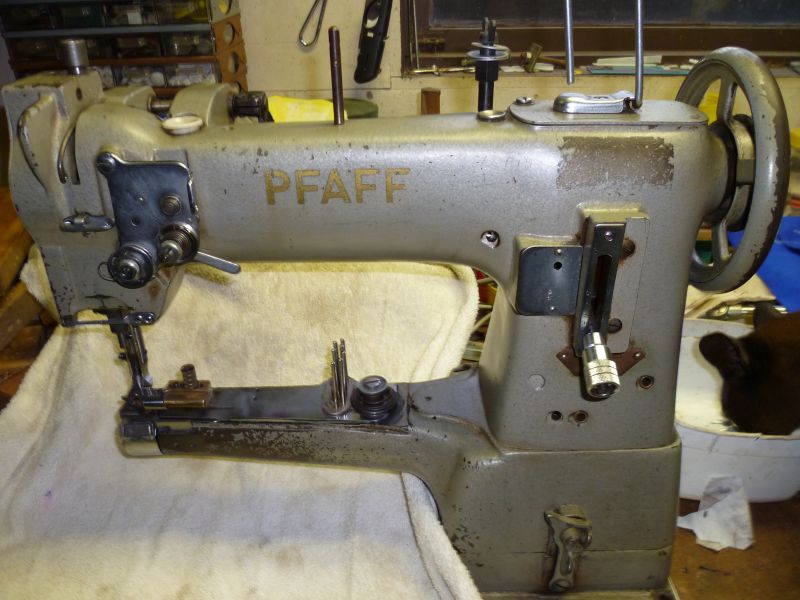
Pfaff 335 BB (older model) experience?
dikman replied to plinkercases's topic in Leather Sewing Machines
I just finished reading your renovation writeup, Jimi, and realised that yours appears to be the same vintage as mine - mine is labelled 17BL. Presumably they pre-date the introduction of the H designation, but I have no idea what the 17 stands for. -
Pfaff 335 BB (older model) experience?
dikman replied to plinkercases's topic in Leather Sewing Machines
Plinker, I simply used a spare pulley that I had to replace the handwheel (coupled with the servo it slows things down quite a bit). I had to make a sleeve as the pulley hole was too big. A 550w motor will be plenty big enough. Jimmy, the hole for the rod is pretty well a "standard" looking hole, the problem appears to be the design of the sliding lifter. I intend to have another look at it sometime simply because it annoys me that I can't figure it out! You can see the tension release lever in the photo, I haven't seen this design in any other photos I've looked at .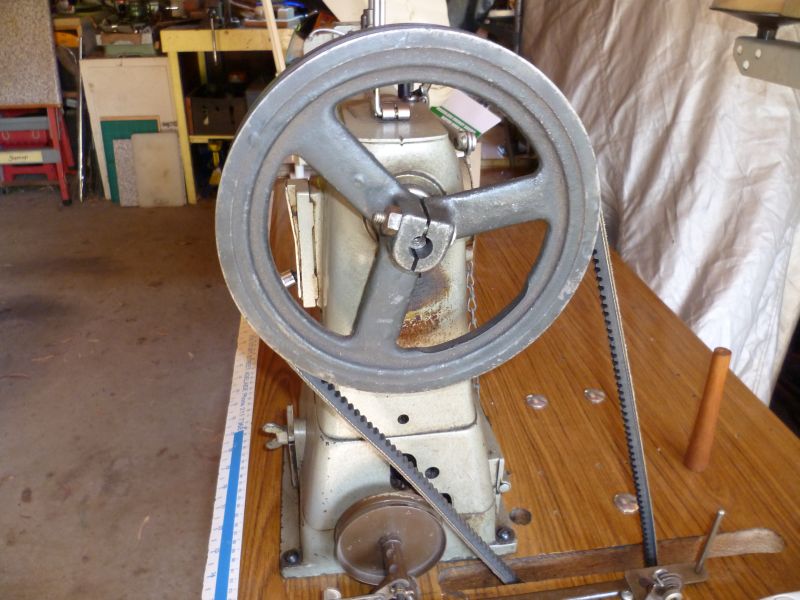
-
Pfaff 335 BB (older model) experience?
dikman replied to plinkercases's topic in Leather Sewing Machines
Looks pretty much the same as mine, with one obvious difference - on the plate that mounts the thread tensioner mine has a lever behind it and on the right, this is a manual tension release. When I first got it I fitted a rod in the hole behind the tension disk so that it would release when the foot lift lever is operated. Unfortunately, what happens then is that every time the needle bar rises during stitching the tension release operates! Not good. So far I haven't been able to figure it out because I can't see anything wrong/bent/broken. It looks like it's made to do that. Has me puzzled. -
Pfaff 335 BB (older model) experience?
dikman replied to plinkercases's topic in Leather Sewing Machines
I have an older model (quite old, I suspect) and while I could probably squeeze 1/2" under the feet I'm not sure how it would handle it as I think it's designed for 3/8" . I fitted a servo and a larger handwheel and it's actually quite a gutzy machine (it uses an internal gear drive rather than a drive belt). Biggest potential problem is the stitch length as the best I can get is approx. 4mm apart. I have got it to sew #138, but it's happier with #69 thread. It should be fine for belts, bags and sheaths as long as you don't go too thick. Holsters might work, depending on what you have in mind. If you're thinking about your typical Cowboy Action holster, then no. If you can get one at a good price then they are a pretty nice machine to add to the workshop. -
Yeah, I'm feeling pretty chuffed. Occasionally I have a win.....
-
Thanks Darren, sort of what I figured.
-
Deryk, Darren and I are in Australia, which is why I asked. The prices in the US can't always be relied on even as a guide.
-
I've been searching for this book for ages and I've finally got a copy (or will have when it's delivered). The book isn't readily available here in Oz (so would be a special order, with all the costs that entails) and I don't consider getting it from the US to be an option - high cost of the book and exorbitant postage charges. So you can imagine my surprise when, three days ago, I saw a copy for sale on ebay (and it was here in Oz). Starting bid was $19, with no bids, so I bided my time and waited until about four hours to go and put in a bid. Nerve-wracking wait, but I got it! No other bids, plus $15 postage, so I'm happy!
-
Out of curiosity, Darren, any idea yet of pricing?
-
Does that mean you can grill lunch while you're welding?
-
Bruce J, yes, it had occurred to me that sitting it lower would probably help overcome arm movement issues - but then if it's too low you'd be bending over all the time to see the stitching! My back wouldn't like that either. Having said that in thinking about it it could suit my needs quite nicely (non-production work) unfortunately even if it becomes available here in Oz I fear the cost would put it out of reach.
-
Mexican loop question
dikman replied to dikman's topic in Gun Holsters, Rifle Slings and Knife Sheathes
No need for a photo, Josh I think I've figured out what your stamp looks like. -
Mexican loop question
dikman replied to dikman's topic in Gun Holsters, Rifle Slings and Knife Sheathes
Thanks Josh, I just tried using a beveller on the cut line and it helped by giving me an actual edge to use as a guide. Now to look for a cut-type beveller for the swivel knife. Any chance you can post a photo of your stamp? The one I made is half an hourglass, so I'm curious what you use. -
Neck knife with a pouch
dikman replied to zenhas's topic in Gun Holsters, Rifle Slings and Knife Sheathes
I thought it looked like flint. -
Mexican loop question
dikman replied to dikman's topic in Gun Holsters, Rifle Slings and Knife Sheathes
I think I've finally got a pattern template that looks like it should work (well, it does with cardboard), but having drooled over Josh's stunning stamping I decided I have to do a serpentine pattern. After three attempts at making a stamp I have one that works ok, but (there's always a but, it seems) I'm finding it's particularly difficult to use. I've tried using cut lines as guides, and scribed lines, but it's not easy achieving a consistent appearance.It's made me appreciate even more Josh's superb stamping. At this stage I'm not about to try it on my holster so I'll come up with a pattern that is more forgiving i.e. if it doesn't quite line up perfectly it won't be too obvious! -
Hmm, some people are slow learners......
-
Neck knife with a pouch
dikman replied to zenhas's topic in Gun Holsters, Rifle Slings and Knife Sheathes
Nice work. That rock it's sitting on is rather interesting looking. -
As one gets older some things that used to be considered portable seem to magically put on weight........
-
An interesting machine, and I wouldn't mind one, but I suspect the price is likely to be such that as koreric says I'd be better off coughing up the extra for a "proper" machine. That arm movement could be an issue for some, as I know that after a half hour on a reloading press my arm is starting to complain. Small pieces/short runs would probably be ok, but stitching a belt could be an issue.
-
If I can offer some advice (bear in mind I've had "some" experience with industrial sewing machines but I still consider myself a rank amateur at this stuff) if you think you're likely to end up sewing leather goods by machine then don't mess around, look for a medium-class walking foot machine - Singer 111/211 class, Consew 206, Seiko 8DB etc or Pfaff 335 (or equivalent) if you want a cylinder arm. These will do the type of sewing you mention and with a bit of tweaking should handle up to #138 thread. If you buy a straight stitcher it won't take long to realise it's limitations on leather. Also, get a servo motor. You might have a natural ability to control a clutch motor on leather (if you're lucky), but most don't and they can be pretty scary and frustrating to learn to control. I find it's enough to worry about getting a nice stitch line without fighting a motor that wants to travel at warp speed! If you think you're likely to want to start collecting industrial sewing machines then by all means buy one of these to start with, but be warned once you start it's a very slippery slope!
-
The Unicorn has Landed -- Singer 19-10 in the shop
dikman replied to Matt S's topic in Leather Sewing Machines
Nice looking machine, something just a little bit different.Looks to be in pretty good condition, judging by the paintwork. -
Mexican loop question
dikman replied to dikman's topic in Gun Holsters, Rifle Slings and Knife Sheathes
Thanks LD2, guess I'm about to find out.... -
Thanks for that, Lobo. I've watched some of the "fast-draw" things on youtube, and while they are impressive (in their own way) they do nothing for me. My abilities in Single Action are such that even with a fast-draw holster I've still got Buckley's chance of winning!. As my interest has grown I've found that I'm getting interested in the more traditonal style of holster. I can see where I'll end up with several different styles of holster/gunbelt combos (one for every day of the week! ).
-
Mexican loop question
dikman replied to dikman's topic in Gun Holsters, Rifle Slings and Knife Sheathes
I've resurrected this 'cos I'm still working on it!! In the intervening time I've bought a couple of Ruger Vaquero's, 5 1/2" barrels so I've decided to make Mexican loops for these. My pattern looks promising, but I've just realised that I've got about a 3" drop from the belt, which seems excessive for a loop style? I can shorten it a bit and still make it fairly easy to get the pouch through the loops. Question: should a Mexican Loop have minimal drop? I should add that I like having the holster hang a bit lower. Also, does this style work as a cross-draw? I don't think I've seen any photos used like this.