Chief31794
-
Posts
1,801 -
Joined
-
Last visited
Content Type
Profiles
Forums
Events
Blogs
Gallery
Store
Everything posted by Chief31794
-
Welcome to the site, this is a great forum with lots of friendly people. Chief
-
 I sew them by hand. I can't see any way to sew them by machine. Chief
 -
I'm a big fan of Clear Lac, used it when it was Neat lac and still using it. Seals great, does a good job if you need a resist. I apply the finish in light coats and rub it in, nice soft sheen and really protects the leather very well. Chief
-
What Do You Use To Sew Wallet Liners
Chief31794 replied to Chief31794's topic in Leather Sewing Machines
Thanks Cheryl and Aaron. My mom has an old singer tredle machine, I think that would be perfect but it is an antique and getting it from her isn't something I'm willing to tackle, it was her grandmothers and she's 83. Chief -
I have an old singer normal sewing machine that I installed a leather needle in, it does okay, but the speed is too fast and not easily controllable. I was wondering what the folks that sew a lot use for sewing things like pigskin liners, calfskin liners etc when the leather is only about 1.5 - 2 oz thick. Are there smaller machines that have good speed control and maybe even a walking foot?
-
Practice pieces can be ordered from Tandy, Springfield Leather Company, and just about any other leather craft store there is. As for thicknes, I would get at least 6 oz but any size over that is acceptable. If you get a couple of pieces of 4oz it's worth carving just to get a feel for carving thinner leathers (probably want to back it with some shelf paper or tape or cardboard (not corrugated) to control stretch just for practice, so no problem. The "Scrap" pieces normally come in a bag and are random as to weight and size. Sometimes you can find them sorted by weight, you'll also generate plenty of practice pieces as you work in this craft for later practicing. Post pictures as you progress to let us know how you're doing.
-
Bruce is absolutely right, I forgot but Barry King sells his swivel knife blades to fit a Tandy swivel knife, that's a great idea, Barry charges $15.00 for his blades that fit a Tandy, the only difference is the shaft diameter, the blades are the same ones he sells for his knives. He's also right on that better tools do better work, and that if you don't like it, they are definitely sellable. The Tandy kit stamps probably would have to be given away. That is sort of what I was trying to talk around to, however, I went with the Tandy Kit because I got the feeling you wanted to get in as reasonable as possible to start. I don't buy anything but Barry King Stamps and have replaced nearly all my Tandy stamps over the years, don't have any of the Z series stamps though because I have thrown them away or gave them away or lost them over the years, I bought a Tandy Deluxe Leather Craft Kit in 1971 and that's what got me started, wish I had the kit just for nostalgia, etc. Good Luck and welcome to the wonderful world of Leathercraft. Listen to Bruce, he's one of the legends of the craft. Chief
-
I would buy what I need as I need it, many people buy a deluxe kit for about $700.00 and never use some of the items in it. If you want to learn sheridan, I would suggest the seven piece craftool basic 7 tool kit, they are available from Tandy for about $36.00, it comes with a swivel knife, and 6 Sheridan type stamping tools a beveler, camo tool, veiner, pear shader, seeder and a stop. They are not very good tools, however, most of us started on them and they get you in for less than $40.00 so that you can determine whether or not this is for you. I would also buy some veg tan pieces to practice on. Then I would watch every video I could find on YouTube and Tandy, then pay $9.99 for Tandy's one month of videos in the leathercraft library and watch as many of those as I could find. I would search this site for casing, carving, etc posts and peruse them. This is based on your wanting to get started as inexpensively as possible. Many people will say you shouldn't waste your money on these tools as they aren't very good, they aren't very good, however, very good stamping tools are going to average about $30.00 each for ~$180.00 plus $40-$100 for a swivel knife and blade. Your choice, if you like it and stay at it, eventually you will get the better tools or at least some of them. Your choice. Hope that helps, Chief
-
How Do I Properly Organize My Stamping Tools?
Chief31794 replied to MMLeathercraft's topic in How Do I Do That?
First, welcome to the forum. For me, I have two racks that combined will hold about 170 stamps. The 80 hole rack is for my Sheridan carving tools and I keep the tools in sections, for example I have a column with 4 checkered beveled with them arranged with the narrowest at the bottom and progressing to the widest at the top. The rack slants back toward me. The next column would be smooth beveled, etc. The most important for me is to keep them in the same place so I don't have to look for them. The other rack holds figure carving tools, geometrics, basketweave, etc. Hope that helps. Chief -
I trace my patterns onto Tandy tracing film with a No. 2 pencil, I reuse the patterns 8-10 times with no problem. The pencil lines guide you for the first transfer, after that the lines are there whether the pencil marks stay or not. The stylus will leave impressions in the tracing paper that, to me, are better than the pencil lines. Chief
-
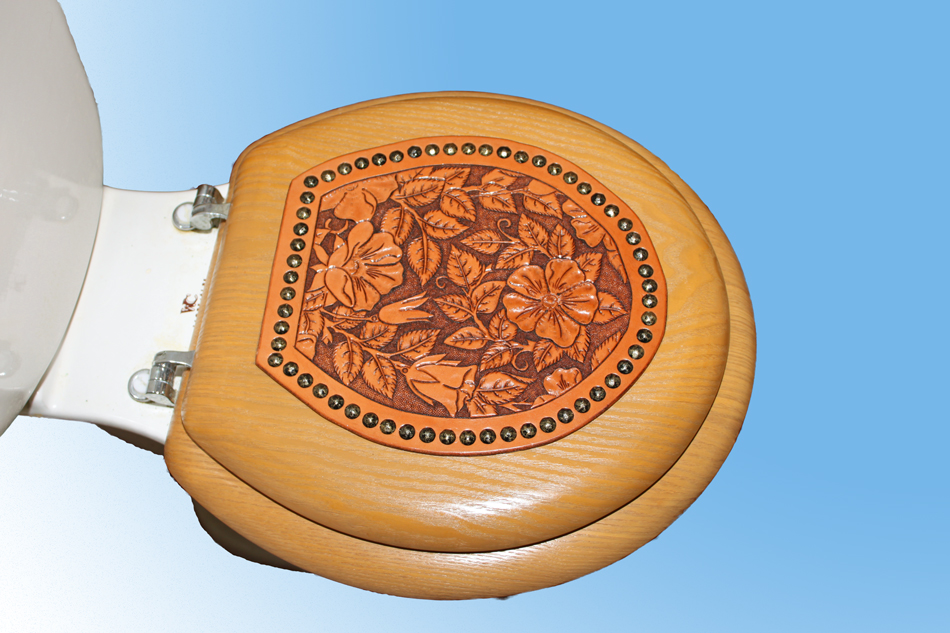
I made this a few months back and installed it. Our seat went bad so I bought one and she wanted something on it. I had seen one here on the forum a while back so I did it. It has gotten more comments from visitors to the house than any of my other work ever has. I saw one on ETSY the seller was asking $450.00, I got <$20.00 in the seat, ~$3.00 in Leather, another $3.50 in Tacks, and ~$.50 in dye and incidentals. That makes my labor (about 3 Hours) worth about $423.00 or $141.00 per hour. Maybe I'm selling my stuff too cheap!! Chief

-
Trekster, I'm not sure, mine doesn't require a significant amount of force on the handle in either direction, however, I am normally sewing through 3 layers of 4-6 oz (depending on the project). I occasionally sew through three layers of 8/9oz and it stilll doesn't require much effort (thankfully). Chief
-
I don't have any idea, I assume it's about 2005 or so. Chief
-
To help with the 3D, Tandy sells a 3D hefty handle which distributes the blow to more surface area, they are relatively inexpensive. If you're bending the shafts even on the Z tools you got in the kit (Z designates that it is from a Kit and Aaron is right, they are the worst of the worst), that being said, they shouldn't be bending, you are hitting too hard. I suspect you may not be wetting the leather enough then allow it to dry by to nearly it's natural cover before stamping with the tools. Another tip to help with the 3D stamps is to "rock" them back and forth and side to side as you tap them, that will make them more consistent and make the depressions deeper. Go to Lowes or Harbor Freight if you have one and get a 2lb Dead Blow hammer, that will make the big stamps easier. It isn't necessary, but I use one simply to prevent more wear on my poly mallets. Welcome to the forum and to Leather working. Chief
-
Biker Wallet
Chief31794 replied to Chief31794's topic in Purses, Wallets, Belts and Miscellaneous Pocket Items
This was dyed with Tan Antique Gel and then two coats of Clear Lac. No pics of the inside, wallet is gone, sorry. Chief -
Absolutely, I have it well secured to a bench. There are very stern warnings in the manual about securing the machine. The operation of the handle could lead to it tipping over I think. Chief
-
I do have one and it works really well, I don't sew a lot but when I do sew it does a great job. Took a little tweaking to understand it and now I don't hesitate to use it when the situation warrants. You can download the manual from Tippmann whether you bought it from them or not. Chief
-
Leather Business Cards
Chief31794 replied to EmbossingDieCompany's topic in Marketing and Advertising
Same here, I just got in two templates made to my design specs, a rifle sling template and a banjo strap template that will make cradle or standard banjo straps, absolutely beautiful, and right on the mark. Great company to do business with and has great products and great customer service. Chief -
Fiebings Aussie was recommended to me, I tried it and it does a good job of water repellent. I don't think there is an absolute water proof, if leather gets wet enough it will affect the leather, Aussie is a beeswax based product. I put it on with T-shirt material and then heat it with a hair dryer I keep in the shop, you will see the finish liquify and then it "soaks" in to the leather, I then wipe off the excess and buff. It produces a nice mellow shene. Like the product Bob recommended above, there are several good finishes, this is just another one and it is a Fiebings product as you indicated you would like to use. Chief
-
The manual has a very good guide to set up. If you didn't get a manual it is available for download in PDF format from the Tippmann site. Start at the beginning and go right by the manual. One of the most important things I've found is proper needle size, use the guide they give you and test it as described in the manual (the needle slide test). Most problems I've found don't have a lot to do with set up, do it by the book and only adjust stitch length after that as the thickness of the material changes, then make sure you are operating the machine methodically, handle all the way down then all the way up. It takes some getting used to in that you have to hold the material with one hand and operate the machine with the other. The videos that they ship with the machines now are also available for download on the site and are worth watching. Chief
-
Stitching groover does a great job, you can order them over the web from several suppliers, many of which advertise here on the forum. Springfield Leather, Tandy, etc. all ship within the US and even overseas, I can't tell where you're located. Many of us don't have local stores, and the Web is one of the best things that has happened to making suppliers available. Stitching groovers in general aren't very expensive especially compared to many of the other tools we use in leather craft. Welcome to the forum. Chief
-
They look great to me, very well constructed and nice work as usual. Chief
-
Tylerbrinks, First, welcome to the forum and to the wonderful world of Leather Craft. You'll find this is a great site and there is lots of friendly folks here with lots of knowledge. To answer your question (and you will probably get some more and alternative ways to do this) but the way I cut leather is: Dampen the leather on the grain (upside) side. The leather doesn't have to be Cased, but by dampening it, the cuts will be a lot easier and a lot smoother. I wouldn't try to cut through the entire piece in one pass, a couple of light passes are much easier and will result in less "Stretching" of the leather on lighter leathers. Dampness will do wonders for the ease of cutting. Try it on a piece of scrap and I think you'll see a big difference. Chief
-
Make sure you pull about 2" out of the bobbin, then make sure you hold the end of the needle thread and it should be out about 2" as well. Cycle the machine and it should pick up the bobbin thread and then you pull it through the plate by pulling on the needle thread. If not, you may not have the bobbin installed properly, make sure the thread slips in under the little pressure clip on the side of the bobbin case. Hope this helps. Chief
-
Welcome aboard, this is a great site, ask all the questions you want, that's the way you get the most out of the forums. Chief