Dwight
-
Posts
5,231 -
Joined
-
Last visited
Content Type
Profiles
Forums
Events
Blogs
Gallery
Everything posted by Dwight
-

Another Iwb Holster Question
Dwight replied to glockanator's topic in Gun Holsters, Rifle Slings and Knife Sheathes
If my customer can't be persuaded to choose my "Cactus" model for IWB, . . . my next choice for them is a pancake. IF I make them an IWB pancake, . . . it is always a "flat backed" pancake. I've found that will make it much harder for the holster to collapse inside the waistband without the hand gun in it. As LOBO pointed out, . . . a standard pancake can collapse like a pin pricked balloon. But then again, . . . almost all of my customers are looking for concealability and comfort, . . . and I make only a few OWB holsters. May God bless, Dwight -
When you get going well with that stuff, . . . remember that I also saved $45 on my "blue gun" Ruger LCP, . . . and another $45 on my little "blue gun" Keltec. They're both plywood, . . . and make perfect holsters. I'm making a Judge next. May God bless, Dwight
-
Going along with Lobo, . . . gun shows in general will usually have at least one table with a bunch of used magazines, . . . they are usually up for grabs. Personally, . . . I have a disc sander, . . . and a chop saw out in my shed. I can make any magazine out there out of scrap wood pieces, . . . in all of about 20 minutes. I did it just last week for a Glock, . . . customer wanted two Glock mags under his arm, . . . back to back, . . . so I made a yellow pine Glock mag, . . . worked like a champ. May God bless, Dwight
-
You can also use this little trick, . . . it'll take a few minutes to make, . . . but with a couple different ones, . . . you can get differrent looks. May God bless, Dwight

-
Curved Gun Belt Question
Dwight replied to johnggrg's topic in Gun Holsters, Rifle Slings and Knife Sheathes
Curved gun belts come in many different iterations: A curved gun belt like Marsahll Matt Dillon wore, . . . you would make it 3 inches wide and the center hole on the tongue would be made 38 inches from the tip of the belt buckle (John Bianchi standard). A curved gun belt like John Wayne wore in True Grit, . . . is 2 1/2 inches wide, . . . and again would be 38 inches, measured like the above belt. A curved gun belt to wear today with your concealed 1911, . . . would be 1 7/16 inches wide, . . . and would have 7 holes (instead of Walmart's standard of 5) and the center hole would be 36 inches from the tip of the belt buckle. You can also go to the "Belt" page of my website, . . . it will show you the proper way to measure for a new belt. May God bless, Dwight -
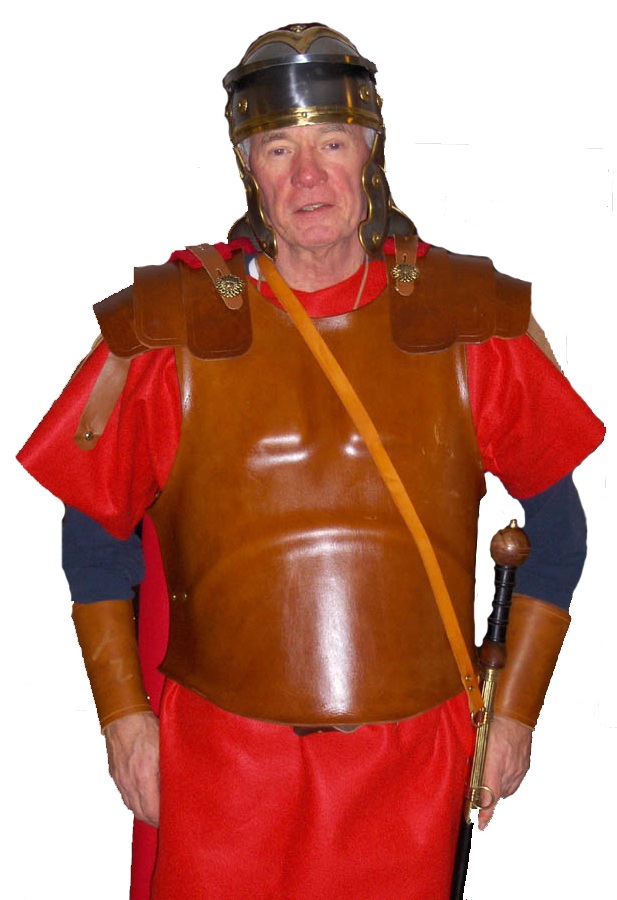
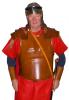
That particular armor is called Lorica Segmentata, . . . and is a pain to build. I have the metal version, . . . which is fairly authentic. That style as leather armor was never really used by anyone back then, . . . but is used today by actors and/or re-enactors. Good luck,.............. May God bless, Dwight
-
Do you have a picture of the back? I would love to see how that was done, . . . looks like a very interesting design. May God bless, Dwight
-
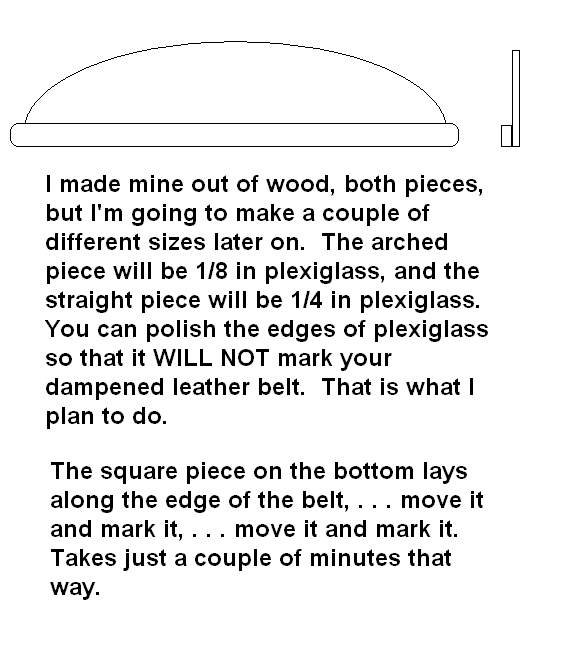
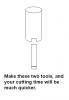
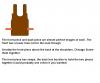
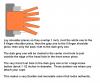
You don't say how big the circles are, . . . and that can be the deal breaker, . . . or deal maker. Personally, . . . I hate making repetitious cuts, . . . etc, . . . so I make tools for such things. In this case, . . . say for example I wanted the circles to be about 1 1/2 inches in diameter, . . . and the bar about 2 inches long and about a half inch wide. I'd first find a piece of 1 1/2 inch electrical mettalic tubing (better known as thinwall conduit), . . . cut it off about 9 inches long, . . . lay it up real easy against my sander, . . . sharpen the outside edge of one end of the conduit. I'd then take a grinder and grind off a section a half inch wide and about 3/4 inch deep. I'd then make me a piece of pine wood, . . . 1/2 inch wide, . . . and about 5 inches long. Position the pipe at one end of the board, . . . punch it through the leather with a mallet, . . . move it to the other end of the board, . . . punch it through. Use the board to mark where the sides should be cut with a razor knife, . . . cut em. Done ! Using EMT conduit, . . . your edges will not be perfect, . . . but they will be uniformly imperfect, . . . each one will be the same. The drawing may help illustrate the idea. I use these types of punches for all my repetitive punching work, . . . have quite a number of them built over the years. May God bless, Dwight
-
I use the paragon shaped knife blades in my strap cutter as well as to do all my leather cutting of patterns, etc. I have a round knife, . . . just do not like the critter. And, . . . yes, . . . I made a strop of a scrap piece of 10 oz leather, . . . little jeweler's rouge, . . . keeps my knife blades all sharpened until I chip em or something that makes em unserviceable. They work much better than straight out of the mfg'r's package. May God bless, Dwight
-
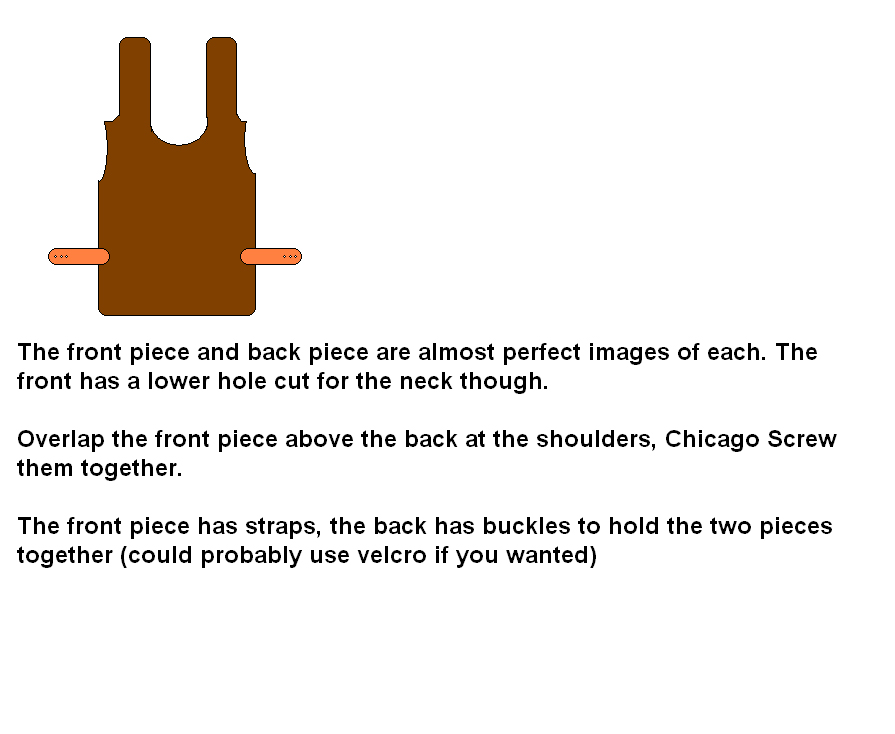
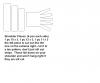
Good Morning, I'm attaching some drawings for you, shoulder pieces and front and back. I'll send you a paper cut out of the two big pieces if you send me a snail mail address. My original pattern was a "trial and error" cutting of black vinyl from JoAnn Fabrics, I bought a 45 inch by 36 inch piece for $16.99 or so. It is a little flimsy when compared to the leather, . . . but works wonderfully when compared to paper. The leather measures .165 thick, which is 10/11 oz leather. I happened to walk in to a Tandy shop the day they got some "consignment" leather in, which had some sort of finish and pattern on it, . . . I purchased two pieces, . . . something near 40 x 60, . . . and made the armor, shoulder pieces, grieves, cuffs, belt, apron, and still have a few scrap pieces. I use the armor in my persona presentation of the Centurion of Capernaum, Salvatorus Antonio, from the year 35AD. One thing you MUST remember to do with this type of armor if you are going to wear it, . . . make sure the arm holes and neck holes are big enough. If they are not, . . . they will rub you raw, . . . and you run a real risk of infection, . . . Secondarily to that, . . . in your forming process, . . . look real close at mine, there are two wooden blocks forming the "breast plate" projections, as well as a downward curving crescent. The forming process for that was done on a flat table to get the impressions, . . . tough on the thumbs, believe me, . . . and the downward curving crescent was nothing more than a piece of 3/8 inch rubber hose, taped to the table. The blocks were also taped to the table. After you get your details formed, . . . work on rounding your shoulders and the sides, . . . but do the detail stuff first. Soak your leather in the bathtub in water that is as hot as you can stand to work in it, . . . soak it for a good 4 or 5 minutes, . . . you want it really wet, . . . but don't use scalding water. You should be able to keep your hands in the water. Block off about an hour and a half or two hours to do this process. You need to form it, . . . then go back and play with it every few minutes to make sure the shape is not changing. (I actually used a piece of screen wire, rolled into about a 24 inch tube, . . . 6 feet long, . . . suspended in my hallway over a heater register, up about 36 inches from the floor, . . . to finish the rounded forming and drying of the sides. The shoulder straps just hung down over the ends of the tube.) When you get it out of the water, take it immediately to your forming table, . . . do the breast pieces, etc, . . . get that done first. You can then form the rounded parts over a 5 gallon plastic water jug, . . . must be smooth so you don't get inadvertent impressions. BE SURE TO DO THIS: at the neck holes, arm holes, and bottom of both pieces, . . . use your thumbs to form it outward, like the edges of a funnel. Roll the leather out, . . . this gets rid of the sharp edge that will chafe you mercilessly. It also adds tremendous rigidity to the armor. Leave it to dry for at least 36 hours, . . . do not try to force dry it, . . . maybe put a fan on it, . . . but no electric heater or such. I have not done any detail carving on mine yet, . . . but all the Roman statues show wreaths, birds, people, some of their gods, . . . lots of details were put on their armor. That of course was for the Emperor and Legio's, . . . but hey, . . . centurions are a bit vain too, . . . need a bit of "decoration" When I do it, . . . I'll just cut the detail like a carving and then paint the details. Probably going to be an eagle and a wreath, . . . not sure yet. If you have any questions, . . . email me back. May God bless, Dwight
-
Black Dye Rubbing Off
Dwight replied to JD50's topic in Dyes, Antiques, Stains, Glues, Waxes, Finishes and Conditioners.
One quick cure, . . . 50/50 mixture of Resolene and water, . . . brush on with a cheap bristle brush. Let it dry for 24 hours. Should end the dye coming out. May God bless, Dwight -
What size are you? I'm 6'1" and about 180, . . . would my armor fit you? If so, . . . I can mail you a paper pattern. It is similar to the centurion's armor in the recent movie The Eagle with Channing Tatum. May God bless, Dwight
-
Do You Heat-Dry Your Items?
Dwight replied to JoelR's topic in Gun Holsters, Rifle Slings and Knife Sheathes
I only heat dry in the winter time, . . . over the wood stove during the day, . . . above the propane furnace at night. In the warmer months, . . . it all gets hung in the sun to dry. I will probably build a cabinet next fall, . . . but only if I am successful at building business more than it is now. May God bless, Dwight -
I bought the actual Dremel 400XPR in a kit at Lowes. Price was a little north of $100, . . . came with a bunch of useful tools, . . . most importantly the flexible shaft, . . . and variable speed. The unit alone was about $20 less, . . . didn't make sense to buy just it, . . . got a carrying case too. I wouldn't sell it for what I paid for it, . . . one of my best tools. May God bless, Dwight
-
Cheryl, . . . you know that I am about to bust a gut, . . . you asked a question that popped up an image in my mind from 55 years ago, . . . I never forgot, . . . always thought was funny, . . . and here we are, revisiting Geography class from Orange Elementary School. We were taught there that the eskimos didn't tan the hides of the seals they killed, . . . or the polar bears, . . . or anything else. Their women chewed the hides until they got soft. I don't know if that is true, . . . and I'm sure not telling you to do it, . . . but I surely do thank you for bringing back an old memory that still makes an old geezer laugh. May God bless, Dwight
-
Shipping Out Some Fancy Stuff, Part 2
Dwight replied to Lobo's topic in Gun Holsters, Rifle Slings and Knife Sheathes
As ususal, . . . Lobo stuff, . . . top quality, . . . good looking, . . . very desireable. Keep up the good work (including the other "phase 1"). May God bless, Dwight -
Unfortunately, there are about as many designs of vests as there are people wearing them. I have 3 black, 1 brown, 1 grey, 1 blue, . . . and they all fit differently. My black Wilson is the best fit. That is why I am suggesting that the first thing you need to do is go to a thrift store (Salvation Army, . . . or something like that) and there you should be able to try on 10 to 100 vests. One of them may fit you the way you like it. Buy it, . . . take it home, . . . take it apart, . . . BINGO, . . . you have a perfect pattern, . . . and if you like, . . . you also have the lining. If you don't want to do that, . . . for a more "Harley" look, . . . you can buy a bag of Tandy rivets, . . . punch and rivet the pieces together. If you want a more "Buckskin" look, . . . punch and lace it together. There are a number of "Buckskinning" books on the market. Punch and lace is Brownie scout easy. Cutting the sleeves off a Levi jacket also produces a neat vest, . . . one you could use as the liner, . . . hand sewing around the edges, . . . covering it with garment leather. Good luck, . . . may God bless, Dwight
-
Without a picture, I am not sure what you are talking about, . . . but I can share a couple of things I've done for sharp folds. One is using a "V" groover on the flesh side, . . . going about 1/2 way through the leather, . . . skive some of the excess away from the cut on that flesh side, . . . wet the leather down, . . . fold it over a straight edge, . . . both ways, . . . that usually works well for a "hinge" piece for me. If the leather was thinner, . . . I'd just take a dull knife blade (so dull it WILL NOT CUT), . . . and score/crease both sides, . . . again wet, . . . and fold back and forth. When it dries, you will have a good hinge joint. May God bless, Dwight
-
First Holster And Mag Pouch
Dwight replied to JoshLSTV's topic in Gun Holsters, Rifle Slings and Knife Sheathes
Josh, For a first holster & mag pouch, . . . good stuff ! One thing you can do to make it a LOT better though, . . . cant the pistol forward about 15 degrees or so. I usually try for a vertical line that goes pretty much from the bottom of the grip to the bottom of the barrel on the gun. That line points vertical down the wearer's leg. That is not the classical FBI cant, . . . but canting it so the muzzle is pointing backward will pull the handle in toward the wearer a bit as it is worn, . . . and if he/she bends over, it is FAR less likely to stick out the back saying: GUN........GUN.........GUN. It also rides a lot more comfortably. Other comments would be: pull your stitch lines all in closer to the flashlight, mag, and gun. As they are, . . . in time the pouch inside will become larger, making the item less useful. Also, . . . when you do your snap straps, . . . leave about 1/2 inch longer leather on the outside end of your snap loops. It is SOOOO much easier to snap and unsnap with that extra little bit of leather. May God bless, Dwight -
My Latest Speed Rig
Dwight replied to Boothill Bob's topic in Gun Holsters, Rifle Slings and Knife Sheathes
As the others have said, . . . excellent !!! May God bless, Dwight -
I don't follow what you are trying to do, . . . got a picture? May God bless, Dwight
-
Don, I am not familiar with your Skidmore creme, . . . I use Resolene almost exclusively for my leather work. I have found that if I sand the edges AFTER a coat of Resolene, . . . I can turn em really black with dye or shoe polish, . . . and it bleeds very little into the product if I burnish it first. Worth a try with your Skidmore creme. May God bless, Dwight
-
Great job, Troop, . . . May God bless, Dwight
-
Hey, BigGriff, . . . another thing you can do that you will pat yourself on the back for, . . . and really enjoy, . . . buy some cork. Flat, maybe 1/16 of an inch thick, . . . use your strap cutter to cut it about 1/16" narrower than your piece of STAINLESS STEEL you bought for your straight edge. Contact cement the cork to one side of the STAINLESS STEEL straight edge. Cork will not mark your leather, . . . and the straight edge will not move if you have any pressure hardly at all on it. I emphasize STAINLESS STEEL because regular steel rusts and can leave residue on your leather that can ruin you whole day, . . . as well as aluminum can get a coating on it that rubs off on your leather too, . . . and it's nasty to try to work around that stain. I bought my 48 inch stainless rule (cork backed of course) from ST Leather, in Saint Louis several years ago. Love it. May God bless, Dwight
-
If you have 8 oz leather, . . . do it, . . . it makes a good sheath for most purposes. May God bless, Dwight