Dwight
-
Posts
5,254 -
Joined
-
Last visited
Content Type
Profiles
Forums
Events
Blogs
Gallery
Store
Everything posted by Dwight
-

Tooled Leather jacket or have i lost what little mind i have left?
Dwight replied to Windrider30's topic in How Do I Do That?
If I was doing your project, . . . I think I would start out with a vest, . . . one that would closely emulate that portion of the jacket. I bought some leather from Tandy a few years ago, . . . it was called "milled vegetable tanned" and was a really soft leather, . . . and I think it was like 6/7 oz, . . . which would work quite well I would think for your purposes. AND, . . . when you get it done, . . . please put a bunch of pics up, . . . sounds like something I too might be interested in doing, . . . "some day". May God bless, Dwight -
Prefered Holster for 1911
Dwight replied to Dorado's topic in Gun Holsters, Rifle Slings and Knife Sheathes
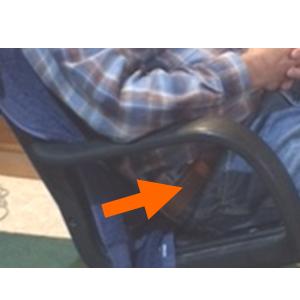
Wearing the Cactus or any other similar design at what is called 4 o'clock, . . . you will never know it is there. I've got mine on, . . . look at the pictures. It is also tucked inside the shirt, . . . so I can go to the door and no one ever has a clue. The one pic shows a red arrow, . . . indicating the front strap holding the holster to my belt. Just a bit of info from the guy who not only makes holsters, . . . but has worn them for upwards of 50 years, . . . on and off. A shoulder holster and a full size 1911 do not go together much of any real way, . . . and the Galco you mentioned is one of the poorer choices you could make. It is great for a plastic fantastic handgun, . . . a .380 or a .32, . . . or a single stack small 9mm, . . . forget it for anything bigger. Looks great in the movies, . . . but so does 007 knocking the bad guy off the water tower 1/4 mile away with his .32 Browning pistol. Neither one is very practical in the real world. AND Amazon will only soak you about $175 bucks for it. Good thing about it, . . . when you throw it in that bottom drawer in your dresser, . . . it won't eat much and won't have to be walked very often. If you want to carry a 1911 (I've had one on and off since Saigon in 1966), . . . you need first a really good belt, . . . and no fiber, braided, or textile belt will be better than a dual layer leather, . . . 1 1/2 inch, . . . glued and sewn for the project. A roller buckle is good for most people, . . . but not necessary. THEN you need the holster. A pancake is 1st choice for OWB, . . . something similar for the IWB, . . . just different attachments. AND, . . a flat backed holster will be 5 times more comfortable unless you happen to be, . . . (politely said), . . . of the "larger waisted" in size, . . . providing the extra padding. Seriously, . . . don't waste your money on the shoulder holster, . . . if you lived close enough, . . . I'd bring one over to you, . . . let you wear it for a couple days, . . . you would most likely say thank you as you handed it back to me. Edited to add: I also just checked, . . . a Rock Island, full size 1911, . . . 2 ea / 8 rd Wilson mags, . . . in a Galco shoulder holster, . . . the entire rig is 4 pounds 10 ounces. Three pounds of steel hanging under your left arm pit, . . . is the pits. May God bless, Dwight

-
Ruger Security Six pancake Holster
Dwight replied to Gordon's topic in Gun Holsters, Rifle Slings and Knife Sheathes
Actually, . . . the best I've found so far, . . . Tandy sells a product called "bag stiffener" used in hand bags. Makes really good patterns, . . . can be cut "big" and then carefully sanded down to just exactly "the" pattern you want for a certain project. It also cuts fairly easy, . . . but is still really rigid. May God bless, Dwight -
Ruger Security Six pancake Holster
Dwight replied to Gordon's topic in Gun Holsters, Rifle Slings and Knife Sheathes
If you lay the gun down on a piece of cardboard, . . . outline the gun, . . . add 2 inches in front of it, . . . 2 inches behind it, . . . you'll have plenty enough space there for your "wings" that have the belt slots in them. This is a JLS holster for a 1911, . . . but you can see how the wings are in relationship to the body. As well, . . . you see the back piece. I personally just put a rounded piece up there, . . . sorta like a half a ball shape, . . . JLS prefers to cut his down, . . . they both work and serve the purpose. May God bless, Dwight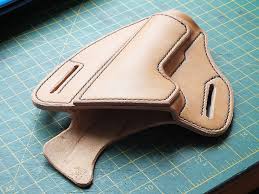
-
Prefered Holster for 1911
Dwight replied to Dorado's topic in Gun Holsters, Rifle Slings and Knife Sheathes
Take a look at the front page at www.dwightsgunleather.com , . . . it and others similar to it are THE single most comfortable, . . . all around. Seated, . . . you are more advantageous with a shoulder holster, . . . standing or kneeling, . . . this is the style. And if you look closely, . . . it is totally concealable, . . . yet only one extra movement, . . . you are armed (pulling up the shirt, . . . out of the way). I've worn shoulder holsters, . . . and personally (since I also own a Rock Island like yours) you will probably be like the rest of us, . . . shoulder holsters are fine if you are carrying a single stack plastic fantastic firearm. All steel is better on the waist. IMHO. May God bless, Dwight -
Ruger Security Six pancake Holster
Dwight replied to Gordon's topic in Gun Holsters, Rifle Slings and Knife Sheathes
No, . . . they should not be the same size, . . . nor even the same shape. For a more comfortable holster, . . . make the back flat, . . . and all the "bag holding the weapon" being the front piece. The back piece should also have a shield to keep the hammer and upper part of the weapon from digging into the side. A security six hammer will especially dig into your shirt / ribs, . . . one of those plastic thingy's don't do it so much. Been there, . . . done that. The SS is also a somewhat heavy weapon for it's size, . . . suggest a thumb break for it, . . . even making the difference much more pronounced. May God bless, Dwight -
I've had my boss for several years, . . . follow exactly what the mfg recommends, . . . have no issues. IT IS A BIT TRICKY to get the machine set up at first if for some reason yours is not, . . . but follow their directions and it'll work out. You also want to get a couple of 1/4 X 20 wing nuts, . . . and if you get to where everything you sew is pretty much the same thickness, etc, . . . use them to lock down your tensioners. As for reverse, . . . I just lift up my foot, . . . push the piece back, . . . lower the needle and sew, . . . must do each stitch individually, . . . but it works. May God bless, Dwight
-
Where to start: 1911 full size conceal carry
Dwight replied to VTleather09's topic in How Do I Do That?
First of all, . . . does he want an "In the waist band" or "out of the waist band" holster? You'll see them referred to as IWB or OWB. If he is content with an OWB, . . . it is hard to beat a pancake design, . . . for ease of construction. Make it out of 7/8 oz veggie tan, . . . cut from the butt or shoulders. Take a look at my website on the product page, . . . at the very bottom, . . . are a black and brown, . . . right and left hand versions of my design, . . . called a Cactus. You can emulate that with a pancake, . . . making the back flat, . . . the front you want to soak in water until it is a floppy, sloppy wet "thang", . . . and simply mold it over the gun. You cannot get a better mold than the actual gun that will be in the holster. If you notice the bottom of my Cactus design, . . . it is somewhat "tapered", . . . making it easy to insert down in the pants, . . . and allowing stuff that inadvertently gets into the holster to fall through. Easy way to do it is cut out the back piece, . . . wrap the gun tightly in Saran Wrap, . . . throw that floppy, sloppy wet piece you will use for the front down on the gun and start the molding process with your fingers. I don't wear gloves, . . . but watch your fingernails, . . . they leave scratches. Mold the leather to the gun. Go get a cup of coffee and a doughnut, . . . find something to do for an hour and a half or so. Come back and touch up the molding, . . . hang it up to dry. AND I MEAN DRY. Don't mess with it until it is dry and hard, . . . might take a full day, . . . depending on your climate and where you put it. Next lay the dried front onto the weapon, . . . then lay the whole thing down on a pillow, . . . adjust the back to where it needs to be, . . . take an ink pen and outline the back onto the front, . . . cut out the front. Put in the snaps for the strap that will be closest to the belt buckle, . . . sew that half of the holster. Wet the back in the center part where it will touch the weapon, . . . and mold it to the backside, . . . hang it up to dry. When it is dry, . . . sew the back side after attaching the other strap & snap. BEFORE YOU SEW, . . . COAT BOTH SURFACES WITH WELDWOOD CONTACT CEMENT, . . . LET IT DRY, . . . PUT EM TOGETHER, . . . sand the edges smooth, . . . run your stitch gauge, . . . and sew the thing. After sewing, . . . dip dye it, . . . and if you can do it, . . . hang it where the temp will be above 120 but not above 145, . . . let it dry in there. Buff all edges, . . . nice and shiney, . . . buff off any excess pigment from the dye with an old wash cloth, . . . don't let your wife ever see it, . . . Apply your desired finish, . . . I like Resolene. Have fun, may God bless, Dwight -
If you google the term "rope lashing" you can find information on this. It actually is only one great big overhand knot, . . . with the ends pulled together between the two layers, . . . and is the technique that for centuries, sailors have made eyes on the ends of rope for lashing, tying, and for lasso's, . . . And BTW, . . . that is a cute bracelet, . . . thanks for sharing. May God bless, Dwight
-
That is your opinion, . . . I respect your opinion, . . . but no first responder and no LE in the US has EVER been caught up in a Tet 1968 scenario, . . . Khe San, . . . Heartbreak Ridge, . . . and not one of them have a clue, . . . including you, . . . what it was like to hit the beach on Guadalcanal, inchon, or Omaha Beach. Next time you want to feel sorry for the "oh so hard" life EMT's or LE live compared to the military, . . . go spend a day in a military hospital, . . . see the vets, . . . let them tell you about how they only lost their legs and one arm, . . . 5 of their 6 buddies came home in body bags. No, . . . you are the one who is clueless, . . . as well as ignorant. May God bless, Dwight
-
From the work I've done with lasers, OLDNSLOW, I have learned one thing for sure, . . . DO NOT make it a tight fit, . . . very tightly molded, etc. Crimson trace lasers for the front of the trigger guard are not much different one from the other, . . . just the mounting going back behind it. What I try to do is make a holster with a bit of molding to grab the slide, . . . and for the barrel to butt into, . . . but the rest is a bag, more than a holster. Otherwise, some of the lasers can be turned on by the holster. May God bless, Dwight
-
I would say they see police and firefighters as not having any where near the danger of their respective assignments. At least that would be my call on it, . . . but mebbe if someone hollered at em, . . . they may change their minds. May God bless, Dwight
-
S&W 686 Three Evils Holster
Dwight replied to Boriqua's topic in Gun Holsters, Rifle Slings and Knife Sheathes
Just remember, bikermutt, . . . plagiarizing is one of the sincerest forms of flattery, . . . And after seeing the barb wire in that "dimension", . . . I just might flatter him some too. I also once thought there was no way I'd ever do a lot toward carving (something I still believe), . . . but I bought an old "Jumbo" saddle some cowboy out Denver way had, . . . the edges are decorated with just barely visible stampings that I am sure were done by some old cowpoke wanting to decorate his saddle after he bought a plain one. It no doubt served his purpose, . . . I sometimes sit and look at it, . . . wishing I could just have a half hour conversation with him. AND, it also taught me that stamping and carving are for the interest of the one doing it far more than those who will observe it later. At least that is my story, . . . and I'm sticking to it.............. May God bless, Dwight -
I've never seen a saddle without strings / with the brass rivets or whatever holding it together. Could that be a clue as to who / when / where it was made? May God bless, Dwight
-
I would be very much interested in working with you on that project, JustRob, . . . Send me a private message (upper right hand corner of the page) and we can go from there. May God bless, Dwight
-
How Much Leather Will I Need To Make Chaps
Dwight replied to BarrelPony's topic in Clothing, Jackets, Vests and Chaps
Pebbles, . . . the vinyl I use is .040 inches or 1mm thick. It is much heavier than the tablecloth vinyl, and is used for upholstery, cushions, seat covers, and the like. I use it because it is the nearest I have found to leather in the way it mimics folding, laying, or hanging. BUT, . . . I had not thought of tablecloth vinyl, . . . and at least for the pattern shape, . . . it may very well work out for you. I would, however find some belly leather, or scrap stuff you have laying around for the belt, etc. I do that with mine and it works out pretty good for me. May God bless, Dwight -
The other day, . . . I got my new thermometer that I ordered, . . . drilled a hole in the front, . . . stuck the old thermo in the hole, . . . it is just nice and snug, . . . Left it on for several hours, . . . wanting to see if I would get up to the safety temperature of 140, . . . never happened. I got to about 135 and that was all. I'm not unhappy about it though, . . . I've got a safety if something goes wrong, . . . it's low enough that I can just up and forget for an hour or so and no big problems will occur with the project, . . . and I basically made it out of scrap or surplus parts I had laying around. As Hannibal used to say on the "A" team, . . . I love it when a plan comes together. May God bless, Dwight
-
Wet Molding, pressing in hydraulic press, etc holsters
Dwight replied to HBAR's topic in How Do I Do That?
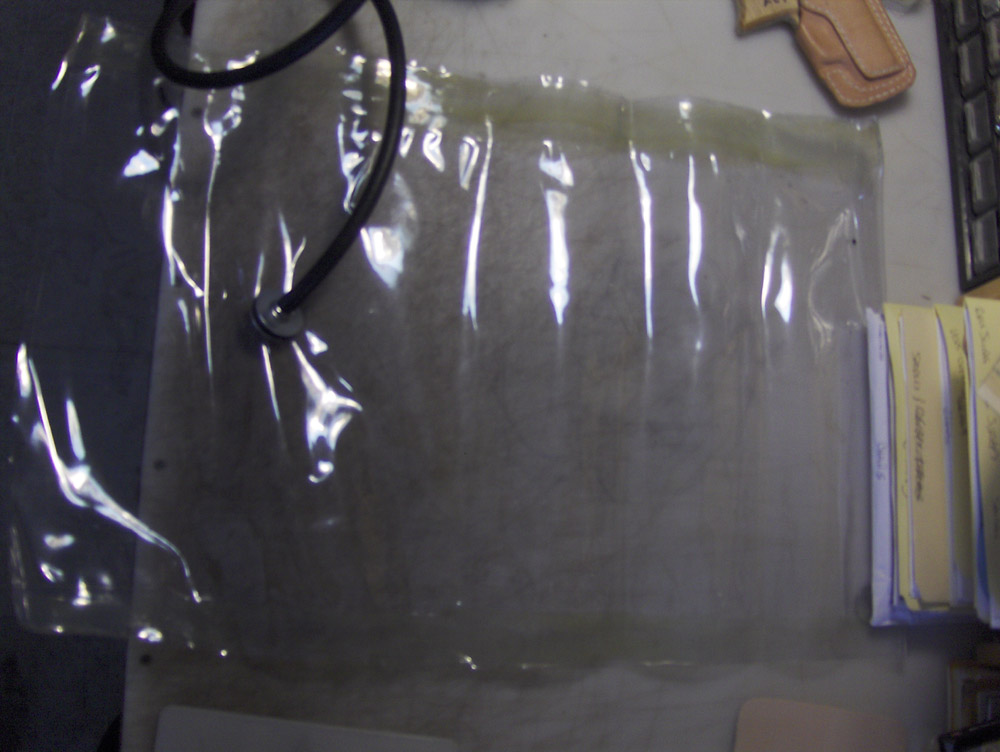
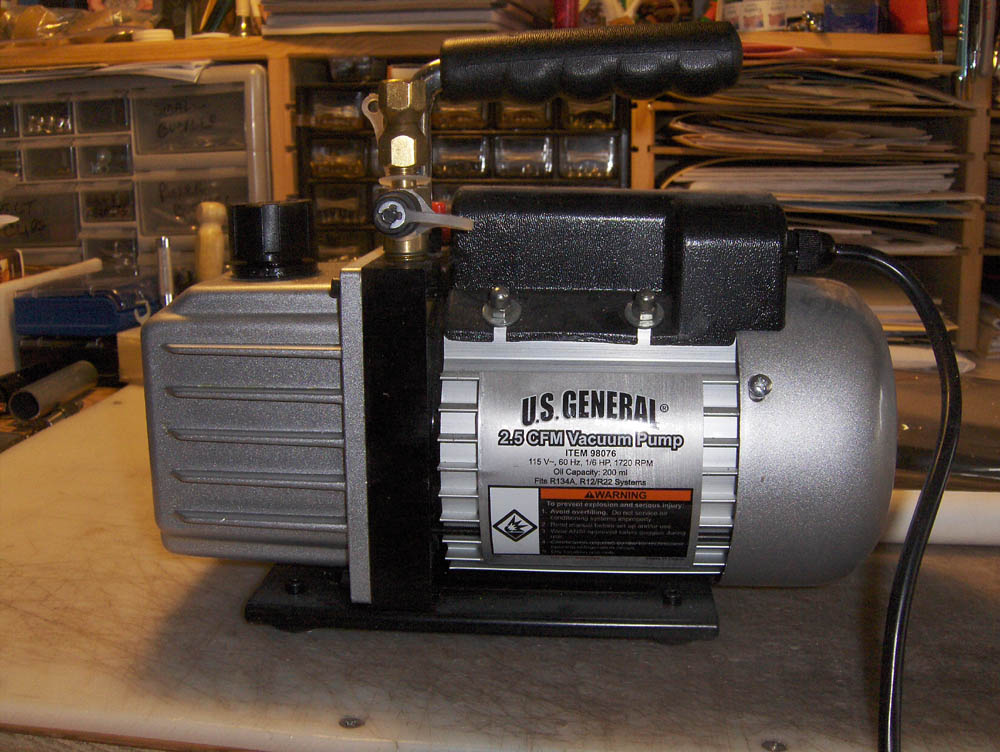
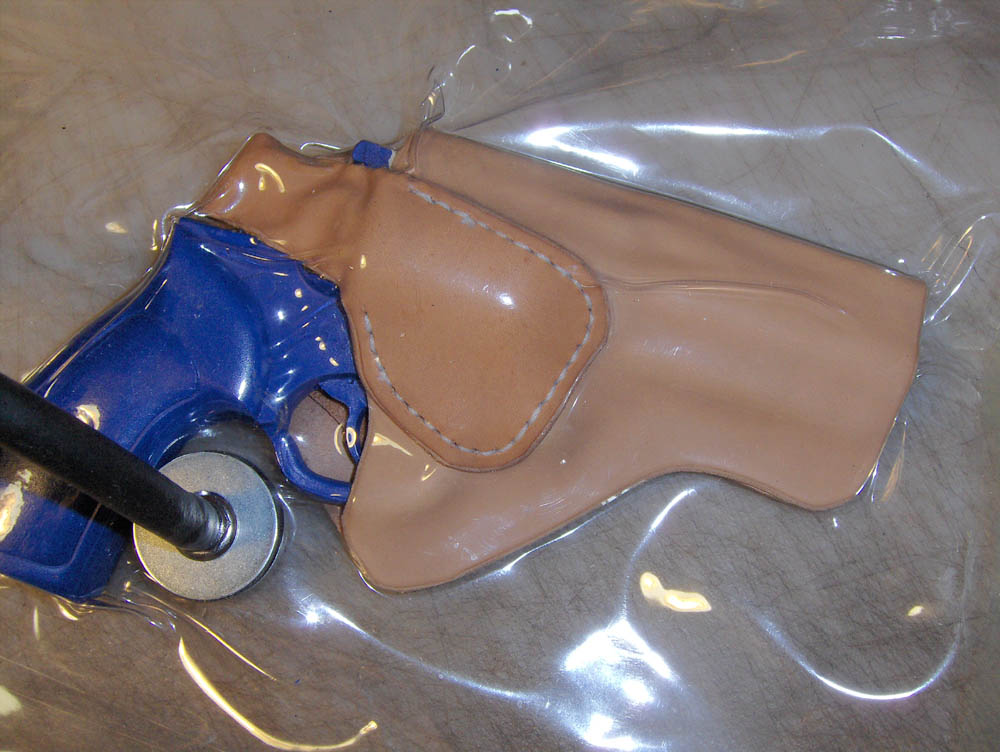
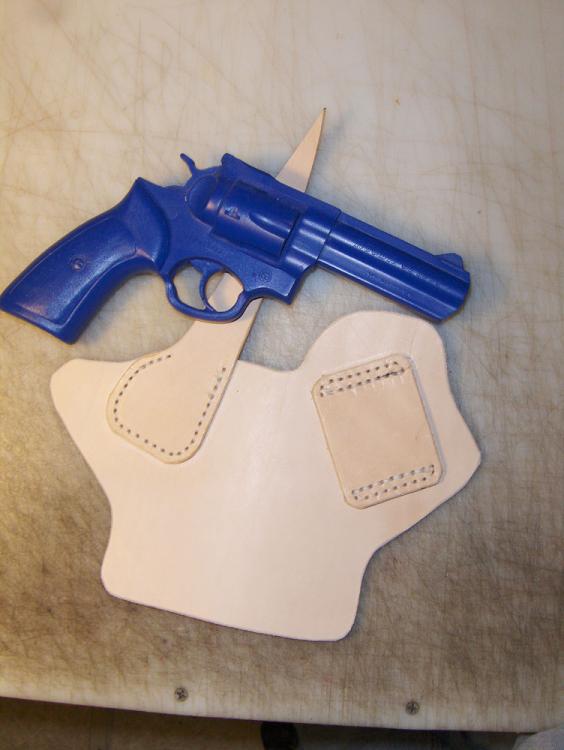
Hbar, . . . Reading your post, . . . I could almost look up in a mirror and say, . . . yeah, been there, done that. A number of years ago, I built a small press, . . . and at first, . . . I was thoroughly happy with the results. Then, like you, I began comparing what I was doing with other's results, . . . and mine did not get up to where I really wanted them. Someone mentioned vacuum forming, . . . and because I used to do vacuum formed magnetic signs, . . . I decided to try it. I'll never use a press again. In fact, a young fellow in Arizona wanted to buy some press rubber, . . . I made him a good deal. I use it for almost all the holsters I build, . . . The bag is nothing more than a piece of heavy vinyl from Joann Fabric about 24 inch square. I use a Harbor Freight vac pump, . . . you can see the blank leather before the process, . . . and during the process. This was not supposed to be a hi-def holster, . . . but you can see around the hammer where it pulled in the thumb break strap. I had to straighten that later, . . . but that was no problem. I also made a Rhodesian holster for a 1911 commander, . . . first one I made with the bag, . . . eased it out of the bag after forming, . . . let it dry, . . . the gun was a bit snug, so I "forced" it into the dry holster. I almost thought I would need a razor knife to get the holster off the gun. That alone sold me on this process. I also like this as there is almost no possibility of crushing or breaking a weapon with this, . . . and I wonder about a press. Anyway, . . . food for thought for you. The little black slide cake was done in the vac bag, . . . not looking for a lot of hi-def, . . . just a working holster, . . . but you an see how well it did. That is 7/8 oz shoulder leather. May God bless, Dwight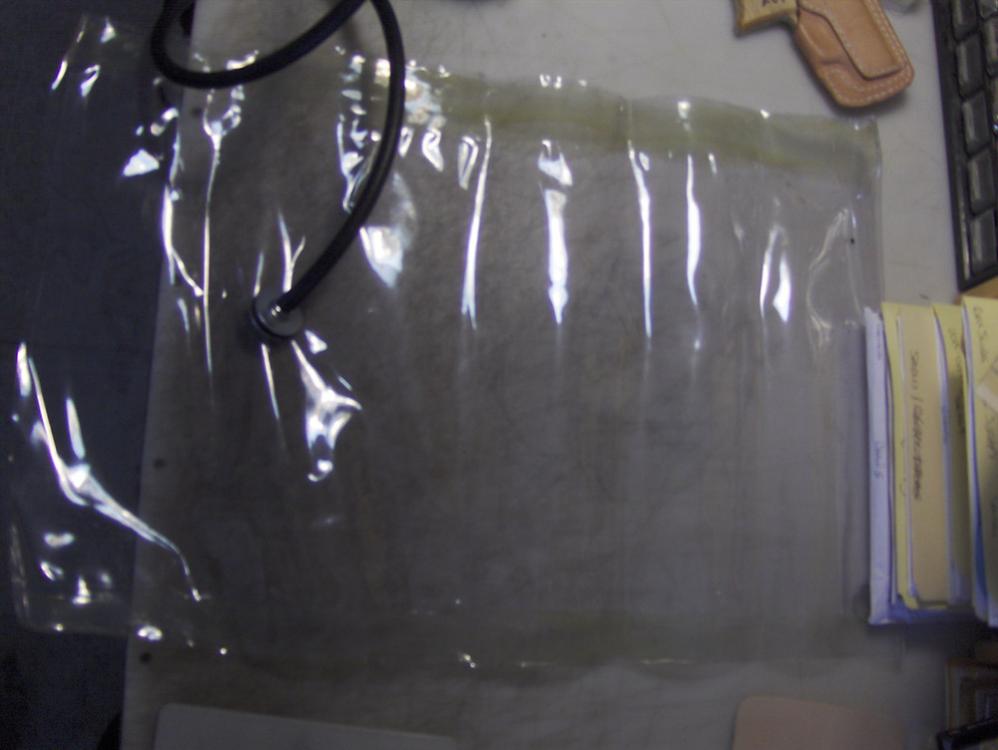


-
Tinker Tailor, . . . it has been several years, . . . and I don't have the info right at my fingertips, but there was a post, . . . and it may have been on here, I'm not sure, . . . where another maker listed several instances where a person either fell or was pushed, . . . the impact of the spinal column being crossways to the handgun, . . . allowed the spine to be irreversibly damaged. I just don't want to be involved where that is a remote but none the less, . . . real possible scenario. I also do not make shoulder holsters that do not cause the muzzle to point down. Not everyone is as careful with firearms as I am, . . . and knowing that, . . . I want to build in whatever safety I can for my customers. If someone does not like my restrictions, . . . I wish them and their new supplier the very best. May God bless, Dwight
-
Just be sure that they know if they have a pistol on their spine, . . . get pushed down hard, . . . they will be in a wheel chair for the rest of their lives. A number of holster makers do not make them for that very reaoson, . . . I am one of them. May God bless, Dwight
-
Uberti .45LC El Patron holster molds?
Dwight replied to CaptQuirk's topic in Gun Holsters, Rifle Slings and Knife Sheathes
Hey, Capt, . . . just a small warning, . . . you might want to take a set of calipers to whatever other SAA you want to use for the mold. Colt, Beretta, and some others are one size, . . . Ruger is a different size, . . . and it is sufficiently bigger that it can (and has, . . . ugh !!!! ) make a difference in the holster. The Ruger is a tad bigger overall, and the cylinder is a lot thicker. Just do the measurement and you should be good. May God bless, Dwight -
Tell me about your "Hot Box"
Dwight replied to Dwight's topic in Gun Holsters, Rifle Slings and Knife Sheathes
Looks good so far, msdeluca, . . . When I get these projects, . . . I usually procrastinate a while, . . . then get mad at myself, . . . just quit what I wanted to do, . . . and DO IT. That's actually how mine came about earlier this year. May God bless, Dwight -
You are right about the holster needing just a bit more grip, . . . I intended to do that with a bit of cant, . . . and somehow it just didn't get programmed into the product. I went all summer (after building the hot box) without using it, as I have both a door and an large window facing the South, . . . and I use them to dry most any thing I have, . . . and it is usually "overnight". I started 2 holsters Sunday late afternoon, . . . just for kicks and giggles, . . . and finished the second one this morning (putting on two snaps) before I put it in the post office to go to Arizona. Man how I wish I had done this so many years ago, . . . as I would be all cranked and ready to work, . . . but everything is drying / wet / damp / or something, . . . so I'd quit for the day. Now, . . . if I've got three projects going, . . . I can pretty well go non stop until I figure the sheets and linens are calling. I won't get a lot more done, . . . but it'll be more fun doing it. Next up: 2 cell phone cases / holster / belt / and a set of armor for a Roman Centurion. May God bless, Dwight
-
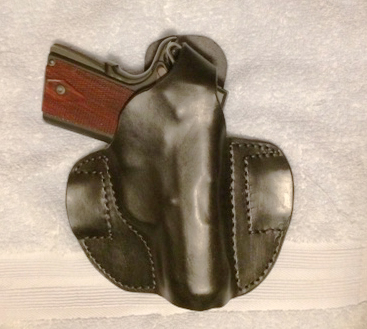
OK, . . . don't beat up too bad on me over this one, . . . it is my first "Slide Cake", . . . and was done in less than 24 hours: design / pattern / cut / sew / mold / dye / fit / buff / and final finish. What made it all work was the hot box. AND, . . . we found a name for it, . . . the slide cake, . . . because it "slides" on my belt a little bit. Now, . . . I did pull a big boo-boo, . . . locating the thumb break, . . . had to move it, . . . so three rivets fill in the otherwise blaring holes, . . . BUT, . . . I am really pleased with it, . . . far more than any pancake I ever had or made. AND, . . . it just might become a regular in my carry rotation. Anyway, . . . it's fun to have good news, . . . just wanted to share, . . . May God bless, Dwight


-
Tell me about your "Hot Box"
Dwight replied to Dwight's topic in Gun Holsters, Rifle Slings and Knife Sheathes
Well, . . . did a bunch of things down thru the summer, . . . never needed the "hot box" for what I was doing then. Got to thinking about it today, . . . no real sun for hanging in the window, . . . Made two holsters today, . . . and the concept works great, . . . and no problem with it "overheating". It dried one holster I dyed in about 2 hours, . . . dried the Resolene applications for 2 holsters in about an hour, . . . (I'm wearing one right now that I put resolene on earlier today, . . . normally would never have done this, . . . but the hot box makes it so workable). Got two cell phone cases drying in there right now, . . . did the old water forming trick, . . . waiting for them to dry. Been in there about 3 hours so far, . . . Just wanted to give everyone a heads up, . . . and the good news that the design works, . . . you want to copy, . . . jump in there, . . . but you gotta use your own wood. May God bless, Dwight