


Dwight
-
Posts
5,251 -
Joined
-
Last visited
Content Type
Profiles
Forums
Events
Blogs
Gallery
Store
Everything posted by Dwight
-
 Hey, John, . . . can you show us a full picture, . . . I'm curious as to what else is on there. Thanks, may God bless, Dwight
 -
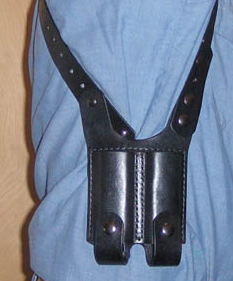
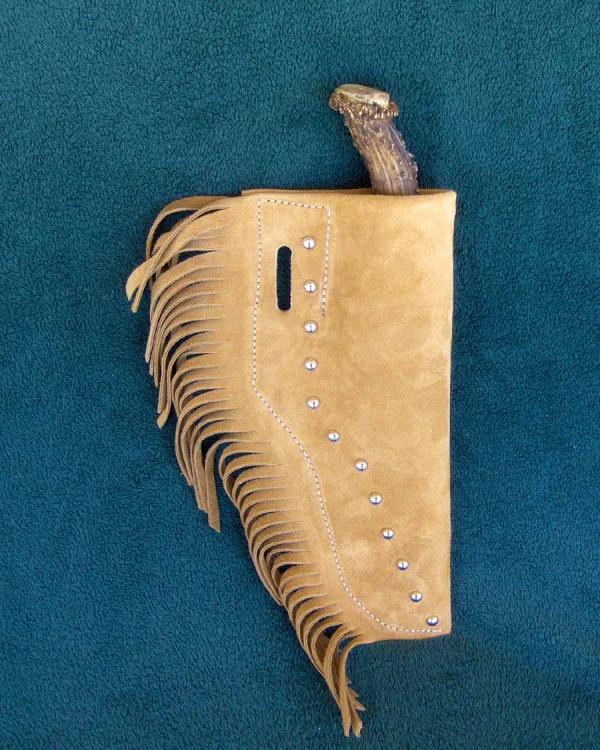
I didn't notice the shoulder holster part, . . . Here's the shoulder holster rig I use for side by sides. I also do a back to back, . . . not as wide, . . . I think it looks better. Basically two pieces of leather, . . . same process as the other one, . . . just different design. May God bless, Dwight
-
Red Cent, . . . that's cool, . . . never thought of that. I think the first place I would look would be for one of them nylon shotgun boleros some guys use, . . . holds 25 or so, . . . goes over the shoulder. Should be able to just trim out the length you want, . . . sew it at the top, . . . sew it at the bottom, . . . loops are already pre-formed, . . . and those would have to hold up I would think or they wouldn't be selling many of them. May God bless, Dwight PS: Rickdroid, . . . what store did you find that elastic in, . . . I'm looking for some for a special belly band I gotta make for a preacher. He's thinking he needs to carry, . . . but so that not even his deacons can see it.
-
Here is how I do it, . . . if you really need it, . . . I'll check (shop is in a mess right now) and see if I can find my manila folder pattern. It's really pretty simple, . . . back is flat, . . . front is the width of the mags plus about a half inch over the depth of the mags times 4. Sew the center, . . . wet and form the mags on the sides, . . . let it dry, . . . sew, trim, dye, finish, . . . you are done. I use the snaps, . . . makes it easier and quicker to get off if needed, . . . plus the opening allows it to be placed with a belt loop between the fingers, . . . it DOES NOT move around on you then. May God bless, Dwight


-
Hey, Red, . . . whatcha gonna do with elastic? May God bless, Dwight
-
I use Weldwood exclusively, . . . and for instance a belt and holster: put first pieces together with weldwood, . . . force dry with a heat gun, . . . sew, . . . dampen and do first wet forming around gun, . . . hang up to dry. While the holster is drying, . . . glue up both sides of the belt, . . . lay flat on the table, . . . force dry with a heat gun, . . . press together with my hands (belt laying flat on the table), . . . sand edges, bevel edges, run edges through my burnisher, . . . sew the belt together. I'm done for the day on those two projects. Come back tomorrow, . . . finish sewing the holster together, . . . dye both, . . . hang up to dry, . . . third day, . . . put finish coat on both (Resolene usually), . . . after a few hours drying time, . . . put on the finish hardware, . . . ready the paper work for shipping out. Far as I'm concerned, hammers are for nails, . . . rolling pins are for pie crusts. Get a can of Weldwood, . . . you will also get rid of whatever problem you are having with the glue gumming up the sewing machine. Weldwood never does that for me. May God bless, Dwight
-
I've got one of those pieces of marble too, . . . mine is going to become a shooting bench out at the 200 yd mark. May God bless, Dwight
-
Ugh, . . . there for a second I thought JLS was talking about skinning me, . . . thankfully I'm not veg tanned, . . . just sun tanned. May God bless, Dwight
-
He can have holster or blueing, . . . not both. Holsters will wear the blue off, . . . and the Python blue, . . . thought gorgeous, . . . is not invincible to wear. You don't want to know how I know this for a fact. May God bless, Dwight
-
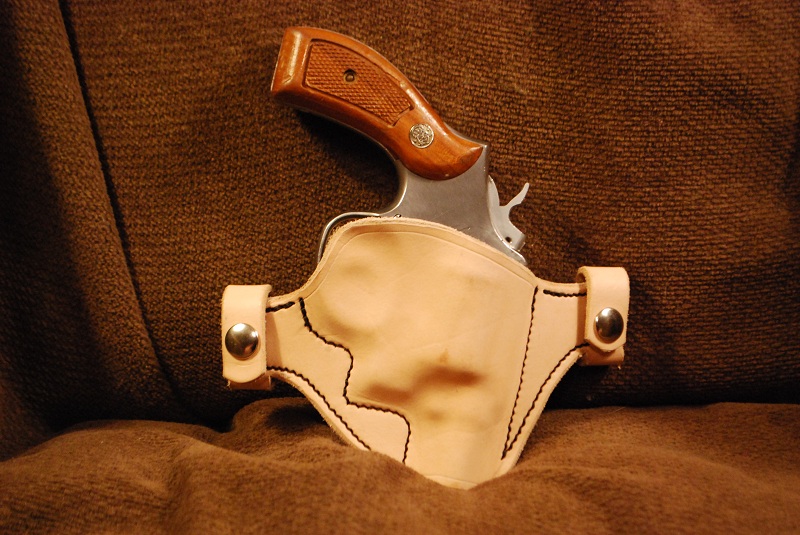
I make my pocket holsters with the flesh side out, . . . puts the smooth side to the weapon, . . . gets a better fit. Also, . . . I use Resolene on the outside of the holster, . . . it all but eliminates that "catching" of all the stuff in the pocket. Just one way of doing it. May God bless, Dwight
-
Thanks, Matt, . . . I just changed mine yesterday, . . . started to toss the old blade, . . . decided to keep it, . . . gonna "practice" on getting it sharp. Now I know how to do it, . . . I'm usually sharp enough to think of something like that, . . . but this getting old stuff sometimes don't let one think 100%. May God bless, Dwight
-
Personally I own a whole slew of knives of different sizes, shapes, . . . round knife, . . . butcher knife, . . . pocket knife, . . . little plastic box cutter, . . . standard "Stanley" box cutter (4 of em), . . . and a couple other "specialty" blades. Sometimes I use a square, . . . sometimes a rule, . . . sometimes a line on the leather, . . . sometimes a plastic triangle, . . . they don't help the 90 degree part, . . . just the line being cut where I want it. The Stanley box cutter is for me THE BEST. First thing I do when I put in a new blade, . . . it gets stropped 25 times in each direction. Periodically, . . . it continues to get stropped as needed, . . . There comes a time, however, . . . when for some reason I have yet to discover, . . . it no longer wants to sharpen. I turn the blade around and start again on the other point. When it won't strop up nice and sharp, . . . I toss it. The KEY thing, . . . MOST IMPORTANT thing to making good cuts, . . . is a SHARP, SHARP, SHARP cutting instrument, . . . AND, . . . practice with it. I used to grip mine with my index finger holding down the tip, . . . arthritis does not let me do that any more. I hold it like I would hold a claw hammer, . . . and I make "next to" perfect 90 degree cuts. But then again, . . . been doing this stuff for a bunch of years, . . . the experience is quickly attained, . . . it's the practice that keeps the experience sharp. May God bless, Dwight
-
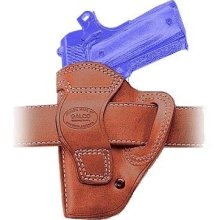
Bob, . . . if you were to come to me with your request, . . . my first two suggestions would be an Avenger style (1st choice, . . . it generally keeps the butt tucked in fairly tight), . . . or a flat backed snap cake. The down side to the Avenger is when you get it on today, . . . it will pretty much stay on all of today, . . . being in a wheel chair, it would be a real pain for you to take it off. OTOH, . . . a snap cake will only add about 1 1/4 inch to the length of the holster, . . . and if you have to shed it, . . . two snaps and you are done. The down side is of course, . . . they can be tricky to mold so that the butt pulls in tight. I'm sure you are familiar with these, . . . but just for a refresher, . . . here are some pics. Both of these are really easy to change the cant, . . . it can be a bit of a pain, . . . but if you wanted either of these up to a 45 degree cant, . . . it can be done. May God bless, Dwight
-
Beaded knife sheath
Dwight replied to Craig44's topic in Gun Holsters, Rifle Slings and Knife Sheathes
Good job, Craig, . . . I do not have the patience for that kind of work, . . . and with Chuck gone, it is good to see someone coming along behind him. I REALLY like that knife blade, . . . and the way you attached it gives it an air of authenticity. My two attempts at anything like this are far below your level, . . . but I thought I'd share them with you. The sheath was lined with rawhide so he would not cut it up drawing the knife in and out, . . . and the beading went on the upper end of a suede gun bag for a rolling block 45-70. Just one curious question, did you bead the main beads separate and attach later, . . . or are they actually sewn individually onto the sheath? May God bless, Dwight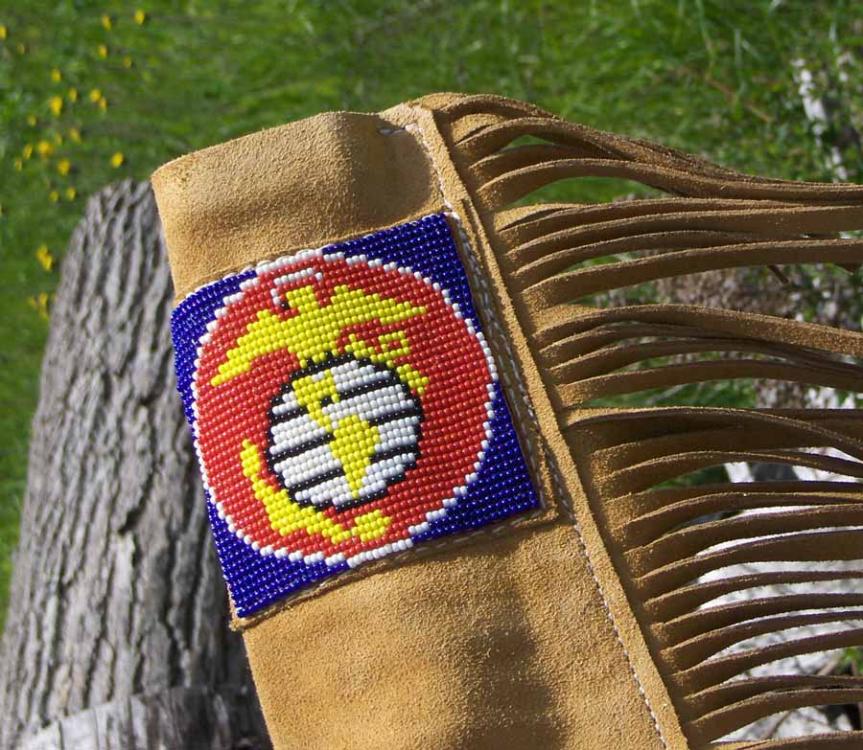
-
I don't do a lot of chaps, . . . mostly only for friends, . . . but I found a "cheat" that works wonders. Get the 40 or 50% off one item coupon for Joann's fabric store, . . . go back to their vinyl section, . . . buy up 40 bucks worth. It is a bit more flimsy than chap leather, but it is close enough that I use it to do a pattern I've never done, . . . and then I have the pattern. They can be sewn on a regular machine, . . . and fit tested by the actual user, . . . adjustments made, . . . etc, . . . and the outlay is not that bad. Plus you fold em up, . . . put em away, . . . and you can cut em up, . . . sew em back together a different way, . . . practically indestructable. May God bless, Dwight
-
Dummy Gun Bulldog
Dwight replied to JLSleather's topic in Gun Holsters, Rifle Slings and Knife Sheathes
Personally, . . . I'd take the evening, . . . scrounge out an hour and a half or so, . . . find me a piece of 1/4 inch steel plate, . . . start filing and drilling, . . . put two screws through it, . . . and when I got done, . . . that dude would have a hammer. It isn't that hard, . . . really. May God bless, Dwight -
Take a look at this............ http://www.statelinetack.com/item/weaver-leather-hay-chaps/E001600/ Don't look like they would be hard to do at all...... May God bless, Dwight
-
Hey, Mike, . . . glad to see you back. Don't tell my you are still trying to hold that cat and the dust buster, . . . I'd hoped you had given up on that
")
If you ever figure out how to shoot one of those micro .45's, . . . put the secret in a box and ship it to me, . . .
I can defend myself with it, I'm sure, . . . but we're talking inside the proverbial 21 feet, . . . outside of that, . . . ummmmmmm, who knows?
May God bless,
Dwight
-
Hi there Dwight. The last 3-4 months have been a trial. Got pneumonia -- again but hadn't been feeling quite right for some time before that. My doc got me on a prescription that knocked the bug but, again, I was still feeling weak and puny. He finally found that I was one of the 3% or so that will have a nasty reaction after using one of my blood pressure meds for a prolonged period of time. Now, after about 2 1/2 months off of the stuff I'm feeling like myself again -- just a bit older and slower, which my son had to remind me of on my birthday. Saw my doc today and everything is looking good, even got the OK for cataract surgery in a week or so. I'm with you on the mini .45s and no matter what, even a Govt. mod doesn't do half as well as my Smith M-24 3inch in .44 special. The drawback is that it's bulky. Good to hear from you. Thanks. Mike
-
Whoa, . . . sorry to hear about that pneumonia thing. I was too young to remember the times I had it as a kid, . . . hear tell it is no fun though.
Been there, done that with the BP medicine though, . . . found a book by ol' Doc Adkins, . . . took his advice, . . . lost almost 40 pounds, . . . found out I did NOT need them after I lost the weight. My problem was the bottom number, . . . wanted to be above 90 and my doctor had a hissey fit. Never did get along good with any of the meds anyway, . . . made me check the ol' doc out.
Still have to watch the weight, . . . careful of he pies, cakes, cookies, etc.
Your son sounds like mine, . . . always reminding me that I ain't 30 any more. But we are both fortunate to have sons who care enough to get after us.
Good luck on that cataract surgery, . . . let us know when it is, . . . we'll get you on the church prayer list.
May God bless,
Dwight
-
Thanks again Dwight, I appreciate hearing from you. Mike
-
-
New Shoulder Holster
Dwight replied to Dwight's topic in Gun Holsters, Rifle Slings and Knife Sheathes
If you decide to give it a whirl, . . . send me a PM, . . . we'll get together and I'll show you the other things you need to make. May God bless, Dwight -
Starting To Get The Hang Of This Holster Thing
Dwight replied to SLP's topic in Gun Holsters, Rifle Slings and Knife Sheathes
For a while I used the same post for both sides, . . . the flat piece that normally goes with the male end. Then it dawned on my that one day I'm gonna wind up with a bunch of shiny, pretty, caps, . . . that I cannot use, . . . so now, . . . I put em together like they would normally go, . . . you don't see em anyway, . . . and the bulk has never been a bother. I'm not sure I'd take a chance on a rivet piece for a snap, . . . can be lots of torque applied on a snap, . . . rivet post may pull through. May God bless, Dwight -
Starting To Get The Hang Of This Holster Thing
Dwight replied to SLP's topic in Gun Holsters, Rifle Slings and Knife Sheathes
Looking good SLP, . . . I'd wear this one too, . . . (but I like your Dad's better ). Anyway, . . . just one "kinda" criticism, . . . the snap up on top. I bury my snaps on the "thumb snaps" so that all you see are the male and female parts. The other sides are not shown. On both this and your Dad's, . . . the cap on the female part will be allowed to rub up against the person carrying it. In time, sweat will work on that piece of metal, . . . and eventually a shirt will be ruined if the wearer sweats very much at all. I have not been successful in finding any snaps that hold up like I would like to have them do in a sweaty environment. The finish wears off, . . . and the rusting begins on the steel ones, . . . the brass ones will turn a shirt green, . . . make it look like you're starting a little garden there or something. Either one is a stain that will make the little woman doing the washing very much unhappy with the wearer. Anyway, . . . like I said, . . . just a "kinda" criticism, . . . nothing harsh. May God bless, Dwight -
New Shoulder Holster
Dwight replied to Dwight's topic in Gun Holsters, Rifle Slings and Knife Sheathes
I bought a couple of pieces from Tandy, . . . like maybe 12 x 24, . . . for something like 20 bucks, . . . figured I'd play with it doing some things. Looked at other holsters, . . . they used what has to be a close cousin to kydex, . . . so I tried it out on some stuff, . . . this is the first one exactly like this. I tried to pull the triangles apart, . . . nothing happening there. And the holes came right out with a punch, . . . were kinda ragged, . . . had to dress them with a sharp pointed knife. Edges dress out real quick on a belt sander. AND it is DIRTY when using a belt sander. I'd have to have a separate sander and location if I really did a big bunch of that. Have fun, . . . invent, . . . that is part of the lure to me of leather work. Thanks for the good words, . . . May God bless, Dwight -
Tom, . . . open the main forum page, . . upper left hand corner (presently) two black seats, . . . one fully one third profanity. There's no room for that trash on this site. Adult section can do what it wants, . . . but on the main forum page that any new person or child might find by accident??? No, . . . I do not think so. I also believe since it was taken down once before, . . . someone is just showing their asinine behavior by re-posting it again. May God bless, Dwight
-
best way to install clips
Dwight replied to charlescrawford's topic in Gun Holsters, Rifle Slings and Knife Sheathes
I only use them sparingly, but I do use them. In almost every case they are first riveted through the hole in the bottom of the stem to a piece of leather prepared just for that purpose. It has a slot in the upper end that the clip goes through, . . . as well as an opening for the spur on the bottom to catch on the belt. Then the leather piece is sewn onto the holster, pouch, or other leather goods, . . . and it makes a clean inside surface for whatever is in there. Most of the time when I use them, . . . there's a gun inside. This one would be an LCP. May God bless, Dwight
-
I think it is about time someone stood up and took a stand against the encroaching trash that is becoming daily fare on here. First we have to put up with a full page, . . . left to right, . . . assortment of various iterations of skulls that do absolutely nothing to enhance the image of leather working in general or leather working in practice. It is nothing more than death bed pornography. Then we open the site up and some trash minded individual thinks it's funny to plaster the "F" bomb word all over. It gets taken down once, . . . and it is back up again. Can we get some kind of consensus among the members on here, . . . especially those of us who have been here for a while, . . . who contribute sensibly vs. pornographically, . . . that we do not need, do not want, and are fed up with this trash? Thank you, . . . may God bless, Dwight

