


Stetson912
-
Posts
1,431 -
Joined
-
Last visited
Content Type
Profiles
Forums
Events
Blogs
Gallery
Store
Everything posted by Stetson912
-

Bible cover for the Wife
Stetson912 replied to TheAlbinoYeti's topic in Books, Journals and Photo Albums
I think that's good for a first effort. Better than mine hah. Beveling is tricky business, but once you get it you got it. The trick is to consistently strike the tool frequently while moving it along your cut line in very small increments. When you start out focus on keeping the force constant and moving the tool ever so slightly over before striking again. You can go slow to start. Shopped and fluidity come with time and practice. To clean ant rough but up after you can take a modeling spoon and smooth it out too.keepb it up -
Card holder
Stetson912 replied to Bolanca's topic in Purses, Wallets, Belts and Miscellaneous Pocket Items
Not bad. Nice concept. -
That's funny. And I think there is a calculation when making an '80/20'... Don't you just use the 'wing it's button on the calculator? Haha.
-
Good to know Ken. I'm getting more excited about making an order lol. I've seen his tools and they look great
-
I have the basics from Tandy and learned how they work. But I don't have the tools more suited for Sheridan style carving. I have a few bevelers and shaders and the like, but most I'm unhappy with. I'll figure out what I want in my research process haha. I always do. I tend to agree with that philosophy, just in this case I think I'd just like to invest in the better tools as most are replacing Tandy counterparts (ie veiners shaders ect)
-
@Mike Craw, thanks. That's what I've been hearing. Price wise it's all about the same. I'm sensing the best way to find out what I need is to ask him haha. Truthfully I don't know what I need myself. I haven't done much tooling because I haven't had the tools for it. So I'm going to give it a go. I have a bk swivel knife that I like. But I'm considering one of Clay's as well. I love his mail handles too, beautiful work with the resin and wood
-
I've been reading some posts here as well, everything g I've seen has been positive about clay and everyone seems to like what they get.
-
I'm interested to know about clay miller tools. Mainly his stamps and how they compare to Barry King's stamps. If there is anyone out there who could let me know about quality ect I'd appreciate it. I emailed clay and got a price list and he seems like a good guy and his products look exceptional. Also, his sizing is different so of anyone could recommend sizes for medium to small Sheridan and floral style carving that would be awesome. To thanks y'all
-
When I first started these videos helped me with pattern making. This is the first of two videos. There's no music or anything just him showing how he makes a pattern. as for construction of holsters, there are a few by him as well, bit I liked adam's leather works videos and obviously Sam Andrews videos are great as well.
-
Show me your wallet
Stetson912 replied to Joseph1836's topic in Purses, Wallets, Belts and Miscellaneous Pocket Items
It's cool seeing what people classify as wallets. All the different designs n such. -
Depends on what you ordered to provide you the packing material hehe. Clever idea. Doesn't look difficult to make. So you can just replace it when the foam wears out.
-
NewWork Belt
Stetson912 replied to Tim Schroeder's topic in Purses, Wallets, Belts and Miscellaneous Pocket Items
oh yeah, I like to use my ragitty projects for work too... Phshhhh! This is beautiful! If this is a work belt what's a dress belt look like? Haha is the hardware silver? -
Ohhh, I was hoping to see a horse stitching... I was curious how one would hold the needles.. hehehe Seriously though, that's a great find. I like things like that. Take something old and give it new life.
-
Show me your wallet
Stetson912 replied to Joseph1836's topic in Purses, Wallets, Belts and Miscellaneous Pocket Items
@Joseph1836, that's a nice wallet. For burning thread. You don't want to just put the flame to it. You want to approach the thread with the flame until it just starts to melt. I like to move the lighter around as I do this so it isn't stationary. Alternatively, you can back stitch twice and that should keep it together just fine, then trim flush. You don't have to burn the ends this way. Just what I like to do sometimes -
Good to see you back Jeff. I downloaded some of your patterns. Just wanna say thanks. I too am curious about the 80/20 method if there is a formula. I've never seen a video that addresses this problem. I saw videos from a channel called shooters shop that I used because he went into detail on his process but never did he explain the 80/20 or any other combination.
-
Lol, just needing out is all haha. That round spot on top did look like a hole at first to me too. But I realised it was something else and just didn't know what. Thanks to alpha2, I now know what that is for haha. Learn something new each day.
-
@bikermutt07I believe they work the same way as the self filling water bowls you can get for your fur-buddy. The reservoir is upside down and a little higher than the smaller bowl/dish that fills with glue. (This height determines the fill level of the glue in the smaller bowl section) When the smaller area fills to the point where it's level meets the bottom of the reservoir it becomes an airtight system. The air inside the reservoir is pushing down on the glue with equal pressure to the atmospheric pressure pushing down on the glue/fluid in the smaller vessel. The system will stay at equilibrium until glue is used, then air is allowed to travel into the reservoir displacing glue until the system balances again. Just don't poke a hole in the reservoir....(not that out would) You'll get glue everywhere! Haha.
-
Large round serving/coffee table tray
Stetson912 replied to CloudyCreek's topic in How Do I Do That?
How about instead of walls you make it bowl shaped? You could take the round of leather, cut a radius, then fold it on itself and stitch or use snaps. Basically it ends up being a cone but if the round is wide enough it's a very wide cone, and you could probably get the bottom pretty flat. Just an idea, maybe worth an experiment. Instead of cutting from the center out, maybe leave a gap of an inch or two. Alternatively, wet moulding wouldn't be hard if you already have a large bowl or platter that you like the shape of, you could use that as a mold. Another thought would be using 2 pieces of leather. Think of a hat bring, it's really just a round of leather with a hole in it. You could stitch a base piece to the bottom side of this really big washer and then shape the sides with minor molding. Those are my ideas, i know the molding and two pieces ideas aren't ideal, but it's the best I got haha. -
It could. I wouldn't recommend boiling water though. I did that once and ended up with a grotesque looking little black hockey puck, it doesn't take much. A hot to the touch water would work I think, then dry in. Low oven. The downside is that they may become brittle when hardened. I'm not sure that's what you will want. But you never know until you try it out. Use up some scrap bits and give it a try.
-
Is the aquilim expensive? Its water based right? How's the bond? While I do enjoy the fragrant aromatic stench that effervesces from my bottle of weldwood or barge, ahem... I don't like the idea of sucking down carcinogens. I find myself lacking ventilation and should really find some...or maybe try this stuff? 20 mins seems like a long time but, id rather wait the 20 mins than choke on my fun sized jar of caustic super stick. PS, I like the tiny toilets... Perhaps teflon?
-
Show me your wallet
Stetson912 replied to Joseph1836's topic in Purses, Wallets, Belts and Miscellaneous Pocket Items
@Joseph1836, sort of did. You've heard the phrase taste the rainbow... That's what happens to cows tat are allowed to graze on rainbows... Ok, so that's hoopla! This is how I done it if you wish to know the technique. -
Haha, that would be quite a job. Oh, and to answer your question mjolnir, there is a share button that gives you the link to a post when you are viewing it. I just copied and pasted the link. I agree too, a smaller practice handle would be ideal. Even if it's just around a bolt or something. Oh! I bet you can make pens using this technique too.... I think my mind gears are grindin'
-
That's an awesome story. I like her YouTube series and I think she is incredibly talented. I kinda figured she would have liked the idea. I can just imagine though.... It might be a little tormenting to a boot maker to see someone cut up some boots lol. On a more serious note, I think this is a great idea. Especially with boots that are old like the ones you've shown. They have served their purpose and are now getting a second life. I'd like to be a fly on the wall in your shop, seeing how you do things. Very nice work.
-
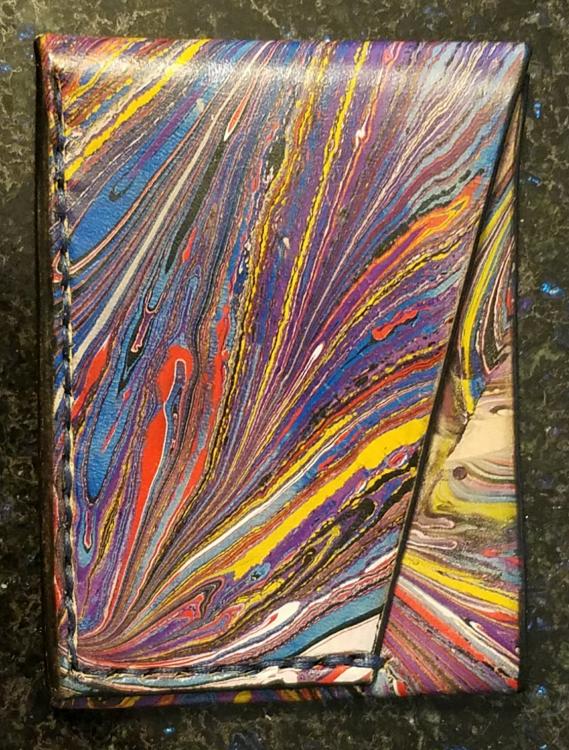
Show me your wallet
Stetson912 replied to Joseph1836's topic in Purses, Wallets, Belts and Miscellaneous Pocket Items
This one is a basic 4 slot I made out of horween Essex and another black veg tan I had. This is the one I use, it is the JLS pattern. Minimalist 2 pocket wallet. Very thin. I hardly know it's ever there.
-
I think that's a cool idea. Let's hope Lisa Sorrell doesn't find out hehehe.
