


Stetson912
-
Posts
1,431 -
Joined
-
Last visited
Content Type
Profiles
Forums
Events
Blogs
Gallery
Store
Everything posted by Stetson912
-
After looking at this again, it's very similar to how piping is done. French seams are done similarily too. To really keep the stitching hidden, Charon is right. Smaller holes and higher spi. But I think you will need round stitching holes as well. Anything angled will show the stitching. I'm not familiar with sewing machines but, needle shape may be worth consideation? Hope you figure it out!
-
Buff it real good, then either resolene of tan kote work well. I'm sure there are lots of other finishes you can use too.
-
This is a great question/experiment. I don't really have an answer. But there's a video of an upholster joining edges together simply with glue and a fabric lining. Maybe this will help?
-
@Nuttish, thanks for the post! Awesome stuff!
-
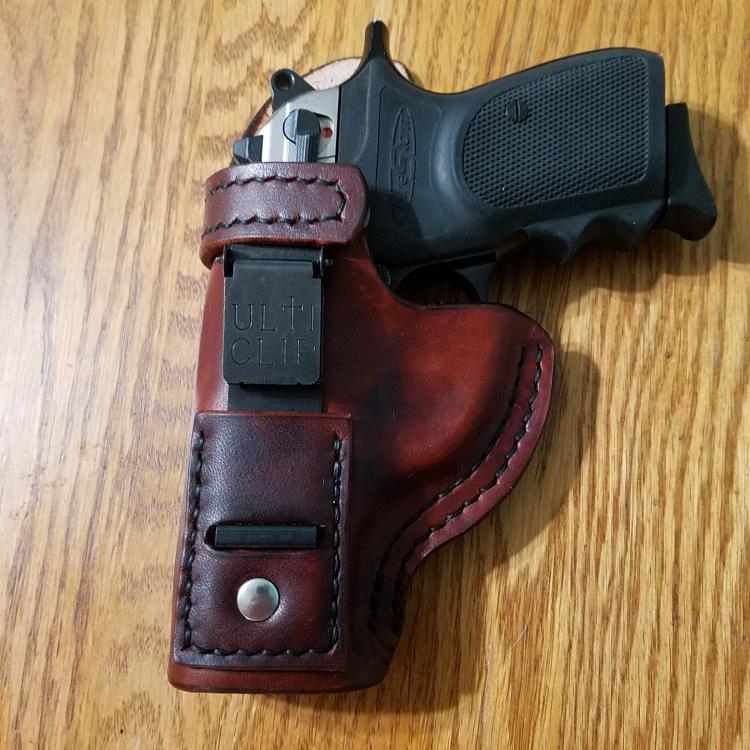
Hey guys, here's one I just finished up. Just need the resolene to dry haha. Info: 8/9 oz wickett Craig veg tan, Feibings tan dye, resolene top coat, and the clip is an ulticlip. The ulti clip apparently is designed to grip clothing so no belt is required (personally not a fan of this carry style but to each their own) This is what was asked for so i obliged. Let me know what you think. Critiques welcome.
-
 Just realized you called it flushed... And it's a brown color... Hehe.. oh the maturity level of some of us on this forum hehe
 -
Yea that it's the downside. But it looks awesome. Stitching color works well to
-
If that's the color I think it's an awesome brown.
-
Depending on what leather it is and stuff, you could use a strap cutter and get 2 10 ft pieces that are 1.5" wide. Then use those to make belt blanks or dog collars
-
Thanks for posting this! I somehow forgot about it haha!
-
Sorry, just getting this. I use just water for the first go. But I wet the edge. After that i is the yellow saddle soap as I don't have glycerine saddle soap. After that I use a bit of beeswax on the edge and rub it in. Sometimes I seal with resolene after the beeswax for a more solid edge. The Don Gonzalez video is good to watch too. That's the method I was trying to describe
-
I lay it flat on my rock(granite tooling slab) dampen the edge and take my canvas wrapped around my finger. Start rubbing the edge with the canvas finger more downward than lateral pressure. Sometimes a bit of an angle helps. Then flip it over and repeat. I do this with my thinner stuff. Seems to work ok for me.
-
Lots of good advice already. Being new I'm going to say some things that may sound counter intuitive. First, good leather is worth the money! Nstar has good stuff. The banner vendors do too. Cheap leather will really give you issues so don't stinge on leather. (Not that you can't find good leather for cheap either) If you would like to check, makers leather supply (out of Texas, great people) have wickett and Craig leather. Russett, natural tooling, and bridle in a few common weights. They even sell #3 tooling and bridle by the square foot. It is a bit more expensive but, I know for me at least, I can't always afford a whole side. Second, tools are important. Don't skimp here either. I'm not saying you need top line stuff. But, the better your tools the longer they will last and serve you. You only need a few tools to start out too. The main things you'll be doing are cutting, skiving, and stitching. That is every project. A couple good knives to cut and skive and a good set of stitching/pricking irons and a good awl will go a long way. Plastic or rawhide mallet, and maybe a decent hole punch set for snaps and rivets (if you decide to use them). These are the essentials. Finally, just time and practice. Don't rush yourself because you'll make mistakes and be discouraged. But, you also learn from the mistakes you will make, so that's ok too. There are a lot of good folks here willing to help. Never be affraid to ask. You'll find your niche soon enough. Welcome to the world of leather!
-

Round handbag
Stetson912 replied to Buttons's topic in Purses, Wallets, Belts and Miscellaneous Pocket Items
That's a lot of leaving. Looks nice to me. Good job -
My first four wallets.
Stetson912 replied to HamiltonLeather's topic in Purses, Wallets, Belts and Miscellaneous Pocket Items
Nice original style choices. I've done a few billfolds myself. They still cause problems for me. Just gotta keep on going lol -
These are amazing. I'd like to learn beadwork.
-
The publications Mike suggested ate 100% worth it. The stitching book will teach you how to stitch anything you need to stitch. And the techniques on the books are invaluable. That said, there are different types of boxes and different construction methods. It depends on what you are trying to achieve and what type of box you want to end up with.
-
Been MIA for a while, Simple leash and collar
Stetson912 replied to Stetson912's topic in Collars, Cuffs, Leashes and Leads
Thanks Mike, if you can do a belt you can do a collar. I'd like to see what you end up making. -
Been MIA for a while, Simple leash and collar
Stetson912 replied to Stetson912's topic in Collars, Cuffs, Leashes and Leads
Thanks raksha. That's what they wanted. It's nice to be able to knock out an easy simple project sometimes -
Been MIA for a while, Simple leash and collar
Stetson912 replied to Stetson912's topic in Collars, Cuffs, Leashes and Leads
This I got from Roger at rjf leather. Had it a while. It's thicker than I typically get but good for this application. Might get around to making me a belt. Maybe, depends. I happen to be circumferentially challenged hehe. -
The quick stick and stitch is tried and true. It all comes down to the end goal. If it is for utility you want it to be strong. If your dogs are like mine and just loaf around the house licking their bums all day then, well I don't think it matters if it's built like a tank. There are many ways to do it, comes down to how you want it done. And bdaz gives sound advice too. And true, we ain't got no rivers in Tucson (running ones anyhow hehe) even when they do run probably just a creek compared to NC .HAHA!
-
I agree with Mike. Test it on scrap. Be sure it won't bleed through or stain or something weird. As for lining the way you want to, I would cut the liner wider than the collar. Enough wider that when you turn the edges there is ample room for your stitching to grab.(typically 1/4" to 3/8") should be ok. Also, be sure to skive the edges before you turn them if they are a little thick. Not skiving could make a little bump or ridge down the length of your liner. If you want to get real fancy, you could even pad the collar. Just my thoughts. Finally, this is most important, take pictures and show us what you made hehe. Hope it works well for you.
-
Here's a simple collar and leash made from 9/10oz European bridle. It's havanna in color (a deep chocolate brown) brass hardware. Collar is 1 3/4" wide and leash is 1" wide. Thanks for looking. Let me know what you think, and critiques always welcome.

-
Wow, that's some fine work. From the pictures and description it sounds to me like each of the side and bottom edges of each piece of the pockets (8 pieces;4 pockets and 4 liners) and interior and exterior (4pieces; one interior and exterior and 2 liners) is skived extremely thin. To a feather edge I would think. Then you would glue the linings to the pockets interior and exterior and crease them and finish the top edges (with edge paint I'm guessing) then you would stitch it up and finish the stitched edges. The coin pouch looks to be only 6 layers at the edge. So the pieces there would probably not have been skive as thin as the card slot side so that the thickness of both edges would be close to the same. And if you've ever tried hand skiving you will appreciate how well made this wallet is, it's no easy task and I always mess it up somehow. Haha.
-
like this? It's applique. You punch holes and lace it/ braid it. I can't tell you how to do it though. Sorry :/

