Danne
Members-
Posts
772 -
Joined
-
Last visited
Content Type
Profiles
Forums
Events
Blogs
Gallery
Store
Everything posted by Danne
-
Yes, I get how you mean here, but I don't feel this give a good enough result. Like 0.5-1mm difference would ruin my "card pocket section" in some situations, for example on a card case with pockets on both sides. 0.5-1mm difference could of course be sanded when assembled, but then my stitching doesn't line up perfectly. But this can also be because your technique with this is better than how I think I would do it if I tried.
-
But let's say you would have four card pockets, then you wouldn't have a straight edge to mark from, because of the build up it would be less width on the bottom pockets. I think I will have to just do some practice pieces. I have since I started this craft always planned everything very well before I start a project, but sometimes it can be good to just try things.
-
In the manual it talks about two modes, one low speed mode. And here I see the same model number and "0-5000 RPM Adjustable Speed Control" https://www.tokopedia.com/ptsams/dinamo-mesin-jahit-industri-550watt-mtr-energy-saving-servo-motor
-
Not same brand name, but same model number so I guess it's the same servo http://www.jegon.com/upload/ueditor/file/20181222/15454620994420286.doc http://www.jegon.com/en/products/46.htm
-
Add me too please.
-
Another wallet
Danne replied to WyattEarp's topic in Purses, Wallets, Belts and Miscellaneous Pocket Items
Wow, very nice tooling. I know this is not posted in the critique section. But at least I always appreciate critique. I see that you have some small creases at the fold, maybe this is because it's a little thicker leather. But do you or have you tried to glue the lining around a curve? like around 90 degrees? Again, impressive tooling, and very clean work. -
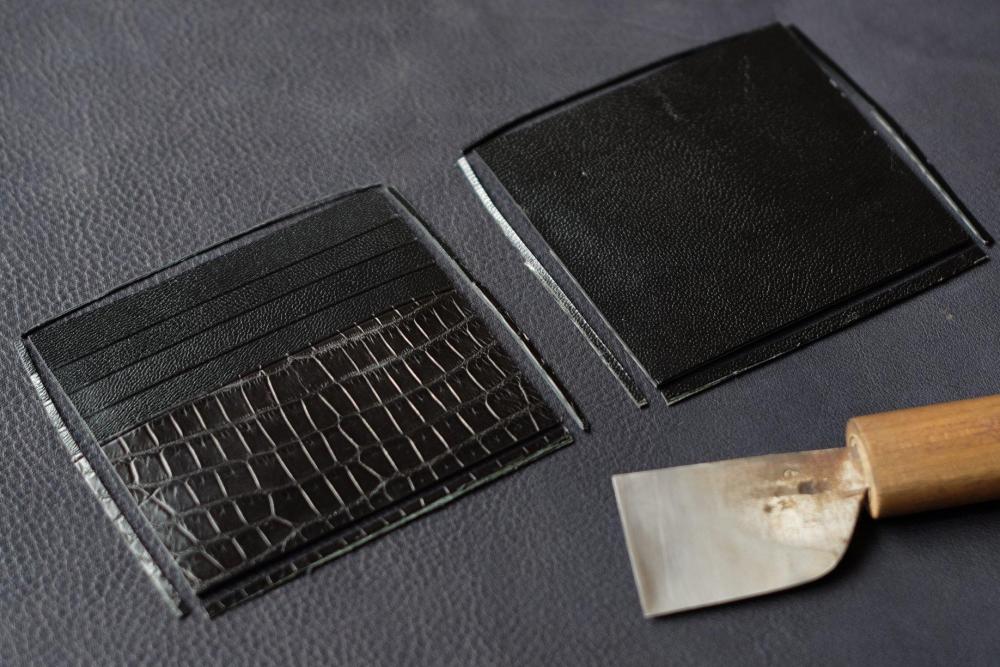
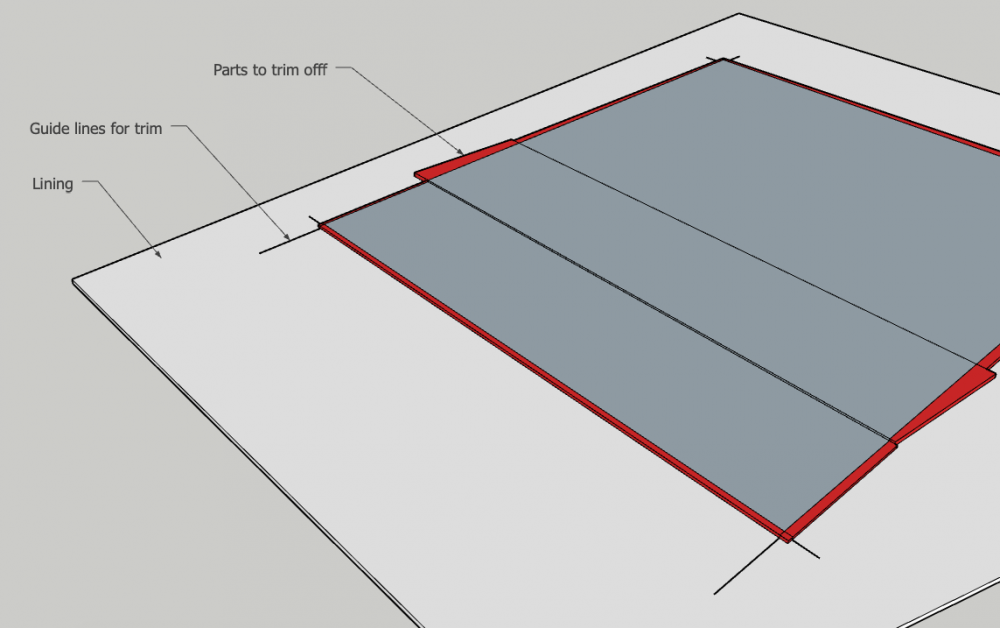
Hi, I would like to discuss construction techniques in this thread, or cutting techniques. I start with explaining how I do for example a card pocket section, it can be for a card case or a wallet. Since the thinnest leather I use is 0.5mm I often make the lining to the finished dimension and trim from the back side after top layer and card pockets are glued in place. This solution work good, but when I have a splitting solution I plan to construct my wallets a little different and using thinner weights for the lining, so I will have to learn how to "flush cut" parts. Here is an example I saved from someones Instagram. I can think of a lot of different solutions to do this. Like using a template glued to some thicker card paper, use a L-square ruler. But none ot these solutions will give me a perfect result. And i'm certain there are better solutions. (And no I can't use cutting dies since I focus mostly on custom work and a lot of different dimensions.) The only solution I can come up with is to draw cut guidelines on the lining, and after assembled use them to trim. (See my drawings) this solution also have it's flaws. You will not be able to for example use a roller press tool (those in steel or rubber) because even if you start in the middle you will distort the leather and loose the dimensions on lining (unless it's stiff leather and/or a little thicker) Let us discuss more ideas. Ideas that will results in very close to perfect dimensions.
-
Double Turn Edge Billfold
Danne replied to scrapyarddog's topic in Purses, Wallets, Belts and Miscellaneous Pocket Items
This is very clean. -
Thank you. The method i've used a lot to improve is to never do things if I feel unsure about the result. Like creasing the card pocket tops (with a regular creaser FN2, not FC) which means I have to "toe and heel" when I crease. The result gets better when I feel confident when I do it, and don't hesitate. So what do I do? I have practiced this on scrap pieces until I get the result I want. I remember someone said it was impressive that I have improved so much when I haven't done a lot of projects. But even though I haven't done a lot of products, I have stitched, creased and painted A LOT of edges on scrap pieces. Which is also good because when I do a project I don't try new things, I stay in my "comfort zone" with methods. But on scrap pieces I can try something that probably will not work as good, but it's worth trying.
-
Thank you. Yes I spend a lot of time trying to plan everything well to avoid mistakes, and end up in situations where the stitching doesn't match up and such.
-
I take it as a compliment, thank you. But in my opinion a perfect result isn't what should be important, but always trying to improve something. I have a couple of things on this wallet that I want to improve, will I improve everything on the next wallet? no but I will improve something. I give a couple of examples that I would like to improve. 1. The exterior crease outside stitching, isn't perfect on the interior. My iron either tend to burn/cut the leather, or with lower heat it doesn't make a crease that is defined enough. So I will look for another iron. 2. The stitching, I plan to X-stitch (punch from both sides with the same iron before assemble, so I get the same slant on all stitches. 3. Work on the corner stitching so the last stitch isn't straight. 4. Getting a splitting solution and make card pockets slightly thinner and full width and lined.
-
The important part isn't that things have to be perfect. I think this is the best. "Be happy with your improvement, but never fully satisfied, and always try to improve things" When I crease those pockets I "heel and toe with my iron. First with very little pressure to define the edge. Then I do it two times with slightly higher pressure, But since I have very little contact with the iron on the smaller sections, I also heel or toe at the longer parts to get a consistent crease. You have seen my edge painting tutorial here? It's basically how I do it, of course I always try to do smaller changes to get better results. Ps if you follow that guide and crease after the first layer of paint, do it on a test piece first. Because it works with some leathers, and some color combinations and it also depends on the creaser, if you have a creaser that round of the edges it's nice to paint before creaseing because you get a nice rounded corner with good adhesion of the paint.
-
Thank you. It was scary with black thread on orange and also a new thread I haven't stitched with before. And i'm not 100% satisfied with the interior stitching, but a lot of things is possible to improve with planning. Like making good drawings, make sure my skiving knife is sharp, paint those extra layers of edge paint for a better finish. But when it comes to stitching it's a little bit of a lottery for me, sometimes the result is really good, other days decent other times not so good. I'm happy with the result, and I know the result is good, but I tend to put most focus on what I can improve instead of appreciate how I have improved my results. Thank you
-
Wallet is finished, I will try to take some better photos after it's cleaned (A little dirty from sanding and such on these photos)
-
Stitched and ready for creasing and edge finish, I never get really satisfied when stitching with black thread on bright colors. Slightly misalign the awl and it shows so well, and also "double loops" around stress points stick out so much.
-
Thank you, Soon finished, top stitched and pockets glued in place. Always a nervous moment to glue pockets in place since I have planned very well how much need to be trimmed off the bottom and edge. Top edge stitched: The white in the right upper corner transition is just some glue I haven't cleaned up yet.


