kgg
-
Posts
3,343 -
Joined
-
Last visited
Content Type
Profiles
Forums
Events
Blogs
Gallery
Store
Everything posted by kgg
-
There is a couple of links to video's of the moving arm. I assume there are specific feed dogs and needle for each machine. i) https://www.facebook.com/khsewing/videos/how-the-moving-arm-working-in-binding/554470568589194/ ii) https://www.facebook.com/100064388931666/videos/223974593051605/?__so__=permalink Unless you are going to turn the machine into a dedicated edge binding machine it seems to me like a lot of extra work just to do edge binding and then have to strip it down to do regular sewing. kgg
-
The cost difference between a brand name like Juki, PFAFF, Alder and a clone is going to be substantial ($2500 vs $5000+) so traveling to test ride a machine is a great plan as this is going to be an expensive outlay of cash. When you go to visit a vendor bring along some samples of leather you would be sewing with the thread size you would like. Hopefully the vendor has a LS-1341 there as well so you can compare it to a LS-1342 as you may decide you can do without the lift feature and save some dollars. All the machines in the 341 class will handle V138 and some claim to be able to use V207 in 3/8" plus thickness. Once you are at or above the 1/2" thickness consistently you probably should consider a Class 441 machine like a Juki TSC-441 or clone like a Cowboy 4500, Cobra Class 4 to name a couple. There are many clones of the Juki LS-1342 and another option maybe something like a Thor GC-1341 ( https://sunnysewingcenter.com/index.php/product/thor-gc-1341-cylinder-arm-walking-foot-sewing-machine-for-leather-upholstery-and-heavy-weight-materials/ ). A couple of reference charts: Leather weight to Thickness: https://www.weaverleathersupply.com/pages/leather-thickness?srsltid=AfmBOopqG07GeZKU1T96bRXTs1dHSx0rvBmYIep5bJEKUcl3ltioJRUZ Needle size vs Thread size: https://www.tolindsewmach.com/thread-chart.html If you want to reference someone type the "@" symbol then type a letter of the persons user name, a list will appear and then just click on the persons user name in the list. kgg
-
The Cobra 26 is a hybrid clone of the older Juki LS-341 with what appears to be a Alder type bobbin assembly rather then a Juki style. The Techsew 4800 is sort of a clone of the Juki LS-1342 expect it has the larger nose gauge of the Juki-LS-341. The large knob on the top of the machine changes the vertical stroke of the presser foot and walking foot (amount of alternating vertical movement). @Wizcrafts has offered some excellent advise. How thick are the seams you are planning on sewing / crossing over?? Where are you located?? kgg
-
Just for future reference: Needle to Thread Chart: https://www.tolindsewmach.com/thread-chart.html kgg
-
The thickness to don't think is the problem I think it has more to do with you needle thread size combination. If I am reading the label on the thread correctly it is metric 20 size which is V138 thread. The metric 120 which is a size #19 needle is for metric 30 which is v92 thread. The correct size of needle needs to be a minimum of 140 metric (#22) and max 180 metric (#24) in real thick stuff. The needle hole made in the leather has to be large enough to basically accommodate 3 strands of thread, the top thread strand and the two strands of bobbin thread on either side of the top thread forming the loop. kgg
-
That took effort. Not for the faint of heart. Nicely done. kgg
-
If the cable slips again just make a complete wrap of the cable around the bolt. I don like KISS solutions. kgg
-
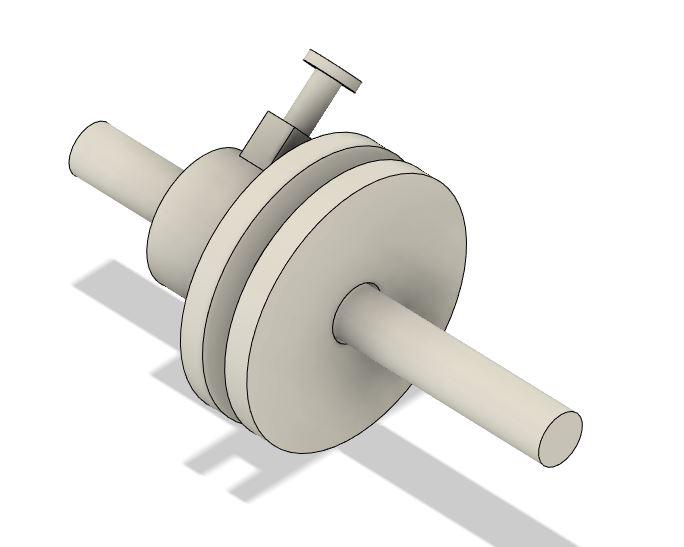
As a couple of suggestions to tighten up the cable: i) add two nuts and large flat washers to the threaded bolt to sandwich the cable. ii) I had a machine that had a half moon pulley on the end of the knee lift shaft that the lifting cable went into. I can't remember the make or model but here is a sketch of sort of what I remember but using a small wheel pulley. kgg
-
Looking on their Milwaukee website they say i) " We constructed the durable tote with 1680D ballistic material and all-metal hardware so it can withstand harsh jobsite environments." There is no mention of any plastic. ii) "The PACKOUT™ 10” Structured Tote features tear resistant layered ballistic material, a reinforced structure that holds its shape over time, and has a carrying capacity of up to 50 pounds." From those two statements there is no plastic being sewn. The multi layers of ballistic material would give the sides of the bags the needed structure strength to keep the sides stiff. Sewing ballistic material is probably going to be tough on needles and will need either be sandwiched behind layers on fabric or have multiple layers to be able to bury the thread knots in. I agree. I think punching through 1/8" or close thick LDPE or HDPE is going to pose problems as cracking / splitting maybe a real concern. I also think you would probably be into using a Class 441. kgg
-
What machine are you planning on using?? kgg
-
The Cobra 26 is essentially a hybrid clone that has the same specs as most of the other Juki LS-341 clones except it appears to be using a Alder bobbin assembly rather then your typical Juki style assembly. In this class there a lot of capable clones of the Juki LS-341 to add to your list like the Cowboy CB341, Thor GC-1341, Techsew 2750, Kobe LS-1341 to name a few. Basically it comes down to who you feel will give you the best service, access to replacement parts and of course dollars. kgg
-
Looking forward to seeing your arrangement. I assuming you are going to tie to the existing presser lift lever. kgg
-
There are a lot of Fusion 360 youtube video's that would be helpful in getting started and as you use it the easier it gets. Just choose one CAD program and stick with it. Thank you. I did not include any of the typical 3D machines you see on buying sites like A mazon as I discounted them from the very beginning. If I can offer anything just drop me a note. kgg
-
My take on 3D Printers so take it with a grain of salt. Like all things it comes down to what you want it to do and dollars. Once upon a time the 3D printers were for your tinkers and now they have evolved in print accuracy, speed, accuracy and ease of repairs/ replacement parts. It use to be that Prusa lead the pack for the hobbyist but they have fallen behind both in the customer service and equipment capabilities while still being expensive for what you get. The company that has really changed the filament 3d printers is the Bambu Labs equipment. From the cardboard box to being up and running with your first print it takes about maybe 30 minutes. It is decent equipment, fast, accurate and replacing parts is pretty straight forward as well as cost effective. The Bambu Lab PS-1 for about should do most hobbyists needs. I want a 3D printer to be Fast as I hate waiting and the prints to be accurate, less 0.25mm tolerance. Beside the 3D printer you need: i) good CAD design software which can have steep learning curve like Autodesk Fusion 360 ii) good filament iii) filament dehydrator I own 2 Prusa's (now gathering dust) and a Bambu Lab X1-Carbon 3D Printer. I run the hell out my machines. kgg
-
One of the most valuable machines for me are 3D printers which allows me to print stamps, gauges, table tops, edge binding attachments, etc not only for the sewing machines but other other equipment like hand presses, burnisher etc. kgg
-
I did have to adjust the arm on the head side of one machine where the lever actually does the lifting as it was binding there slightly. kgg
-
Thank you, that was my cheap KISS solution.
-
I find that a bit odd. I just checked my Techsew 2750 and the only thing I can see that would cause the lifting to be hard would be an incorrectly placed, overly strong spring that returns the lift to a natural down position on the lever system or the screw on the pivot point is tighten to tight. Any chance of a photo showing how your lift is now setup. kgg
-
@DieselTech @greygeist3191 @Brokenolmarine Thank you kgg
-
A lot better. Glad you got that pretty well solved. kgg
-
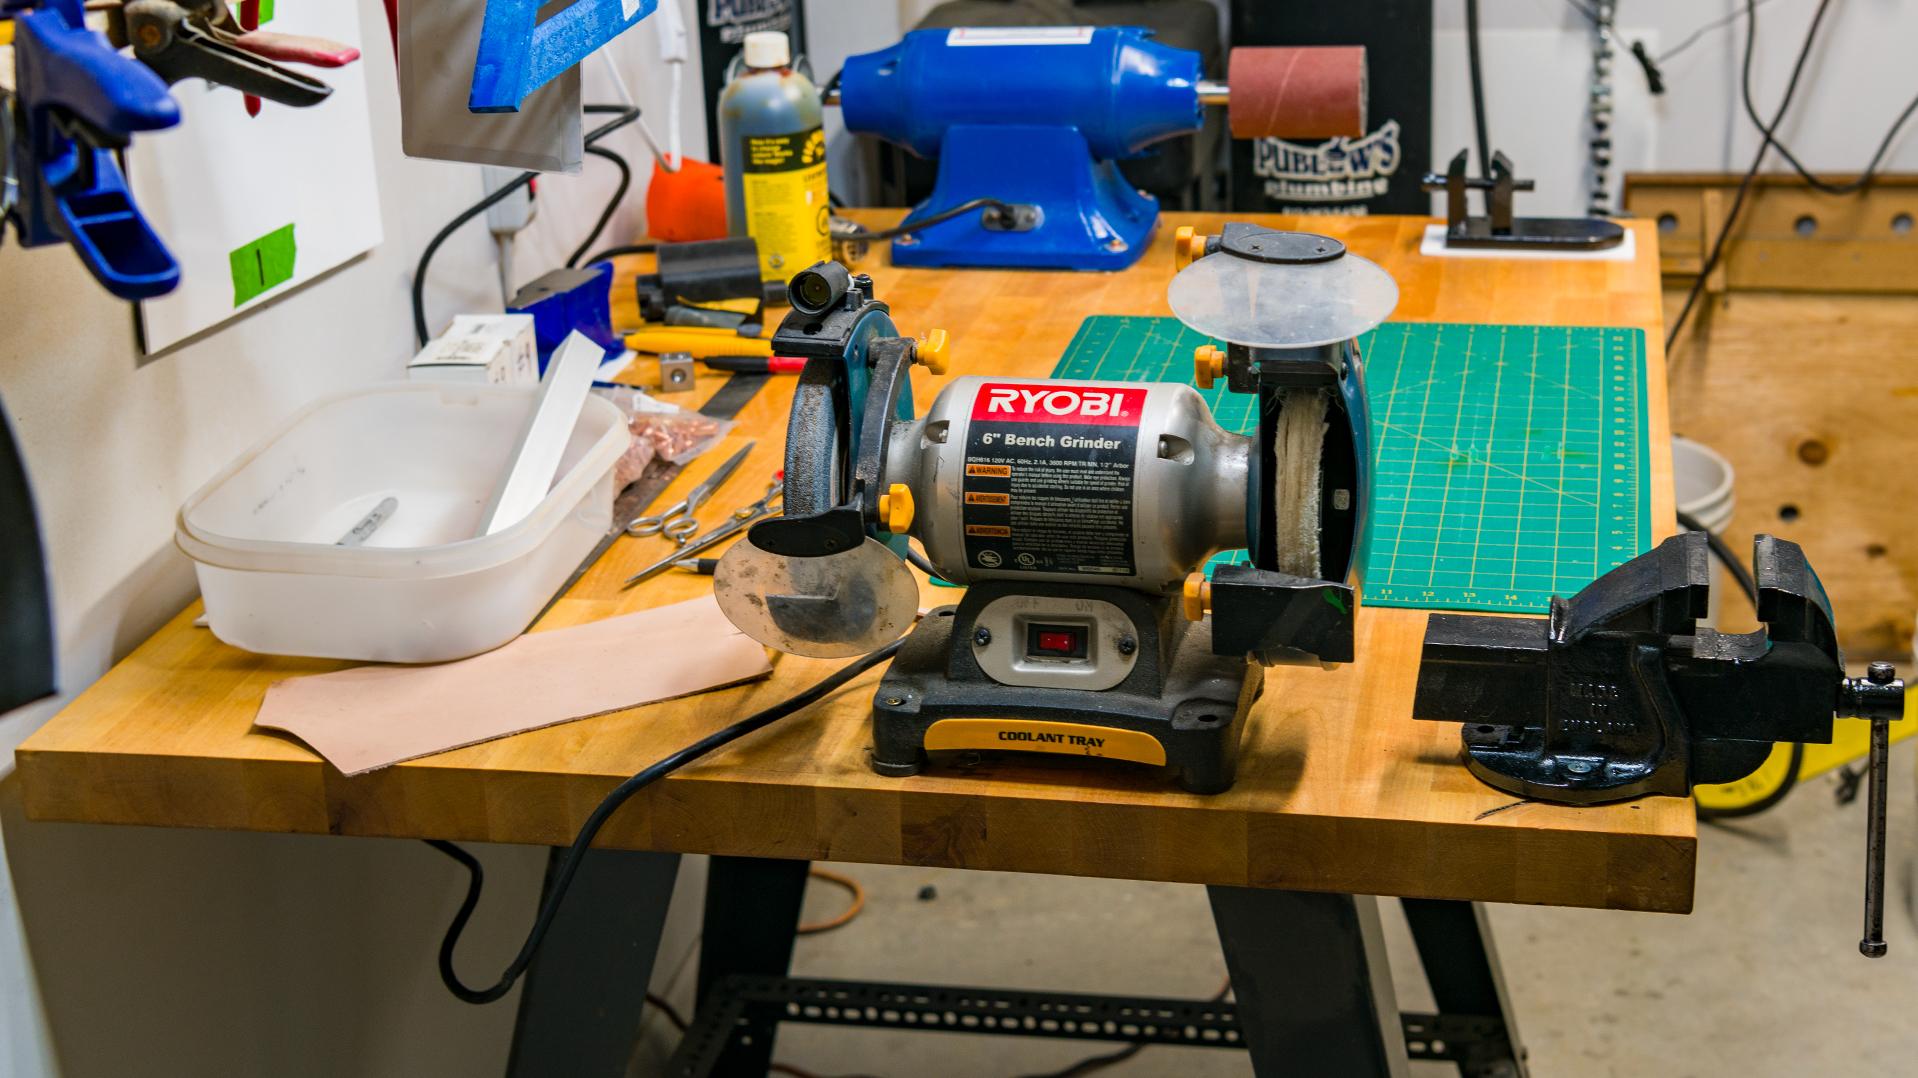
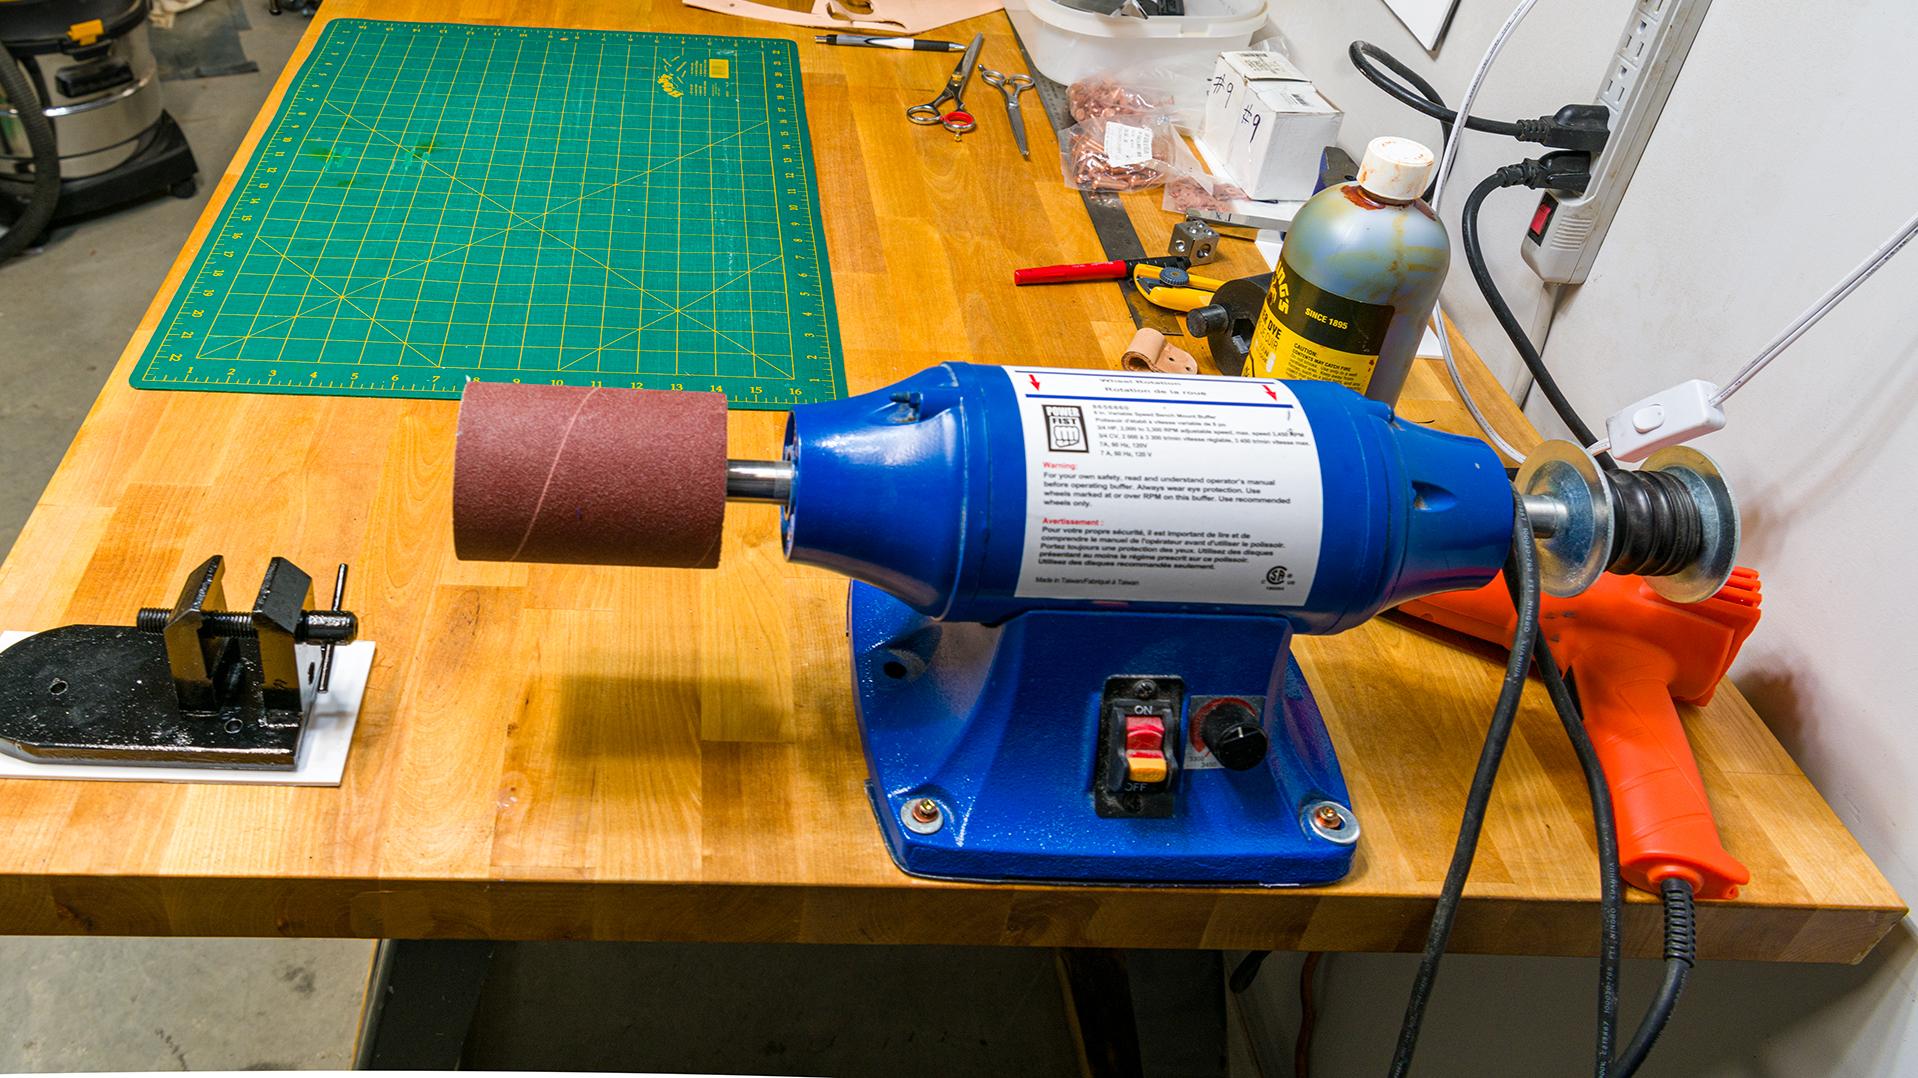
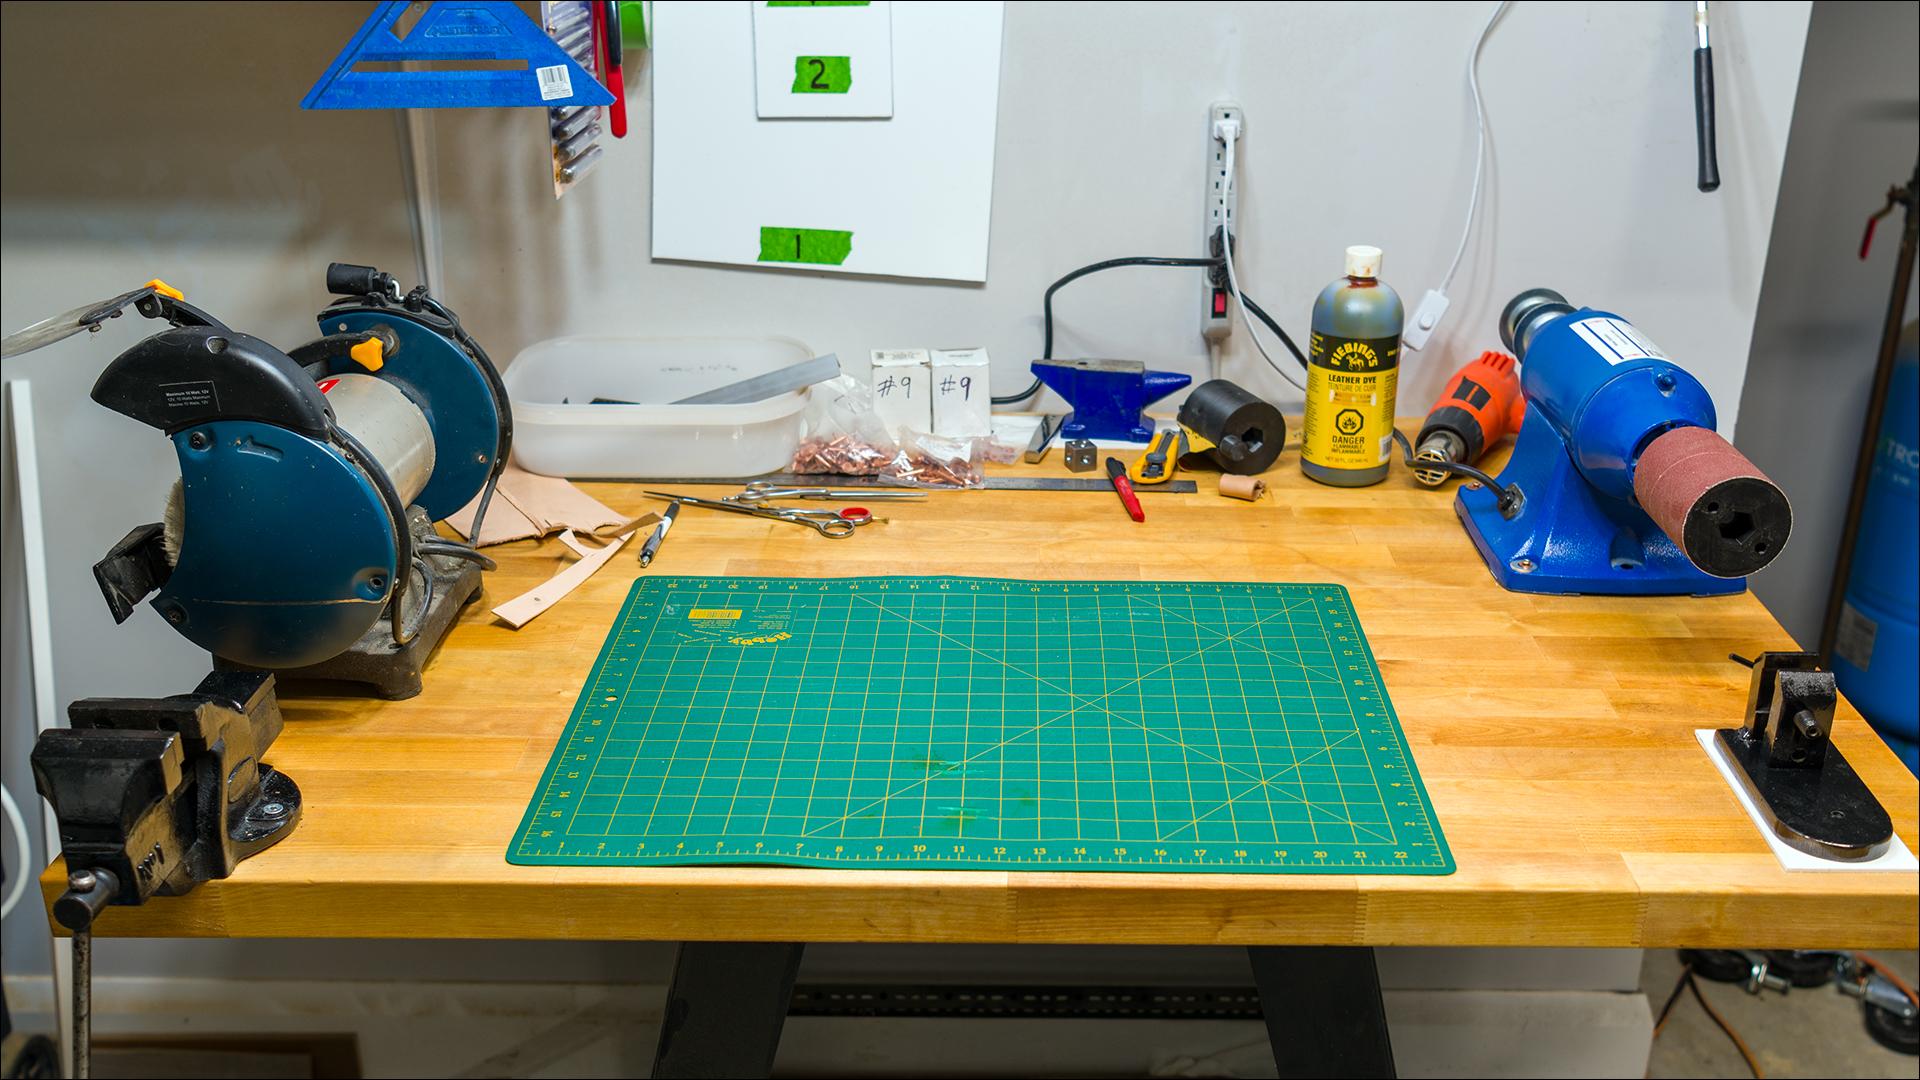
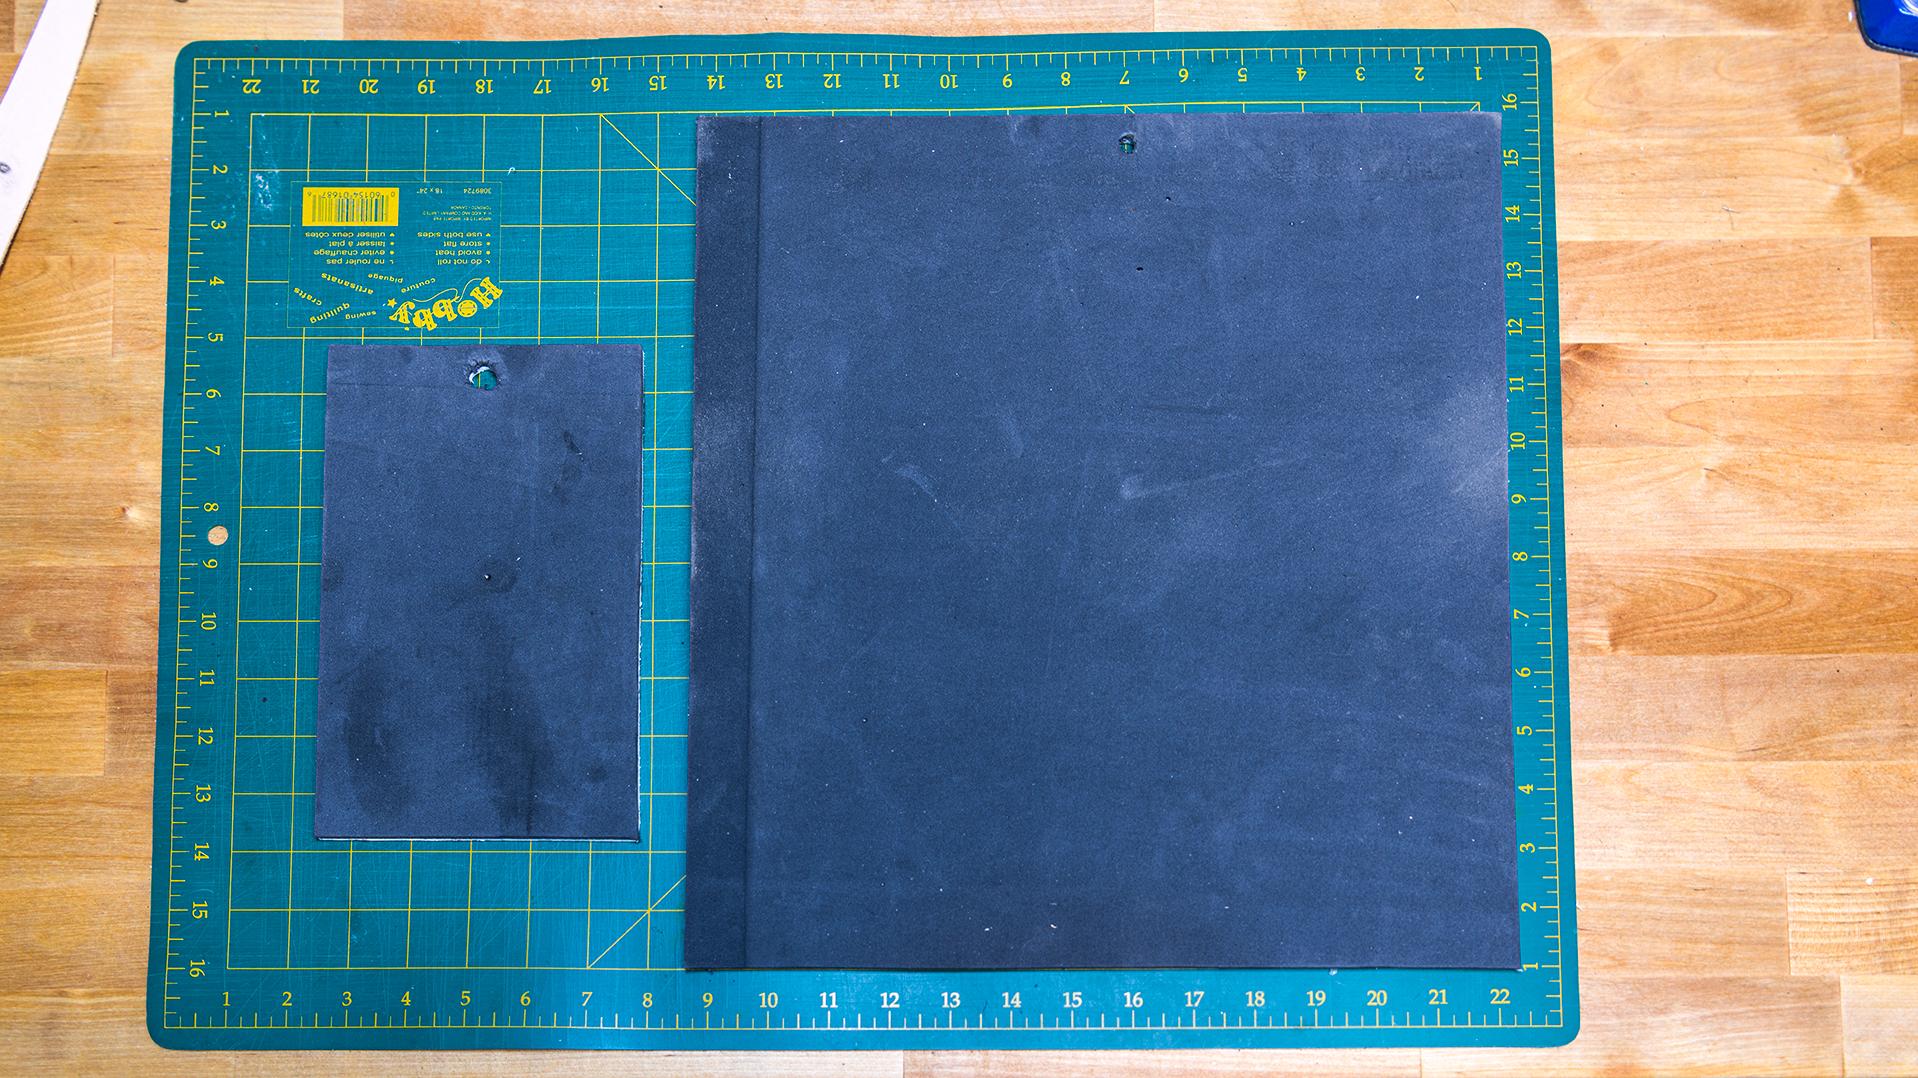
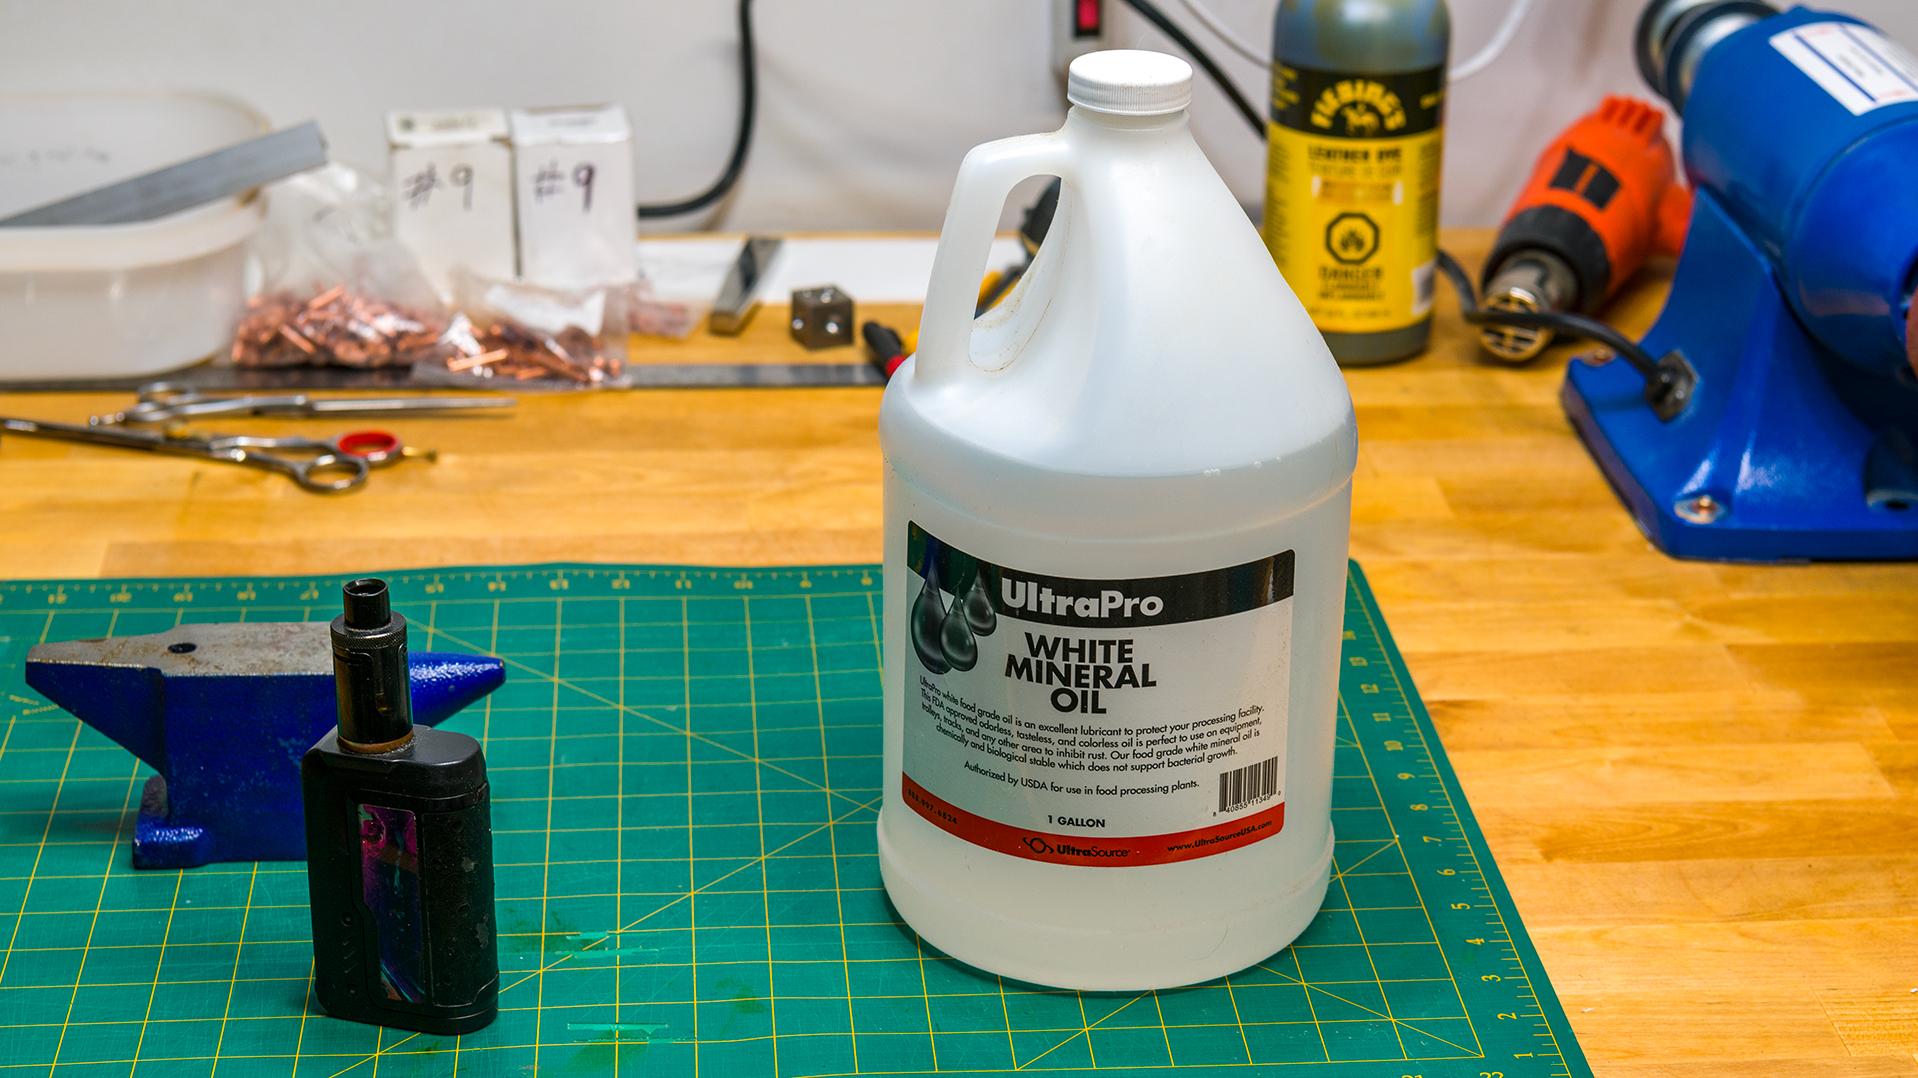
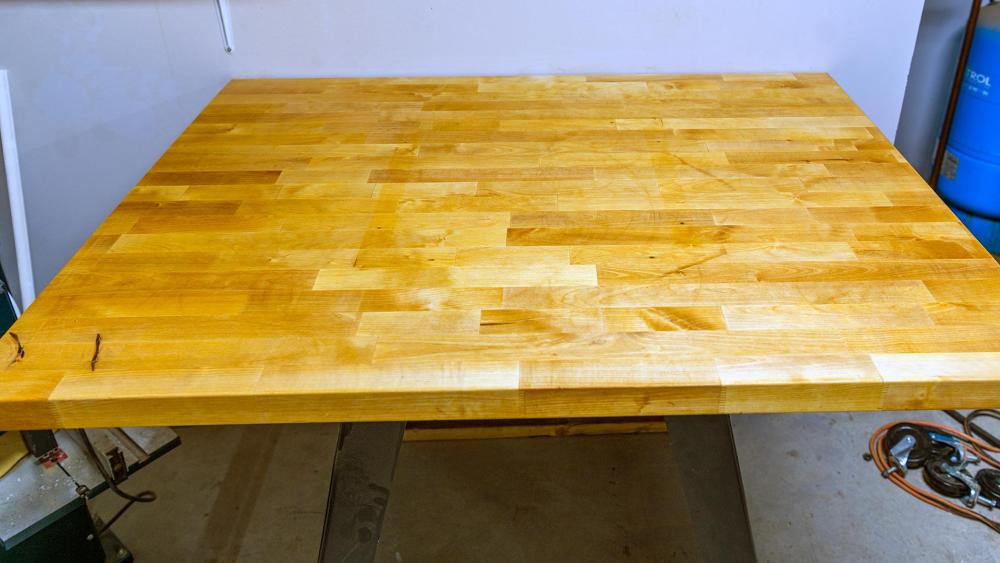
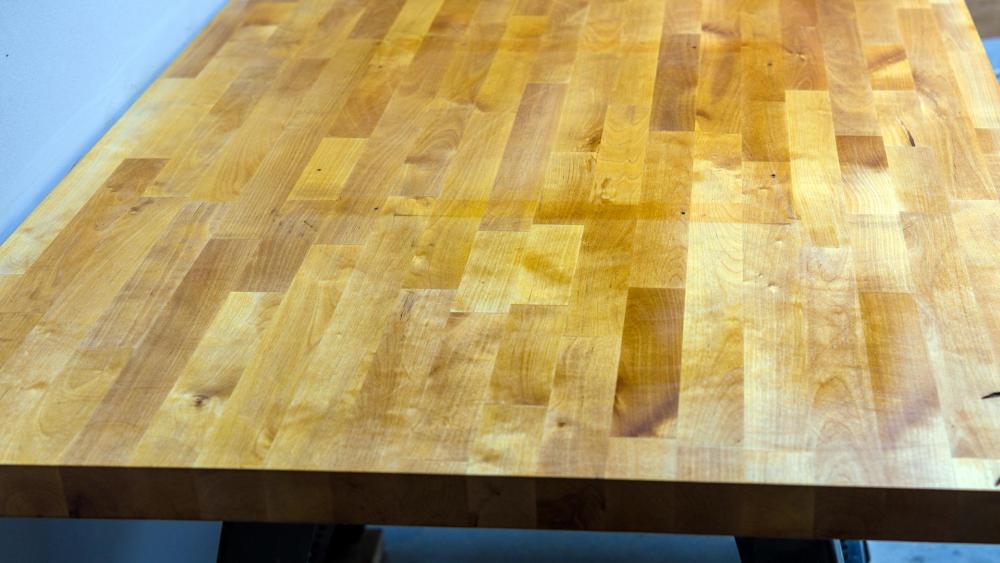
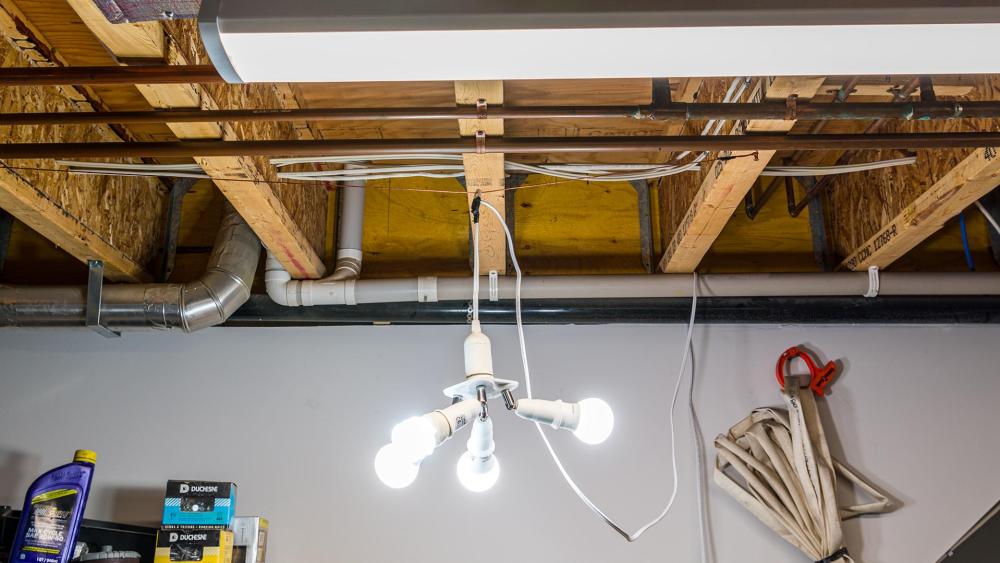
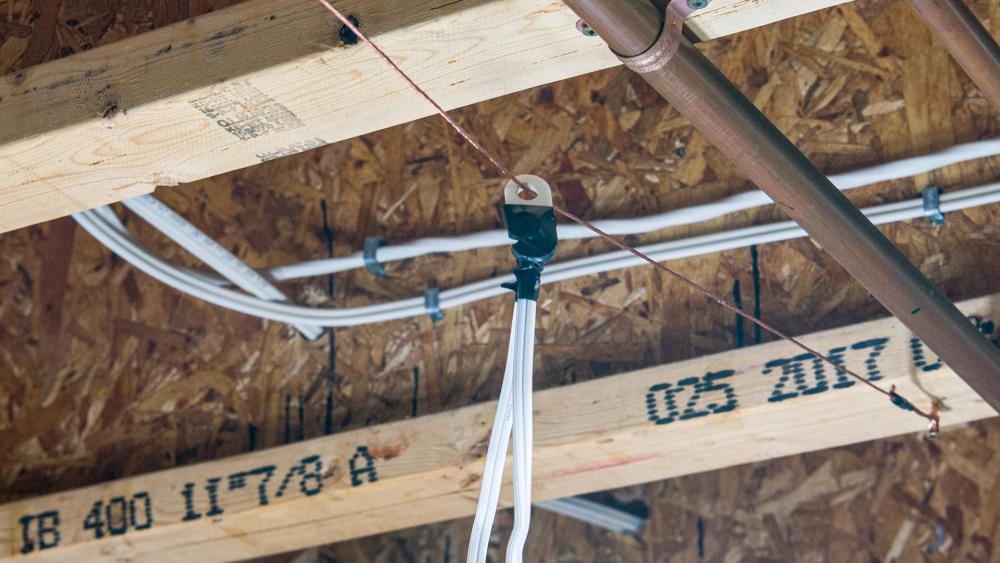
I had to revamp one of my work areas which takes up about a 4' x 4' area so what a better time then Labor Day Weekend. Work Table: i) I set the height of the work table so the top surface was equal to the top of my belt buckle. This height is to low for my son but I'm Short. The Butcher Block table top is one piece measuring 4' Long X 3' Wide X 1 3/4" Thick. ii) The Butcher Block top was sanded and then oiled three times with white mineral oil. The mineral oil was spread over the surface by hand using 80 grit sand paper as the applicator. The mineral oil was allowed to soak in for 24 hours between coats. I could have probably done another coat. iii) I spruced up an old vise and installed it on the left front side of the table top. The only markings I could find on the vise were in the casting " No. 1 " and " Made in England ". How old and made by who??? The other little vise on the right side of the table is a homemade one and mostly used a paper weight. iv) I installed my cheap Ryobi bench grinder / buffer on the left side of the table top. v) Then I installed my version of a variable speed Burnisher Machine on the right side of the table top. The sand paper side of the burnisher uses your standard 3" x 4 1/2 " sanding discs with a 3D printed adapter. If I want or need to use sheet sand paper I have another 3D printed adapter that allows for that, the black round thingy alongside the blue mini anvil. Lighting: The area does have 4' shop light but it was really to far out and didn't provide enough light and created shadows in certain areas of the table so I installed a Hanging Lantern Cord and a 4 Lamp Socket Adapter fixture that can be slide from one side of the table to the other. The lights are suspended on a plastic connector and slides on a #12 bare copper wire attached to the wooded "I" beam floor joists. Cutting Mat The old self sealing cutting mat had warped really bad. I was going to have to be replaced it but before I would through it out I figured I would try and flatten the waves out. What I did was use a heat gun and heated the back first then I heated the front in about 8" sections and placed a flat board with some heavy weights across that area of the mat. I would let it cool then I would do move onto the next 8" section. However I well give it another heat treatment this evening to get the couple minor waves flattened out. Now it is usable again. HDPE cutting boards I like HDPE more commonly known as puck board as a cutting surface but the main draw back is the surfaces are really slippery and can slide around. I have in the past tried different things and none really did work that well. My solution was to ruff up one side with 80 grit sand paper and glue some 3mm high density form to it. I used good old fashion contact cement, Heavy Duty Lepage. Now I get the added benefit of having a little cushioning while cutting. These pieces were left over 1/8" scrap. This my provide someone with some ideas so any and all comments are appreciated. kgg


-
In your first video when the machine was under power the noise not the dinky noise but the rough cranking noise did you get that straighten out? Was that caused by a dry speed reducer bushing and over tight belt? A video with the machine under power would be nice. kgg
-
Unequivocally the one and only Juki TSC-441. No harm in dreaming but that ain't happening anytime soon unless I win the lottery. kgg
-
The Cobra Class 26 is a hybrid clone of the Juki LS-341 and what appears to be bobbin assembly similar to that used in Durkopp Adler 867 ( https://www.youtube.com/watch?v=jpzfM0bsd6g ) kgg
-
I decided to go down further into this rabbit hole. I use A&E sewing thread which is made in Canada and the USA so I figured I could find some good info from a brand name manufacturer. 1. Nylon 66: Anefil Nylon® AB https://www.amefird.com/wp-content/uploads/2023/10/AE_Anefil_Nylon_AB_Product_Literature.pdf Constructed with 3 ply multifilament, bonded nylon 6.6 Tex 135 (V138) Strength: 23.8 lbs. Low-profile stitching 2. Bonded Nylon: Anefil Nylon® https://www.amefird.com/wp-content/uploads/2023/10/AE_Anefil_Nylon_Product_Literature.pdf Constructed with twisted multifilament, bonded nylon Tex 135 (V138) Strength: 23.8 lbs. Low-profile stitching According to A&E both threads have the same strength of 23.8 lbs. main difference other then construction appears to be in the threads application as Anefil Nylon® AB is used in the sewing of automobile air bags as an example. I wasn't able to get an accurate cost difference between the two. kgg