kgg
-
Posts
3,386 -
Joined
-
Last visited
Content Type
Profiles
Forums
Events
Blogs
Gallery
Store
Everything posted by kgg
-
Keep in mind no one machine will do everything well and most of industrial sewing machine do not like using V69 thread preferring V92 and larger. That is why a lot of us have more then one class (Upholstery Class 563/1541, Class 341/1341, Class 441) or style machine (Flatbed, Patcher, Cylinder Arm). I think as an all rounder with a flatbed attachment that are rated to sew about 7/16" thick leather you may want to consider the Class 341/1341 machines similar to the Cowboy 341, Cobra Class 26 and the Techsew 2750 to name a few. They use the 135X16 needle system for leather and 135x17 needle system for fabric. The Class 441 machines can do thin stuff if properly dumbed down and with the right feet dogs/presser feet/needle plate but really shine at the doing the really thick items. Keep in mind that they take a large diameter needle the 7x3 or 794 needles and may not give you a nice looking finished item with small sized thread. As a visual comparison think of a 3" finishing nail punching a hole vs a 1" finishing nail. I guess it really comes down to which machine that will do most of your items most efficiently. You may find it better to get a Class 341 / 1341 cylinder arm now and if the need arises then invest in a Class 441. As this is going to be an expensive investment I would suggest making a road trip to a dealer (or sending a sample of your items to a dealer) and test driving a couple different classes and styles of machines using the thread size you want to use. kgg
-
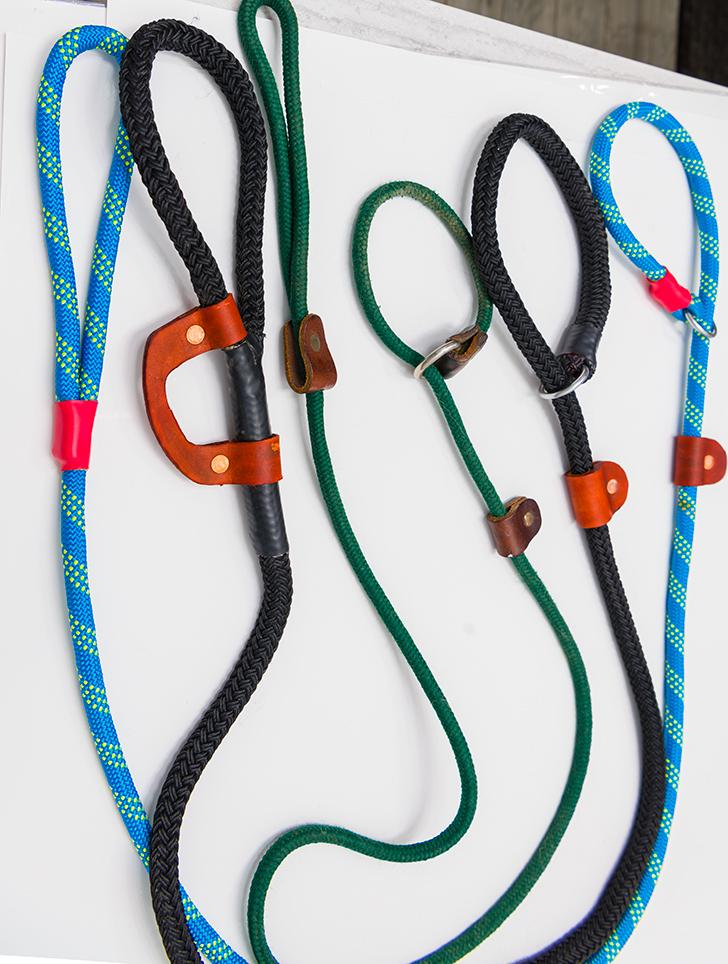
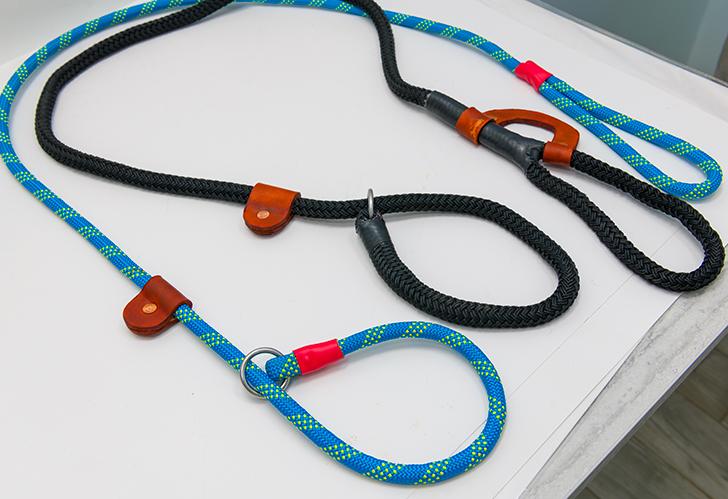
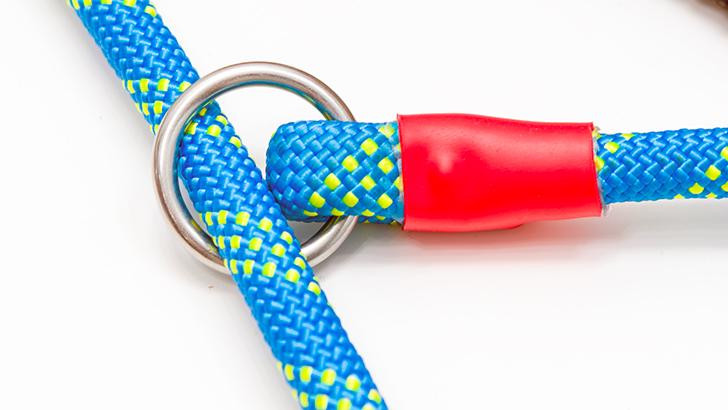
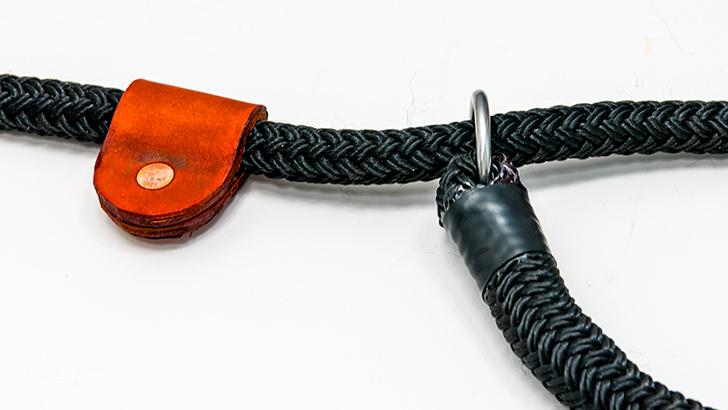
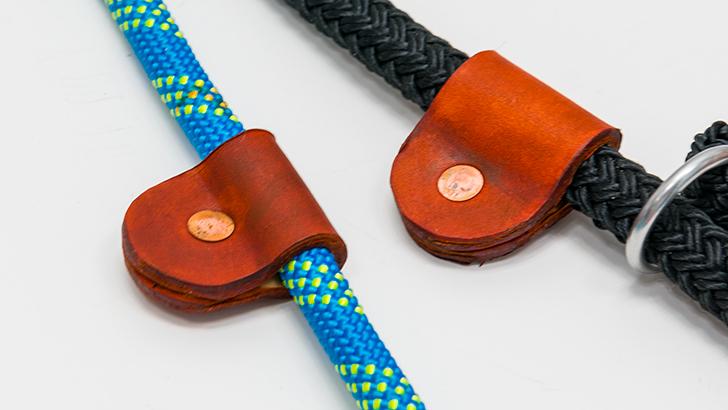
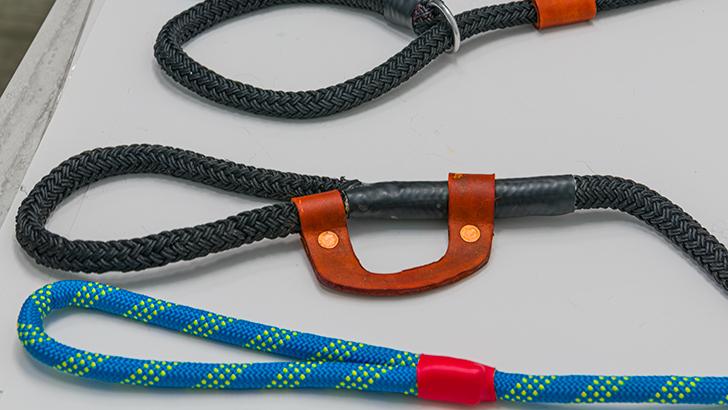
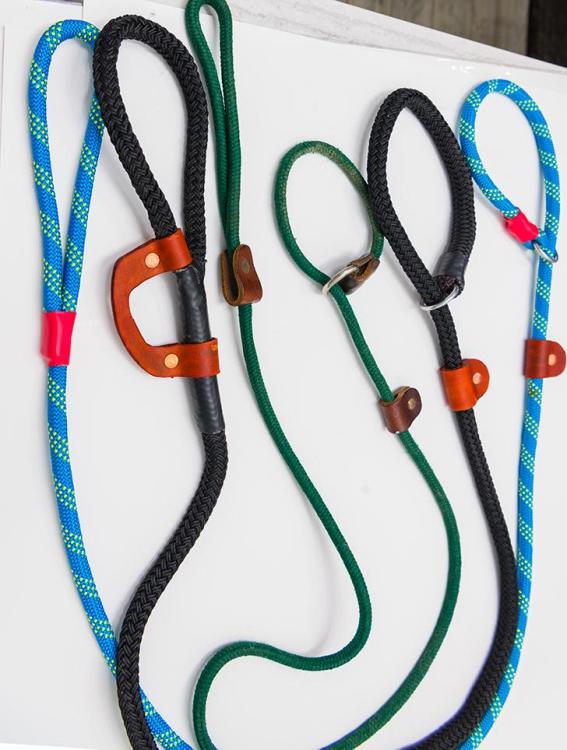
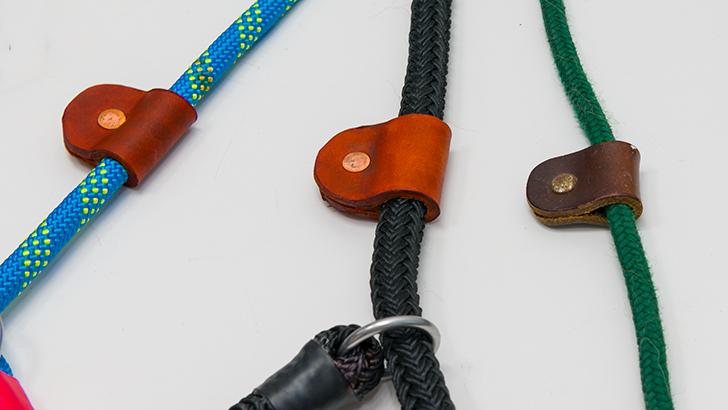
Not much leather work here but it was something I needed. After I "retired" from the Engineering BS we opened a dog boarding and grooming kennel as it seemed to go hand in hand with my hobby of dog showing and breeding. Well after 20 years of use our last original kennel slip lead finally decided to give up the ghost. I always have liked the English style kennel slip leads but they are now costing about $20 CAD plus for something sort of half decent in 1/2" diameter and $40 CAD for a proper spliced 5/8" double braided nylon. I personally don't like the feel of flat nylon or flat polyester leads or the leads made PVC coated webbing's like biothane and how they work but that probably is just me. Over the years we have boarded and handled a lot of big guys (plus 120lbs) as well as the aggressive dog breeds like the Black Russian Terriers, Pit Bulls and Cane Corso's. Our kennel leads need to be safe, dependable, tough and be able to be used on almost all breeds. So me being me I went to the scrap bin to scrounge enough bits and pieces to make up some new ones. I did have to buy some new 1/2" 48 strand braided Polyester rope and 5/8" double braided Marine Nylon rope but the rest I had like copper rivets, 1" welded metal "O" rings, scrap 3 oz veg tan and 1" diameter shrink tubing. This is what I ended up with. I figure these will probably outlast me. i) cost for each slip lead averaged out at about $8 CAD. ii) the sliding leather keepers are two layers of 3 oz leather glued together, wet formed around the rope and riveted together so there is a nice smooth leather surface rubbing against the rope that will not slip through the O ring. Had that happen with a store bought one and it wasn't fun. iii) the shrink tubing is to provide a nice smooth transitional surface and hide / protect the copper rivets. iv) the blue slip lead is braided 1/2" 48 strand braided polyester. Initially it will be stiff but will soften with use. v) the black slip lead is double braided 5/8" marine nylon with the ends spliced back into itself. The leather doodad on the handle is for accessories like plastic bags. It is very pliable and feels comfortable in the hand and will be the one that I use on my dogs (Nova Scotia Duck Tolling Retrievers). vi) the green slip lead is owned by a customer and is a store bought 3/8" that appears to be made with braided polyester. All comments are appreciated. kgg

-
This is a class 441 clone machine of the Juki TSC-441 and is similar to the Cowboy 4500, the Cobra Class 4 along with other machines in this class. These days they all seem to be pretty dependable. The main question that should first be answered is this class of machine the right one for what you want or need to sew. This article will help you determine what machine or machines will best suit your needs. What are you planning on sewing and with what size of thread???? kgg
-
Can you use an embossing plate without a clicker?
kgg replied to DaleksInc's topic in How Do I Do That?
Just to add to the list if you have a hydraulic shop press that would also work. kgg -
A lot of servo motors these days come with a needle position sensor for less then $200. The table that the machine setting on is a nice DIY design. If I was in need of this type/style of machine I wouldn't pay anymore then 40 percent of what I could get a new one for. That would put the price say around $550 but that is just me. kgg
-
If I'm not mistaken like @Constabulary has stated it is a clone of the Singer 45K21. This I think is very similar to what use to be referred to in recent years as a GA5-1. Bottom feed machine, no reverse with the GA5-2 having reverse. A more modern clone I think would be a Cowboy CB2500. If you contact @CowboyBob I am sure he would be better able to tell you about any differences between the two machines. As a note here is a link to the Cowboy CB2500 with speed reducer and servo $1395 and $1695 with reverse ( https://www.tolindsewmach.com/cb2500.html ). I think for such an old machine be it good looking shape the price is way to high when there are new machine buying options at a lesser cost available. kgg
-
What is your budget?? What do you consider medium weight?? How thick?? What size of thread do you want to use??? Are the machines being offered by an individuals or companies??? Personally I wouldn't choose either I would prefer to look for something with a wider range of thread selection as I think all three would limit the thread size selection to V92 max. I would suggest finding a Juki or clone as replacement parts and accessories are easier and cheaper to find. kgg
-
It would be safer to say it may do some very thin wallets occasionally. Not really the machine for the job. I would look for something like a Juki 1181n or clone at a bare minimum. kgg
-
It's a domestic sewing machine made for fabric. How thick of leather are you wanting/needing to sew? kgg
-
What model number? I don't know of any of the Husqvarna's as being other then domestic sewing machines not industrial or capable of sewing leather with other then the thinnest with V69 (Tkt/M40) thread. kgg
-
If the machine is what you want / need then getting an unopened boxed machine for that price is an excellent price. I would buy it anyway as if it doesn't meet your needs then you could always sell for that price or more. kgg
-
If I'm not mistaken they were sold by Reliable out of Toronto that was later replaced by their Reliable 3200SN which are needle feed machines. So be careful as they were not walking foot machines like @chisel has noted and made for fabric. kgg
-
Cleaning the internals of Pfaff 545
kgg replied to potentialgaloshes's topic in Leather Sewing Machines
Depending on how bad the machine is gummed up I would suggest: i) Lightly gummed machine: Use some compressed air to blow out the light stuff like lint then flush the machine with some synthetic transmission fluid to help soften / remove the old grease. The synthetic transmission fluid will penetrating deep into the bearings. Then flush out the synthetic transmission fluid and re-oil. ii) Heavily gummed machine: Using a large tote type container soak the machine in diesel fuel in a safe location. Flush out the diesel and re-oil. I give my new machines a redneck bath using a couple of concoctions of synthetic transmission fluid mixed with synthetic motor oils as a matter of course before first running them but then again I don't ever use sewing machine oil in any of my machines, new or old. kgg -
This was a first for me seeing such an obvious fake seller trying to peddle well known machine names like Techsew, Weaver and Sailrite. However it is a good reminder for those in the market for a machine to be cautious when dealing with such sites. kgg
-
While doing a quick search on Alibaba for a drop feed cylinder arm sewing machine similar to the Seiko TF-6 I found an interesting yet concerning link. Link: " BRAND NEW Techsew 5100 5200 ALL MODEL Fully Loaded Package 16 Cylinder Heavy Duty Compound Feed Industrial Sewing Machine " ( https://www.alibaba.com/product-detail/BRAND-NEW-Techsew-5100-5200-ALL_11000016761112.html?spm=a2700.galleryofferlist.normal_offer.d_title.6d9266556GfEav ) Supplier: Rising Star Productions out of Nassau, Bahamas ( https://bs29080611782rwqr.trustpass.alibaba.com/index.html?spm=a2700.details.0.0.6a006370bQzG2H&from=detail&productId=11000016761112 ). On the Rising Star Productions page they also listed Techsew 4800, 2600, 2750, 810, 830 and SK-4 @Techsew Ron this maybe of interested to you. kgg
-
The Seiko TF - 6 was a left handed machine drop feed machine using a max thread size of V92. I think this series has been dropped and now the right handed drop feed machines are the only ones available now in the TE series which also have a thread max of V92. Have you considered maybe a post bed machine????? I did a very quick search on Alibaba and could not find a drop feed cylinder arm. kgg
-
Most all of us are subject to some form of legal system not a justice system. You are lucky up here in Canada we have two legal systems that try and co-exist as we have two official languages (English and French) common law and civil law that try to co-exist together. About all you can really do is keep your individual data footprint / exposure to a minimum, like social media platforms. There's always going to be bad actors out there. kgg
-
Good info. Lucky you did spray that through the gun. kgg
-
Go with the info in the original post or contact Tecmic ( https://www.tecmic.co.jp/en/ ) directly about the age and spec for this particular model. Personally when you consider the cost I wouldn't bother, machine $600 USD which is about $825 CAD plus a servo motor at about $200 CAD plus another $200 for a table / operating pedals / miscellanenous parts/ etc you would be over $1200 CAD. Why not contact companies that do repairs to industrial sewing machines like Manson in Vancover ( https://www.masonsewingmachine.com/ ). Most upholstery class machines machines can do 3/8" of material. Since you are looking at a cylinder arm style Tecmic you really I think should be looking at machines like Juki LS-341 / LS-1341 and clones. What is you budget as there maybe other options that would suite you needs like a one armed bandit. kgg
-
No longer available. kgg
-
The Singer 31-19 was the forerunner to the walking foot, it has been mostly referred to as kick foot or trailing foot machine. The short answer to your question is NO. Neither machine as you really need a Class 441 machine for holsters that can handle thread above V207. kgg
-
The Juki LS-341 takes a "M" style bobbin and the Cobra takes a "U" style bobbin. To that end there are differences which maybe minor but the OP did mention that he was told by LMC it was a hybrid of Juki and PFAFF. I don't know of any PFAFF's that take a "U" Style Bobbin while the Juki LS-341 and 1341 take the "M" style bobbins. kgg
-
A couple of questions: i) does your machine have a speed reducer or just one belt from the head directly to the motor?? ii) does your machine have a clutch motor or a brush servo motor or brushless electronic servo motor??? iii) what size of motor? A couple of photo's would help clear up your particular setup and narrow down possible solutions. kgg
-
The Tandy Outlaw is a re-badged Cowboy Outlaw done for Tandy. Within the one arm bandits you also have the Tippmann Boss which maybe a consideration for you. For holsters you need a class 4 by rights similar to the manual Cowboy Outlaw or motorized Cowboy 3500/4500 machines but the other items you could more then likely get away with a Class 341simialr to the Cowboy CB341 machine. Then there is the used market for both the manual and the motorized machines. Maybe there is something in the used section of the forum. kgg
-
I thought it was a hybrid but I thought it was an Alder hybrid so that clears that up. Since you are in the US another popular machine in this class is the Cowboy CB-341 as well as a multitude of other less known clones. kgg