


kgg
-
Posts
3,383 -
Joined
-
Last visited
Content Type
Profiles
Forums
Events
Blogs
Gallery
Store
Everything posted by kgg
-
I wouldn't bother with purchasing this machine particularly since it does not have reverse and it has a clutch motor. Learning to use a clutch motor has for most a steep learning curve. Upgrading the motor to a servo motor will set you back another $150 to $200. I would suggest looking for something like a Juki LU-563 or a Consew 206rb. What part of Canada are you in? Someone maybe able to suggest a dealer near your location. kgg
-
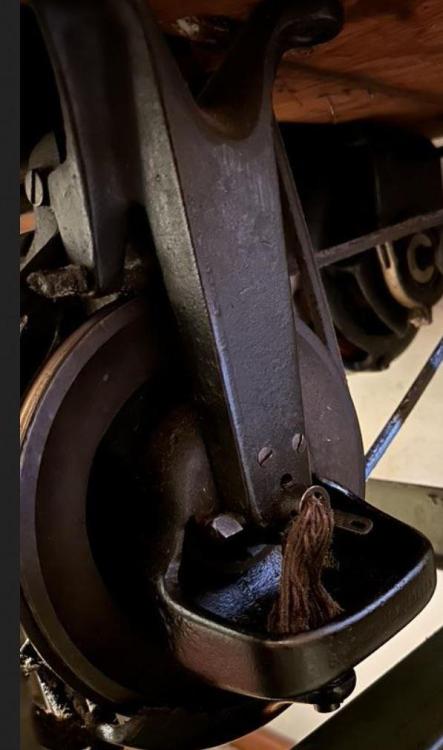
I re-sized your photo to get a little better look at the speed reducer. It appears from the photo that the wick goes to the bearing for the lever that actuates the motor. I would carefully remove the speed reducer / lever mechanism from the table. That way you could better see how and what the wick actually is suppose to prove oil to. You said " Both old leather belts are slipping, I assume because they seem to be saturated with oil. " Once you get the belts off can should be able to see the path the wick is taking from the oil pan and how / why the belts are becoming oil soaked. You are going to have to at least try and clean the oil off the belts, remove any oil from the pulleys where the belts set or the belts will continue to slip. If the wick is use to oil the bearing for the lever that actuates the motor you could probably just stub it off and remember to put a few drops of oil on it every once in awhile. If you decide to replace the full wick from the oil pan to it I would suggest threading a new wick through a tube (metal or plastic ) so that the oil doesn't natural drip down on the pulley and belts. As for: i) the wicks think of 100 percent cotton wicks used for oil lanterns which can be had at hardware stores or 100 cotton cording used in upholstery edges on seats which can be had fabric stores. ii) cleaning the bearing out by flushing with thin oil and compressed air or even a tin of 10w24. A couple of additional photo's would help. kgg
-
Yes this is often done. I'm assuming you are in the US so I would check with Toledo Sewing Machines ( https://www.tolindsewmach.com/ ) for a speed reducer and a servo motor pulley. kgg
-
From what I can gather and I don't know much about linen thread the #16 that you are using in the Juki 341 is a 3 cord or 4 cord which has a thickness of 0.56 mm or 0.65 mm thread equal to about: i) #16, 3 cord just a touch over V207 which means it should use probably a#25 needle ii) #16, 4 cord just a touch under V346 which means it should use probably a#26 needle. So since you are using it in the Juki 341, i) I figure you are using #16, 3 cord as that machine isn't rated to handle a #26 needle or V346 thread. ii) The #22 needle is good for V92 thread or about a #30 linen thread. iii) The #25 needle you are using in the Cobra is good for V277. If you can read the information off the barbours thread spool to get a size or if you could measure the diameter of the thread someone more knowledgeable could suggest a proper size needle that may work. The Class 441 machines, Juki or clones are only rated for thread up to V415 or thread with a diameter of about 0.28" or .72 mm. kgg
-
You may want to check with Leather Machine Co. for how you need to set the machine up. Also attach a couple of photo's of how you have threaded the machine as they may recommend a different method of threading. The Cobra clones are threaded differently then the Juki TSC-441, the Cowboy or the Techsew. Here is a topic with photo's of how the top thread is threaded differently on these machines. You could try and thread the machine like a Juki TSC-441 and see if that works. Different thread path, different tensions, different number of top thread tension points. Also what size of needle are you using in the Juki 341 with what size of thread and what are size thread are you using in Cobra with what size needle? kgg
-
The two leather belts indicates to me that the machine has a speed reducer pulley setup and the wick going into the oil cup is to lub the speed reducer pulley bearing. Any light oil should be work. When you replace the pulley belts if possible replace the wick and flush the bearing out. kgg
-
Yes you are correct just no letter before the serial number. I misread the information. kgg
-
Nicely done. Neat and tidy. kgg
-
Cowboy CB4500 premium w/eps vs Techsew 5100 se w/eps
kgg replied to DieselTech's topic in Leather Sewing Machines
I almost bought a one armed bandit and came to the same conclusion before getting a Class 441. Now it just comes down to which machine best meets your budget, needs and who you feel will give you the best after sales service. As far as accessories / attachments that is going to depend on what your needs are. When it comes to the needle positioning some people like it and others not so much. My machine did come with the needle positioning along with a 9 coil brushless motor. I never installed the needle positioning and the jury is still out as whether I keep the brushless motor on the machine. kgg -
Cowboy CB4500 premium w/eps vs Techsew 5100 se w/eps
kgg replied to DieselTech's topic in Leather Sewing Machines
I forgot to add that there are presently three one armed bandits available, Tippmann Boss, Cowboy Outlaw, Weaver Cub. kgg -
The site for dating the Singers I would use the " International Sewing Machine Collectors' Society ". Dating your Singer by serial number ( G4763530 ) indicates it was made in Elizabethport between 1916 -1918 and with your machines having a low number for that series probably built in 1916. ( https://ismacs.net/singer_sewing_machine_company/singer_dating_by_serial_number.html ). The way I read the information is that 29K machines built prior to 1900 had No serial numbers. As far as getting the thread through if you have access to a length of #20 AWG copper wire, guitar string I think is smaller at #22 AW or #13 piano wire. Those should go through. kgg
-
Cowboy CB4500 premium w/eps vs Techsew 5100 se w/eps
kgg replied to DieselTech's topic in Leather Sewing Machines
Simple answer is Yes. My simple way of determining the class of machine. If a machine uses the 794 X SIZE of system needles then it is a Class 441 where SIZE is the size of needle that is determined by the size of thread being used. In the class 441 you have the one armed bandits and the machines with 9", 16", 25", 37.5" cylinder arms. I class machines basically on what the equivalent Juki or Singer series of machines it best's represents like 29K / 1141 / 1541 / 341 / 441. For someone new to machines trying to figure out which clones have similar capabilities can be a chore. kgg -
Cowboy CB4500 premium w/eps vs Techsew 5100 se w/eps
kgg replied to DieselTech's topic in Leather Sewing Machines
If your thread range is V138 to V346 then you are into a class 441 machine to handle the V346 thread. If you are planning on selling / repairing traps or straps in general for other people be very careful, get trained, certified and insured. It isn't just about that you can do the work or what machine can do the job it's the liability should things go south. kgg -
I think you got a bum motor. I think the best solution before making changes to the hand-wheel would be to replace the servo and get that sorted out first. I would suggest looking at either a brushed servo motor something like the CSM550-1 or an electronic controlled servo motor with at least 9 coils, 12 coils would be preferred like the Sailrite workhorse or the Reliable SewQuiet 6000SM both are 12-Coil servo motors. kgg
-
cowboy 341 Oryx/Cowboy 341 compatible parts
kgg replied to Desertdweller's topic in Leather Sewing Machines
All the Juki's and the clones like Cowboy CB-341, Cobra Class 26, Techsew 2750, KOBE LS-1341 to name a few in the 341 / 1341 class cylinder arm machines all have the hand-wheel orientated so the belt is closest to end of the machine and main bearing. When you move up to the Juki TSC-441 and the clones like Cowboy 4500, Cobra Class 4, Techsew 5100, KOBE TSC-441 to name a few they have their hand-wheels orientated with the belt on the outside. A lot of the Singers like the 111W 155 had their hand-wheel orientated with the belt on the outside while the Singer 212 the hand-wheel is orientated with the belt on the inside. Pfaff also had a mix the 1245 had the belt on the inside while the 145 and 545 had it on the outside. I guess it comes down to how each class of machine is designed and how the "all alluring" belt cover is supposed to be installed. I am surprised as I don't know of any manufacturer / dealer that ships the machine with the hand-wheel installed on the machine over on this side of the pond. You should have your brother bring leather needles along in the size for the thread you are planning on using. Needles for the Juki and clone 341 / 1341 use 135 X 16 X SIZE for leather and 135 X 17 X SIZE for fabric. Here is a good link for needle size vs thread size. https://www.tolindsewmach.com/thread-chart.html kgg -
The jerk is probably from the minimum startup speed of the motor you are using. Yes, increasing the size of the hand-wheel will help with slowing the machine and increase torque. However it will not eliminate the startup jerk. I think you would be better installing a proper speed reducer pulley and leaving the existing hand-wheel. You will get better speed reduction, increased torque and it will help to reduce / smooth out the startup jerk. kgg
-
Not Leather but it is a sewing machine question!
kgg replied to 5teve's topic in Leather Sewing Machines
What size of thread with what size of needle are you using? Also a few photo's of how you have your machine threaded maybe of some help. kgg -
cowboy 341 Oryx/Cowboy 341 compatible parts
kgg replied to Desertdweller's topic in Leather Sewing Machines
Any of the accessories that will fit a Juki LS-341 or LS-1341 should fit for parts I would reference the Juki LS-341 numbers. The manuals for the Juki LS-341 would be the one's I would use and have attached them as pdf's. I did notice you have the hand-wheel installed backwards, may or may not make any difference. I do like the back drop of hides in the background. kgg 341 engineer manual.pdf Juki_LS-341N_Engineers_Manual.pdf Juki_LS-341N_Instruction_Manual.pdf -
Help choosing between Juki DSC 245 and LS 1341
kgg replied to nycgirl's topic in Leather Sewing Machines
Here is a link to the Juki site for the LS-1340 series machines. https://www.juki.co.jp/industrial_e/admin/pdata/filedata/332/ls1340.pdf kgg -
Looking for my next machine! Best out there?
kgg replied to Starwind0's topic in Leather Sewing Machines
My understanding is those machines are domestic and embroidery machines. kgg -
I use the cheap Chinese manual press machine like ( https://www.amazon.ca/dp/B0771NFSLZ?psc=1&ref=ppx_yo2ov_dt_b_product_details ) at $56 CAD plus tax delivered ( $40 USD). They are cheap but do a decent job and the dies and hole punches are cheap, delivered at $10 -$12 CAD ($7 -$9 USD) if bought off places like Aliexpress. The downside to the lever handle presses particularly the ones with the lever at the rear is you only got one hand free to handle the item as the other one is used to operate the lever. That is where a kick press shines. I am now in the process of doing a proper press table and converting my two cheap hand presses to operate as kick presses. One to be used as a punch and the other as a setter. kgg
-
Looking for my next machine! Best out there?
kgg replied to Starwind0's topic in Leather Sewing Machines
The reason I didn't mention the Juki LS-2342 line is i) the price is about $7,500 US which would be over the OP budget and ii) they have the built in drive motor, which I'm not a fawn lover of. If the motor fails you would be tied too Juki for a replacement where as on a regular drive train it would be a quick, fairly inexpensive repair from any number of motor suppliers. kgg -
New Consew seems tight on part of the stitch?
kgg replied to Tsiatko's topic in Leather Sewing Machines
To determine if it is a problem remove both presser feet and see if the feel changes significantly. If it does, chances are that the feed dog is set to high above the needle plate or the presser foot is set to low. Check your manual and see how high it should be above the needle plate at it's highest point of travel. I would guess probably about 1mm. If no change, then remove the front cover too check and see what is binding / rubbing inside and oil the hell out off all the parts while cycling the machine by the hand-wheel. Also contact the dealer if this is a new machine. If this isn't something simple definitely contact the seller and if was a Amazon purchase contact them for a return as it was probably a "fresh off the boat" machine with no pre-delivery done. kgg -
I am assuming you mean the original sized hand-wheel that came on the machine. This video should help with the removal and insulation: kgg
-
It is usually difficult to find the information particularly on the cheaper no name Chinese ones. Sometimes the Chinese one's will have a picture showing the internal coils so you can do a count otherwise I would assume 6 coils. The servo motors like the SewQuiet 6000SM 12-Coil Servomotor and the Sailrite Workhorse Servo Motor advertise that their motors have 12 coils. The thread should be properly threaded through the post first. In the top hole, half twist around the post so the thread enters the next lower hole on the backside. The thread wrap looks like an "S" on the post. kgg
