kgg
-
Posts
3,380 -
Joined
-
Last visited
Content Type
Profiles
Forums
Events
Blogs
Gallery
Store
Everything posted by kgg
-
I bought a Consew 206RB-5 that doesn’t have assembly instructions.
kgg replied to Tsiatko's topic in Leather Sewing Machines
I would call the seller and get them to email you a copy of the manuals, assembly, parts, maintenance, etc as you will need them later on. kgg Table Assembly: -
What is Mycelium Leather? Does it exist?
kgg replied to RobertoDR69's topic in Leatherwork Conversation
The way I look at it is the climate has been constantly changing in a constant state of flux through the various warming and cooling cycles since it was somehow created. To make any substantial changes we would have to reset the global population lifestyle to that of the cavemen. Can't see that happening anytime soon. I still wonder who is getting rich off the fear mongering climate change kick. The climate of some sort will be around as long as I'm going to be kicking but it might be nice to be able to plant a pineapple tree in the backyard up here in Canada. kgg -
What is Mycelium Leather? Does it exist?
kgg replied to RobertoDR69's topic in Leatherwork Conversation
If I remember correctly about 20 years ago weren't all the "experts" saying we were headed for another Ice age. That scare didn't work so they are onto another be afraid. To help reduce the CO2 the main contributors would need to reduce their emissions, China, US and India. However that is going to come at a price of manufacturing all items for the worlds population. Taxing the average joe with carbon taxes isn't going to do anything worth while. People will still need food, transportation, housing, etc. kgg -
I am not familiar with D/E thread. Could you post who the manufacturer is or a link to the thread. Typically a 29 K clone would use a system 135 X 16 needle or be converted accept the 135 X 16 for leather work. Typically they are rated for V46 to V138 thread with needles sizes up to #22. A good link for thread size to needle size can be found at https://www.tolindsewmach.com/thread-chart.html kgg
-
And they wonder why people buy imported stuff from not so environmentally protective countries. What a shame. kgg
-
I would have sent it back. kgg
-
The machine appears to be in good shape. I think the first ones only had a single top thread tensioning system and was changed to a double when they changed the casing. A 550 watt brushed servo should work quite nicely but for the price difference between the 550 watt and the 750 watt brushless servo motors I would go with the 750 watt with at least 9 internal coils, 12 coils would be better. What I did notice in the photo is the top thread doesn't go through the top thread guide pin as it should before the horizontal multi hole tension guide. The angle is way too steep, as close to horizontal as possible with the top hole of the top thread guide pin. kgg
-
Help choosing between Juki DSC 245 and LS 1341
kgg replied to nycgirl's topic in Leather Sewing Machines
The main difference as far as I am concerned and aware of are: i) the DSC 245 is only rated to handle V69 thread while the LS-1341 is rated for V138 ii) the DSC 245 has a small bobbin and to get the same large bobbin the LS 1341 has you need to move up to the DSC 246 iii) the DSC 245 has a built in synchonizor for binding iv) the DSC 245 has a much short alternating movement then the LS 1341 Juki's are a top notch brand name often copied by others and you well get quality but it is going to be considerably more costly then a clone machine. There are lot of machines available from Cowboy and Cobra to name a couple. All I can say is get a machine that meets your needs and budget from a company that you feel will provide good after sale service. To better narrow down a machine that may work for your items how thick is the total thickness you are going to be sewing including where any seams are? kgg -
You basically got two options depending on your budget i) find a good used machine or ii) purchase a one armed bandit. i) Tippmann Boss ( https://tippmannindustrial.com/tippmann-boss-leather-sewing-machine/ ) at about $1000 USD plus shipping and it can according to the spec handle up to V415 thread and with a max sewing thickness of 3/4". ii) Cowboy Outlaw ( https://www.tolindsewmach.com/cowboy-outlaw.html ) at about $1395 USD plus shipping and it can according to the spec handle up to V346 and possibly V415 thread and with a max sewing thickness of 5/8". iii) Master Tool Cub ( https://www.weaverleathersupply.com/collections/cub-manual-leather-sewing-machine/products/master-tool-cub-manual-leather-sewing-machine-aluminum ) at about $1999 USD plus shipping and it can according to the spec handle up to V346 thread and with a max sewing thickness of 3/4". Get a machine that meets your needs and budget from a company that you feel will provide good after sale service. If possible test drive various machines. kgg
-
Just my experience but overall it was just too temperamental for my liking and seemed like it always needed something readjusted from the simple things like top and bobbin tension too set screws in the bobbin drive shaft / gears backing off issues. It might have been just that particular machine, the amount of abuse it got before I bought it, lack of maintenance or that I was asking it to do to much. Then add to the mechanical problems that diaper brown color. kgg
-
I am going to assume you meant to type Juki DU 1181N not Juki DL 1181N. This is a walking foot not a compound feed machine and is a light duty machine that is rated for V92 thread. To do bridle work you would be better off looking for a class 441 machine. kgg
-
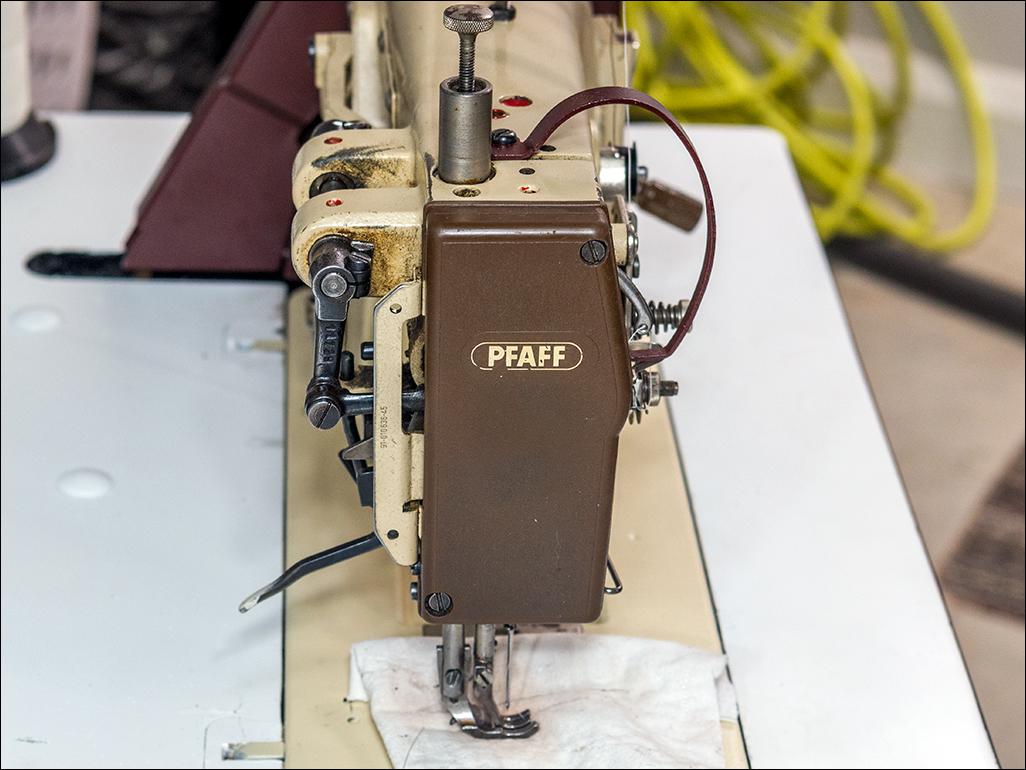
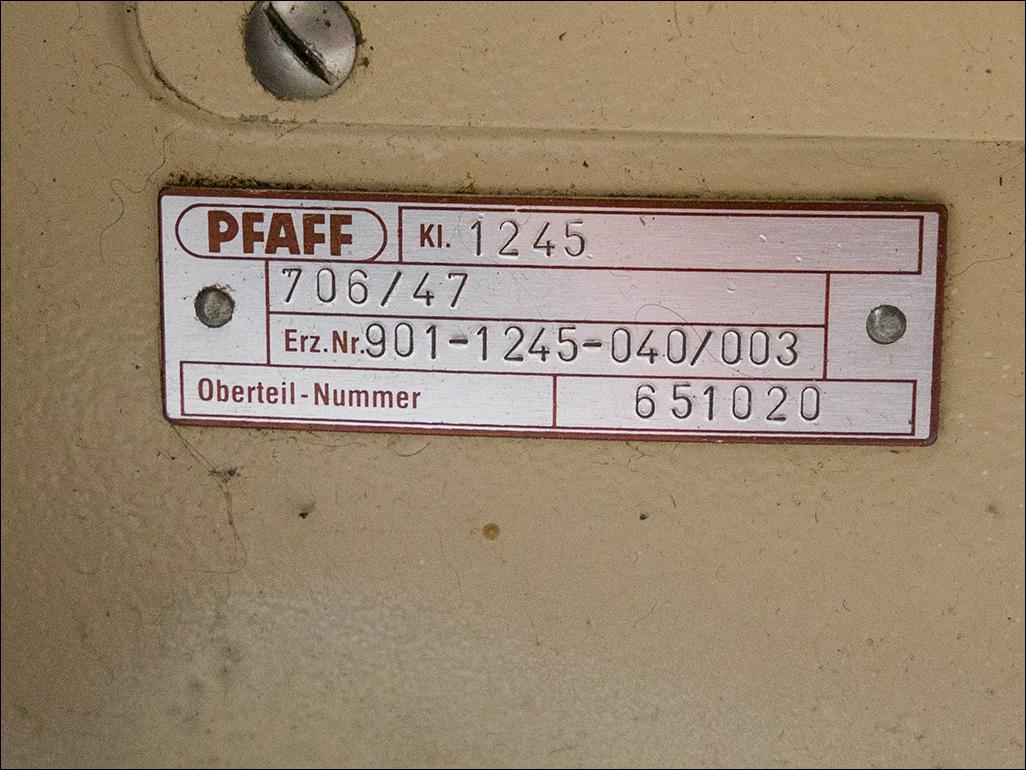
From the info I have see it is rated for system 134-135 needles in the range 110 - 140 ( #18 to # 22). That to me indicates it can handle thread V69 (40) to a max of V138 (20) in thin material. I did own an old casing PFAFF 1245 for a very, very short period of time a couple of years ago and it was a disappointment. Also it did have a small bobbin. There is a couple photo's of the machine after I overhauled it and it's name plate. kgg


-
Adler Cylinder Arm 49-2 Any Info, Manual or Singer Equivalent
kgg replied to FizzyWizzy's topic in Leather Sewing Machines
If I was looking for an old machine that was an oddity I would probably consider purchasing it as a keep sake. If I was looking for a something that would be a main stay machine with inexpensive parts / attachments I would not consider it. Without knowing what you are planning on sewing it would be hard to give any suggestions as to what machine would be able to do the task???? wallets, belts, bags, holsters, leather over 3/8" thick. Also what is your budget?? kgg -
Adler Cylinder Arm 49-2 Any Info, Manual or Singer Equivalent
kgg replied to FizzyWizzy's topic in Leather Sewing Machines
First off what are you planning on sewing? This machine is a right handed machine rather then the typical left handed machine, parts are going to be expensive, if they are still available. Looking at the photo it appears to have a clutch motor and for better sewing control you will need to replace it with a servo motor about $200 Cad. What is the asking price? If this is going to be your only or first machine I would look at other options. What part of Ontario are you located? kgg -
Depending on how many hides you buy it maybe worth while to make a road trip to Montreal and pick your hides. kgg
-
This could be as simple as: i) top thread path incorrect ii) needle inserted incorrectly and or not fully seated iii) incorrect needle system or incorrect size of needle for thread size. What size of thread are you using with what size of needle? kgg
-
You could use 3D printed stamps or metal stamps however if this a one of project like @Bert03241 has suggested you would be better off hiring someone or a company to make the stamps. By the time you invest in equipment, learning a design program and the time of doing a prototype it wouldn't be cost effective. The main problem is going to be dealing with the client and what they want / expect the logo to look like on the items (straight impression, burned in, colored with dye or foil, etc). If they already have a logo suggest that they go to whoever did the logo and get them to supply the stamp or stamps if they want different sizes and you just take care of the actual stamping. If they just have a hard copy of the logo get someone to convert it into a electronic file and ask for prices from the various embossing / stamp companies / individuals on the net. @fredkhas made a couple of good suggestions. kgg
-
I will only comment on machines as I am not familiar enough on the linen thread to comment. a) There are concurrently three one armed bandit machines available: i) Tippmann Boss ( https://tippmannindustrial.com/tippmann-boss-leather-sewing-machine/ ) at about $1000 USD plus shipping and it can according to the spec handle up to V415 thread and with a max sewing thickness of 3/4". ii) Cowboy Outlaw ( https://www.tolindsewmach.com/cowboy-outlaw.html ) at about $1395 USD plus shipping and it can according to the spec handle up to V346 and possibly V415 thread and with a max sewing thickness of 5/8". iii) Master Tool Cub ( https://www.weaverleathersupply.com/collections/cub-manual-leather-sewing-machine/products/master-tool-cub-manual-leather-sewing-machine-aluminum ) at about $1999 USD plus shipping and it can according to the spec handle up to V346 thread and with a max sewing thickness of 3/4". b) There are a lot of class 441 clone machines available between the $3000 and $4000 price range like the Cowboy 4500 (7/8" max sewing thickness with V415), Cobra Class 4 ( 7/8" max sewing thickness with V415) to name a couple. Most clone machines either come with a wax pot or it can be purchased separately. c) You mentioned are planning on sewing several layer so you would be able to use up to three layers of 10-12 oz leather in the above machines but not four. The thing to remember is 10 to 12 oz leather is going to be in the range of approximately 5/32" to 1/4" in thickness ( https://www.leffler.com.au/leather-thickness-conversion-chart/ ). As far as recommending a machine choose one that meets your needs and budget from a company that you feel will provide good after sale service and if possible test drive various machines with your items. kgg
-
Nice job on the boxer head study. The tray is a nice addition for those that roll their own or use a pipe. I gave up smoking cigs, pipe and chewing tobacco about 5 or so years ago after 50 good years of indulging. I converted to vaping not for health reasons just a 4 pack a day habit was getting a little expensive. kgg
-
Sailrite smooth leather foot set compatibility question
kgg replied to sojourner999's topic in Leather Sewing Machines
I would buy presser feet and a feed dog to fill with JB weld. First I would suggest two things: i) if the feed dog is leaving unwanted marks check the height the feed dog is above the needle plate. It maybe to high and need adjustment. ii) if the presser foot is causing the unwanted marks try reducing the presser foot tension. kgg -
Sailrite smooth leather foot set compatibility question
kgg replied to sojourner999's topic in Leather Sewing Machines
My understanding is that i) the Juki 563 and the Consew 206RB, that you have, take the same presser feet which are the same as those that fit the Singer 111G, 111W and 211W ii) According to the link you provided for the smooth presser foot they are supposed to fit the Singer 111W. iii) the Sailrite Fabricator is a clone of the Singer 111W. iv) The Sailrite portable walking foot machines have specialized presser feet that only fit the Sailrite and clone portable walking machines and don't fit any industrial sewing machine. The price for those feet from Sailrite are expensive at $49.95 USD ( $68 ) and the style reminds me of those that fit the PFAFF 1245 or the Alder 669 as how the center presser foot tightens on from the left side. I wouldn't bother purchasing them as I would just buy a cheap set off Aliexpress for less then $3.50 USD ( $5 CAD ) and fill the teeth with JB weld. But that is just me. kgg -
There a lot of clones of all the Juki models but a lot of people seemed to be pleased with the Consew 206 RB-5. kgg
-
Here is the manual for the Singer Class 7 and should answer your questions. Also here is a link a cross reference of needle size to thread size ( https://www.tolindsewmach.com/thread-chart.html ) class_7_one_needle_lock_stitch.pdf
-
I think you maybe disappointed with that machine. That machine appears to be: i) sort of a Juki DU-1181n clone, ii) just a walking foot (presser foot , feed dog) not a compound feed (needle, presser foot, feed dog), iii) can handle up to 1/4" max thickness, iv) limited to small max thread size of V92 (one size up from domestic thread), v) can handle a max needle size of 135 X 16 size #22 (140 metric), vi) smaller bobbin then Juki du-1181n vii) low presser foot lift of 10mm viii) Weaver rates this machine as a LIGHT duty machine. I own a Juki DU-1181N and it is a light duty walking foot machine made more for fabric. I think you really need at least a Juki DNU-1541S or clone if you want to do belts and knife sheaths. kgg
-
Best affordable sewing machine for leather 5/8”- 3/4”
kgg replied to lilbax's topic in Leather Sewing Machines
In my opinion both those machines you listed are upholstery class machines with one being a cylinder arm machine (the Cobra) and the other a flatbed machine. Neither will do the job properly if at all as both are rated for less then what thickness you want to sew. That leaves you needing the punching power of a class 441 machine. If you want a manual machine (one arm bandit) you will need a machine like the Tippmann Bose, Cowboy Outlaw or the Weaver Cub. If want a motorized class 441 you will need something like the short arm Cowboy 3200 or the short arm Cobra Class 3. What is your budget????? kgg